Project Dianoga (Previously: Project Elvis)

Just ordered this


And two of these.


I should be able to drain the loop now if I need to :)

I prefer to fit my waterloops together with quick disconnects, this makes it easy to drain or prefill individual components by plugging in open ended tubing and filling or draining as required.

I have been following this thread and it is very impressive, I wish I had your skills.:)
 
Thanks man. Yeah I thought about it but right now I can get the XSPC fittings there for £3 odd each and the ball valve was £7.99. So it's probably about the cheapest way I can drain the rig.

I strongly doubt I will ever change any parts in this rig. Not unless something goes bad. The only time I will ever want to drain is just to clean it really, and I've done my best to make sure that I don't have to do that very often by using coloured hose.

I've been doing some reading and the Phenom 2 X6 1055T is a really strong CPU. What's cool is that things are finally becoming more highly threaded too.

I just want it to be my daily beater. The less hours I put onto my main rig the longer the components last really.
 
Yay :D


Took the barbs out.


And fitted mine :)


GPU


Cooler off


Cleaned the core.


And fitted.


Those memory sinks just about fit :)


And done :)

 
Thanks :D

So earlier I got the board out and test fitted both the GPU and the NIC cards. I did this so that I could get exact actual measurements for the board parts I need to make.


I then decided it was finally time to fit the CPU block. I did this by robbing half of the mech from a Noctua air cooler (the back plate and red bits) and used the bolts that came with the water block and bolted them straight through like this.


And fitted.


I also decided to pressure test the GPU with Dr Drop. This turned out to be a nightmare, with it just peeing air straight out. Then I realised that you really do need to tighten up the compression fittings all the way. This pic was taken when I still had a leak. I had to tighten them more so that you could not see any thread at all.


I'm kinda mad at myself because I'm praying I haven't killed the GPU. I took it apart again after and repasted it and couldn't see any damage so yeah, hopeful :)

I also built up the ball valve.


I tell you what XSPC fittings kick the crap out of those other ones I have. They're so easy to tighten.

However, I realised after (when fiddling around) that if you moisten the hose it's then far easier to tighten the fittings. It's also going to be easier to fit the hose, then fit the fittings. The fittings are easily done up hand tight.
 
So for today's work log I am going to show you what you need (apart from a good steady pair of hands and good eyes) to cut acrylic almost perfectly.

Let's first start with what you need. Firstly you want these.

Obviously you need a rotary tool. You then want one of these.


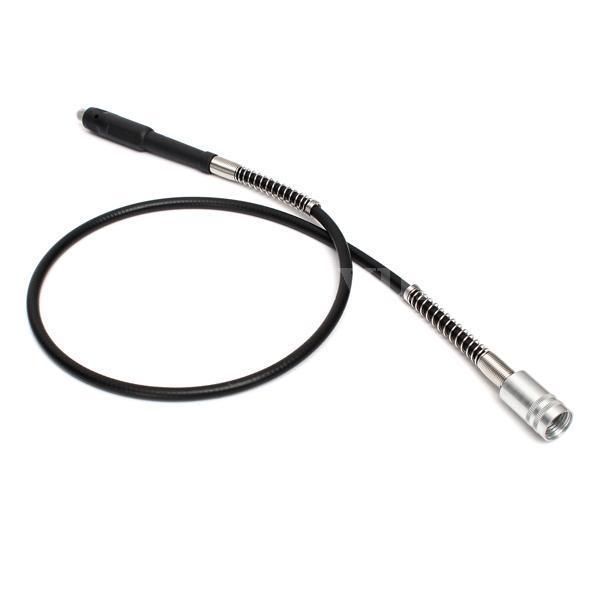
They are called "snakes" and Silverline does a good one pretty cheaply. You then want these. After years of cutting acrylic I have found these to be the best.


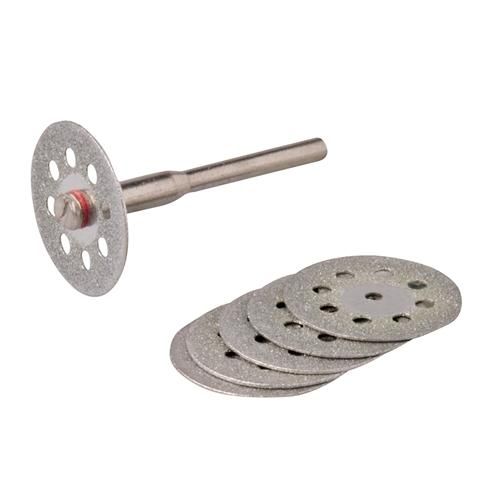
25MM Diamond coated blades. Again from Silverline and should cost about a fiver. I am on my second to last one and I bought them four years ago. They last *ages*.

You then want a clean dust pan and brush, one you will only use for this. The reason is you are going to want to sweep the powder and bits off of yourself and using a dirty one sucks.

OK, so those are the basics. As I said with the blades they are the best. No ifs, no buts. Anything else I have used has cabbaged the edges. These things glide through like a hot knife through butter. The snake is needed because a Dremel is like writing with a chisel, the snake turns that chisel into a pen.

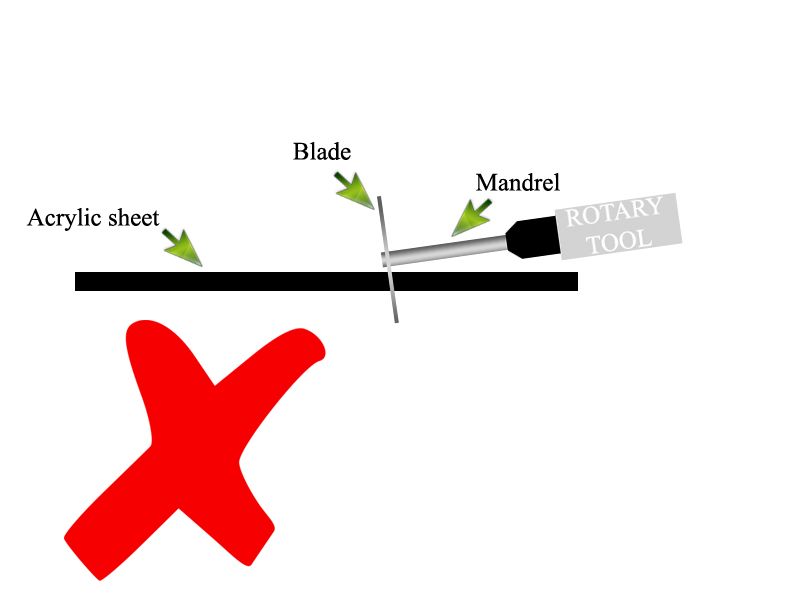
OK, so take a look at these two pics. These are "Acrylic cutting 101" pretty much summed up.


And the correct way.


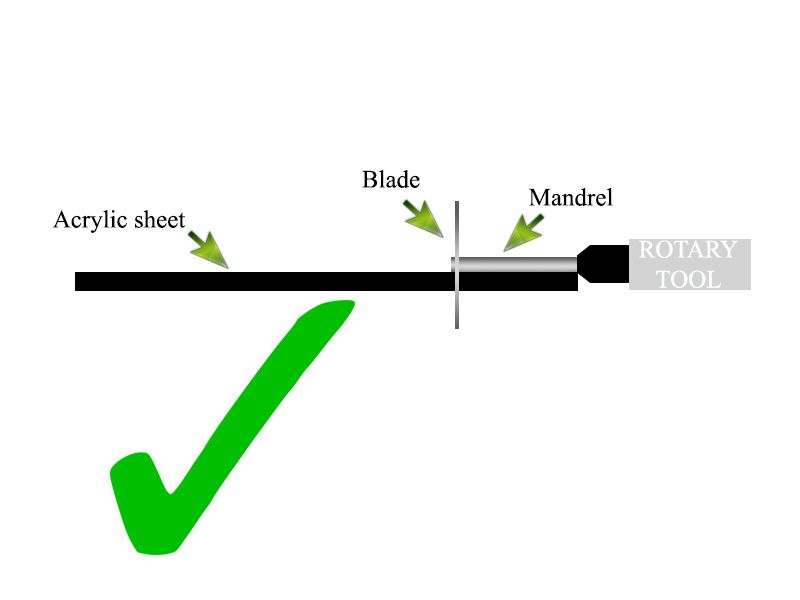
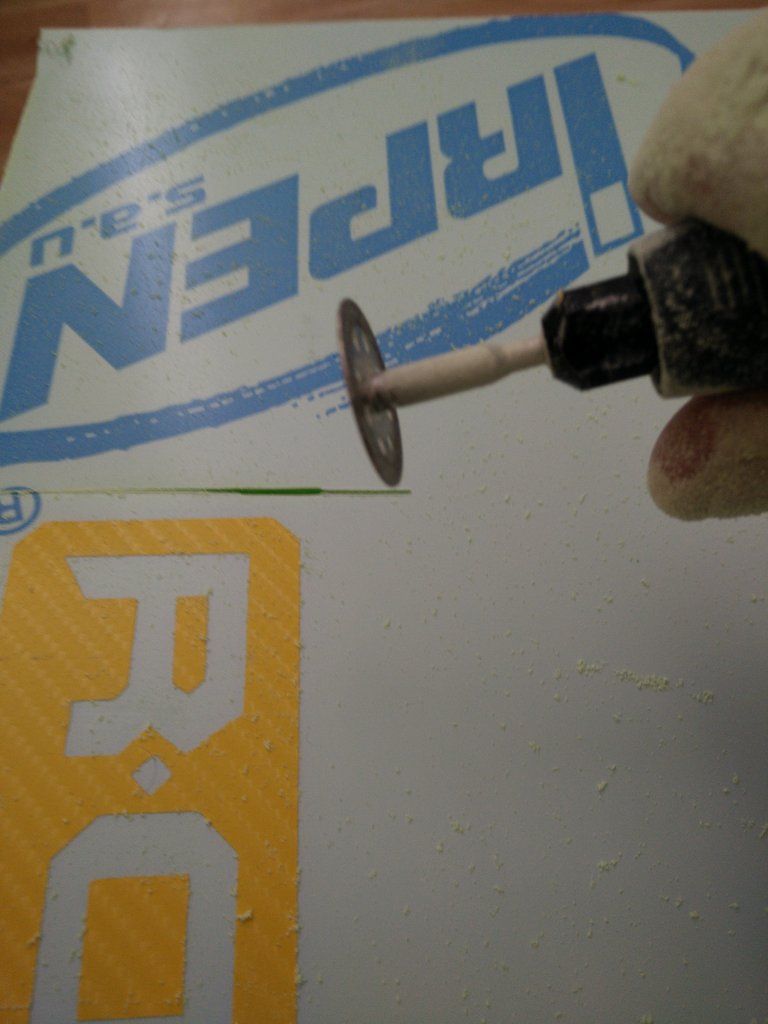
OK so as you can see if you go in at an angle (which you almost certainly will due to the relatively short mandrel) you will end up with a wavy sloped edge. There is no getting around this unless you rough cut all of your pieces and then cut them again with about 5mm over hang. This way you can put the blade in straight on the edge (as there won't be enough material around your cut edges to foul the tool itself) and cut nice straight lines.

The only down side to this method is that the screw on the end of the mandrel that holds the blade in will scar the edges of your piece. However, this is where I offer two pieces of advice.

1. If the part you are cutting is the same both ways (IE you can flip it over and it will be the same) then it's OK.

2. If the part is not the same flipped over then you need to print your stencil (or mark it out with a ruler and pen) flipped. This way the scar edge will become the back when you turn it over.

I have tried practically everything I can think of to stop this scarring but even two layers of duct tape was not enough. That screw spins fast and gets really hot, melting straight through any tape or protection. I even tried lining up an alu sheet with the piece but the screw jammed and sheered off.

I also do not recommend trying to keep the screw off the edge. If you do then the blade will likely snag and come out as you are cutting.

OK, so step one - Design.


Step two - Stick down or mark out with pen and ruler.


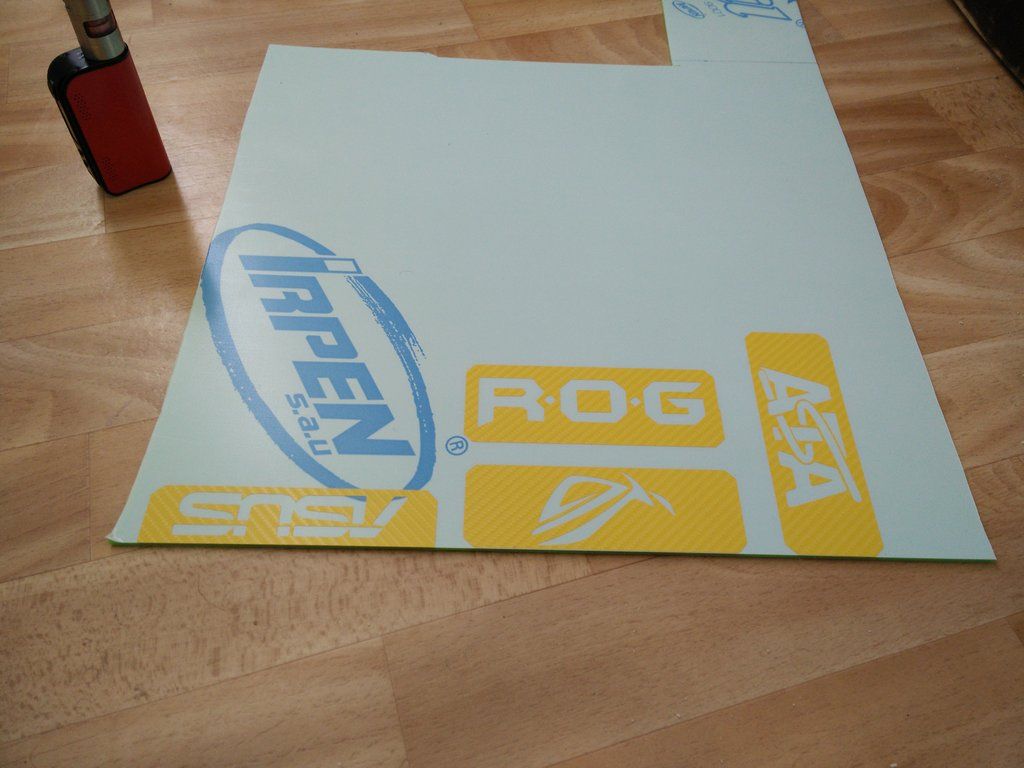
Noting that I have left around at least 1CM or 10MM between each piece so I can rough cut and then final cut.

This is the bit you should be using. It is good for 3mm and 5mm acrylic.


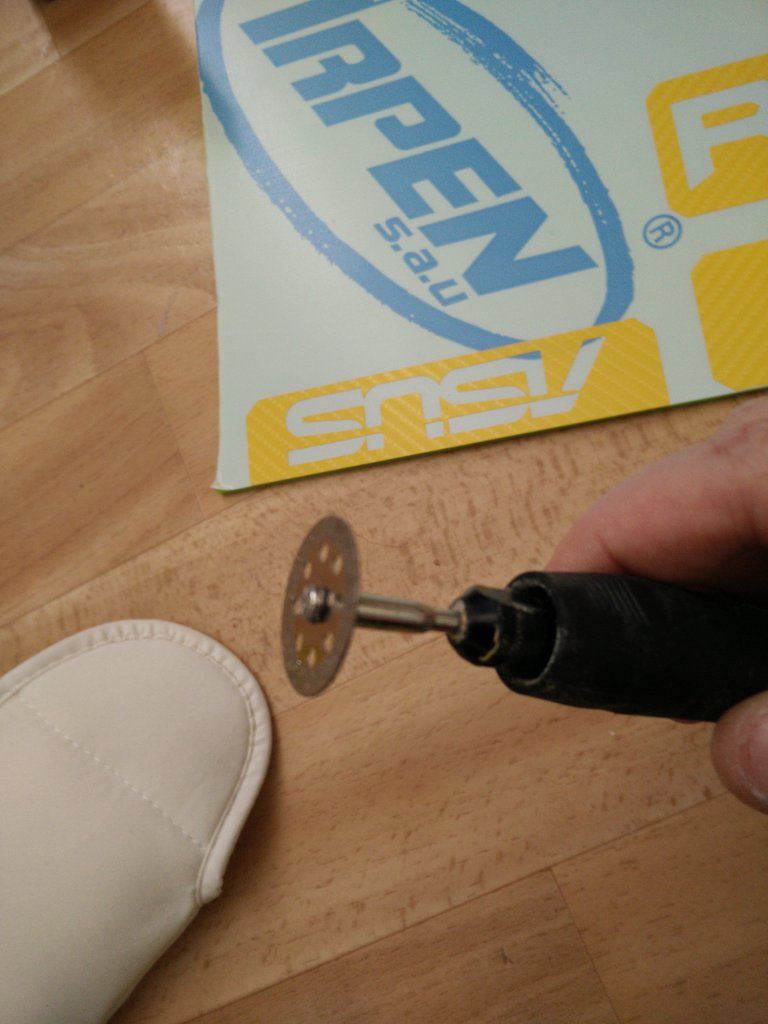
And the diamond coating.


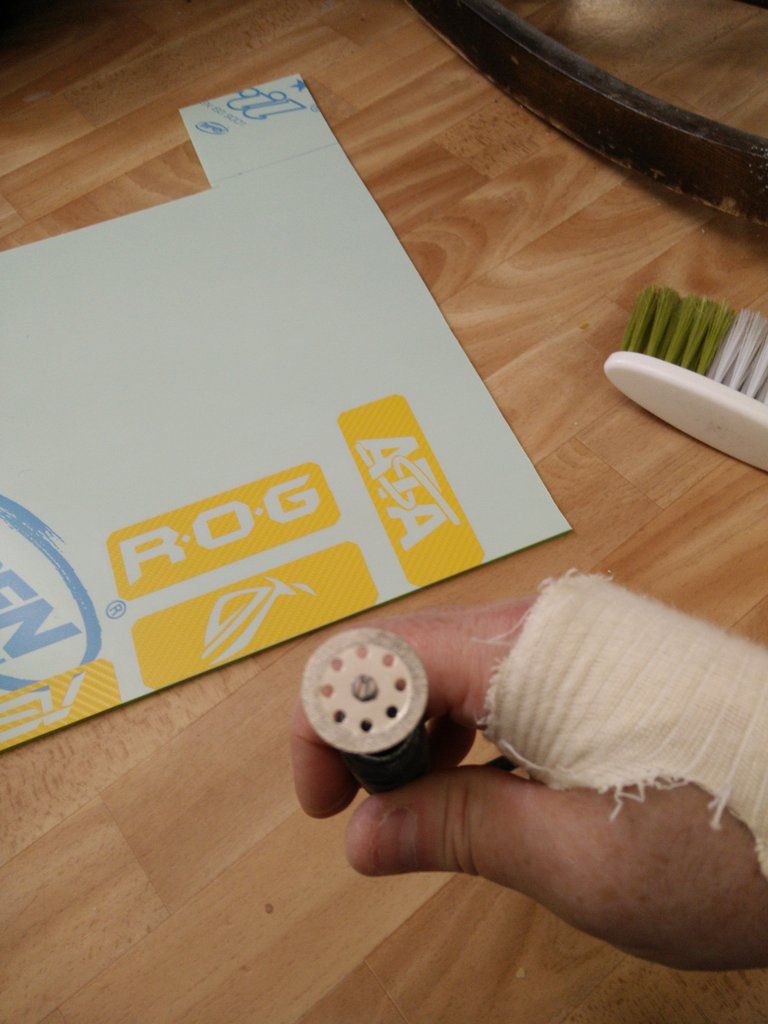
And here you can see me rough cutting each piece the "wrong" way. It's the only way you can cut them now, and you correct it later.


Here they all are rough cut. Put as many pieces as you can along a good edge, that saves you a cut basically.


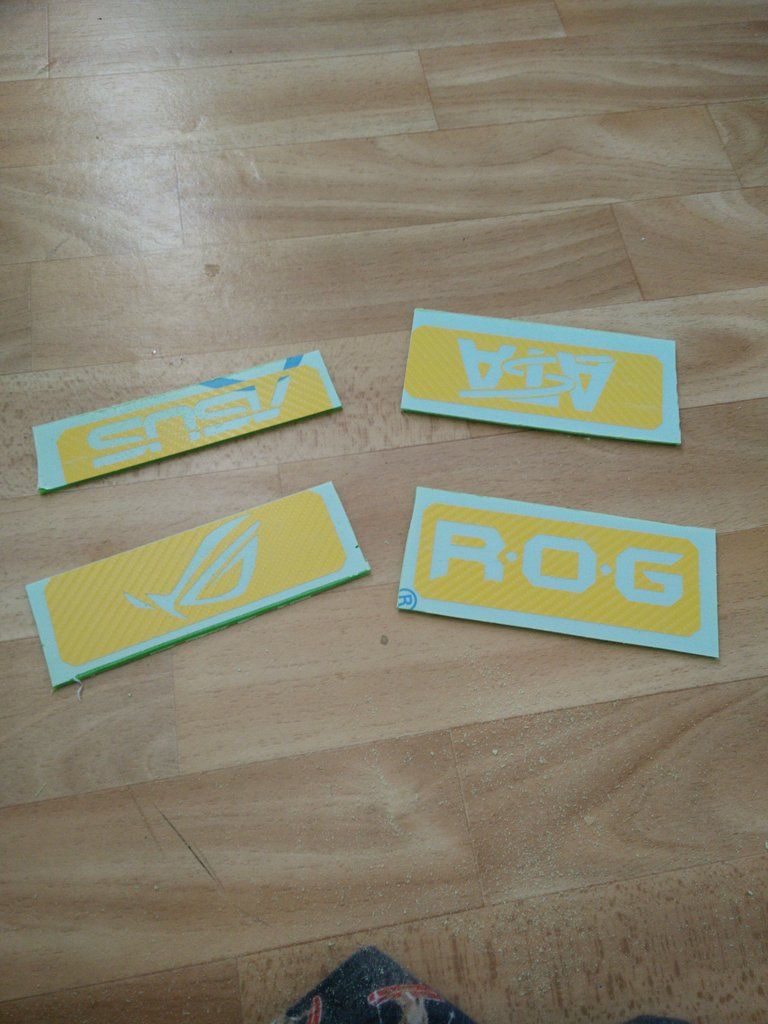
And now you use this method, as the blade can now go in straight as there is not enough edge material to foul the tool or chuck.
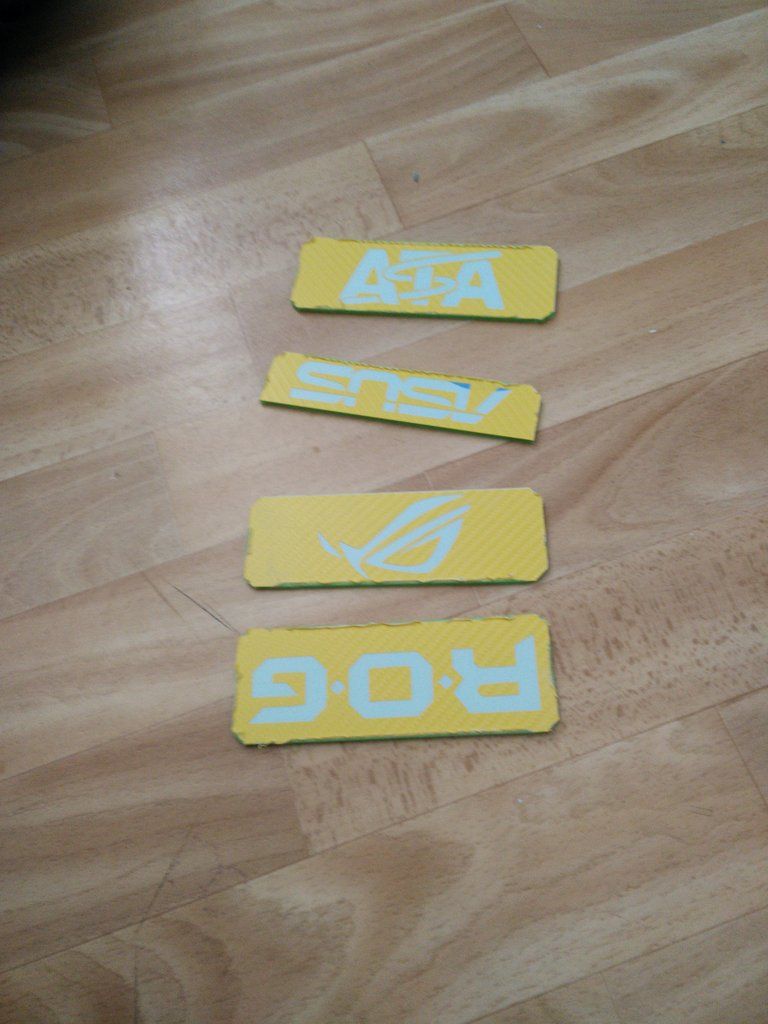


Finish cut.


Then sand. This part is not rocket science, you need a flat surface and a sheet of paper. I am using 600 alu oxide here as it is very strong and lasts. The trick of course is to put the piece down as upright as possible and then just start pushing and pulling back and forth.


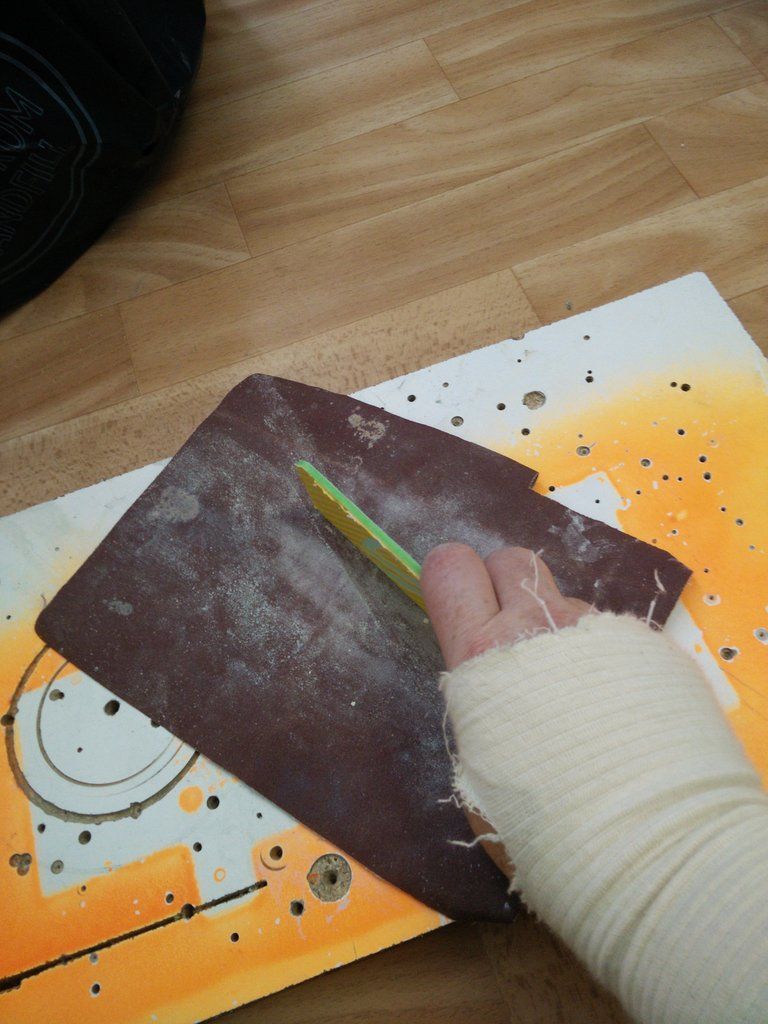
*Note. If you are cutting small angled edges like I am then be very careful when sanding them as it's very easy to wee them up and make them look different sizes. Once you mis shape one you will be chasing your tail on all of them trying to make them look the same again.

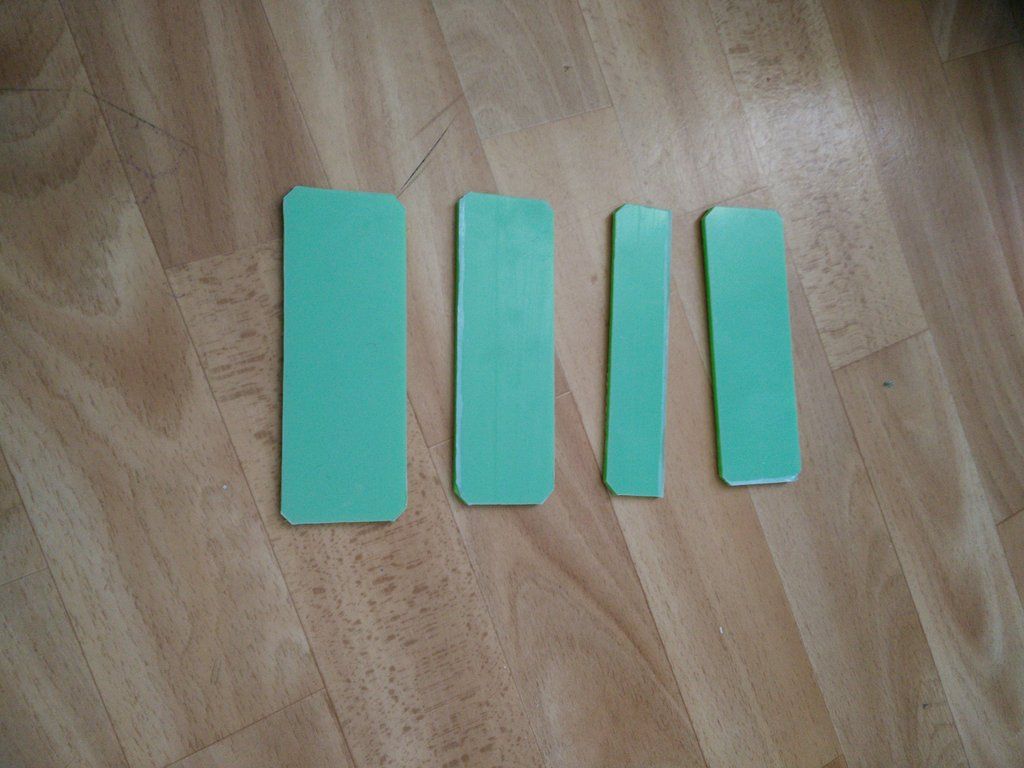
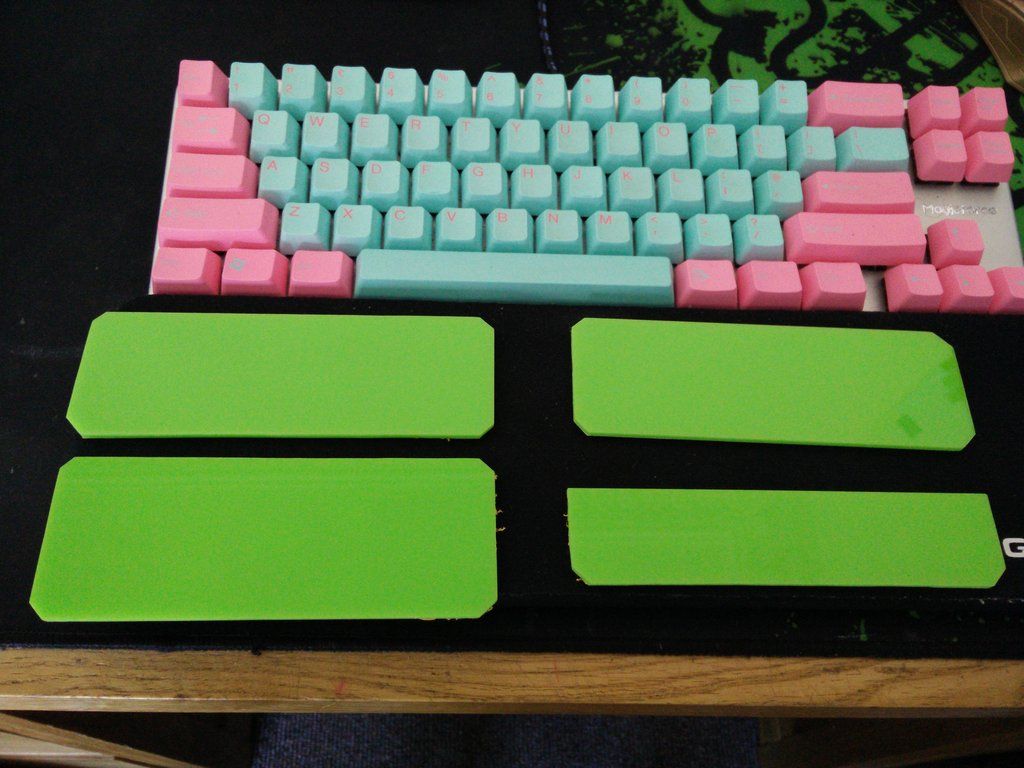
Here are my cut pieces sanded. I will edge polish them later with finer wet sandpaper.


And done. Note, I have left the back side covering on so I know which side to put the decals on. They are also all different sizes, each corresponds to a design so I will know what decals to put where.


Unfortunately I am all out of green metallic and am waiting on an order I placed at the weekend. Should be here tomorrow, then I will do a "how to use a plotter 101"

Be good.
 
Yeah thats not an optimal solution for me. I get slammed on delivery fees since Im outside EU, and then slammed again on import tax.

Need to find a new way to order it.

Surely the import tax is peanuts on something that costs say £5?

I can buy that candy apple metallic vinyl for £3.50 for 75cm x 30 cm. It's enough to make three 30cm wide x 25cm deep sheets for cutting with. I have used two so far (so £6 odd) but I wasted about half (so one order) because I did not realise it had a protective layer on that jammed my plotter so it got wrecked) but knowing what I know now I could have done it all for £6 ish.

If you ever cut something that has a piano finish on it (like the black chrome I used for ROTT and the candy I used here) then it usually comes with a protective layer on. It's to stop it getting dirty or scratched.
 
Thanks to a frightfully good piece of fortune the board parts are done :)


It turned out that when I trashed the entire first set of vinyl* I had created a lot of scraps. It was difficult, because they were all odd shapes and some not even wide enough to fit the plotter, but I just glued those ones down to paper and then removed the blade and did a "dry cut" to make sure I was located correctly :)

They're all finished now then. I've laid them out so you can build a picture in your mind ;)


I'm not done yet though so I won't fit them yet.

* When the first set of vinyl arrived it looked scratched and dirty. I complained to the seller who sent me a replacement straight away. However, I then realised that it wasn't damaged because it had a protective layer over it that you need to peel off. Sadly I did not realise this and trashed about 3/4 of it cutting stuff that was not cut deep enough, ruining the vinyl. This was what I had stored in a box so I'm very glad for it now :D
 
Few simple jobs on for today. I got up pretty early so I decided it was time to do some more wiring and soldering etc. Hopefully I will be done with that soon. So here's what I started with. A simple Molex splitter.


I have plenty of female ends but no black males left (ok joke away :D )


TBH nearly all of the wiring will be hidden in the right side panel any way so tbh if I wasn't so fussy I wouldn't even bother. Problem is I will see it and it would annoy me. I test fitted the cover panels onto the motherboard last night and they all fit nicely. Talk about transform a board ! However I had already sort of decided that I had over done the branding so now they look like this.


These too came today.


SATA cable for the show SSD and 50mm plain black fan. I was poking around on the bay the other day, typed in "50mm fan" trying to find a green one and this came up for 99p delivered on clearance. Sod's law the doorbell went once I had literally packed all of the braiding stuff away. Doh. I will get that extended and braided today. I will probably run it at 5v.
 
Last update for today. Firstly I desoldered the very short wires on the 50mm fan and soldered on a 50cm cable.


Then of course I braided it and made it Molex compliant etc.


OK so motherboard before.


Motherboard after. Notes - it's not finished by any means. The plates are not even on straight as they are not aligned with the cards going in ETC ETC.


One thing annoying me now is the copper. However, I have this at my disposal so the next time I set the booth up I could well blow the whole thing over.


Note - when I say whole thing I mean the cooling assembly, not the board.

So the power switch arrived ages and ages ago and I have been meaning to poke/buzz (test for the switch continuity/send voltage into it) it so I could find the pinouts for the switch and pins for the LED. That's one problem with ordering from China you never get instructions. I bought these a few days back and fitted PCIE male pins to them so I can connect them into the PSU to give me a hot and cold probe.


19mm power switch.


Thar she blows.


And thanks to some good advice I have now ordered this.


And these.

 
So here is the rig as it stands.


I put a bracket in yesterday to straighten up the warped panel. Worked well :) Not much to see, but pic.


So today I decided to finish the SSD platform. First up was masking the light clump.


Marked for LED holes.


Here in the ghetto we don't have drill presses so we use masking tape :D


The idea was to drill 2mm pilots, then 8mm holes 3mm deep (to clear the black) and then 5mm holes 8mm deep to clear the smoked and hold the LEDs. That kinda looks like this.


It's very dark and miserable today, so I used my torch to show what I have done.


LED time, my favourite time :D


In this pic I have introduced some light by using my torch to show the metallic finish :)


Make sure all the cables fit OK.


Bring on the night :D

 
Being a complete noob to water cooling (hey, I'm learning !) I realised that I was not going to get away with just the fittings I had. At certain points the hose needed to twist or turn too harshly which would cause kinking. It needs to be sent 90' so it can stay straight.

I had a real result today. I went to a certain website and they were having a one day sale. So, I ordered six of these.


For 99p each ! I also ordered three of these for £1 each


And these were 60p, so I have ordered two.


You will not see the coils, they are only for where the hose passes through the top of the res (I made a channel there) and for the hose coming out of the rad into the res (again, hidden from view). It's a safety thing more than anything. I will also use the chrome fittings on the rad (so you don't see them) and on the chrome ball valve (so they will match) and then use the XPSC fittings to fit into the elblow blocks to get me around corners.

Very happy, total order price was about £16 to literally finish the rig. I have only spent around £45 on fittings so far, if that. So the only thing I am missing now is the actual water haha.
 
So my order of fittings etc is here :) I've now made up all of the parts that needed assembling and it's all now ready to have hose fitted.

The penultimate order from HK is in too, the 6 way fan splitter.


I wasn't expecting much of it but it's excellent. I said before that the fans were very quiet at 12v. Well I was wrong, especially when you are running six. One was barely audible but man get six of them going it sounded like a typhoon was passing through the living room :D Thankfully the low speed option brings them all down to barely audible as a whole. Very happy with that, can just throw the switch for benching.

OK so today I will not be working as I visit my mother every Friday. So I had some free time last night and got to thinking about the name of the project. Elvis was fine, but that was supposed to be a joke with the crappest water cooling parts you could buy. It's gotten a bit more serious since then and I wanted to dedicate it to Wayne who sadly died a while back.

So the project now has a new name. I was poking around a few days ago for a name that would suit the build. This ended up leading me to alien names, which then led me to Dianoga.

A quote from the Wiki page - "Dianoga would often prove a nuisance by nesting in bodies of water, sewage systems, and whatever other large concentrations of dirty, appalling liquid that they could locate"

Sounds absolutely perfect :D So I present the banner, and will be changing the name of the thread myself where I can.

 
So I will admit that Dianoga has been about experimenting. Ever since I was a child I liked taking things apart and once I was done having fun I would toss them in the shed. Broken VCRs, telephones etc.

Now with the water run in Dianoga there are certain parts of it that make me wish I would have had the balls to go with hard line tubing. However, I feel it would have been a step too far for my first ever water loop.

So how does one make curled up and very thick hose go back to being straight? well, the answer is heat. Like many forms of plastic polyurethane is made up of units. These units have a memory, and at a certain heat they will return to their original shape. Overdo it however and you destroy their properties and they go limp.

So whilst this may not look like much in the pic this is a perfectly straight piece of PVC hose, holding 8.5 bar of pressure. I wanted to make sure that after this heat it would remain safe and seal up properly.


This is really great :) it should actually make the runs even easier than before.
 
Update. So some one very kindly sent me an old S939 Danger Den cooling block. I immediately had ideas of using it on my northbridge assembly and even more so because on my board the fets, NB and SB are all linked. Originally my board came to me looking like this.


Note the extra cooling and wrap around memory cooling plates? well sadly it had turned a bit green so I removed it and it then looked like this.


So the idea is to basically make a heat transfer plate from 5mm alu. This will then be bolted to the NB cooler (there are four holes) with countersunk screws and thermal paste. I will then fit the block to the plate again using thermal paste. This way the block can keep that entire assembly cooler :)

Oh here is the block BTW. I had to take off the face plate and flip it, as the old G 1/4 holes were kinda odd.


And here it is with Dr Drop in its buttocks. It's been like this for over 30 mins now with no drops at all.


That feeling when you go to your stash and find out you threw away the 5mm alu offcut. DOH.

PT 2.

Fail ! :D

So here is the heat transfer plate I made.


I made it so that the counter pressure from the lower springs would stop it bending (plus that metal sheath).


I then fitted it to the board but the screws were too proud. So I figure I will mill the block a little to cover the screws. Sadly the block is a lot thinner than it looks at the thinnest part and I hit it, putting a hole in it lmao.

:D

Ah well, not all of your ideas are good ones !
 
lol I've still got one of those blocks, they're awesome. Did you get the nozzel for inside too? Doesn't look like it's fitted?

Also that's NOT 8.5 Bar, that would be something daft like 123 psi...

It's 8.5 PSI, it's about 0.5 bar, trust me that hose can't handle 8.5 bar :P and those fittings (AND THAT BLOCK!!) definitely can't handle 8.5 bar.

You don't need to pressure test them to anything more than 0.5 - 1 bar (i'd keep it low) you shouldn't be seeing pressure differentials like that in a loop at all anyway. It's a nice leak test but pressure isn't what will make your loop fail
 
Last edited:
Fancy giving it to me? :P Mine's wrecked :D

Yeah I have the filter thing I took it out because of the odd barb arrangement and flipped the plate over (the top plate). Sadly the arse end has a hole in it so is about as much use as a perforated condom.
 
Back
Top