You are using an out of date browser. It may not display this or other websites correctly.
You should upgrade or use an alternative browser.
You should upgrade or use an alternative browser.
HELIOS (Caselabs SMH10 | black/copper | EVGA SR-2 | Geforce Titan) - by alpenwasser
- Thread starter alpenwasser
- Start date
alpenwasser
New member
i am so glad my mpower's pci-e slots are black, else you would've just planted another very time consuming idea in my head.
Haha, well if my board is broken now you can all go


All in all it took about five hours of painting, plus the drying time.
EDIT:
Not bad! Assuming you'll also be using the two bottom Sata ports anyway?
Yeah, the Titan uses the uncovered slot and covers up a bit of the one above that.
The top slot and everything on its height will be covered by the top radiator, so those
two red USB headers at the top are also not of concern.
")
alpenwasser
New member
I love how the expression on the dogs face says "WHAT ARE YOU DOING TAKING PICS OF ME WHILE I'M MAKING LOVE TO YOUR LEG?!?!?!?"
Haha, he's actually sitting still in that pic and just waiting for me to pet him. But yeah,
I think it's a pretty great shot of his aaaawww-face if I may say so. :wub:
Great job man, the attention to detail continues!
That's what this is all about, thanks!
Ace_finland
New member
Using tape to cover the open slots are a great idea! I have never liked when its just painted on the outside, with this u get an even "smoother" look than painted. Def keeping that thing in mind
alpenwasser
New member
Using tape to cover the open slots are a great idea! I have never liked when its just painted on the outside, with this u get an even "smoother" look than painted. Def keeping that thing in mind
I'm pretty happy with the result (provided the board still runs
 ) I must admit.
It does depend a bit on your slot colour and angle of view. The problem was that the
red on the SR-2 is rather bright and the angle at which I would have been looking at
the board day-in-day-out would have basically been the best angle to view the red,
so I felt compelled to fix that. It was just too prominent. If you had something darker
(say, a nice blue, for example) the problem might not have been as noticeable.
Plus, the covers can be easily removed if I ever need to use one of those PCI-E slots,
so I don't really lose anything.
alpenwasser
New member
Question Time...
OK, question time: I have a slight dilemma when it comes to fittings, and while I won't
be making a decision right now I thought I'd bounce some ideas off of you guys...
The basic concept for the piping (at least at the moment) is this: I take some 16/12 mm
Copper pipe (already bought, impressively massive ), into which I will cut G1/4" female
threads, which I will then screw directly into fittings. The nice thing about this is that the
fittings are about as wide as the pipe is thick, which gives the hole affair a very sleek
look IMO, avoiding those compression-fitting-like bulky fittings which are usually used
for rigid tubing.
Now, there are a few options when it comes to fittings, none of which I'm perfectly happy
with yet. The original plan was to use Alphacool's shiny copper fittings. Unfortunately,
the only angles which are available from Alphacool in shiny copper are female/female
angles (leaving aside the dual 45° rotaries, which are female/male), namely these guys:

Keep in mind that I need the revolvable version, otherwise this will not work. To get
that male thread I need, I could use this:

As you can see, depending on loop complexity, this will become rather extravagant, requiring
somewhere between 40 and 60 nipples alone. I have about 20 angles in my loop at the current
stage of planning, which might still change a bit depending on what I can come up with, but
the general ballpark figure is about what I'll end up using most likely. I have actually ordered some
shiny copper fittings for testing purposes, and the finish is indeed very lovely, so I can't complain
about quality from what I've seen so far.
Alternatively, I have been thinking about using black fittings, since this might actually provide
a nice bit of contrast to the copper pipes (keep in mind that I will polish the copper tubing to
a mirror finish, so having black fittings might bring them out much more than having copper
fittings). Alphacool themselves actually make a dual-male 90° connector, but there's also these
guys from Bitspower, which will certainly be ridiculously expensive, but would be perfect from
a mechanical viewpoint:

There are also multiple-45° rotaries with dual-male endings. The big trouble with the Bitspower
fittings is their exorbitant price and actually getting them.
I'm really not sure at the moment which of these paths I will eventually end up going down,
so I thought I'd get some input from you folks to get the creative juices flowing. It will be end
of year at the earliest when I can progress to this stage anyway, so it's not a matter of great
urgency.
I can't promise to follow any and all advice, but I certainly would be grateful for input on this
matter. Thanks!
PS: I have actually asked Alphacool if they would manufacture a special edition shiny copper
with dual-male fittings, but no dice. They don't do special requests.
OK, question time: I have a slight dilemma when it comes to fittings, and while I won't
be making a decision right now I thought I'd bounce some ideas off of you guys...
The basic concept for the piping (at least at the moment) is this: I take some 16/12 mm
Copper pipe (already bought, impressively massive
), into which I will cut G1/4" femalethreads, which I will then screw directly into fittings. The nice thing about this is that the
fittings are about as wide as the pipe is thick, which gives the hole affair a very sleek
look IMO, avoiding those compression-fitting-like bulky fittings which are usually used
for rigid tubing.
Now, there are a few options when it comes to fittings, none of which I'm perfectly happy
with yet. The original plan was to use Alphacool's shiny copper fittings. Unfortunately,
the only angles which are available from Alphacool in shiny copper are female/female
angles (leaving aside the dual 45° rotaries, which are female/male), namely these guys:
Keep in mind that I need the revolvable version, otherwise this will not work. To get
that male thread I need, I could use this:
As you can see, depending on loop complexity, this will become rather extravagant, requiring
somewhere between 40 and 60 nipples alone. I have about 20 angles in my loop at the current
stage of planning, which might still change a bit depending on what I can come up with, but
the general ballpark figure is about what I'll end up using most likely. I have actually ordered some
shiny copper fittings for testing purposes, and the finish is indeed very lovely, so I can't complain
about quality from what I've seen so far.
Alternatively, I have been thinking about using black fittings, since this might actually provide
a nice bit of contrast to the copper pipes (keep in mind that I will polish the copper tubing to
a mirror finish, so having black fittings might bring them out much more than having copper
fittings). Alphacool themselves actually make a dual-male 90° connector, but there's also these
guys from Bitspower, which will certainly be ridiculously expensive, but would be perfect from
a mechanical viewpoint:
There are also multiple-45° rotaries with dual-male endings. The big trouble with the Bitspower
fittings is their exorbitant price and actually getting them.
I'm really not sure at the moment which of these paths I will eventually end up going down,
so I thought I'd get some input from you folks to get the creative juices flowing. It will be end
of year at the earliest when I can progress to this stage anyway, so it's not a matter of great
urgency.
I can't promise to follow any and all advice, but I certainly would be grateful for input on this
matter. Thanks!
PS: I have actually asked Alphacool if they would manufacture a special edition shiny copper
with dual-male fittings, but no dice. They don't do special requests.
Hmm, in your case I think I'd be leaning toward the Bitspower fittings. Your theme is copper + black, so personally I like the idea of contrast. Too much copper may not work as well IMO. Bitspower isn't cheap for sure (I feel your pain), but they *do* make quality fittings.
My water noob vote is for the contrast!
My water noob vote is for the contrast!
Hey alpenwasser , it seems to me that either way you go it's going to cost.
I think you should add the cost up for both versions and decide which one you prefer the most. The copper might look best all polished up , but may be a bit overkill with all the other copper color you have in this build .
I kind of agree with Bartacus and SeekaX , the black fittings may give some extra contrast and might be less expensive.
I think the final decision will be yours with the look you want to achieve.
alpenwasser
New member
Hmm, in your case I think I'd be leaning toward the Bitspower fittings. Your theme is copper + black, so personally I like the idea of contrast. Too much copper may not work as well IMO. Bitspower isn't cheap for sure (I feel your pain), but they *do* make quality fittings.
My water noob vote is for the contrast!
That's what I've been thinking, contrast would really emphasize those pipes.
+1 for the bitspower fittings
you got a titan, 2 xeons and a caselabs case, money can't be the issue here :lol:
TBH I'm more or less broke at the moment.
For one thing, most the of the expensive stuff I bought with money I earned working
last winter (which I can't do now with college), or had saved up over a long period
of time before that.
Your point, however, is of course valid. I think that starting to skimp on stuff now
would kind of let down what's come before. So it's not so much a question of whether
or not I want to afford it, it will simply take more time to save up enough money
again.
Hey alpenwasser , it seems to me that either way you go it's going to cost.
I think you should add the cost up for both versions and decide which one you prefer the most. The copper might look best all polished up , but may be a bit overkill with all the other copper color you have in this build .
I kind of agree with Bartacus and SeekaX , the black fittings may give some extra contrast and might be less expensive.
I think the final decision will be yours with the look you want to achieve.
I share your concerns for copper fittings being a bit much. In fact, I've been working
on the RAM blocks, adding some black in there to reduce the amount of copper
and make the copper which is on show stand out more.
And yes, either way it's going to cost.
Black Bitspower fittings for the win.
Duly noted.
I think go with the black but what do I know
as for cost how's it compare 1 black vs 1 90+1 nipple per pipe end?
I think I'll ask Bitspower for a quote directly, so I'm not sure yet on final cost. But, looking
at Bitspower fitting prices where I live two nipples plus the Alphacool angle would probably
still be less expensive, at least with local Bitspower prices.
Thanks for the input guys, it's very much appreciated!

It's very much looking like BP fittings at the moment (if I can get a hold of them),
but it will probably be end of year at the earliest until I can order them. I need to pay
some rather fat bills with my October and November money.
Last edited:
alpenwasser
New member
life getting in the way of a build, thats just not on is it
Ah well, I've been on this project for the past two and a half years or so, a few more months
ain't gonna break me if the end result is worth it. Patience & persistence FTW!
alpenwasser
New member
Colour-Coordinating the RAM Blocks
Colour-Coordinating the RAM Blocks
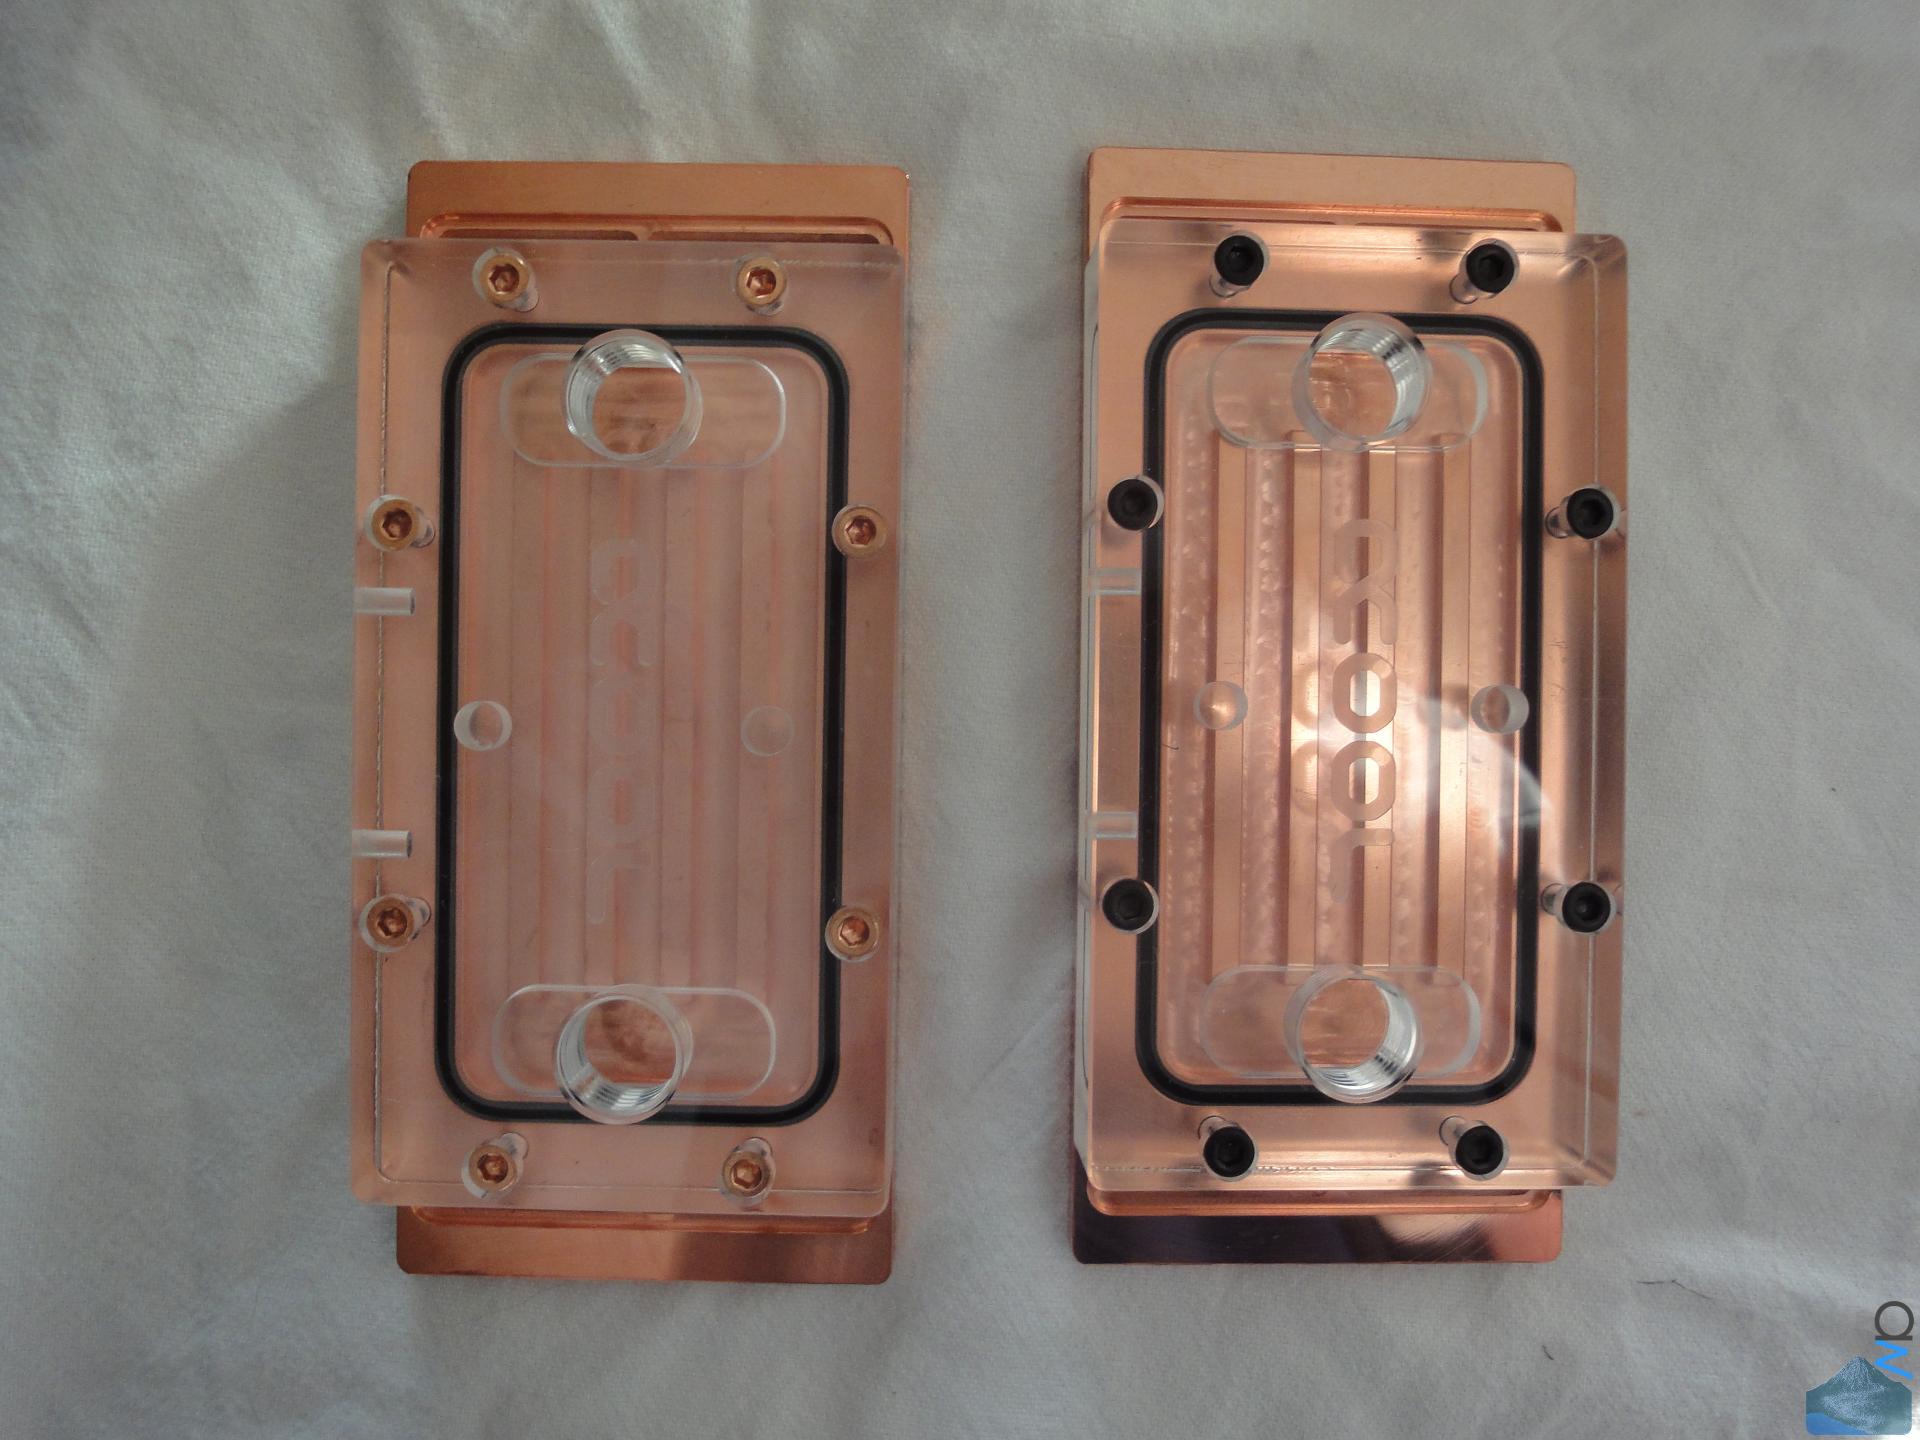
We all know copper is goodness. But, like so many treasures on this planet, it should not occur
in overabundance so as to keep its specialness. While I do really like the Alphacool RAM blocks,
I was never perfectly happy with either version available. The POM top is just too much black
with not enough copper, while the plexi top puts so much copper on show that it renders it less
effective in the overall effect IMO.
So, over the past ten days or so, I've been working on fixing that. I forgot to buy normal primer,
so I just did three coats of etch primer. Not exactly by the book, but such is life. If this
had been a really prominend piece with a large surface area I would have gone out and bought
some normal primer, but for such a small piece this was adequate.
After that, I gave it five coats of black, sanding it down with various grits between 1200 and
5000 after each coat, depending on how bumpy the most recent surface was (it's been rather rainy
and cold here, not at all optimal conditions for painting, and I can't do it in the apartment
because we have clients coming by here, so it can't smell like paint :lol: ). Anyway, eventually
I got a nice and smooth black surface, to which I then added two layers of clear coat, sanding
and polishing them down as well. Unfortunately, one of the pieces slipped off the table today
and got its paint job banged up, so I need to redo the last stages on that. Hence, only one
piece in the last few shots.
Anyway, this is what the RAM blocks look stock, and with black screws I swapped out to reduce
the amount of copper:
(click image for full res)

Masking the blocks:
(click image for full res)

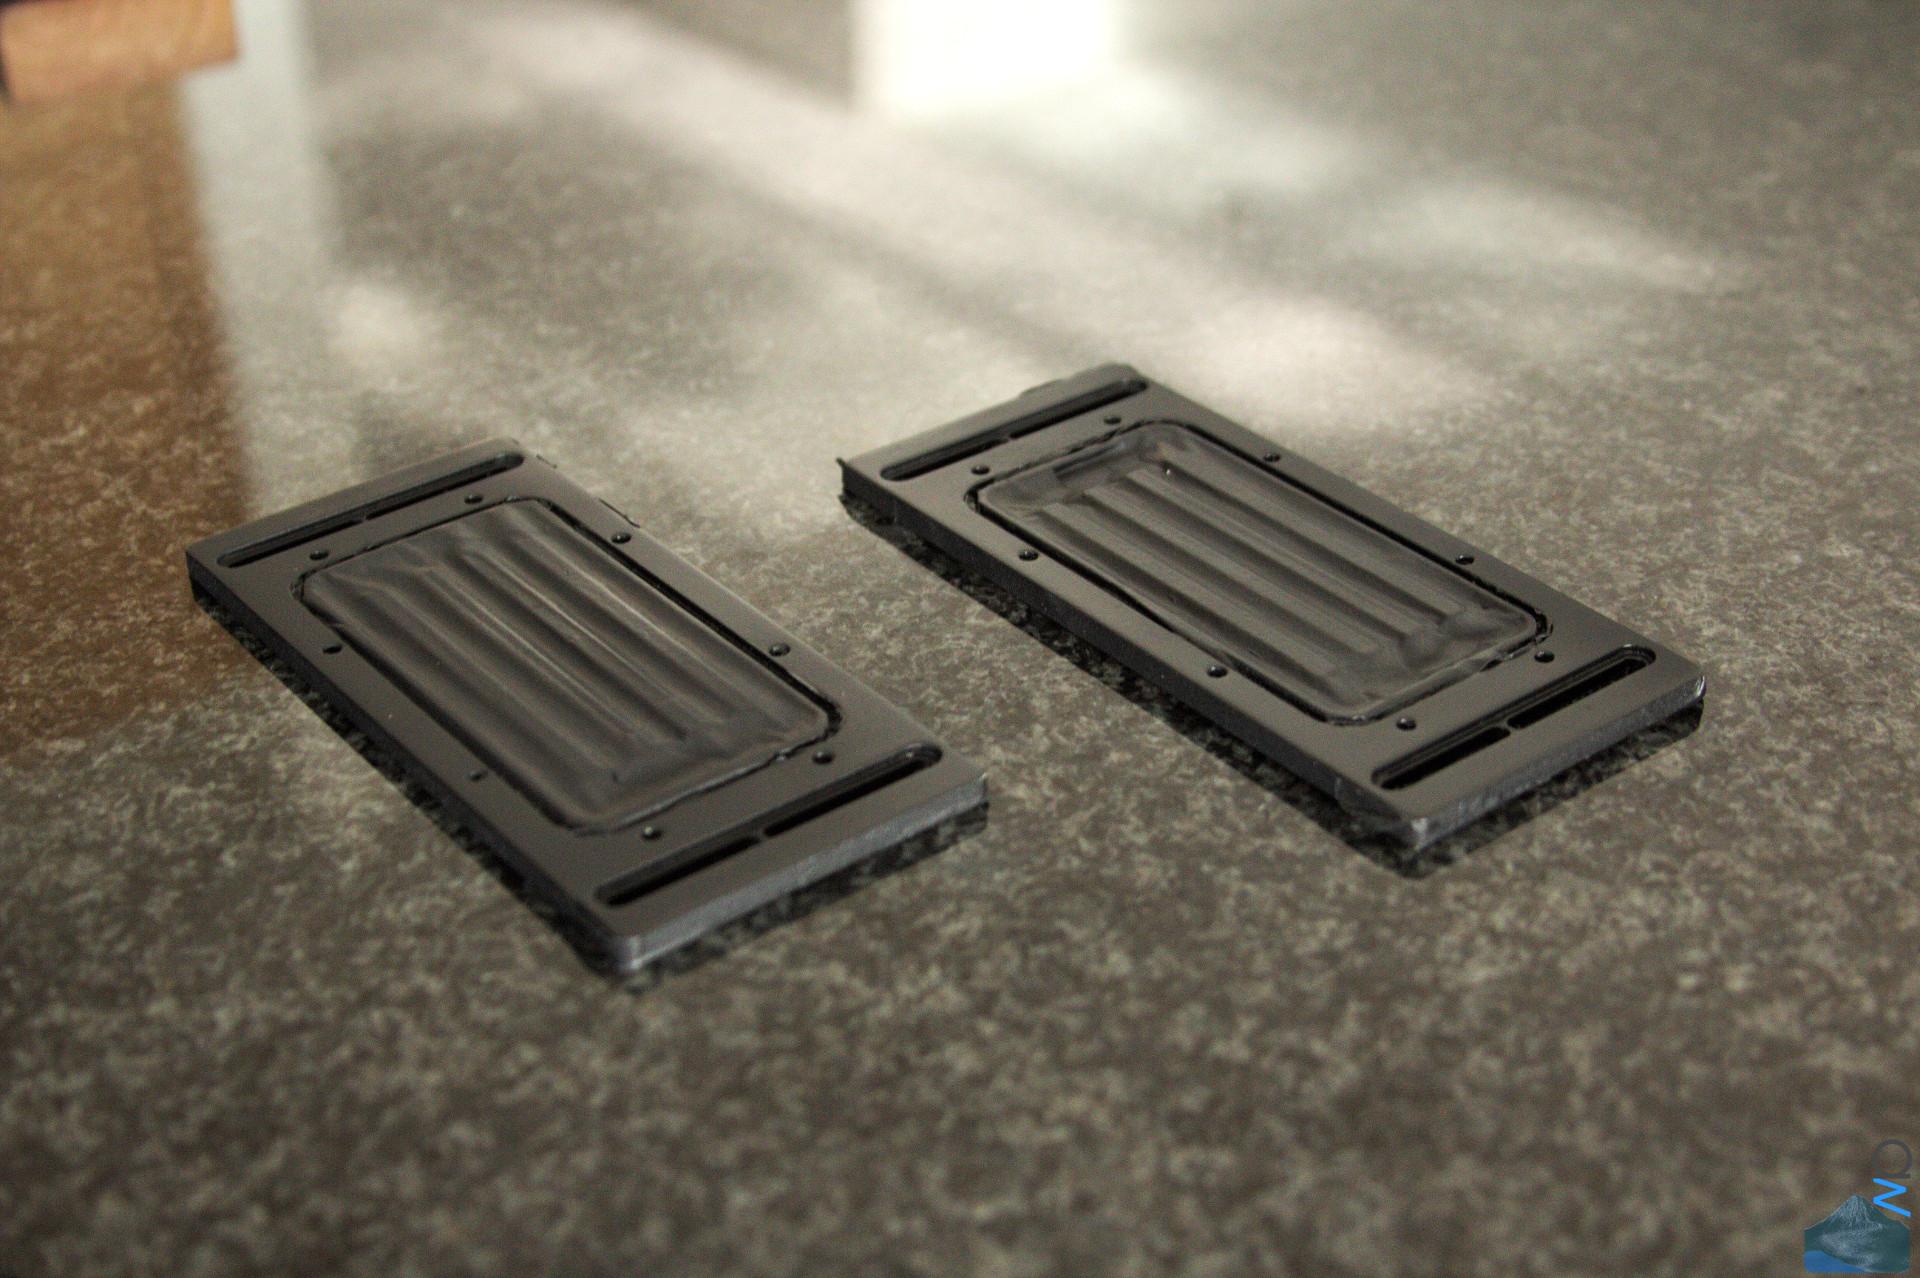
And in black, without the clear coat yet:
(click image for full res)

Right after taking off the masking tape, you can see the edges are still very raw:
(click image for full res)

Interestingly, the plexi tops are polished on the sides and the top side, but not the side
which comes into contact with the water, giving it a slightly milky appearance. Can't have
that of course. Left is the polished block (5000 grit paper, wet, then 10 000 polishing compound
and my trusty random orbital sander with a felt pad).
(click image for full res)

The cold plate, clear coated and polished:
(click image for full res)

And from another angle...
(click image for full res)

And assembled:
(click image for full res)

(click image for full res)

The finish is not absolutely perfect. Part of that is simply due to the geometry of the
cold plate, which won't really allow proper sanding without taking off too much paint in
some parts, so no matter how many coats you apply, you're always going to take off just a
little too much at some corner or edge if you want it to be perfect everywhere else, meaning
you need to apply another coat and so on. If it were a huge flat panel it would probably
have been simpler in that regard.
Other reasons for imperfections are the rather cold and damp weather we've been having here,
which has just not really allowed the paint to flow ideally. Unfortunately, my dad has part
of his business at home, so there are clients coming by from time to time, which means I can't
paint in the comparably warm and dry apartment.
And lastly, of course, is simply my inexperience. I have done a bit of painting before, but
this was my first attempt at a proper flat gloss job. The bracket for the GPU block was a bit
of a different beast since I wanted to get that powder coat-like finish, which didn't require
as much sanding and polishing, obviously (but still took be a bit to get right, the droplets
had a tendency to be of very varying sizes, which was of no use of course).
But overall I'm still very happy with it considering it's the first time I've done something
like this. The imperfections are there, but you can't really see them unless there's really
good lighing coming in just from the right angle. I'm definitely looking forward to doing
some more of this in the future and honing my skills (yes, yes, I'm aware I could just give
it to a body shop or something like that, but where would the fun in that be).
Colour-Coordinating the RAM Blocks
We all know copper is goodness. But, like so many treasures on this planet, it should not occur
in overabundance so as to keep its specialness. While I do really like the Alphacool RAM blocks,
I was never perfectly happy with either version available. The POM top is just too much black
with not enough copper, while the plexi top puts so much copper on show that it renders it less
effective in the overall effect IMO.
So, over the past ten days or so, I've been working on fixing that. I forgot to buy normal primer,
so I just did three coats of etch primer. Not exactly by the book, but such is life. If this
had been a really prominend piece with a large surface area I would have gone out and bought
some normal primer, but for such a small piece this was adequate.
After that, I gave it five coats of black, sanding it down with various grits between 1200 and
5000 after each coat, depending on how bumpy the most recent surface was (it's been rather rainy
and cold here, not at all optimal conditions for painting, and I can't do it in the apartment
because we have clients coming by here, so it can't smell like paint :lol: ). Anyway, eventually
I got a nice and smooth black surface, to which I then added two layers of clear coat, sanding
and polishing them down as well. Unfortunately, one of the pieces slipped off the table today
and got its paint job banged up, so I need to redo the last stages on that. Hence, only one
piece in the last few shots.
Anyway, this is what the RAM blocks look stock, and with black screws I swapped out to reduce
the amount of copper:
(click image for full res)
Masking the blocks:
(click image for full res)

And in black, without the clear coat yet:
(click image for full res)
Right after taking off the masking tape, you can see the edges are still very raw:
(click image for full res)

Interestingly, the plexi tops are polished on the sides and the top side, but not the side
which comes into contact with the water, giving it a slightly milky appearance. Can't have
that of course. Left is the polished block (5000 grit paper, wet, then 10 000 polishing compound
and my trusty random orbital sander with a felt pad).
(click image for full res)

The cold plate, clear coated and polished:
(click image for full res)

And from another angle...
(click image for full res)

And assembled:
(click image for full res)

(click image for full res)

The finish is not absolutely perfect. Part of that is simply due to the geometry of the
cold plate, which won't really allow proper sanding without taking off too much paint in
some parts, so no matter how many coats you apply, you're always going to take off just a
little too much at some corner or edge if you want it to be perfect everywhere else, meaning
you need to apply another coat and so on. If it were a huge flat panel it would probably
have been simpler in that regard.
Other reasons for imperfections are the rather cold and damp weather we've been having here,
which has just not really allowed the paint to flow ideally. Unfortunately, my dad has part
of his business at home, so there are clients coming by from time to time, which means I can't
paint in the comparably warm and dry apartment.
And lastly, of course, is simply my inexperience. I have done a bit of painting before, but
this was my first attempt at a proper flat gloss job. The bracket for the GPU block was a bit
of a different beast since I wanted to get that powder coat-like finish, which didn't require
as much sanding and polishing, obviously (but still took be a bit to get right, the droplets
had a tendency to be of very varying sizes, which was of no use of course).
But overall I'm still very happy with it considering it's the first time I've done something
like this. The imperfections are there, but you can't really see them unless there's really
good lighing coming in just from the right angle. I'm definitely looking forward to doing
some more of this in the future and honing my skills (yes, yes, I'm aware I could just give
it to a body shop or something like that, but where would the fun in that be).
alpenwasser
New member
i didn't know ram blocks came with a beast mode switch, really liking what you have done there mate
Haha, it wasn't so much a switch as a very slow-moving trigger squeeze (OK, that's a really
bad metaphor, I will admit :lol: ).
But thanks!
Fine job with the paint , the finish looks perfect in the pictures.
Black really looks good on the ram blocks.
I think it will add a bit more contrast and match the BP fittings.
Thanks! It's actually improved over night. You can see in the very last picture there are some
dark and some not-so-dark areas under the plexi. The dark areas are where the plexi is pressing
directly onto the paint finish, the not-so-dark areas are where there is no direct contact between
the paint and the plexi. Over night the paint has been further compressed and now there is almost
complete contact between the paint and the plexi, giving it a very nice uniformly dark look (only in
the corners do they not touch, but it's really negligible and might still improve with time). I'm guessing
it's going to be impossible to ever get it off again without ripping off the paint, too, but it does look
nice.
Similar threads
- Replies
- 2
- Views
- 223