Tiger Style - A build log

name='webbo' said:
Well it will give me an excuse for yet another upgrade then:cool:.

I can't see how it would die more quickly though as the only difference between the ultra and the pro (I checked the pcb on both) is one has that connection made (ultra) and the pro dosn't. I'll have the pump setup onto the fan controller anyway so it will alarm if it does stop.

Thx for the concern m8.

My alarm is very technical.. Smoke streaming out of the top of my case!
 
Yeah its usually on 24/7 tbh.

Pumps

As previously stated I wanted to stick with the DDC pumps but to get the most out of them you need to us the top inlets and as my previous mounts had the pumps mounted verticlly I wouldn't be able to utilise both top inlets. A friend however sorted me out with a nifty bracket which I had powder coated to match the case.

076.jpg


This enabled me to fit the pumps side by side allowing me to use the top inlets and as an added bonus allowing me to fit a few more HD's should I need to in the future by utilising the free space above the pumps. The bracket fits onto a fan which is in turn fitted onto the PA120.2 on the guts side of the UFO.

I still wanted the pumps to be as silent as possible and although they don't give off much sound they can vibrate slightly which can be transfered through the case and then onto the desk. To counter this I fitted some anti vibration mounts.:

088.jpg


Anyone keen eyed enough to spot the mistake here (apart from the missing barbs!).

And here they are mounted in the case :

123-1.jpg


They just fit together and in hindsight maybe the petras or EK pump tops would have been an easier choice but I have further plans for the tops which will appear later in the build log;).
 
Stripping the Blitz

My weapon of choice for this build is the Asus Blitz Extreme. I was fortunate enough to win this motherboard which is renown for being the one of, if not the best P35 board around. I had the blitz formula previously (DDR2) and its an overclockers wet dream. It has all the settings you could want from a bios and then some! It got my previous quad to 4ghz P95 stable so I know how capable they are but this board is the DDR3 version so we shall see later how well it performs - fingers crossed.

Heres the board as it comes stock :

blitz2.jpg


pic courtesy of OC3D

As you can see it comes with a pre-attached waterblock on the NB, which while effective and alot better than traditional aircooling, it's also very restrictive and will kill the flow. While its great to see a major board manufacturer like asus to be innovative and consider enthusiasts needs, it seems to me to be a little short sighted that after providing a waterblock they use thermal concrete to badly mount it which will negate alot of the cooling effect it has. Still something is better than nothing so big credit to Asus there.

So I needed to strip the heatsink off to get some decent thermal paste on the chipsets. The pain here is that you cannot take the nb alone off. The NB is connected to both the mosfets and the SB which inturn also cools the crosslinx via a heatpipe assembly. So that makes the whole thing a tad more difficult, anyway heres the board naked :

096.jpg


The heatpipe was a SOB to get off. I don't think the thermal paste(or cement as I prefer to call it!) asus used is designed to allow multiple mounts. After unclipping the push through pins, the trick to remove the heatpipe (which is the same method that should be used for maximus users) is to heat the assembly up with a hairdryer. This should loosen the cement enough for it to become pliable. DON'T pull the heatsink assembly, you need to twist it gently if you are considering doing the same. Pulling it will most likely damage the board by either ripping the NB clean away from the board ( I have seen pics of this!) or chipping the die - either way your board will be little more than a doorstop if you do this.

150-1.jpg


Pics of the naked chipset to follow:
 
Apparently its easier to remove when its cool rather than hot, certainly on x38 boards it seems to be what people are finding
 
name='teknokid' said:
Apparently its easier to remove when its cool rather than hot, certainly on x38 boards it seems to be what people are finding

Depends what you mean by cool. If you mean that the board is simply cool then no it isn't easier. I have heard that freezing the board (yes - sticking it in the freezer!) allows very easy removal but I personally wouldn't risk it. If the board is brand new (never been used/tested for any period of time) then the epoxy paste may not have time to glue itself to the chipset allowing for easy removal.

I guess it depends on whatever method you feel confident with.
 
To 'clothe'' the blitz I wanted to use EK blocks all round. Unlike the maximus there are no mosfet blocks available. This is probably a good thing as the mosfet blocks are flow killers and have little/no effect on overclocking anyway, so I had to come up with something else to cool them - more on that later.

For the NB and SB I DID find some EK blocks but the SB would need to be modded. ANyway, here are the blocks (EK Asus 1 NB/SB).

078-1.jpg


The finish on the blocks were a little scuffy so I gave them a quick lap and they are like mirrors now.

100-1.jpg


Sexy huh?:p

Right this is where things got tricky. The SB block needed modding to fit due to some capacitors that were in the way so out came the trusty modders tool (Read: Dremmel) and I nibbled the acetel away to allow a good fit.

103.jpg


Fits like a glove now with no clearence issues at all.
 
Because the mosfets were also cooled by the heatpipe assembly I had to change that and the only viable solution was to use a thermalright HR-09S. This is what comes with the kit:

079.jpg


The base of the cooler was a little too long tho so again it needed modding to fit with about 2cm dremelled away. Fits fine now.

104.jpg


I used the pads that came with the heatsink as using past is a little tricky as there are a few resistors that are a little higher than the mosfets themselves which would otherwise be crushed.
 
So the last bit of prepping the board was the crosslinx chip. This chip dosn't get hot but Asus saw fit to cool it so who am I to argue. The problem I had is that it only has one hole for the pushthru pins. Enzotech to the rescue!:

102.jpg


I used the enzotech BMR-C1 ramsinks as IMO they are superior to the very similar swiftech MC14 sinks in that they have a larger surface area (20 pins vs 16).

The last little section of the board I wanted to cool was the PLL chip as this can get toasty and is the last section of the board that I saw fit to cool. Unfortunately its directly inline with the top PCIE slot so it needed to be a small sink - I used one of the low profile Zalman sinks for this.

108.jpg


With the board prepped I finally feel as though I', actually getting somewhere with this build at last!:)
 
So onwards and upwards they say.

CPU prep

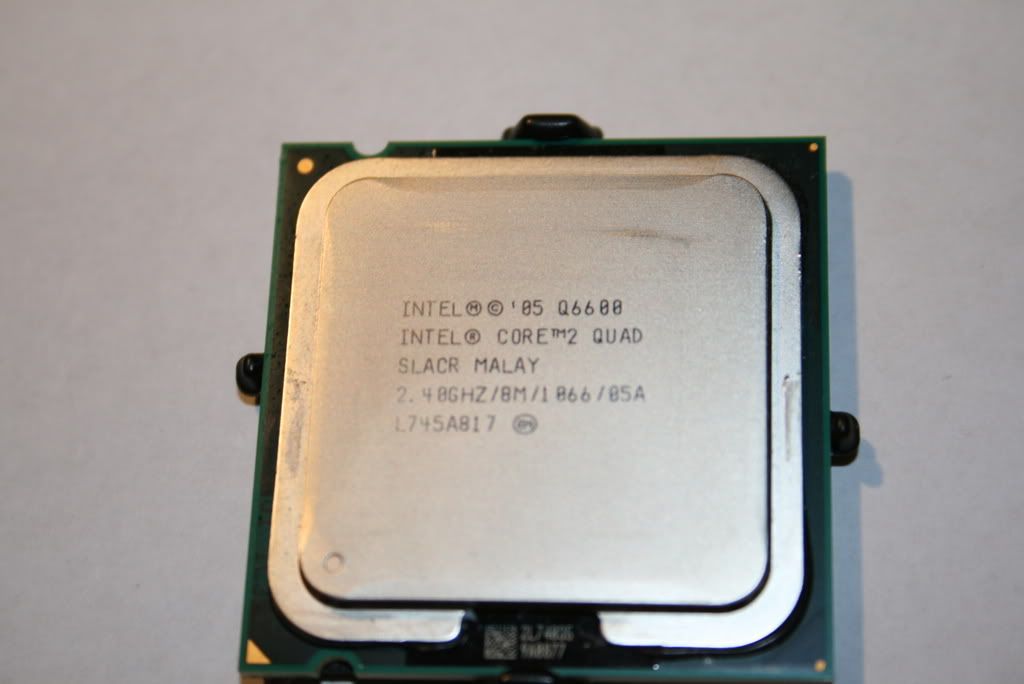
I am going to hold out a little for the QX prices to come down a little (hopefully) and unless I can pick up a bargain in the meantime the cpu I will be using is the Q6600 G0. This little baby is a 45A 'Golden' stepping and has a 1.225vid so it should clock pretty well - as always though its a bit of a lottery.

109.jpg


My only hope is that it clocks as well as my previous cpu and can get 4ghz stable with a lower vcore. I heard these chips can run hot so it was time for a little lapping.

110.jpg


Yup - massively concave as I suspected. Heres how I lap my CPU's. There are a few variances in the various lapping guides out now and I don't really want to go in how it should or shouldn't be done - I have tried most ways and here is what worked best for me :

Tools needed :

400,800,1200,1500,2000 wet'n'dry paper (NOT sandpaper).

Metal Polish

Sheet of glass

Same masking tape.

Prep you surface.

You need a flat surface - glass is perfect for this. I taped the 400 paper onto a sheet of glass. Glass from a photo frame ort mirror is fine if you dont have any other glass to hand.
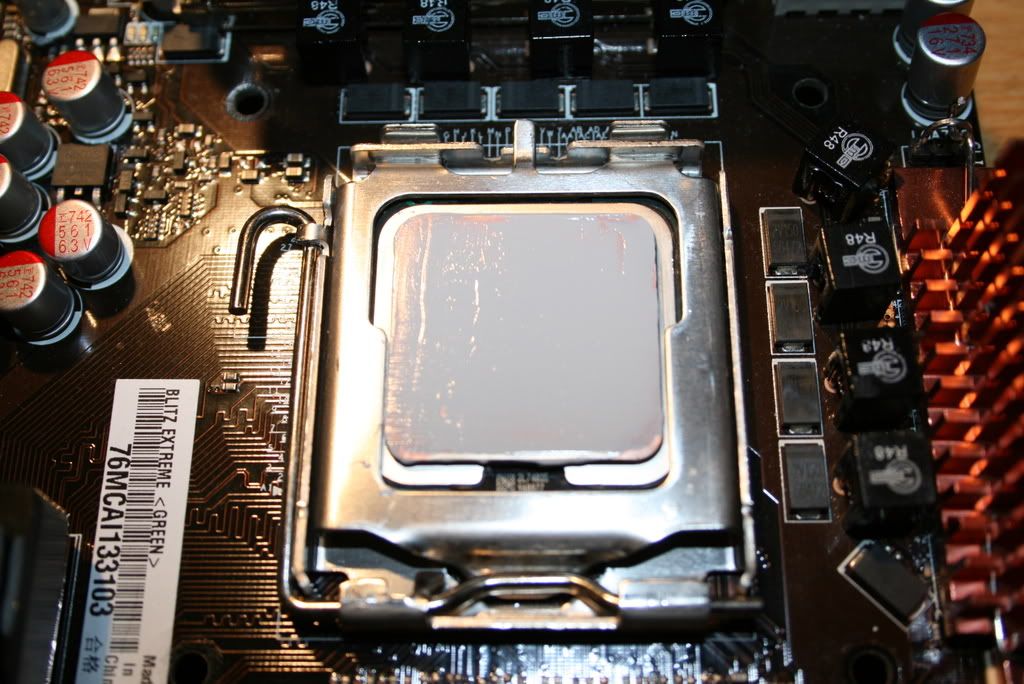
Prep your IHS

I taped off the 'vent' (dunno what its really called but its the notch bit on the IHS) on the CPU. I also tape the cpu plastic protector plate to the underside of the cpu. Basicly you are preventing any ingress of dust or water to the sensitive bits of the cpu.

Start lapping

Now this is the controversial part. I sand my cpu's down using it dry, alot of people use it wet but I get better results using it dry. The only problem with using it dry is there is a risk of getting copper/nickel dust inside the cpu IHS, but there is a chance of getting water and dust in with it wet but aslong as you tape it off then it'll be fine.

Method

I use the up down for 30 seconds then twist 90 degrees and repeat method, until it gets it flat. It dosn't matter imo whether you use the figure of 8 method or up'n'down - both have the same effect. Just make sure you apply an even amount of pressure to the back of the cpu. You can tell its pretty much flat as all the nickel plating will have gone. It will however look very 'scratchy' so then we go onto the 800 grade paper and so on and so on. After each change of paper make sure you clean the cpu, this stops any further scratching from the lower grade paper when you advance to the higher grade of paper. Each time the scratches will appear less and less until you have a dull shine. Now you can honestly leave it at around 800 grade as it should be flat but it's a little unsightly. You can check if it's flat by using the reflection of the surface with something like venetian blinds or anything that has multiple vertical lines. I use graph paper which works well and shows up any inperfections. Bare in mind the aim of the game is to get the CPU IHS flat, mirror finish is just a by product and not neccesary for low temps.

Mirror finish

I however, like to keep going until I get a mirror finish. This will make no difference to the temps but looks so much better and will get you extra e-peen points.

Once you have got as far as you can with the paper you need to then use a liquid polish/paste which will bring out the shine of the copper. Alot of people will advise against this as in effect you are filling all the microscopic crevices with paste where thermal compound should go which is bad BUT aslong as you buff the paste off and then clean the CPU off with isopropyl alcohol THOROUGHLY, its fine.

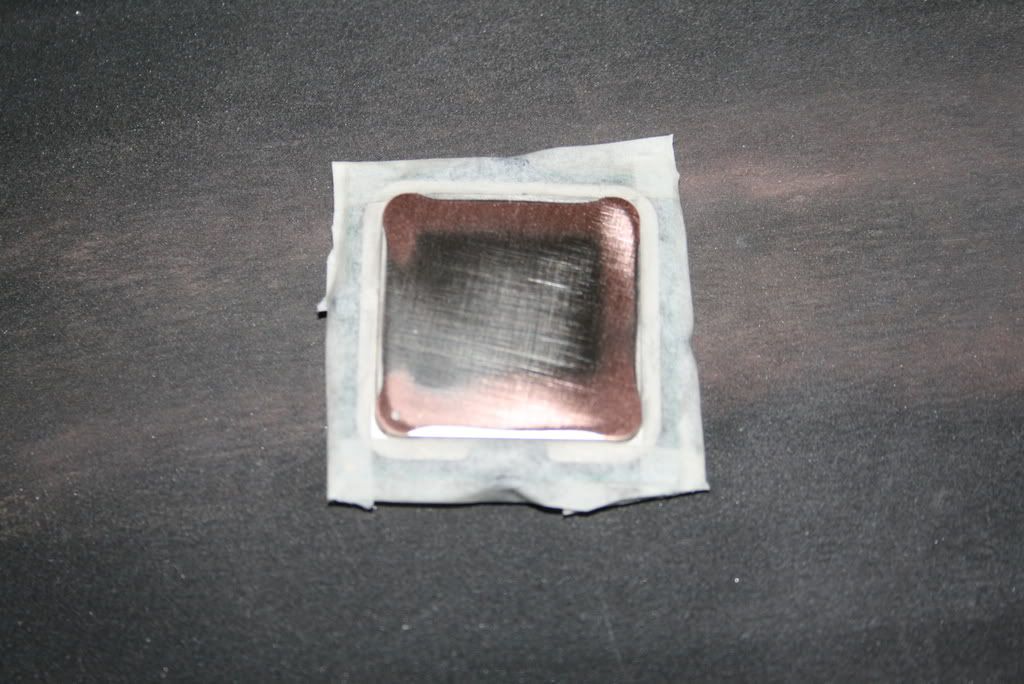
Remove the tape and your results should be similar to mine along with your load temps being much lower:

S5300078.jpg


Note: this is my old Q6600. The battery finally died in my camera while taking pics of the new one lol.
 
CPU Block + mount

Having tried and being very impressed with the D-Tek fusion I was hesitant to try anything different but as I already had EK NB + SB blocks it would be criminal not to also use EK for the CPU block so I took a risk and went for the Supreme by EK.

ek-supreme-acetal.jpg


Reviews show it to be slightly ahead of the D-tek in terms of temps but as the next picture shows the internals - while gorgeous to look at and extremely well engineered, certainly look to be restrictive :

116-1.jpg


Once more EK makes a fine job of the base with a perfect bowed but mirror finish:

112.jpg


As I only plan at this time to have the cpu on its own loop the restrictiveness of the block won't effect cpu temps negatively.
 
Now while the EK mounting plate offers multiple mounts the sheer size of it also makes it incompatible with some boards, mine bing one of them. The problem is that the plate comes into contact with the mosfet cooling around the cpu sockets and the only way to fit it is to have the block vertical which is less than ideal as it then runs perpendicular to the cores on the cpu. Luckily there is an optional bracket that you can buy for skt 775 which is much smaller.

ek-775-m-plate-l.jpg


Sprayed black :

114.jpg


As I wanted as little chrome as possible in attempt to keep to the black/orange theme I decided to spray mine black. Here's a shot of both mounts, the original one being uppermost and modded one on the block :

117.jpg
 
I tested 2 of my favourite sets of paste ShinEtsu MicroSI and some MX2. Previous I have found ShinEtsu to be better but after giving both sets of paste a trial run on air the MX2 proved to be slightly better. There probably isn't much in it tbh and the 1c difference could simply be down to mounts used as it wasn't a very controlled test it was more to satisfy my curiosity.

It looks like there is quite alot of paste on here but thats just a trick of the camera. The paste is vertually transparent its applied that thinly :

118-1.jpg


and with the now sprayed and modded EK mounting plate attached, the block was attached which looks rather svelt in black if I do say so myself :D

119.jpg
 
OMFG!!

Looking good man. Im not going this advanced on my build im doing next week. im not that fussed on the little bits, not until iv got some more money etc etc etc.

Looks good man. Webbo, i love your work! :worship:
 
Nice going, it looks awesome so far, i think i shall have to spray the mount when i finally get round to that part of my project it looks very cool..

I heard putting the board in the fridge works best, which seems pretty low risk :)
 
Back
Top