Project: Ph34r & L04th1ng (56gay Beware!)

FragTek

New member
Well luckily I took some pix of my build while it was in the customization process...

Here's an introduction to project Ph34r & L04th1ng.

Project Specs:

PC-75B

2 x Laing D4 Pumps

Thermochill HE120.3 Rad.

6 x 120mm Panaflo M1A Rad. Fans (push/pull)

Swiftech MCW6002-64 CPU Block

DD Maze 4 GPU Block

DD Maze 4 Chipset Block

Let's take a look at modding the case to fit the ginormous 120.3:

(Sorry for the first few low quality pix, I forgot to bring my digi cam that day and had to snap shots with my phone :()

casemod_1.jpg


Here she is, the beast of all beasts stripped and ready for modification.

casemod_2.jpg


First we had to drill out the rivets holding on the top panel of the case so that we could work on it "outside" of the case. I measured exactly where the rad. needed to be placed and then layed out the mounting brackets as a template for drilling on the top panel.

casemod_3.jpg


Here's all of the pilot holes drilled to perfection :) Notice pilot holes were drilled in the center of each bracket so that we could take a 4.5" (114mm) hole saw and cut 100% perfectly round holes in the top of the case.

casemod_4.jpg


I then took the hole saw and scored each hole to make sure everything looked correct before continuing.

casemod_5.jpg


Voila! Three perfectly round 114mm holes which were then filed out to 115mm.
 
casemod7.jpg


The finished top panel! Looks better than it would have come predrilled from a factory, I was pleased with the final outcome.

***End of day 1 modifications, HIGH QUALITY PICTURES ARE HERE!***

supercool_1.jpg


I made a trip to Lowes after finishing up the top panel to find something that would work perfectly as a gasket material. The genious mounting system I thought up would have left a little less than a quarter inch gap between the top of the case and the radiator on the top side, and the same gap between the fans and the radiator on the bottom side. To me this was unacceptable and had to be fixed, I wanted NO air going anywhere but through the radiator (minus backpressure escaped air, nothing i can do about that :)). I ended up finding these perfect sized square rubber gaskety dealies in the plumbing section. Layed the brackets on top of each one and drew my templates on them with a sharpie and then cut out the necessary holes.

supercool_2.jpg


This is the mounting system I came up with, with the cut-out gaskets in place. If you don't understand how this will all work right now, you will a bit further down.

supercool_3.jpg


A quick picture of what the under side of the radiator will look like with the fans mounted (yes I'm aware that in this pic the fans are on the top side :)).

supercool_4.jpg


A test fit of the radiator and mounting plates through the top case panel to make sure everything fit... And of course everything fit like a glove!
 
supercool_5.jpg


This is a picture of the modified hd bay... Slots were made at the top of the bay for each pump to sit flush with with the front of the bay. Sorry no "in progress" pix for the hd bay mod, but that was pretty simple as u can see.

supercool_6.jpg


HD bay and pumps mounted in case.

supercool_7.jpg


Some initial tubing has been connected. (Pumps tubed in series with a t-line to the top of the case where a DD fillport sits)

supercool_8.jpg


A little bit better picture showing how the radiator has been mounted to the top of the case, it's solid as a rock up there!

supercool_9.jpg


The beginning of my wire hell, you should see it now in it's completion, rofl.
 
supercool_10.jpg


This is it! The case all reassembled and ready to rock-n-roll!

supercool_12.jpg


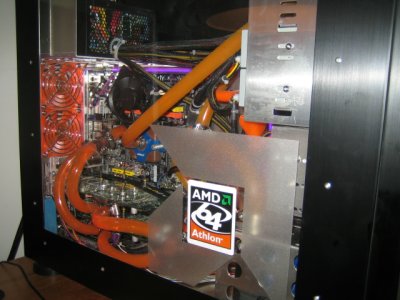
Here it is back at home (all mods were done while I was at work :)) with all of the blocks in the loop ready for coolant!

supercool_reva2_2.jpg


Yes, the coolant is in!

newcase2.jpg


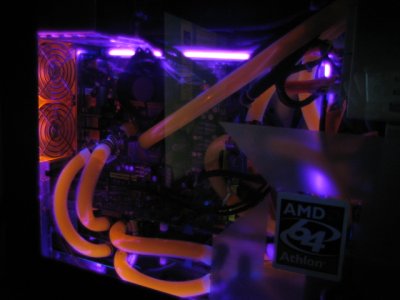
Here she is all UV'd out in the dark, looks pretty insane eh? I think it does :)

fragscomp.jpg


And of course the grand finale :) She's all hooked up and ready to run!

Welp, that's my short but sweet project documentary for Project: Ph34r & L04th1ng.

Enjoy.
 
Thanks man...

As far as it working, no... I'm still waiting for my replacement mobo to come from Newegg. I don't suspect they will be shipping it out until Thursday or later, so I'm still a week + away from having it operational again.

I have a bad feeling that I may have burned up my Winnie super-chip as well, which would really suck... It was one of the few Winnie's that would truely go as fast as you wanted it too. If it is dead, I don't know what I'm going to do. Possibly wait for a Venice or get me a week 40-50 '04 3500+ Winnie instead. I'm really looking for that CBBFD stepping like my 3000+ is though, it really hauls ass.
 
RockBiter said:
omg, I want your rig!

How loud is that thing when it was running?

It's near silent with the fans at 3/4 power, the noise increases considerably at full power though...
 
Yay! Got the pix in the first post to work... That was my retardedness showing, don't mind that ;) Forgot to put underscores in all of the file names, haha.
 
Hell I thought I might just pop in here and post a few updated pix of the rig in case anyone ever pops through and takes a look at this thread.

This thing has gone through a lot of changes since this thread was created... I mean LOTS... I've now got a full SLI water loop goin' on and have it cooling a DC Opty 180.

New chilly1 modded v2000 should be here in the beginning of '06!
 

Attachments

  • comp3.JPG
    comp3.JPG
    186.9 KB · Views: 89
  • comp4.JPG
    comp4.JPG
    138.5 KB · Views: 106
Wow that looks trully impressive!!! I don't want to imagine how much time you spent on this and how complicated this probably was! I am really far away from trying to mod my rig like you did... although I will cetainly like to have such a cooling system! Amazing work!
 
Back
Top