The mystery unfolds
I see what you did there
") .
.I cant wait to see what other mods come out of that crazy mind of yours
") . Subbed
. Subbed 
The mystery unfolds
.. Subbed 


Has been far too long, but it's UPDATE time!
Finally got the rig up and running after months of planning, building, headscrathcing, more headscratching, and even more headscratching.
The front mod is done. Still work to be done on it but cant be arsed right now to be honest. All that hardware has been gathering dust for far too long now.
Time to bring out the power tools in pop's garage.
Had to move the metal piece holding the rad in place
Cutting out some plexi.
Plexi is cut and almost fits
The pipes are in.
Made a wooden frame to get some stability in it.
3 fans fit perfectly, quite astonishing.
a mountain of putty applied.
sanded and painted.
And there she is.
The blue glow in the middle is from a LED strip that's inside the middle pipe. I just cut it open from the back and glued the strip inside.
And that's it for this time. Enjoy!

i need new pants!
That front panel looks sick mate, it blends so well with the rest of the case, well done buddy well done.
*drool*
I like the color, but I'm not crazy about the open grill, I don't like seeing so much fan there, I think it might be a good place for more nylon socks
Good job overall but I'd do something about the visible wires.
Nice.
I also thought about the HDD/SSD cables (I assume those are the ones you referred to) that a cover plate wouldn't be too shabby. Facebooked, Looks great

 Think this idea could have potential.
Cheers mate! Appreciated
EDIT:
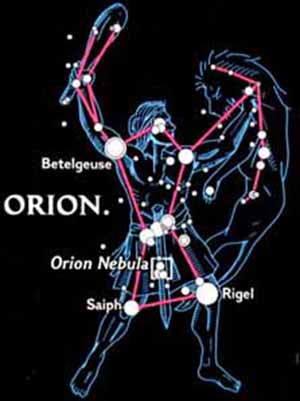
I've had this idea that I'd have the Orion constellation somewhere on the rig. How about making a PSU cover plate from plexi and have it go all the way to the rad in the front. Then print out a sticker with the constellation on it and glue it on top of the cover, and then have leds from underneath shine through the sticker.
or something like this
I've seen some awesome cover plates around, but no constellations
Thoughts?
. Keep it up!Highlander would you mind telling me what you used for the lighting? As those quite nice, also did you add an extra pair of leds to that XSPC block?
Nvm just realized the light in the res wasnt due to the strip, looks nice.
The strip in the back is a silverstone 60cm white led. The leds on the cpu block were included. The one in the res is a Phobya 5mm led and then in the front it's a phobya 30cm strip.I'm not too sure about how a sticker would look. It could turn out really well but it also might look a little tacky if you're not careful. Thats just my opinion.
Awesome work on that front grill, makes me wish I had such a creative mind

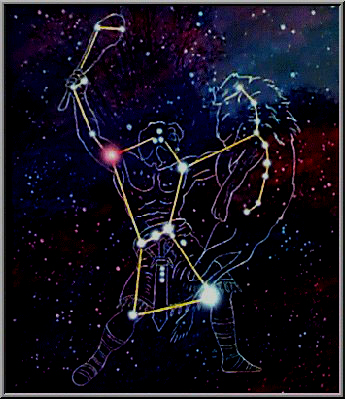
Yeah I dunno either. I guess paiting it is also an option. But how in the world do you paint space and nebulas?
You can print out a picture of the image you like, then cover it in a 'modge podge' type of acrylic sealer, and then after if has dried completely, remove the paper by putting it under water and rubbing off the paper. This translucent image can then be stabilized into an acrylic (or acetate) sheet and used for the case design.
Or you can skip the complexities of making a complete nebula and just use the locations of the stars in the constellation.
Yeah the nebula was just a cool thing I got when I googled. Also thought I would only have the belt of Orion not the whole constellation. Would also be a bit easier to do, just 3 stars in a row.I know this may take some time to get right but if you're willing to spend the time you could always learn to do a nebula like some of the street artists do by using spray cans and things like bowls and pieces of card to make shapes...


 )
)

Im really not a fan of the rad in between the cpu and GPU block tbh
You could have made pretty much all of those hoses hidden better IMHO
How would you have done it?