Well my rig build is at an end, however i do have a side project involving cold cathodes, a laser cut side panel and a empty bit of wall that i have nearly finished that i will detail in this thread later, along with a couple of shots of my whole setup. I thought I would end the rig build by doing a conclusion, going through each of the different parts, explain my choices for using them and my experiences.
I will start with the elephant in the room and what holds everything together: the case. I want to start off by saying that i do not want people commenting just saying that i should have used a different case and saying nothing else. I am aware of what has happened recently with Thermaltake and i am sure it has been discussed at great lengths on the forums anyway i do not approve of direct copying as has been seen so obviously with their products over the past year or so. However having read some of the posts in various build logs where the only contribution has been that they don’t like the case just because of the badge on the front to me seems very childish and short sighted despite the fact that they may be reasons why the original user had that case. For me when i was looking at cases a good 18 months back there wasn’t much to differentiate different cases i am aware that the general layout is fixed however there was nothing that really gripped me until i saw the chaser. It was the 2x200mm top fans that really set it apart from others that i had seen. i had been thinking to do a watercooling build as it would be something new but i hadn’t really done much research into pumps and radiators etc but just seeing those top fans made me wanting to put a 200x400mm radiator up there, and with the tubing holes already done provided an easy way of plumbing also. I will admit to not looking for alternatives as from what research i had already done not many cases have support for 200mm top fans, certainly not 2 of them and as i would probably have to do some modding of the case itself to enable the radiator setup I did not want to spend £200+ on a case and then take a dremel to it. Making the side window was another project that i saw when seeing the patterns already on the side window and seeing that both the left and right sides had the same embossing meant that i could use the right hand panel normally behind the motherboard tray and cut a window in that, then use the normal windowed left side panel to give the area to the back of the cpu some passive ventilation using the space intended for a fan to blow air onto a graphics card.
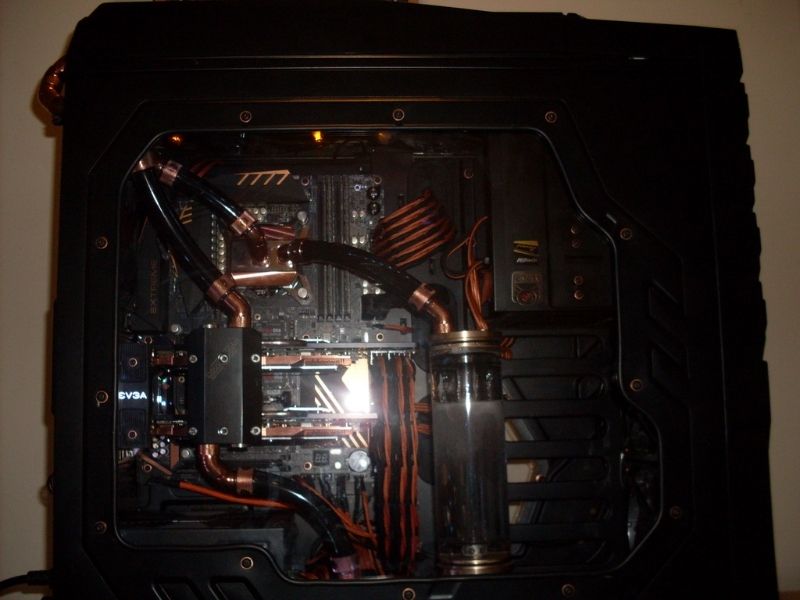
Next the motherboard, originally when i had decided to start looking for the parts I had a bit of a problem, i did not want a black/red build. I also wanted to use the new m.2 technology mainly to get away from using ssd and the sata cables that are either way too short or are like 50cm long that you then have to find a place for all of the extra cable to go. As I was going to be having a reservoir that meant i would have to remove the hard drive rack where the ssds would have gone anyway. One board that cought my eye was the MSI titanium as it had 2 m.2 slots as well as not being black/red however also had oc features that i would never use and was limited in other ways like only 1 usb3 header. Then i got a mail from Scan that was introducing the new Asrock boards and it was like perfect board for me, 3 m.2 slots so i could have windows drive and a raid storage, all the motherboard connectivity i needed and was in a very smart looking black/copper/gold colour scheme with little flashy plastic. That board set out the colour scheme for the rest of the build and I quickly discovered when researching waterblocks is that some did pure copper blocks which would go perfectly with the motherboard colour scheme.
My choice of waterblocks was mainly due to aesthetics i had found 2 manufacturers in Germany that made pure copper waterblocks using the bare copper rather then using a pom or acetyl top piece that would fit in with the overall colour scheme, from what little i could find on the 2 manufacturers their designs were similar in performance. I preferred the look of the heatkiller cpu block, had a bit of a shock when realising that it didn’t come with a backplate thankfully overclockers had one in stock. The GPU blocks I really like the Aqua computer collection, having a black backplate along with a compatible SLI connecting block meant it was a pretty easy choice.
Finding the right memory was actually one of the hardest things for my build, there is a distinct lack of orange memory out there so I was limited in my choice, however seeing the Geil memory with the golden dragons on it was the closest i could really get to matching my board. The Asrock board has white text so matched the white base colour of the memory. The one thing i don’t like is the blue LEDs for the dragon eyes I have however found a fairly simple solution in the form of coating them in correction fluid.
I realise how long this is now, probably too long but I wanted to give my reasons for choosing some of the larger components that were not obvious eg cpu/gpu. I realise that my build is off from the usual pc building path with using more obscure manufacturers, different radiator size etc but I wanted to make this into a real project and something that will take some hours to do. I had a plan in my head of what the build would turn out from seeing the separate components and i am pleased that everything did turn out so well. I also learned new techniques by using the dremel and other tools in order to cut not only the chassis and side window but also the acrylic used for the custom side window. I will post a final update later showing my complete set up along with completed side project.
") i ran into a couple of issues with installing the power supply as it turns out that although the XFX supply is said as being compatable with the sesonic set. I don't know if they have a different version or something but i actually had to mod the cablemod cables for use. i had to replace the connector on the 8 pin cpu cable with the original one from the xfx cable. It was even worse though for the GPU cables. on the original XFX supply the gpu connectors are arranged as 2 seperate 6+2 cables using the same single 12 pin connector so the single 8 pin connector on the end of the cablemod cables just would not fit at all into the psu. What i had to do to make it work is use both a single 6+2 and a double 6+2 and combine them on the single 12 pin connector for 1 6 pin and 1 6+2 pin as i had 2 cards i had to do this 2x luckily that cablemod provides the cables in the first place. The 24 pin and the sata/molex cables work peerfectly as they are although i am going to extend the 24 pin to make it look more asthetically pleasing as its just a fraction too short as it is currently. Another problem i ran into was that the large backplates on the cards are incompatable with the catches on the ends of the pcie finger. The backplate was preventing the GPU from sitting in the slot properly so i had to drain the whole loop and take off the connecting bridge just to get both cards out so i could then remove the platic clips from the slots, after reassembling everything the system would then post normally as the cards were then seated fully into tthe slots. Another issue that i had not forseen was installing windows 7. I managed to find an old 4gb memory card that i used the asrock utility to create a usb bootable install from my install disk on an ainciant celeron M laptop from over a decade ago. Just ordered a few bits from overclockers to enable me to finish the interior how i would kile it then all i would need to do is to make the new front window then i can begin the adventure of overclocking.
i ran into a couple of issues with installing the power supply as it turns out that although the XFX supply is said as being compatable with the sesonic set. I don't know if they have a different version or something but i actually had to mod the cablemod cables for use. i had to replace the connector on the 8 pin cpu cable with the original one from the xfx cable. It was even worse though for the GPU cables. on the original XFX supply the gpu connectors are arranged as 2 seperate 6+2 cables using the same single 12 pin connector so the single 8 pin connector on the end of the cablemod cables just would not fit at all into the psu. What i had to do to make it work is use both a single 6+2 and a double 6+2 and combine them on the single 12 pin connector for 1 6 pin and 1 6+2 pin as i had 2 cards i had to do this 2x luckily that cablemod provides the cables in the first place. The 24 pin and the sata/molex cables work peerfectly as they are although i am going to extend the 24 pin to make it look more asthetically pleasing as its just a fraction too short as it is currently. Another problem i ran into was that the large backplates on the cards are incompatable with the catches on the ends of the pcie finger. The backplate was preventing the GPU from sitting in the slot properly so i had to drain the whole loop and take off the connecting bridge just to get both cards out so i could then remove the platic clips from the slots, after reassembling everything the system would then post normally as the cards were then seated fully into tthe slots. Another issue that i had not forseen was installing windows 7. I managed to find an old 4gb memory card that i used the asrock utility to create a usb bootable install from my install disk on an ainciant celeron M laptop from over a decade ago. Just ordered a few bits from overclockers to enable me to finish the interior how i would kile it then all i would need to do is to make the new front window then i can begin the adventure of overclocking.