800d case build log recon 50 cal

:) I can't be anything but happy for you, and make sure you keep those pics coming with the build progress. We love that type of stuff :)

hence why im here brother xD and all i need now is a new moniter im usinga ben q 24 inch i broguth some few years back xD and a new sound system but that soon come when i sort the pc out though thats the main thing and pictures i will post wont let you guiys down on that xD and thanks dragoonk xD
 
yeah i still got the plasstic film thingy on my desk that be of when my 800D is done as it is the desk is a mess and when i tryd to peal it off it made a chip wich i need to report to the seller but yeah thats a lil glims of what is going on :)
 

Attachments

  • IMG-20130116-00261.jpg
    IMG-20130116-00261.jpg
    106.3 KB · Views: 72
  • IMG-20130116-00270.jpg
    IMG-20130116-00270.jpg
    102.4 KB · Views: 57
  • IMG-20130116-00269.jpg
    IMG-20130116-00269.jpg
    109.5 KB · Views: 54
  • IMG-20130116-00268.jpg
    IMG-20130116-00268.jpg
    108.9 KB · Views: 51
  • IMG-20130116-00267.jpg
    IMG-20130116-00267.jpg
    104.2 KB · Views: 60
  • IMG-20130116-00266.jpg
    IMG-20130116-00266.jpg
    60.9 KB · Views: 51
  • IMG-20130116-00265.jpg
    IMG-20130116-00265.jpg
    82.8 KB · Views: 48
  • IMG-20130116-00264.jpg
    IMG-20130116-00264.jpg
    100.3 KB · Views: 51
  • IMG-20130116-00263.jpg
    IMG-20130116-00263.jpg
    88.8 KB · Views: 64
  • IMG-20130116-00262.jpg
    IMG-20130116-00262.jpg
    106.9 KB · Views: 50
  • IMG-20130116-00277.jpg
    IMG-20130116-00277.jpg
    105.6 KB · Views: 61
  • IMG-20130116-00276.jpg
    IMG-20130116-00276.jpg
    99.8 KB · Views: 47
  • IMG-20130116-00275.jpg
    IMG-20130116-00275.jpg
    104.1 KB · Views: 53
  • IMG-20130116-00274.jpg
    IMG-20130116-00274.jpg
    107.4 KB · Views: 53
  • IMG-20130116-00273.jpg
    IMG-20130116-00273.jpg
    107.2 KB · Views: 52
  • IMG-20130116-00272.jpg
    IMG-20130116-00272.jpg
    110.1 KB · Views: 51
  • IMG-20130116-00271.jpg
    IMG-20130116-00271.jpg
    106.3 KB · Views: 53
Looks good!
What are your first impressions on the keyboard?

Well thats a tricky one realy is because the keybaored is fully mechincial and the macros work but dont work yeah okay you can set like 100 key functions but only you can use 5 on each profile you have 5 profiles wich is handy you know but switching the profiles makes the aivia change colour and you cant set that colour to what profile you wont you gota keep the same colour and you can set a key to run a .exe you can only improt and expert .ini files wich realy sucks lol but like i made my profile the aqua blue and if i hit G1 pc shut downs wha i had to basicly do to get that to work was click record right windwos key then right arrow key then enter stop the record then it workd wich is great rbut you can set it like to laod .exe i dunno if there is a way but ini is codin and looks a pain in the arse lto be honest dunno if they bring a function out for that but other then that my macros are useles to me :( 
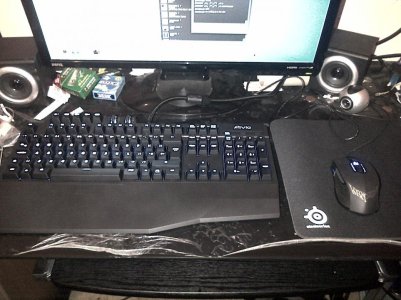
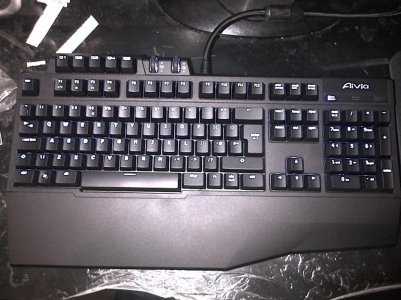
wich is kinda disapointing beacouse i use the macros to laod games programes so thats my kinda opinion but in all in total it is the best keyboard i ever brought the keys are sooooo soft and soooo sensative it is absoutley brillant !!!!!!!!!! and took me a while to work out how the lights come on the keyboard the 2 wheels at the top are like a mouse wheel press it down lights come on sortd and the other one if you press it down mutes ur sound and its got a FN key now that is for tthe f1 f2 f3 f4 basicly f1 is play pause f2 is stop f3 is previouse track and f4 is next track i only had this keybaord yesturday so i am trying to give you the best detail i can and this keyboard has 2 usb jacks and 2 3.5mm jacks and there all sleeved in 1 sleeving wich is great you aint got wires every where its got a usb 3.0 and the mic in head set in jack on the right of the keybaord and a usb 2.0 at the top of the keyboard hope this helps and im still getting used to it lol and it weighs a good 3.3 pounds and has 4 feet that are rubber feet so it dont move around lol :lol:
 
That's a pretty decent impression on the keyboard, it looks good to be honest. I see you got parts there and a big project with big rads and expensive fans and carbon fiber. :)
 
That's a pretty decent impression on the keyboard, it looks good to be honest. I see you got parts there and a big project with big rads and expensive fans and carbon fiber. :)

tbh the sp 120s are a pack so there like 20 pounds and yeah with me gaming is also about the keyboard and mouse no point having a stiff key keybaord that your allways going mad at it you know wha i mean i think if i blow hard enough i press a key its that soft i love it :D 
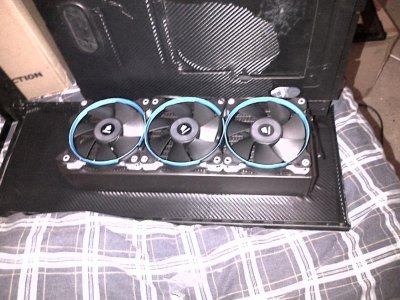
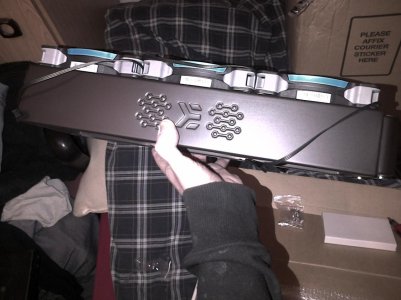
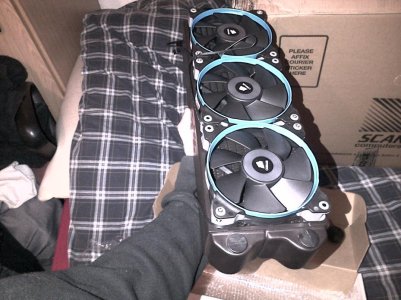
and i got the matching mouse and he asked for the impression on the keyboard and of course this is a forum for that so i gave as much detail as i can as in my opinion and my mate thinks the same beacuse he got the same keyboard but he had his for around a week and he just getting use to it now xD and ooo yeah big 360 rad then i got a 140mm rad 120mm rad and a 240mm rad xD just wanna get this project finished hardware here and cant use it its like oooooo
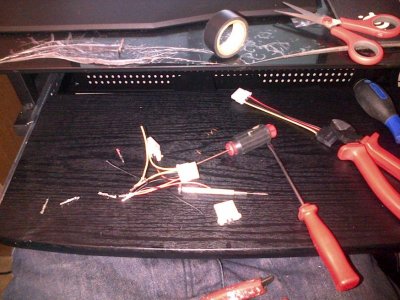
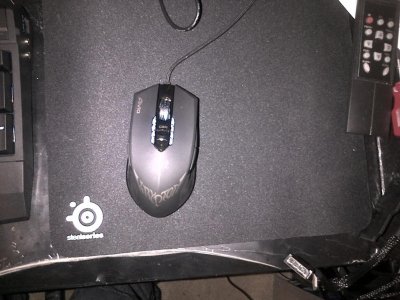
 :( lol

and not jsut carobn fibre vinyling i got sound proof damping tooooo :D hehehe :lol:
 
Hey guys time for a update not much but ...

i have been really busy latley so i thought i do some of the wiring like the 4 military switches get them in 1 power phase so i wont use like 4 molexs from the psu be messy and i loooked and looooked for a 4 female molex to a sata power and could not find 1 so i thought i make my own pics are below and a video of the sunbeam sound controller i vinyld too haha xD and i decided to stick with the oringal motherboard tray and use the sound proofin on top so i can vinyl it on top and still ahve the cut out holes i need and the rest you wont see i could do the 3 bends but then it just a job of like lining things up and all that and i aint got the machinery for that kinda thing sooo yeah sad i know but the aliminum i jsut use for the middle shelf or the encloser for the 5.25 bay as i need both done :) and i need a peace of wood so i can do these bloody holes i need then i can sound proof it in side vinyl it put case 2 getha fit hardware done lol hehe xD o and the sunbeam controler vinyld yeah i know looks all weird and tha but im still trying to get use to this vinyl stuff but hey it goes with the theme though :D and i gota do one more but i lost my front blanks DOH !

http://www.youtube.com/watch?v=GhK3hscC8fo&feature=youtu.be
 

Attachments

  • IMG-20130117-00291.jpg
    IMG-20130117-00291.jpg
    105.4 KB · Views: 62
  • IMG-20130117-00290.jpg
    IMG-20130117-00290.jpg
    103.4 KB · Views: 54
  • IMG-20130117-00289.jpg
    IMG-20130117-00289.jpg
    98.1 KB · Views: 52
  • IMG-20130117-00288.jpg
    IMG-20130117-00288.jpg
    99.2 KB · Views: 47
  • IMG-20130117-00287.jpg
    IMG-20130117-00287.jpg
    102.7 KB · Views: 54
  • IMG-20130117-00286.jpg
    IMG-20130117-00286.jpg
    101.2 KB · Views: 45
  • IMG-20130117-00285.jpg
    IMG-20130117-00285.jpg
    105.5 KB · Views: 52
  • IMG-20130117-00284.jpg
    IMG-20130117-00284.jpg
    99.2 KB · Views: 65
  • IMG-20130117-00281.jpg
    IMG-20130117-00281.jpg
    99.1 KB · Views: 53
  • IMG-20130117-00280.jpg
    IMG-20130117-00280.jpg
    99 KB · Views: 53
  • IMG-20130119-00302.jpg
    IMG-20130119-00302.jpg
    104.6 KB · Views: 52
  • IMG-20130119-00300.jpg
    IMG-20130119-00300.jpg
    105.7 KB · Views: 56
  • IMG-20130119-00299.jpg
    IMG-20130119-00299.jpg
    107.7 KB · Views: 52
  • IMG-20130119-00298.jpg
    IMG-20130119-00298.jpg
    103 KB · Views: 60
  • IMG-20130119-00297.jpg
    IMG-20130119-00297.jpg
    102.9 KB · Views: 46
  • IMG-20130119-00296.jpg
    IMG-20130119-00296.jpg
    98.3 KB · Views: 48
might re do the led wiring and the sunbeam like cut the cables to a decent length for cable tidiness in the 5.25 bay yeah u wont see it coz it be in a encloser thing but it just annoy me lol knowing its a mess so its really just a test and it passed so when its all in the 5.25 bay and riveted to the case and all fitted before i do the encloser i can work out what length is what when its all stacked in the 5.25 :) but enjoy the pics :) :lol:
 

Attachments

  • IMG-20130119-00305.jpg
    IMG-20130119-00305.jpg
    99 KB · Views: 40
  • IMG-20130119-00307.jpg
    IMG-20130119-00307.jpg
    104.7 KB · Views: 51
  • IMG-20130119-00308.jpg
    IMG-20130119-00308.jpg
    102 KB · Views: 50
  • IMG-20130119-00309.jpg
    IMG-20130119-00309.jpg
    106.5 KB · Views: 65
  • IMG-20130119-00310.jpg
    IMG-20130119-00310.jpg
    100.8 KB · Views: 43
Need to sort the carbon film out,
if your gunna do a job, do it properly!

most of it is aight bud but the pics look like its a mess when to see it from a eye its fine i re done pics and postted them but im still learning with the vinyl the tricks and stuff i make mistakes i learn from it best way in my opinion :)
 
oooo i seee the bay res is like that coz it not bolted on yet im waiting for a dark tint vinyl to put on the awcrylic so then i can sort out the 2 g1/4 that on the top left and right corner wich will be blue thats all im waiting for so please dry your tears :D
 
Nice so far bud,but that carbon really needs to be sorted.Out of curiosity whet carbon are you using ? is it just the 3M sticky vinyl or the vinyl wrap dinoc ?It looks to me like the 3m stuff.The dinoc can be heated and stretched to form corners edges ect.Cudos for the kit though.
 
When I saw the bay res, I nearly cried

I thought the same:lol:

Dude you really need to sort the carbon, because is not done wright.
Its visible that quite few cuts are done wrong. I personally like carbon, but I removed most of it from my new project, because I realized that it make case look a bit cheap, at least M8. Carbon looks good until, you cover everything with it.
Well I'm waiting how your build gonna end up, hope it will look good:)
 
guys chill out please the res has 2 x g1/4 blanks on the right and left corners hence why the res is like that on thhem two corners i cant do nothing intil i get http://www.ebay.co.uk/itm/270918329...eName=STRK:MEWNX:IT&_trksid=p3984.m1497.l2649 <<< wich im puting on the acrylic and when that is done then i can attach the front plate bolt it in then sort out them two corners and no gamepro105 aint bitchynuss just people aint understanding and its hard as i ahve learning difficultys and gota use the spell checker alot so i do appoligse guys
 
Back
Top