Suck or blow water through the block?

OLD

New member
Hi Tom and all other PC-Builders.
I have to change from a simple Junkyard Watercooling to a partly standard loop. Because my block overheated and melted partly (that was totally my failure, Alphacool was not to blame).

Looporder.

Until now (56$ customloop):
Eisbaer Solo (pump/block/reservoir) to an old Air conditioning Condenser and back again

Now: would be the best layout
Bayreservoir - CPU-Block - Pump - Radiator ( same old one) - back to Reservoir

Is it possible to suck the Water through the CPU Block instead to press it through?

Material.
Alphacool Repack Dual 5.25" Clear Rev.2 Computer Cuplex Kryos NEXT
PHOBYA DC12-400 PWM
External Cu Condenser. 720mm x 120mm

Regards
Old-Man
I am not a English nativ speaker, so try to guess and ask, instead to blame.
Thanks
 
As far as i understand cpu blocks are designed to pumped through , as they have jet plates or similar to spread the incoming water across the micro fins equally . just for example mine goes flow direction -- pump-res combo/radiator /cpu /radiator /gpu /radiator and back to pump-res combo
 
Hi Eddie


As far as i understand cpu blocks are designed to pumped through , as they have jet plates or similar to spread the incoming water across the micro fins equally/QUOTE]

My thought also, but is there any different between.

(Ambient Pressure) - Pump - (High Pressure) - CPU-BLOCK - (Lower Pressure) - Radiator - (ambient pressure) - Reservoir.
or
(Ambient Pressure) - CPU-BLOCK - (under Pressure) - Pump - (higher Pressure) - Radiator - (ambient pressure) - Reservoir.

But the flow Volume per minute is in both cases about the same. Because the flow resistence of the CPU-Block and the Pump power stay's the same.

Is there really a difference between both Systems?

Has somebody tried it?

Regards
Old one
 
You can actually use it either way but can expect up to 5C difference if you use the inlet/outlet the opposite way.
 
Hi Warchild
You can actually use it either way but can expect up to 5C difference if you use the inlet/outlet the opposite way.

Oh no I would use the inlet as inlet and outlet as out only not in reverse.

Only the Pump after the block than before the block.

Regards

Old guy
 
ALWAYS have the pump taking water directly from the res. And the res needs to be higher than the pump. If not, and you get air bubbles in the system, it can stop or limit the flow in the pump = no cooling.
And yes, I have seen it happen.
 
Thanks a lot for all your Advice.

As coming from the electronic side of things. I try to understand a Waterloop as a electronic circuit but as always the problem is in the details. My Bayreservoir is on the highest Point of the Case, CPU in the middle and Pump at the ground level.
But when the Pump has to be direct behind the reservoir.
Ce la vie.

Happy New Year
Old
 
In theory, as long as the direction of flow is correct, it shouldn't really matter where the pump is in the loop. It is a loop after all, if you're pulling one way, you're effectively pushing the other :)

That said, my personal approach as always been:

1. Res
2. Pump (pulls from res)
3. Radiator
4. CPU Block
5. GPU Blocks
6. Back to Res.

Basically this approach means the fluid is at its coolest just prior to entering the blocks. Warm fluid then returns into the Res, then through the pump (which can add heat of its own potentially) before being cooled.

You could swap things around and, as long as flow is correct, you'll likely not have any issues. Sometimes neatness and ease of build mean you assemble things a certain way. My loop is external so I had lots of room to play. A more space-compromised internal build presents different challenges.

Do be aware of flow though. For example, I did tests using parallel flow as I have two GPU's. There were plenty of nay sayers (including a close friend) who simply didn't accept that it'd work, let alone understand why I was doing it.

Basically, in my testing, GPU blocks were a lot more restrictive than CPU blocks - not a clue why they're made this way. So, using the "best" high-flow CPU block with the "best" GPU blocks available would see the CPU block unable to work at its best. When I switched to parallel flow with my GPU's my temps went down across the board plus the pump was likely having a far easier time due to the better flow.

Note: my plan was always to parallel flow - in fact that's how I started the build - however, it was interesting to prove a point. My friend promptly changed his setup to parallel flow :)

Note 2: as you can see from my (slightly out of date) sig, my last full water cooled build was a while ago. However, it's still going strong. I just wante dto be clear that I don't have experience with any of the current lines of CPU and GPU blocks, so perhaps things are much more evenly matched. I will be doing a new Coffee Lake + 1080Ti WC build in the coming months, so I guess I'll find out :)

Scoob.
 
Yeah, a loop (once filled with enough coolant) operates as a sealed vacuum. Filling it with the res lower than the pump is a real b-stard, but I have done it (took me about two hours of filling through a port I made). I have a flow indicator in that loop, just for peace of mind.
 
Yeah, a loop (once filled with enough coolant) operates as a sealed vacuum. Filling it with the res lower than the pump is a real b-stard, but I have done it (took me about two hours of filling through a port I made). I have a flow indicator in that loop, just for peace of mind.

In my loop, the height of the rad goes from the bottom of the pump to the top of the res, so, air can get trapped within the rad its self. However, a little shake sees the air bleed out quite quickly. I was actually surprised how easy it was. Perhaps the design of the rad helps, I mean, it's huge, 360x360x50 so can hold quite a lot of fluid and air in theory.

Additionally, I only fully top the res up after the system has been bled so air can escape easily. Can hardly believe this loop as been up for about five years since my last tweak - still tests for the correct ph too. Gonna be a shame to pull it apart, but it'll work well with my eventual new build.

Scoob.
 
Thanks

I will do it as you recommended

At the top the reservoir down thru a flowmeter down to the Pump then up to the CPU Block then thru the Thermometer out to the Radiator then back to the reservoir.

I will post some pictures for your survey.

Regard
Dani
 
In my loop, the height of the rad goes from the bottom of the pump to the top of the res, so, air can get trapped within the rad its self. However, a little shake sees the air bleed out quite quickly. I was actually surprised how easy it was. Perhaps the design of the rad helps, I mean, it's huge, 360x360x50 so can hold quite a lot of fluid and air in theory.

Additionally, I only fully top the res up after the system has been bled so air can escape easily. Can hardly believe this loop as been up for about five years since my last tweak - still tests for the correct ph too. Gonna be a shame to pull it apart, but it'll work well with my eventual new build.

Scoob.

I am now convinced I had an air lock in my loop. This one.

Rhl9V38.jpg


Temps were tragic, and when I emptied the whole loop I got this much coolant back.

PWr6YWv.jpg


When I went to refill the new loop (doubled the rad size and etc)

Cy4AkbD.jpg


I noticed the pump would not prime. It is a 2600 RPM pump and I am currently running it at 12v. Due to this the impeller span so fast it refused to prime and push the coolant. So I tipped the rig backward and it emptied the res so fast it literally burped. I then continued to fill until the res was almost full. About ten mins later I hear this odd noise, again like it is burping. Check the coolant 1/3 has disappeared.

So yeah, make sure you give everything a good shake about.
 
I still get small bubbles from time to time. Have topped the res up twice in 6month, and I need to do it again soon. So depending on the loop setup, I can take ages to fully bleed. I think my top rad is the "problem". (not that it's a problem)
 
I still get small bubbles from time to time. Have topped the res up twice in 6month, and I need to do it again soon. So depending on the loop setup, I can take ages to fully bleed. I think my top rad is the "problem". (not that it's a problem)

If you have full control of your pump. Once in a while crank it to max 12V for a second or two. As you say, over time, bubbles in the loop will gather somewhere if its an unoptimised loop, so a full throttle on the pump can help shift them in one go.
 
If you have full control of your pump. Once in a while crank it to max 12V for a second or two. As you say, over time, bubbles in the loop will gather somewhere if its an unoptimised loop, so a full throttle on the pump can help shift them in one go.

I have full control, it's a D5. But it's not enough. I need to tilt the case. The worst thing is, if I didn't have a transparent cpu block, I wouldn't see it :-/
 
I have full control, it's a D5. But it's not enough. I need to tilt the case. The worst thing is, if I didn't have a transparent cpu block, I wouldn't see it :-/

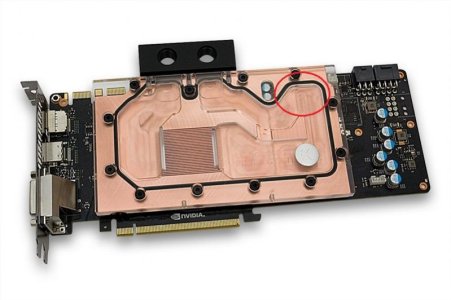
Very strange. Is your GPU vertical then? is it trapped just before the outlet port of the block in the cut out recess?
 
Where it is trapped air must be getting past. Or it would simply follow the loop until it burps in the res.

Well EK blocks on the 780 had a terrible pocket where bleeding was only possible by tipping the cards. when I built my pc desk I had it on the second gpu at the exit outlet. If I didnt tip the desk (damn heavy too) only micro quantities of air would make it to the res.

Luckily newer blocks dont suffer like this anymore.
 

Attachments

  • fc780-gtx-ti_cp_full_800.jpg
    fc780-gtx-ti_cp_full_800.jpg
    49.4 KB · Views: 194
Well EK blocks on the 780 had a terrible pocket where bleeding was only possible by tipping the cards. when I built my pc desk I had it on the second gpu at the exit outlet. If I didnt tip the desk (damn heavy too) only micro quantities of air would make it to the res.

Luckily newer blocks dont suffer like this anymore.

I've still not seen mine lol. Waiting for the light bar to come before installing the mirror :D
 
Hi

The build is running but the flowmeter from Alphacool was leaking it seams it has a chamfer on start of the thread. So my 5mm 1/4 thread had only about 2mm of real thread contact. The small point of contact was a big stress so the plastic got fractured. The HAL sensor had a broken pin. Because the Cable with the riggit double shrink tube work as lever and there is no fixation to the case. I will modify that and post some pictures.

Kudos to Alphacool ! They send me a replacement rightaway Thanks for that. The new one has the same weakness, but because I know them, now I can modify that with ease.

Cu
Feeling old now
 
Back
Top