[Staff Project] NZXSPC

Looking good, can't wait to see more.

I've read on another forum that painting Scythe GT's can unbalance them, your saying that's not the case due to them being thick bladed? You not had any problems painting them in the past I assume?

I'd also read that somewhere, but put it this way, over the years i've painted and used countless sets of the Gentle typhoon fans and never ever had a problem. The Skeleton rig i'm currently running has 3 of them on the 360 rad with the fan blades pained in a nice thick lusterous coat of bright yellow. It runs on average 5 hours each evening and all day at the weekends and has done for nearly 2 years with no problems.

So basically, despite what you might read, it's not a problem.
 
Off topic, I know, but i'd just like to put it out there that Havering has no relation to Essex - it's a borough to itself, and we want nothing to do with it!
We have enough on our hands with Basildon :(
 
Water cooling fitings and tubing have arrived!!!

Also a few other bits and bobs, including a 7th Gentle typhoon so we can go push pull on the front rad.

My god am I excited. I feel like a kid on christmas morning

Big thanks you to the guys at Special tech for sorting my order out for me.

So what fittings have I opted for???

Pictures coming soon.
 
Off topic, I know, but i'd just like to put it out there that Havering has no relation to Essex - it's a borough to itself, and we want nothing to do with it!
We have enough on our hands with Basildon :(

depends what viewpoint mate, from my policing PoV its firmly in essex, but still a dive along with basvegas and romford
 
This is an exciting build indeed!!

wanna be Phantom 410 modding buddies? haha :beerchug:
been watching yours develop also matey. Must make us "Phantom 410 modders club founder members" then?

Not too many updates but doesn't mean no work going on. recently received my fittings. Bought with my own hard earned cash from the great guys at Specialtech. Not just a great range of kit but fantastic customer service, something that in my opinion counts for a great deal these days

So after a bit of a false start with some Alphacool fittings I went with Bitspower "shining silver" as I've never had the chance to use these before. I can honstly say I am as impressed as I hoped I would be.

A few sneak peak pictures ahead of the next round of updates.


062.jpg


068.jpg


080.jpg
Got a few spare?! :dribble:
Little to expensive,but dang..... they look lovely.
 
Ah the proclaimers, an oldy and a goody. still never quite worked out what "havering" was. Sounds like it ought it be in Essex somewhere.

Window wise yeh the window will esssentially replace the area of the vented panel. I had thought about making a much larger window, but then all you do is end up showing the side of your 5.25" drives and to be honest they're not that interresting or attractive.

Annoyingly, the Phantom 410 window already clips the back edge of these at the top right hand corner but it's not a disaster.

Hang on, you're a chap from Denver who's heard of the proclaimers near 1 hit wonder. How come, did they really make it that BIG?


LOL, dude, that Proclaimers song was huge over here too. Just cos we're on the other side of the pond, doesn't mean we're kept completely in the dark. :p

In fact, I grew up listening to a lot of 77 and 82 UK Punk, like the Exploited, Sham 69, 999, the Vibrators, Peter and the Test Tube Babies, etc.... I used to have a leather jacket with band logos and a mohawk when I was a kid.

Looking forward to more pics on this build. WC is awesome.

Also, PBaines is a Phantom modding pimp!
 
Think we might have a new name for the group then, with a bit of a punk twist to it.

How abouts "The Phantom Pimps"

back on topic, the modding is just about done, I've spent some time today midifying the top of the case to allow filling without the need to remove the bay reservoir. That way I can have a nice tidy loop without the need for slack in the tubing.

edit: Some pics of the work on the fill port.

Measuring and marking. I'm going to lose one of the top panel location holes but that's not a real biggy.

007.jpg


Decided it would be easiest to cut with the roof removed. takes about 10-12 screws and it's off nice and easy.

010.jpg


009.jpg


This little tab is also going to have to have a visit from Mr Dremel

012.jpg


Just need to clean up all the edges and give them a lick of paint to match the case and all should be grand.

013.jpg


Looks like my guess work, ahem, sorry, measurements were pretty lucky, sorry, I mean accurate.

I've allowed enough space not just to get the plug out, but to be able to get two fingers in and lift the plug away from the res top.

060.jpg
 
Last edited:
Ok chaps time for some updates.

I've got quite a bit done of late as you'll see from the update on the home page artilces section. As there's not enough room there to go into much detail this is where we'll fill in the gaps.

i'm going to be putting up a fair few updates over the coming days so keep em peeled as they say.

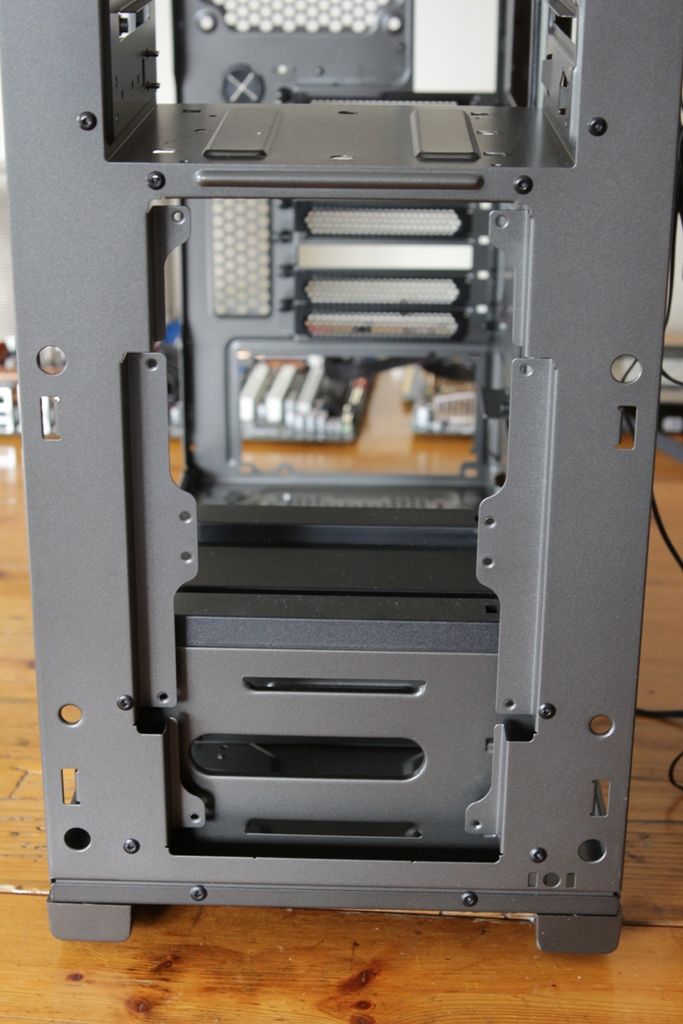
First up is the lower drive bay section. Basically it's getting in the way of the plans for the front rad so it'll have to go.


090.jpg


081-1.jpg


091.jpg


It's held in by a total of 8 rivets, 4 in the bottom and 4 on the front.


080.jpg


076.jpg


Ot it comes!

096.jpg


092.jpg


097.jpg


There was just 3mm in it, and the rad would have fitted into this area. However 3mm is 3mm and it aint gonna fit.

To be honest, even if it had just fitted the mounting holes would not have lined up correctly, which although not insurmountable as new ones could have been drilled it would also have menat a further modification to the front of the case to allow the fans to be fitted and lined up with the rad.

As it is, the floor of the lower5.25 bays is to get a visit from Mr Dremel.
 
Last edited:
Dude you can get a replacement cap for the res that allows you to fit a barb etc should you want to fit a fill port.....
 
With the lower drive bay section removed it's now time to create a little clearance into the 5.25" bay area. It's estimated that by the time the holes in the front rad are lined up with the holes in the cases front panel the end tank will protrude up into the drive bay area by about 15mm or so. A visit from Mr Dremel is all it takes to remove some steel from this area. I've started small, as at present this all I anticipate having to remove. If I need to remove more I can always do so later. It is however a lot harder to put steel back if i've taken away more than I need to!


A picture of the drive bay floor pre cutting (the lower section is also still in when this was taken)

090.jpg


A few pics post cutting. The edges will be cleaned up once I am happy I have the right sized hole cut.

078.jpg


075.jpg


With the floor cut away we can finally get a rad into the front of the case and see how things fit together. There will of course be fans attached to this rad when it is fitted properly but for now just mounting it to get an idea of fit and clearance will suffice.


005.jpg


006.jpg


The ports on the end tank lay pretty much exactly level with the mid plane of the old floor. It may be that if I don't get a nice curve on the tubing and barbs i'll be using that I need to remove the rest of this floor area.

011.jpg


It might look on pictures such as this that they actually come out above the level of the floor, but if you look towards the cut away floor just to the left of the yellow stopper you'll see that they're smack on level with it.

124.jpg


Still plenty of room for the quite wonderful 750 bay res though


014.jpg


128.jpg


At the bottom of the case there's about 5mm of clearance between the bottom of the rad and the floor of the case.

129.jpg


Ok that about wraps it up for now. Over the next few days i'll be putting up some of the work on case window cutting, Fan painting and HDD mounting (have you noticed that all the HDD racks have gone!!!)

Thanks for looking :)
 
Last edited:
Thanks for the feedback guys. A few more updates for you all

Cutting the case window. Decided to go with a simple extension of the lines of the existing window, essentially removing the meshed area. Took quite a few pictues of this so you can see the process.

As you can see the meshed area stands proud of the rest of the panel. This line will serve as our cut line.

016.jpg


018.jpg


First job is to remove the existing window. In this case NZXT have used little metal tabs to secure it. Just a matter of bending these out to enable the acrylic to be lifted out (we will of course be cutting them off later)

021.jpg


022.jpg


023.jpg


Masking off the entire side panel even to the extent of overlapping the tape over the area of the removed window. This masking is to prevent any damage to the panel when it moves into the workshop.

024.jpg


Line marked on the masking tape where we intend to cut.

027.jpg


028.jpg


About 15 mins with the dremel and the section is removed.

031.jpg


033.jpg


Hardest part is always the radius curves. I use older worn down dremel bits to enable the tight curves to be cut. If you're cutting a flat virgin panel it's easier to drill the corners so as the circumfrence of the drill gives the desired radius of the curve, then connect up the holes with the dremel or jigsaw.

We will of course be filing all the cut edges and then sanding them before finally givng them a touch up with a paint to match the gunmetal of the case. Can't have bare metal glinting away at us can we.

034.jpg


Thanks for looking.
 
Last edited:
Back
Top