You are using an out of date browser. It may not display this or other websites correctly.
You should upgrade or use an alternative browser.
You should upgrade or use an alternative browser.
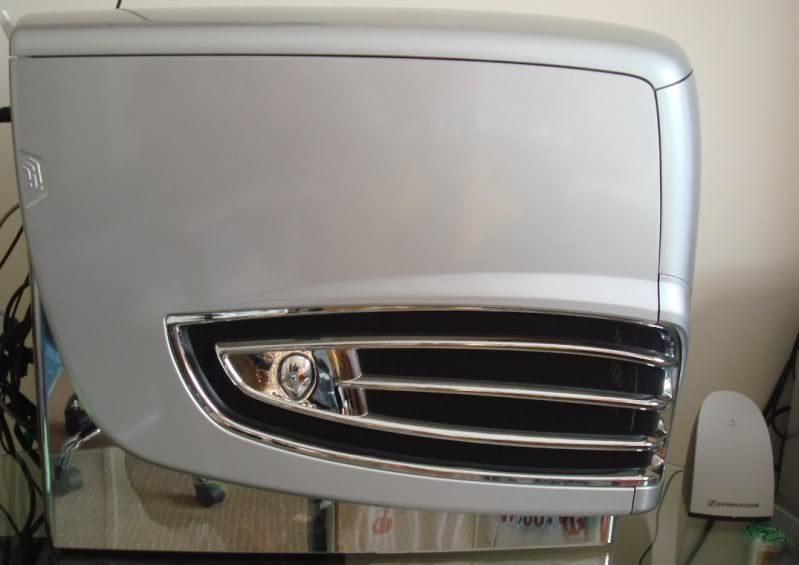
Re-ALX
- Thread starter alienware
- Start date

alienware
Banned
Time for some Limp Bizkit. You can sing along if you know the words !
It's just one of those days, where you don't wanna wake up, everything is
 everybody sucks, you don't really know why, but you wanna justify ripping some rams head off
So tonight I went to dry fit the new cooler. Only to find it doesn't clear the
ram. And that was it. I am so
peed off with this ram that something inside of me snapped and I realised that if I didn't go guts for glory it was game over. So, I ripped some rams head off.
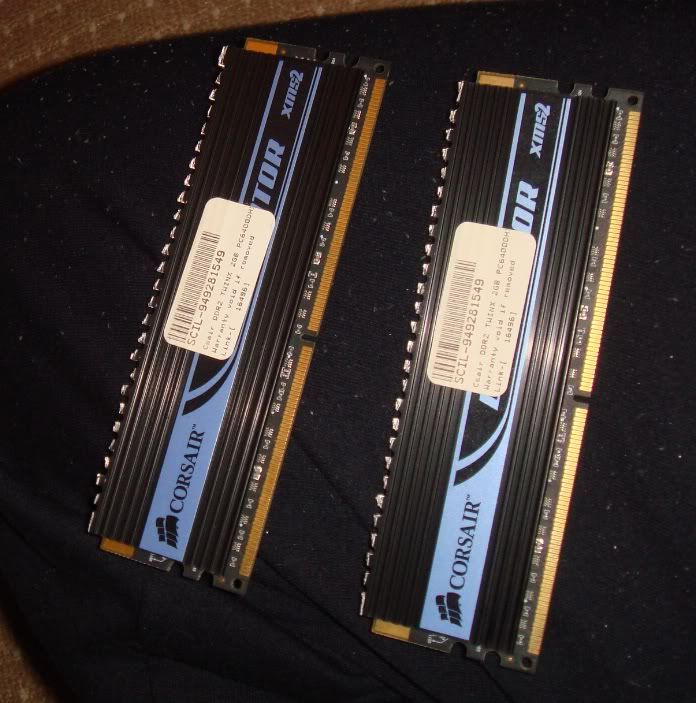
If I
it then so be it, I will get more ram.
This is the most stupid DUMBEST ram ever made. Time for a memtest.
Tests passed. Phew lol.
It's just one of those days, where you don't wanna wake up, everything is
So tonight I went to dry fit the new cooler. Only to find it doesn't clear the
If I
This is the most stupid DUMBEST ram ever made. Time for a memtest.
Tests passed. Phew lol.
alienware
Banned
And now for something completely different. First of all I spoke to Tom this morning and he had on his full Hiawatha gear, saying he hoped it would rain

Tom earlier today...

But as much as he tried he could not make the clouds open (thank god !) so it was time for me to get painting. Now I was going to just get on with it and then do a "tadaaaa" but I figured that would be kind of selfish. So, here is a mini guide on painting. This time plastics.
Now. There are some things you need to know. There are many types of paints, these include but are not limited to -
Enamel. Oily based and sticky, kinda like the gloss paint of the spray world. Very tough finish though.
Acrylic. Water based, breathe on it and you will scratch it. However, it is kind to our enviroment and does have its uses.
2 Pack. There are a few names for this stuff, but it's basically similar to epoxy. It's called two pack because it consists of two parts. The first part is your paint and the second part of the pack is the hardener. HOWEVER. The Government are steering people away from this stuff because it's incredibly toxic, is a carciogen (causes cancer in California apparently) and very harmful to the enviroment. It's apparently so toxic that in the USA you have to pay a VOC exempt charge when shipping it @ $80 a go, and they will only ship it in small boxes. Imagine my pissedoffness when I came to paint my Tiburon and found out that it had to be sent in two boxes, meaning I paid the same for the shipping as I paid for the bloody paint

And that's why there is that silly pic of me in Mortal Kooling wearing a mask and goggles. Trust me, when using this stuff you want to unless you want to die very early.
OK. So this time we are using Acrylic. It's what I had lying around and I can also spray with it outside without getting fined by the council. I live in a pretty posh area and people here love to rat on each other. There is one problem with Acrylic though - I am spraying plastic. The reason this is bad is because when sanded the plastic warms up. And when it warms up the molecular structure of it changes. This means expanding and contracting. It also means that if it is ABS plastic when you sand it and it gets warm it releases chemicals. Acrylic is water based, and will react with these chemicals. Watch how oil displaces water in a puddle on the street and you can get a good idea of what happens. Basically the chemicals push the water out of the way resulting in Spiderman paint (wrinkles and creases very similar to spider's web).
The way to get around this is to sand it well in advance and leave it to cure and react. I did mine last night, in water (wet and dry) and let it sit over night. So, this morning I was all ready.
Now as Tom and I jokingly discussed this morning it is not a good idea to paint outside. Firstly it can be cold (a recipe for disaster with spray paint) and secondly it can be damp or wet. However, if it's your only choice there are ways to make the odds tip into your favour slightly.
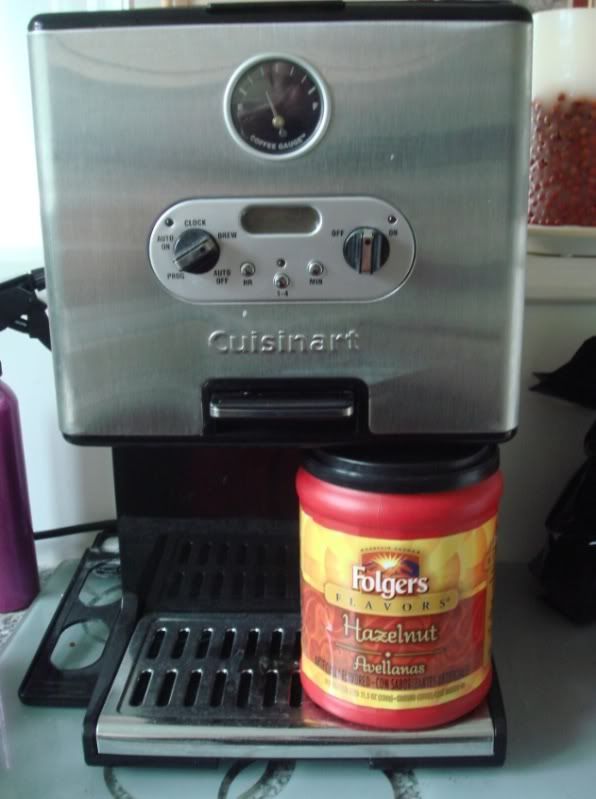
The first thing you need to do when painting, and this is absolutely essential is put on the coffee machine. If you don't do this in my house? well, I'd be about as offended as if you had screwed my missus. Coffee is the fuel of champions and mine is imported from the USA as over here we are all "Tea drinking pussies" as my friends used to so eloquently put it.
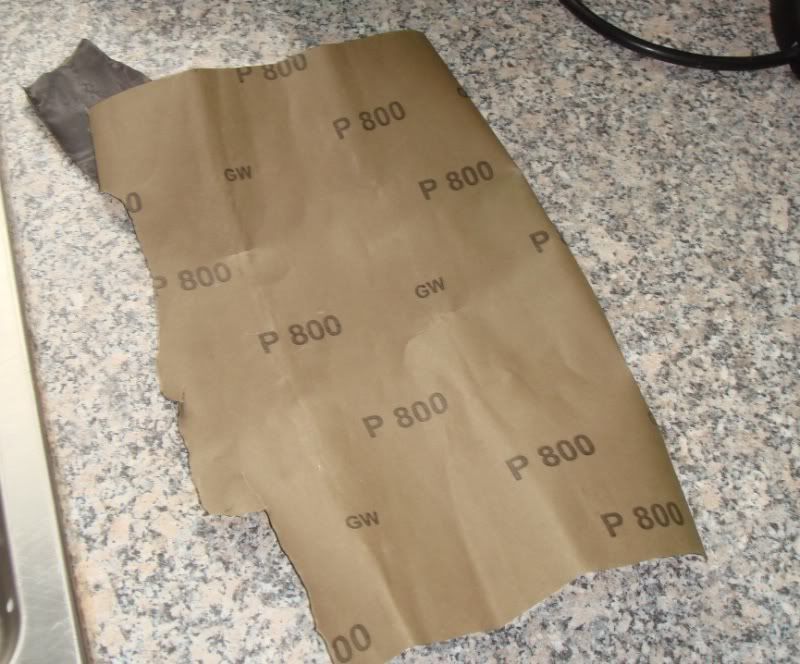
Right. Now after a good whore's breakfast (three coffees and a couple of cigs) we are now ready to start. I always use P800 for plastic as other harsher papers will mark the plastic too bad causing it to 'fuzz' this will then climb through your paint finish wrecking it.
Always sand anything you want to have a nice finish WET. Never EVER EVER sand plastic dry as it will melt from the heat. Sanding wet also allows the swarf to wash away, instead of clumping up and wrecking your plastic.
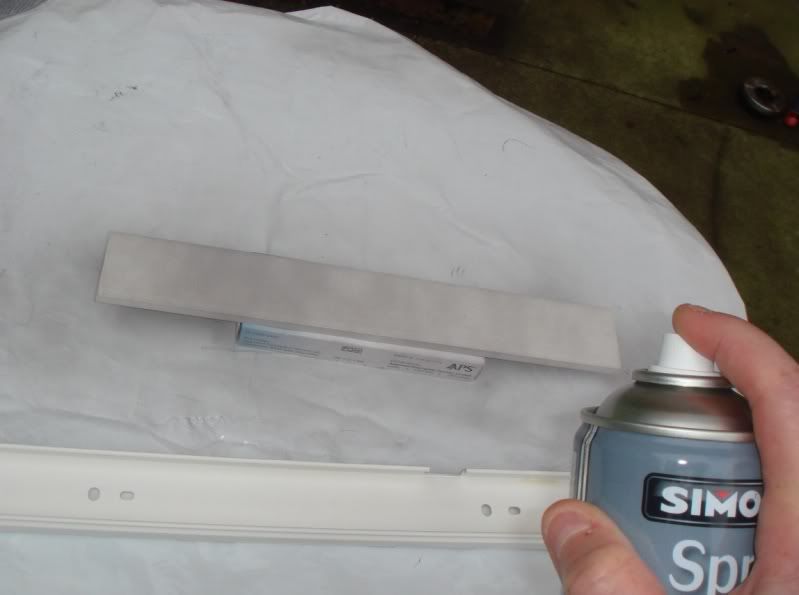
Right. Now, get your primer and shake it hard for about ten minutes. Also, the first trick of spraying outside is this.
Run a sink full of warm water and sit the can in it for about ten minutes. This will warm up the paint meaning it will be at the right temps if it is not a warm day. Spraying cold paint onto a warm surface is another mistake people make. Wrinkles, cracks, patches ETC.
Take your bits outside (oo er matron !) and set them up on something. DO NOT EVER EVER EVER paint with things on a flat surface. They will stick and you will form a skin that will peel as you pick them up.
The first thing to note is spraying distance... This needs to be 8-10 inches or MORE depending on the weather. If the weather is warm and dry spray closer (which is harder to do) because when the paint hits the air it atomises and will dry before it even hits the surface you are painting. This will result in a horrid powdery paint finish.
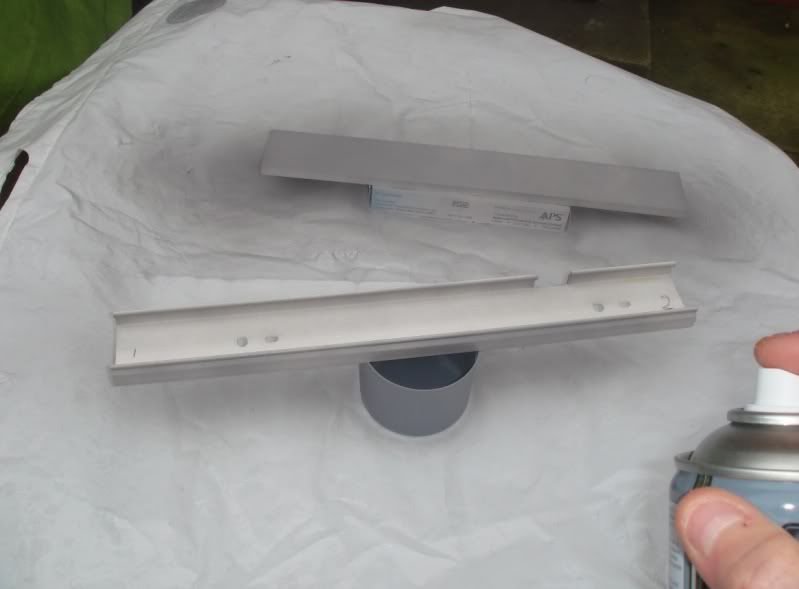
Here I am spraying on the 'tack coat' or 'flash coat' depending on which part of the world you reside.
What is a tack coat?
Put simply a tack coat is a semi rough surface of paint. If you spray on too much at the beginning it will pool and run as it hasn't locked with the surface yet. So, you spray from pretty far back letting it sit in cloud shaped patterns. Then STOP. Don't get carried away hammering on the paint now. Leave it to 'flash' or 'tack' for fifteen minutes before touching it again. What happens is this. The paint will begin to go into the pores and keys you created by sanding. It then sticks up like a load of fingers, ready to hold onto the next coat. However, IT WILL NOT do this if you put on too much. You'll form a smooth surface puddle and the paint will peel off later on. TAKE YOUR TIME. The reason this is called a flash coat or tack coat is because in around fifteen minutes it will 'flash' dry and become tacky. This is a good surface for putting more paint onto. Not when it's soaking wet.
Now here goes the first real coat. Note I have moved the can back? that's because it is quite humid today and I don't want runs. Now this is the point where I make it clear that there is no such thing as a cheap half assed paint job. Moving the can in to prevent waste and trying to cover more area with less paint is stupid and will give you a crappy patchwork finish. To do it properly you need to use A LOT of paint and take plenty of time.
Again if it was warmer and dryer today I would be in a bit closer.
Now. Seeing as you are done for now and have a good 45 mins before you'll be using the paint again, do the following.
Tip the can upside down, press the nozzle until all you get is a nice clear hiss. Some paint will still come out, but it won't sound the same as spraying. What this does is clear the nozzle so you can actually use it again. If you don't do this? Well, it's INCREDIBLY likely that when you go to use it again the nozzle will either be completely blocked or WORSE, the nozzle will be partially blocked and will spit and gob paint all over your surface, totally destroying it.

OK, now it's time to carefully make sure the paint has flashed and you're not going to leave marks in it or damage it. Enamels are far easier to mess up because they are horribly sticky and VERY unforgiving if you touch them too early. Acrylic being water based does not stick to your fingers as much, but you'll still wreck it. Any way, bring it inside and it's time for trick number two with spraying outside and or using cans.
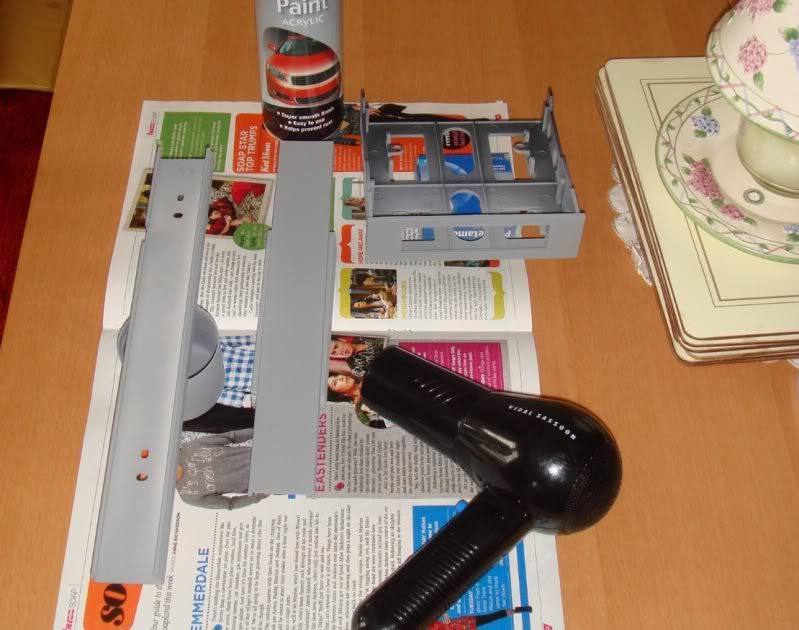
It's time for the Vidal Sassoon treatment. Now. I DO NOT reccomend using this on enamel. Enamel dries by curing, not drying. So blasting it with heat will create dry patches and make the paint softer than before. With Acrylic however we want it to dry, as it is water based.
The first thing I will say is this. USE CAUTION AND BE INCREDIBLY CAREFUL. Hair dryers are bloody hot buggers and this is PLASTIC we are dealing with here. Too much heat and it will warp and become soft. This will crack your paint. However, it will dry the paint ten times faster than a natural curing and also warms the surface of the plastic meaning the paint will bond better than if it was cold

As I say though please do be careful here. I remember once I made a model of a Supra (a very expensive Fast and Furious one with NOS bottles ETC) and became impatient waiting for the paint to dry. I took a shoe box, put the chassis of the model in, cut a hole in one end of the shoe box and put a hair dryer in, putting the lid back on the box. I ran the dryer for two minutes and came back to a puddle of molten plastic. $60 down the toilet. I was gutted.
Once you are done drying the paint (you can use cold air out of it if you wish) gently wipe your fingers over the surface. ONLY DO THIS with Acrylic. What it will do is wipe off the overspray (kinda dusty) saving you from sanding it now. However, you will need to sand it later.
Second coat down then.
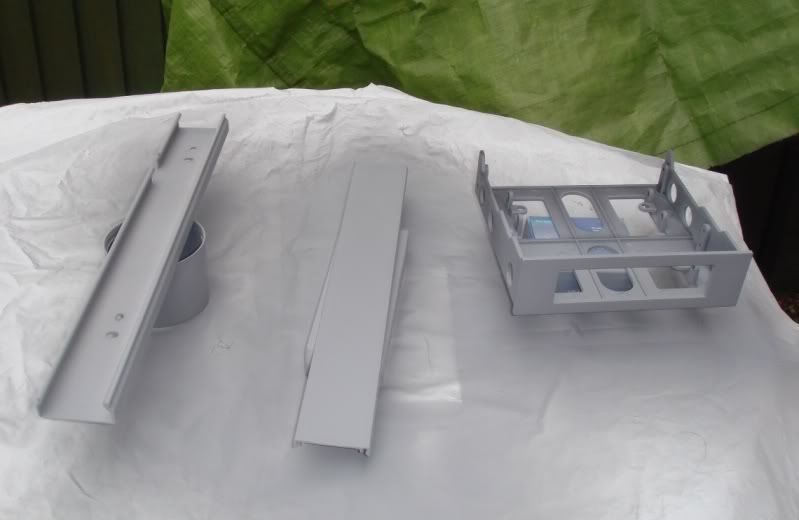
And repeating all of the above steps (this is the third time around) we are now done.
Now it will need to cure properly and then when cured it needs to be wet sanded back to smoothen it out. Once I am done doing that later I will get some more pics, but depending on the air humidity today it may need to go in the airing cupboard overnight to harden enough to be sanded.
Til next time !
Tom earlier today...
But as much as he tried he could not make the clouds open (thank god !) so it was time for me to get painting. Now I was going to just get on with it and then do a "tadaaaa" but I figured that would be kind of selfish. So, here is a mini guide on painting. This time plastics.
Now. There are some things you need to know. There are many types of paints, these include but are not limited to -
Enamel. Oily based and sticky, kinda like the gloss paint of the spray world. Very tough finish though.
Acrylic. Water based, breathe on it and you will scratch it. However, it is kind to our enviroment and does have its uses.
2 Pack. There are a few names for this stuff, but it's basically similar to epoxy. It's called two pack because it consists of two parts. The first part is your paint and the second part of the pack is the hardener. HOWEVER. The Government are steering people away from this stuff because it's incredibly toxic, is a carciogen (causes cancer in California apparently) and very harmful to the enviroment. It's apparently so toxic that in the USA you have to pay a VOC exempt charge when shipping it @ $80 a go, and they will only ship it in small boxes. Imagine my pissedoffness when I came to paint my Tiburon and found out that it had to be sent in two boxes, meaning I paid the same for the shipping as I paid for the bloody paint
And that's why there is that silly pic of me in Mortal Kooling wearing a mask and goggles. Trust me, when using this stuff you want to unless you want to die very early.
OK. So this time we are using Acrylic. It's what I had lying around and I can also spray with it outside without getting fined by the council. I live in a pretty posh area and people here love to rat on each other. There is one problem with Acrylic though - I am spraying plastic. The reason this is bad is because when sanded the plastic warms up. And when it warms up the molecular structure of it changes. This means expanding and contracting. It also means that if it is ABS plastic when you sand it and it gets warm it releases chemicals. Acrylic is water based, and will react with these chemicals. Watch how oil displaces water in a puddle on the street and you can get a good idea of what happens. Basically the chemicals push the water out of the way resulting in Spiderman paint (wrinkles and creases very similar to spider's web).
The way to get around this is to sand it well in advance and leave it to cure and react. I did mine last night, in water (wet and dry) and let it sit over night. So, this morning I was all ready.
Now as Tom and I jokingly discussed this morning it is not a good idea to paint outside. Firstly it can be cold (a recipe for disaster with spray paint) and secondly it can be damp or wet. However, if it's your only choice there are ways to make the odds tip into your favour slightly.
The first thing you need to do when painting, and this is absolutely essential is put on the coffee machine. If you don't do this in my house? well, I'd be about as offended as if you had screwed my missus. Coffee is the fuel of champions and mine is imported from the USA as over here we are all "Tea drinking pussies" as my friends used to so eloquently put it.
Right. Now after a good whore's breakfast (three coffees and a couple of cigs) we are now ready to start. I always use P800 for plastic as other harsher papers will mark the plastic too bad causing it to 'fuzz' this will then climb through your paint finish wrecking it.
Always sand anything you want to have a nice finish WET. Never EVER EVER sand plastic dry as it will melt from the heat. Sanding wet also allows the swarf to wash away, instead of clumping up and wrecking your plastic.
Right. Now, get your primer and shake it hard for about ten minutes. Also, the first trick of spraying outside is this.
Run a sink full of warm water and sit the can in it for about ten minutes. This will warm up the paint meaning it will be at the right temps if it is not a warm day. Spraying cold paint onto a warm surface is another mistake people make. Wrinkles, cracks, patches ETC.
Take your bits outside (oo er matron !) and set them up on something. DO NOT EVER EVER EVER paint with things on a flat surface. They will stick and you will form a skin that will peel as you pick them up.
The first thing to note is spraying distance... This needs to be 8-10 inches or MORE depending on the weather. If the weather is warm and dry spray closer (which is harder to do) because when the paint hits the air it atomises and will dry before it even hits the surface you are painting. This will result in a horrid powdery paint finish.
Here I am spraying on the 'tack coat' or 'flash coat' depending on which part of the world you reside.
What is a tack coat?
Put simply a tack coat is a semi rough surface of paint. If you spray on too much at the beginning it will pool and run as it hasn't locked with the surface yet. So, you spray from pretty far back letting it sit in cloud shaped patterns. Then STOP. Don't get carried away hammering on the paint now. Leave it to 'flash' or 'tack' for fifteen minutes before touching it again. What happens is this. The paint will begin to go into the pores and keys you created by sanding. It then sticks up like a load of fingers, ready to hold onto the next coat. However, IT WILL NOT do this if you put on too much. You'll form a smooth surface puddle and the paint will peel off later on. TAKE YOUR TIME. The reason this is called a flash coat or tack coat is because in around fifteen minutes it will 'flash' dry and become tacky. This is a good surface for putting more paint onto. Not when it's soaking wet.
Now here goes the first real coat. Note I have moved the can back? that's because it is quite humid today and I don't want runs. Now this is the point where I make it clear that there is no such thing as a cheap half assed paint job. Moving the can in to prevent waste and trying to cover more area with less paint is stupid and will give you a crappy patchwork finish. To do it properly you need to use A LOT of paint and take plenty of time.
Again if it was warmer and dryer today I would be in a bit closer.
Now. Seeing as you are done for now and have a good 45 mins before you'll be using the paint again, do the following.
Tip the can upside down, press the nozzle until all you get is a nice clear hiss. Some paint will still come out, but it won't sound the same as spraying. What this does is clear the nozzle so you can actually use it again. If you don't do this? Well, it's INCREDIBLY likely that when you go to use it again the nozzle will either be completely blocked or WORSE, the nozzle will be partially blocked and will spit and gob paint all over your surface, totally destroying it.
OK, now it's time to carefully make sure the paint has flashed and you're not going to leave marks in it or damage it. Enamels are far easier to mess up because they are horribly sticky and VERY unforgiving if you touch them too early. Acrylic being water based does not stick to your fingers as much, but you'll still wreck it. Any way, bring it inside and it's time for trick number two with spraying outside and or using cans.
It's time for the Vidal Sassoon treatment. Now. I DO NOT reccomend using this on enamel. Enamel dries by curing, not drying. So blasting it with heat will create dry patches and make the paint softer than before. With Acrylic however we want it to dry, as it is water based.
The first thing I will say is this. USE CAUTION AND BE INCREDIBLY CAREFUL. Hair dryers are bloody hot buggers and this is PLASTIC we are dealing with here. Too much heat and it will warp and become soft. This will crack your paint. However, it will dry the paint ten times faster than a natural curing and also warms the surface of the plastic meaning the paint will bond better than if it was cold
As I say though please do be careful here. I remember once I made a model of a Supra (a very expensive Fast and Furious one with NOS bottles ETC) and became impatient waiting for the paint to dry. I took a shoe box, put the chassis of the model in, cut a hole in one end of the shoe box and put a hair dryer in, putting the lid back on the box. I ran the dryer for two minutes and came back to a puddle of molten plastic. $60 down the toilet. I was gutted.
Once you are done drying the paint (you can use cold air out of it if you wish) gently wipe your fingers over the surface. ONLY DO THIS with Acrylic. What it will do is wipe off the overspray (kinda dusty) saving you from sanding it now. However, you will need to sand it later.
Second coat down then.
And repeating all of the above steps (this is the third time around) we are now done.
Now it will need to cure properly and then when cured it needs to be wet sanded back to smoothen it out. Once I am done doing that later I will get some more pics, but depending on the air humidity today it may need to go in the airing cupboard overnight to harden enough to be sanded.
Til next time !

alienware
Banned
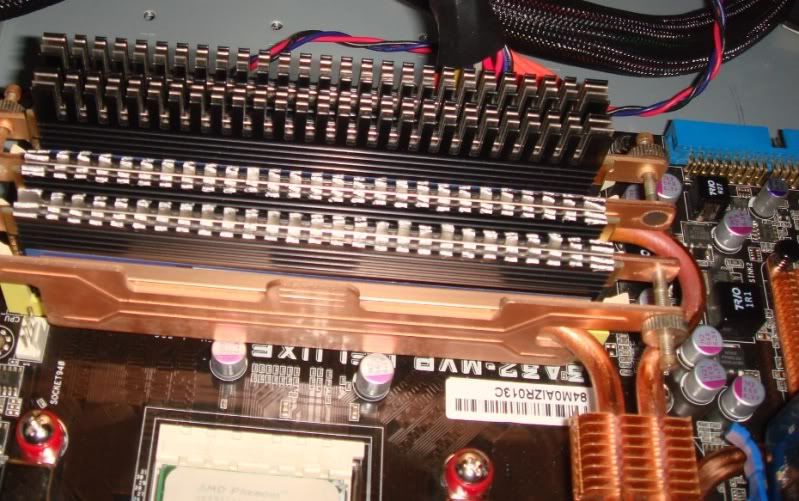
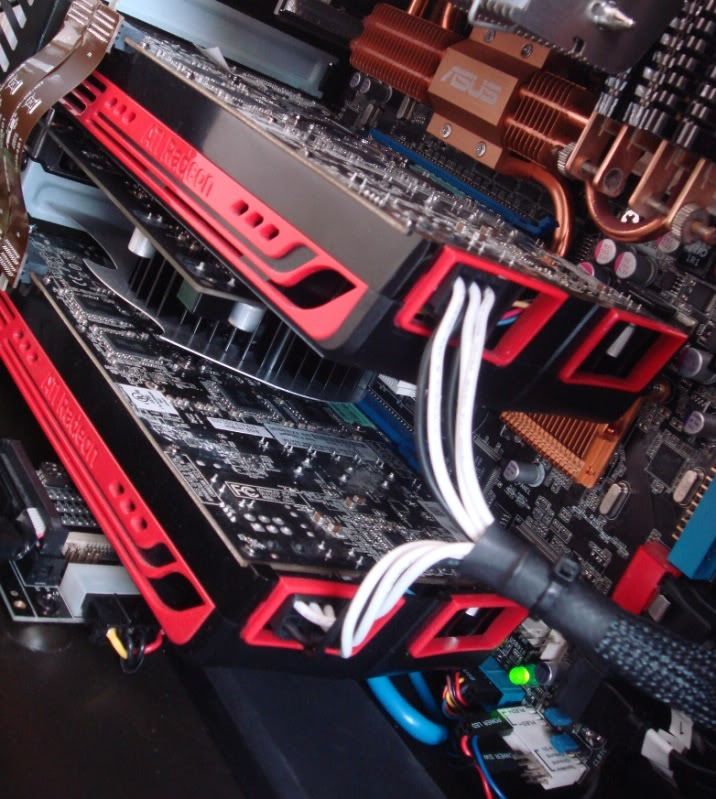
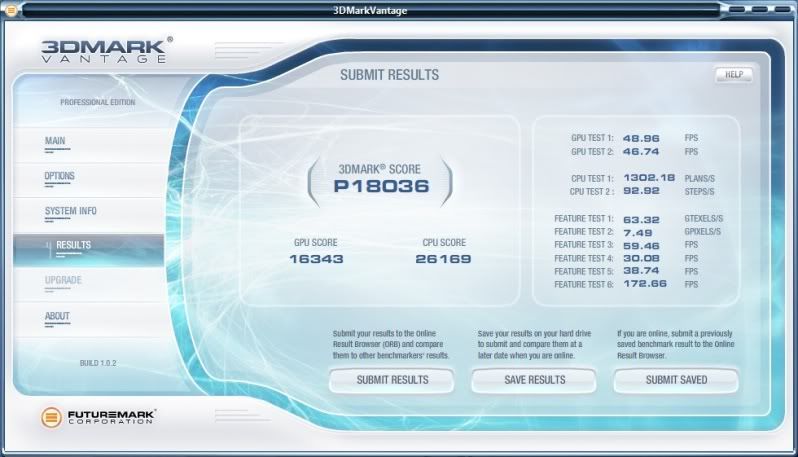
Yeah it's very quiet. Not too happy with the idle temps at stock speed (45-47c) but that can be excused seeing as this motherboard utterly rips through benchmarks. Not by a little bit, but by 2000 3D marks and nearly 4k overall above the Asrock.
I suppose with quietness comes a trade off, but I don't plan on overclocking it any time soon. It's just amazing how much faster it is with nothing more than a mobo change. Funny part is the PCIE lanes have dropped off to 8x. (more research needed on that).
When I ran Fallout 3 HD on the 280 with the same Phenom it stuttered every now and then. When I ran Fallout 3 HD on the Asrock it stuttered a little too much for my liking (so I reverted it) however on here? you get one stutter when quick travelling as the textures load up and then nothing, smooth as butter.
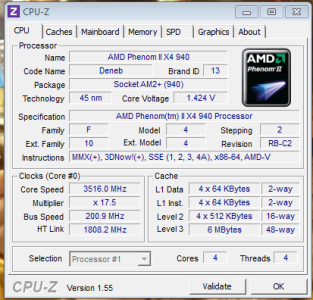
I did scare the absolutely bejesus out of myself the first night it was done. I set the ram timings to 4-4-4-12 in bios and it crashed. Cold boot, crashed at Asus logo screen with artifacts. Out of my mind with worry I reset the CMOS and left it alone.. Then when I got to CPUID it said -
5-5-5-15 @ 1.8v or 4-4-4-12 @ 2.1v. And then I realised that I hadn't changed the voltage hence the crashing. Took me about twenty minutes to find the setting though ! this mobo is seriously hard core.
I suppose with quietness comes a trade off, but I don't plan on overclocking it any time soon. It's just amazing how much faster it is with nothing more than a mobo change. Funny part is the PCIE lanes have dropped off to 8x. (more research needed on that).
When I ran Fallout 3 HD on the 280 with the same Phenom it stuttered every now and then. When I ran Fallout 3 HD on the Asrock it stuttered a little too much for my liking (so I reverted it) however on here? you get one stutter when quick travelling as the textures load up and then nothing, smooth as butter.
I did scare the absolutely bejesus out of myself the first night it was done. I set the ram timings to 4-4-4-12 in bios and it crashed. Cold boot, crashed at Asus logo screen with artifacts. Out of my mind with worry I reset the CMOS and left it alone.. Then when I got to CPUID it said -
5-5-5-15 @ 1.8v or 4-4-4-12 @ 2.1v. And then I realised that I hadn't changed the voltage hence the crashing. Took me about twenty minutes to find the setting though ! this mobo is seriously hard core.

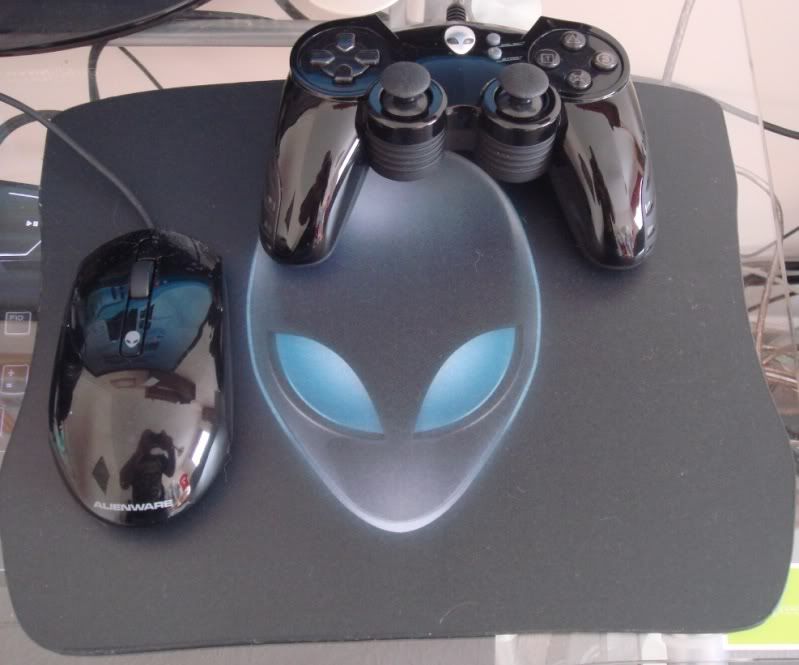
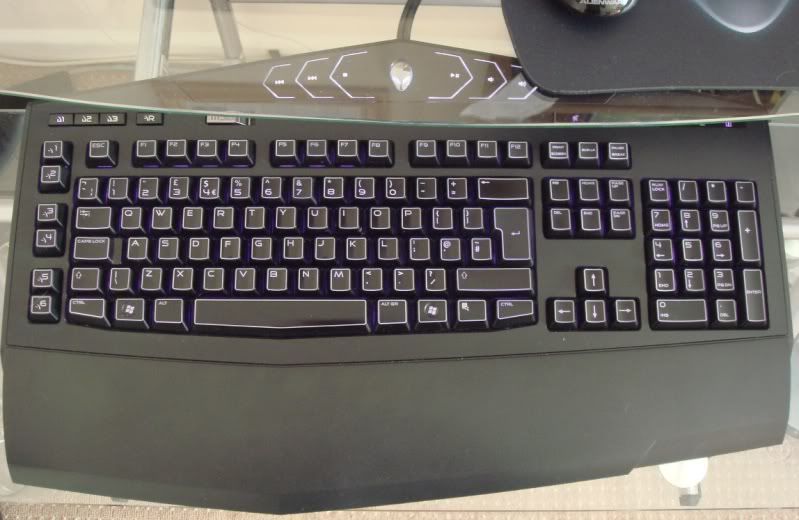
Andy it looks totally minted!! You've done an outstanding job! The cable tidy holes you've done are the shiznit. I'm going to ask my cousin to cut one or two circle holes with a tool he has from his work, i'm hoping to just sand them down instead of putting in a rubber grip. BTW I wouldn't worry about your crossfire PCI-express lanes running @ X8 now, there is a 1fps drop with the 5800 series in x8 compared to x16. There is a 30% drop with an nVidia card @ x8!! One of the main reasons i'm buying a x48 chipset board to run my new Q9450 with 8800GTS as pysX. Like the Alienware keyboard, was going to get one but I needed the FPS area of the merc stealth keyboard but I do have the 5000dpi new Alienware mouse.
alienware
Banned
Sherv. The keyboard is a bit of a PITA if I'm honest about it. It's brilliant for gaming but when you come to type on it it's quite irritating.
Firstly the keys are quite hard to push and pretty firm which is awesome when you are playing games as you don't want them too soft. However this hurts actual typing as you need to go at it hammer and tongs. They are also quite small. And whilst again, very good for gaming this is a ROYAL PITA when typing. I can not tell you how hard it is to touch type fast on it.
It's clear to see it was designed purely with gaming in mind (being a Logitech underneath) but actual typing was a total afterthought. I even have to look down a lot when typing to reposition my fingers even after twenty years of typing. Which kinda sucks.
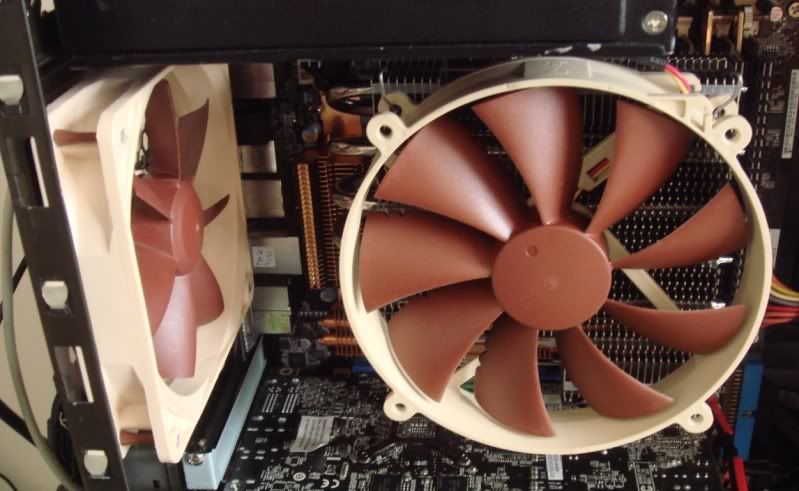
45 to 47c on an AMD you sure its mounted right dude? Ive overclocked to 4.5ghz on a much worse cooler than that Noctua. Take the heatsink of and take a picture of the paste thats on the cpu and heatsink (old stuff thats on there now)
alienware
Banned
Yeah it's mounted fine. TBH the temps are pretty much bang on what they were with the twin fanned 92mm Noctua on there. Infact quick check reveals I am running @ 47c as usual. I am running the fan from the mobo though which I hear isn't the best idea.. I shall see now if I can find a molex-3pin and get it on 12v. I always run my fans from the mobo (CPU) so I guess that could be why I always have lousy temps. Any idea what voltage the mobo gives it?
well i have always wonderd this fella,i no the the power fan connector is 12v but the fan haeders on mine run of the PSU so if the PSU gets hot the case fans spin faster even tho in the BIOS they are set to DC or high performance.
this is why i have a fan controller and man can you tell the difference in noise (yes even 6 noctuas make a hum)and airflow.
but i brough this up last time and i think tom said it could not be that,but it deffo was.
and you only have 1 power fan connector on the mobo anyways,invest in a fan controller fella
alienware
Banned
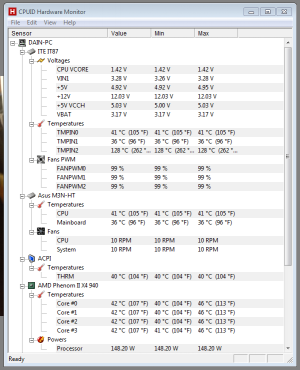
Temps are down, but stocks are up.
What the fudging fudge?

Voltage is bang on the money but OMFG look at how many watts it's eating

It didn't even eat that many on overclock on the Asrock.
Maybe it's showing less voltage than it's actually getting or something, but that can't be right. It's a 125w TDP FFS.
What the fudging fudge?
Voltage is bang on the money but OMFG look at how many watts it's eating
It didn't even eat that many on overclock on the Asrock.
Maybe it's showing less voltage than it's actually getting or something, but that can't be right. It's a 125w TDP FFS.
alienware
Banned
It was on auto dude ! It's 125w TDP - I know that for a million percent fact as that's what I got @ stock clock on the Asrock. However, wanna see something odd?
Just for a laugh I lowered the voltage to 1.32 as I'd had this chip running that @ 3.4ghz on the Asrock. Then I slapped on this

Wattage used? 137. Less than I needed for 3.4ghz on the Asrock.
Bear in mind when new this board cost £270, the power stages are MASSIVE and the heatsinks equally. However, how I am even in Windows on that voltage and watt usage is a mystery. Look at the bloody temps too ! 5c off before !
I will try vantage first but if this holds I will be absolutely stunned. Normally by now on 3.6 I would be bsodding and rebooting ETC. At times I wouldn't even make it to Windows, let alone post on a forum. I have a feeling this board overvolts because it expects a monstrous OC.
Edit. Just went down to put my cake on a cooling rack and get a smoke.. 40c idle after 30 mins. Time for Vantage !
Just for a laugh I lowered the voltage to 1.32 as I'd had this chip running that @ 3.4ghz on the Asrock. Then I slapped on this
Wattage used? 137. Less than I needed for 3.4ghz on the Asrock.
Bear in mind when new this board cost £270, the power stages are MASSIVE and the heatsinks equally. However, how I am even in Windows on that voltage and watt usage is a mystery. Look at the bloody temps too ! 5c off before !
I will try vantage first but if this holds I will be absolutely stunned. Normally by now on 3.6 I would be bsodding and rebooting ETC. At times I wouldn't even make it to Windows, let alone post on a forum. I have a feeling this board overvolts because it expects a monstrous OC.
Edit. Just went down to put my cake on a cooling rack and get a smoke.. 40c idle after 30 mins. Time for Vantage !
Never leave it on auto as that means the board can play about with volts itself. I try to manually set everything but the silly voltages so I know whats going on when things start to fail when benchmarking.
I was only asking before incase it hadnt been mounted properly as you said something similar with the 90cm Noctua you had.
I was only asking before incase it hadnt been mounted properly as you said something similar with the 90cm Noctua you had.