Project Woodbox

I have one of these!!!

Also Feronix that looks awesome! (The 535 has a brilliant camer and Lumia Camera app must've been helpful)

Brilliant is a bit of an overstatement I think, but considering it's only part of a phone that's not even 100 pounds... yeah, it's quite impressive!

The auto settings are a bit wank, but with the ISO bumped down to 100, shutter speed between 0.4 (well lit areas) and 1 second (darker rooms) and something to lay it on so you don't move at all - the photos are definitely not bad enough to hurt the eyes of those who view this build log.

Also, manual focus aaaalll the way :lol:

----------------

Small update

Got me some front intake strips this afternoon. Not really the mesh look that I wanted to go for, but this is a lot less effort and suits the internals/back of the case better anyway. Should provide good enough airflow for 2 Spectre fans at low RPM :)

BRYyLLe.jpg


Gave them that lovely brushed look (should've cleaned them before taking this picture really):

E3VzTNw.jpg


Another thing I did today was removing the excess steel from the HDD cage. Looks a lot better now, although getting it off was kind of a disaster :p

Be3JO5e.jpg


The case will have an empty 3.5" bay once I'm done with the build as there's only one hard drive, which is always nice to have.

8dwS3At.jpg


Some of the cage came loose when I sawed the excess steel off, but I riveted it back, that should hold quite well. The cage itself has a proper abused look now, maybe because it was. At first I thought it was a shame, and maybe I should paint all the internals black anyway.

Then I realized that old semi-broken hardware fits the theme better than black internals ;)

xWclkih.jpg


Last part of the mods today. Whoever guesses what these dots are for wins...

5nwie8D.jpg


Absolutely nothing :D
 
Tssss, no one even guessed what the dots were for ;)

Guess I'll reveal it then. The super secret dots were marks to make super secret...

holes

DU2Awsg.jpg


In other news I got more injuries, which was probably the mod-gods' (looking at Snef and B-Neg there) way of telling me I'm doing something right?

btWzryg.jpg


Little test fit to see if the holes line up nicely, which luckily they did, although a short oversight was that the holes in the case were slightly smaller than the holes in the 'other item'.
Also, the nuts and bolts that I was going to use were bigger than either, so I had to drill both out in two bigger sizes up. That did cause however, that not all holes lined up perfectly anyway (SOMEHOW), but the 'item' is still able to be put securely into place :)

yiWt9BF.jpg


But what is the item? Well, it's the HDD cage that I'm placing just above the motherboard. Honestly I think this is a very good placement in combination with low profile (/stock) coolers and it makes me wonder why no manufacturer has made a small form-factor case with this lay-out before.

0jNMWHY.jpg


mL4oyqo.jpg


Time to get building then! Apologies for the low-quality photos here, I assembled the computer in my bed room as I didn't feel like doing it on the floor of the garage (with my neck hurting like a bitch anyway). This did however mean that I lost both my perfect lighting conditions AND 'tripod'.

The PSU into place. That was quite annoying to install as it's off-set from both the side and bottom (as per new lay-out) panel, but I managed to get it in eventually (giggity).

KM8Ib56.jpg


Motherboard I/O shield in, I didn't even cut my fingers on it :D

yPe1bXq.jpg


I realize now that it hasn't save the picture of the motherboard into place, so we'll skip that for now.

Fan controller into place! Placing it this far in the corner definitely looks cleanest and keeps it away from the GPU, although does make it a little more difficult to control the knob from the back of the case. Ah well, they'll most likely be running on low most of the time anyway!

JMKYC7l.jpg


GPU in, it looks quite impressive for such an old card. I love it :)

fFTTikA.jpg


Very blurry overview shot. I tried :')

ij7QPcc.jpg


Hard drive into the poor abused HDD cage

lsYlTru.jpg


And lastly all the components in place :)

zYwQ1Kw.jpg


Next up comes the actual exciting part of this build log... I will give you all a look at my wood. Wait... You know what I mean :D
 
Nicely done dude! I have a whole host of old cases knocking around even my old Acrylic Gigabyte case ;) sat doing nothing but gathering dust, look forward to seeing you start on the woodwork.
 
Nicely done dude! I have a whole host of old cases knocking around even my old Acrylic Gigabyte case ;) sat doing nothing but gathering dust, look forward to seeing you start on the woodwork.

Thanks mate :)

Thinking I may start the wood measuring and cutting tomorrow! Quite proud at how compact I've managed to make it. I think at this point it might be smaller than my Phenom!

Maybe you should do a little fun casemod too ;)
 
Thanks mate :)

Thinking I may start the wood measuring and cutting tomorrow! Quite proud at how compact I've managed to make it. I think at this point it might be smaller than my Phenom!

Maybe you should do a little fun casemod too ;)
Been thinking about it, I'm looking at probably a tiny FM1 build for a HTPC/Streamer and use half the Acrylic case to build it into. Just need some spare cash and time to pull it off.
 
Thinking I may start the wood measuring and cutting tomorrow! Quite proud at how compact I've managed to make it. I think at this point it might be smaller than my Phenom!

Really dude?, smaller than you Phenom?... Dang dude. Is the Phenom smaller than the Elite 110?, or is this one even smaller than the 110?...
If not... then I am certianly in for a challenge lol, since if you do this build AND you're more experienced than I am, including already done your Phenom.

How do you find it working in such compact, tiny, cases?... difficult, easy?... frustrating, annoying? :p
Got any tips or so?, in which order you find it easier to work with?, any special components or so I should keep extra in mind or so, as in terms "it may be easy to forget about that thing or often you miss that thing" etc?...

Nice one though, like your logs, very nice writing and pictures. Not as fancy pancy as JR though, but he's him lol and you are you so... not sure where I was going with that lol :lol:

Anyway, looking good so far! :)

Been thinking about it, I'm looking at probably a tiny FM1 build for a HTPC/Streamer and use half the Acrylic case to build it into. Just need some spare cash and time to pull it off.

I'd follow that log!... Few people on here that I do actually follow :p
 
Last edited:
Tssss, no one even guessed what the dots were for ;)
Guess I'll reveal it then. The super secret dots were marks to make super secret...
holes

Hard drive into the poor abused HDD cage

Next up comes the actual exciting part of this build log... I will give you all a look at my wood. Wait... You know what I mean :D

Hahaa! That's some nice holes (standoffs included). You got it really compact there.

Do you have any decoupling for the HDD's? Those old hard drives can be a pain when they are stressed.

Looking forward to have a look at your wood! :D

Cheers
 
Been thinking about it, I'm looking at probably a tiny FM1 build for a HTPC/Streamer and use half the Acrylic case to build it into. Just need some spare cash and time to pull it off.

10/10 Would recommend. Cutting cases in half is an awful lot of fun.

Really dude?, smaller than you Phenom?... Dang dude. Is the Phenom smaller than the Elite 110?, or is this one even smaller than the 110?...
If not... then I am certianly in for a challenge lol, since if you do this build AND you're more experienced than I am, including already done your Phenom.

How do you find it working in such compact, tiny, cases?... difficult, easy?... frustrating, annoying? :p
Got any tips or so?, in which order you find it easier to work with?, any special components or so I should keep extra in mind or so, as in terms "it may be easy to forget about that thing or often you miss that thing" etc?...

Nice one though, like your logs, very nice writing and pictures. Not as fancy pancy as JR though, but he's him lol and you are you so... not sure where I was going with that lol :lol:

Anyway, looking good so far! :)

Nah, the Phenom is quite big for an ITX case and the Elite 110 is definitely smaller than either of my cases. The short cable kit on Silverstone PSUs might come in handy for you.

Compare the rear of the Elite 110 (image) to the rear of this project and you'll see how much smaller it really is:
http://i.ytimg.com/vi/su5s9VsYEdM/maxresdefault.jpg

Cause the PSU in this build is an OEM unit that was top-mounted in a OEM case without cable management (as most are) it has quite short cables, which is great for me, cause it's less hassle.

An mSata SSD and no storage drive would definitely help with cables as it saves Sata power AND data cables, but it'll run expensive. What helped for me in the Phenom was using a fully modular PSU and skipping the Sata power cables, but instead using a Molex cable that I needed for my fans anyway, and then plug in a Molex > 3x Sata Power adaptor on the other connector on the same lead.
These are nicely braided by Bitfenix, come in a shit tonne of colours and don't even cost a tenner. Only downside is that it will increase the cable length a little.


This log is just for the fun of it though. :lol:

Hahaa! That's some nice holes (standoffs included). You got it really compact there.

Do you have any decoupling for the HDD's? Those old hard drives can be a pain when they are stressed.

Looking forward to have a look at your wood! :D

Cheers

Thanks mate, nicest thing anyone has ever said to me :lol:

No, there simply isn't enough room for anything other than standard HDD mounting, but it's alright. As you can tell by the Sata ports the HDD isn't /that/ old and on my old Pentium 4/ 6200/ 80GB rig noise was never really an issue using IDE drives even.

I might stick some rubber padding between the case and HDD cage if it does get too much, but I honestly don't think it will :)
 
Last edited:
Great job so far.

If you are looking to get a perfect brushed aluminium finish, check out this guide. I used it for another non PC related project and it looked awesome.

Keeps the brush marks all uniform and straight.

Bit-tech brushing guide
 
Great job so far.

If you are looking to get a perfect brushed aluminium finish, check out this guide. I used it for another non PC related project and it looked awesome.

Keeps the brush marks all uniform and straight.

Bit-tech brushing guide

Thanks mate!

Can't make brushed aluminium with steel, but I'll give it a read ;)


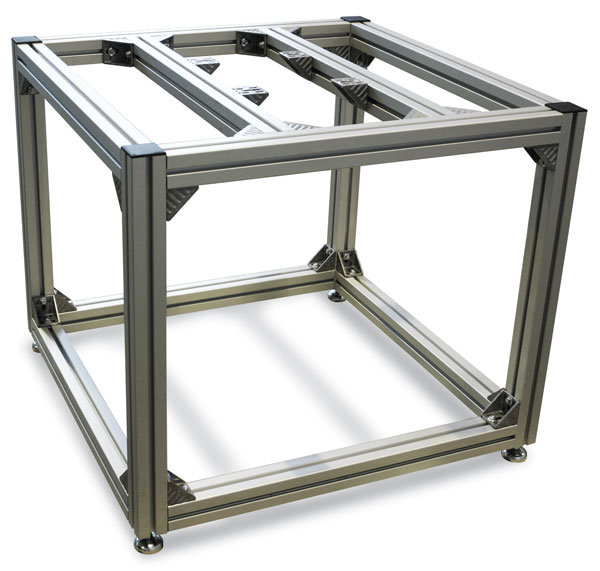
It'd be easier for me as the Acrylic case is basically an extruded alloy frame like this.

with Acrylic sheets screwed to it ;)

Cutting acrylic is definitely a shit job though. I'd still say you should try!
 
Last edited:
One of the last parts has arrived! Cost me €2.50, but that's nearly the last of it.
I've now got all the PSU leads used:

20 Pin ATX connector
4 Pin EPS connector
2 Molex > 6 Pin PCI
1 Molex > Fan controller
1 Molex > Sata power

SvNH1EO.jpg


DxaziuQ.jpg
 
Coming together sweet now Feronix, wood work, wood work, wood work :lol:

Where do you purchase these alloys from?
Just Google Aluminium Profile Extrusion, you'll find loads of companies that do it... Not cheap though and you will need it cutting unless you can handle up to 6 meter lengths. :eek:
 
Wood work is going to have to wait for a bit!

Unfortunately the wood that I spotted in the attic was particle board with mahogany vinyl. Woops :mellow:
So now I have to buy new wood but I'm low on funds so it'll have to wait for a bit!

In the mean time I'll be receiving and wiring up the power switch (yay, soldering and wiring extension). That would mean I do at least have all the parts to make the system run and I can already play around with software/old games/ benchmarks a bit!
 
Last edited:
Got my switch this weekend! :D
Now one question remains... How do I wire it up. I have two wires for the pwr_swtch and two for the pwr_led. Which one goes where?

P2EKxgK.jpg


5aQWn0H.jpg
 
Firstly id remove the single pin connecors from your old pc case that are labelled + and - and then remove the power led you have above. It allows you to separate them since there is that annoying single pin gap on the ASUS board.

ill check how mine is labelled when I get home later and let you know how I have it. Shouldnt be that different. Off the top of my head I have a 6 pin but i use the + and - and then pins 3 and 4.

For you it would probably be like this
C= Common (ground, return path)
NO= Switched contact, Normally Open
NC= Switched contact, Normally Closed
+/- = Power to LED in switch

so for you
Power switch header connects to the NO and C
LED for power connects to + and -

and if you get one for reset, its the same deal
Reset switch header connects to NO and C
HDD led (if you want it) connects to + and -
 
Last edited:
Yep :)

For the power led i removed the single thin + and - connectors from my front panel pins off my 900D case and swapped them with what you have above (power LED)
 
Back
Top