[Project]: Big Bro' Prodigy (BitFenix Prodigy E-ATX mod)

Can't you get some anti vibration mounts? Like the Nexus ones.
http://www.nxstek.com/NXS-doubletwin_hdd_vibration_killer_black_and_white.htm
Pretty sure some other brands also do them, but I'm a big Nexus fanboy ;)

That's fair enough then. What about 2.5" HDDs though? Would probably be easier to put into such a small enclosure. Guess there's nothing wrong with external storage though, especially with that laptop.

And ooooh, I love sneak peeks! Can't wait for the update!

I was thinking about trying anti-vibration mounts but the thing is most of them do take up additional space, something that is very limited in my build ;p haha. I'll see what I can find but anyways I'm considering external HDD's so I can use it with my laptop too which would be very nice.

A 3.5" will fit, the question is how the vibrations are gonna be. But I'm gonna try it! :)

Hey Nikkop

What do you use to bend the metal so well? I am doing a project of my own and Ive been trying to figure out what sort of metal brake I should get to do some rather precise bending!

Cheers
Ninja

+1 to that, noticed the nice metal work a while ago. But now the questions been asked, I'm curious too. Sweet build by the way man, I love the way you are managing to squeeze so much into that case

Thanks a bunch both of you! :)

What metal piece are you refering to? If you mean the motherboard tray, I haven't done that one myself. I got it and here's the link:
http://www.mountainmods.com/mountain-mods-modular-removable-motherboard-tray-p-56.html

I assume you meant the tray as I don't know any other piece being bent :)

/nikkop
 
updatexg.jpg


UPDAAAAAAATE! :D

Cut holes for I/O and assembly - 28/08 -2013

UPDATE 28/08 - 2013

Hiya all!

Here I am with an update that shows that this project is starting to come along! :)
I have recently test-assembled a lot around this build to see what and where everything will fit the best and I think I have found those spots! :)
When that was done I decided to get the parts in place and I also thought that it was time for the motherboard tray to be attached to the case so I can reach all required I/O.
So I thought I'd show you what I've done. Let's go! :)
__________________________________________________________

I started by putting the motherboard tray in spot of where I want it. Since I wanted to have as much place as possible in front of the tray I put the tray as close as possible to the other side where the PSU is.

Since the mesh in the bottom of the case doesn't have any holes it would be pretty hard to connect to all the I/O ports so I decided to make some cut ;)
wbgd.jpg


Whe the motherboard tray was in place I started to mark where I wanted to do the cuts.
4_zps8825750c.jpg


After the markings were done with some masking tape I brought the dremel. I bought a pair of new discs that manages to do the job nicely :)
5_zps6bae14f2.jpg


Aaaand it's done! Took a while to get it done and the tool had to swet a little bit. Here we can see how much I've cut and we see it does look like the shape of regular rear/back case :)
6_zps9cd9cbde.jpg


I turn the case upside down to put the I/O-piece to see if it fits, and it does.
7_zps495f7dc1.jpg


The question is; Does it fit and look good once the components are in pace? Let's find out!
8_zps27e3fadb.jpg


10_zps4dc637c8.jpg


9_zps0ddf0012.jpg


I found this CD in a box at my mom's house (where I don't live any longer). This is a CD with 10 homemade tracks I made when I was about 10 years old. I even sold a couple of copies to teachers at my school very cheap, haha. One of the track's are named "Titanic", I wonder if it has a good "drop", lol! :P
11_zps8d6dff25.jpg


It did look quite good with the motherboard tray and the components in place - I could reach all the ports from uder the case. However, it's not everything that I need to be able to reach. The power supply cord is also going to be at the bottom, of course.
12_zps36e712e2.jpg


Masked I cut the piece off. I only cut a piece larg enough to be able to reach the required things. Cutting more than this would affect the stability of the mesh.
13_zps39943770.jpg


14_zpsa8b564f7.jpg


I also realized I had to make the mesh a bit smaller. The reason is that it buckled due to being slightly wider than the inside of the case. I solved this by cutting a little on each side of the mesh and it now fit's perfect! :)
16_zpsea250547.jpg


17_zpsaae796c3.jpg


18_zps59488cc8.jpg


Motherboard tray with components and the PSU in place! - nothing is mounted with any screws tho, it's only temporary in place.
19_zpsc9cd9110.jpg


20_zpsa06dece2.jpg


I can't be satisfied with just letting it sit there without being mounted so I must mount it somehow with a screw or rivet. I took a pen and started to mark where the holes of the tray was and where to put the screws. I also take the drill to make the holes big enough for a screw.
15_zps7a1752fd.jpg

21_zps93f4badf.jpg


I then screw the mesh and the motherboard tray togheter to see what it looks like. I haven't put all the screws but it does look promising.
Also looks good inside the case :)
24_zps02456c6f.jpg


23_zps8408cbd3.jpg


22_zpsbbe15ff6.jpg


Now the motherboard tray is attached to the mesh but the mesh isn't attached to the csae! I of course have to fix that.
I drill holes in the case and then mount the mesh with the case with a screw, as you can see in the right corner (will be replaced with a rivet later on).
25_zpscd3045d5.jpg

_________________________________________________________________

That was everything about this update! I was satisfied and I think it will be good in the end. I still have grinding and stuff a like to do which I will do when I'm done with all cuts.
With this update I also realized that the project is really beginning to take shape. As I've mentioned before about 80% of the time spent on this project is about planning and test-mounting it all. Since I have now decided where everything will fit I do not have very much left to do! :)
Another thing I realized was that I need to do a couple but small cuts here and there, for example cutting 5mm to be able to fit the radiator and stuff a like. I thought that I will collect all these small fixes in a larger update so they'll be easy to track.
After all the modification is done (so everything is assembled and in place) it will be time for the watercooling and the estethical part of the build.

As mentioned; It's starting to take shape and I look forward to be working with the water cooling soon which I think will be great in this build.
My goal is to be finished before the month of November. Let's see if I can make that deadline! :D

Thank you for reading and following
Best regards
nikkop
 
I can do nothing but I agree with Dale. This looks just beautiful c:

Will you leave the motherboard tray in this colour?
I can tell that you spend so much time planning! There's so much detail and you do small little mods that I would've never thought of. Kudos to you mate :)

PS: The mesh is still sexy ;)
 
Wow, I just realised I never replied to your comments. I swear I did so but It may have been something that happened after I pressed Submit o_O

Sorry for that but here I am!

Looks amazing, good luck when it comes to watercooling :D

Thanks, appreciate it :)

I can do nothing but I agree with Dale. This looks just beautiful c:

Will you leave the motherboard tray in this colour?
I can tell that you spend so much time planning! There's so much detail and you do small little mods that I would've never thought of. Kudos to you mate :)

PS: The mesh is still sexy ;)

Thanks! I may end up painting the tray. It's such a small procedure anyway so I'll see what I feel for in the end, it may happen! ^_^

PS! Check below ;)

beautiful
Silver and Black is a perfect match

Thanks both of you, appreciate it alot.

Some news!!

I won a white Prodigy in a small competition and I wondered what to do with it.
vit1_zps371adc04.jpg


I then realised that the color white is a little sexier that black so I thought that I'd perhaps use the white case instead for "Big Bro' Prodigy"? ;) At least I had to try it out!

Everything is just threwn in at the moment. Of course, there will be some work to do with all the cutting and such but as I know what and where to do it all it shouldn't take too long - the planning of the cuts is what has taken most of the time. As I will do the exact same steps as on the black case I won't take photos and such as those steps can be found in this log.

But yeah, I'm leaning towards using the white one instead. What do you think? Imagine this with mesh (perhaps colored in black?) and white watercooling tubing! ;)
vit2_zpsc7e11a75.jpg


Let me hear what you think! :)

Thanks
Best regards
Nikkop
 
Errhhh idk dude... I think I prefer the black one tbh.

It's your build though, and I definitely think that a white + black + orange colour scheme could be pulled off. Just not sure if this is the right way.

I hope the drives are not going to be on the top like that in the eventual build? ;)
 
whilst i am sure you would make it look damn fine with the white one, i personally really like the industrial look of the bare mesh with the black chassis. and i do think with the orange on the mobo black works better. but as Feronix said, it is ur build. and as it is art, and art is and can't be wrong. you must build what apeals to you. or build em both :)
 
Last edited:
Errhhh idk dude... I think I prefer the black one tbh.

It's your build though, and I definitely think that a white + black + orange colour scheme could be pulled off. Just not sure if this is the right way.

I hope the drives are not going to be on the top like that in the eventual build? ;)

The first time we dissagree! :o Get ready to fight! Just kidding ;)

Imagine this theme, but with the Prodigy instead:
999566_685137548166561_1962010882_n.jpg


I'm totally in love with it and the white color feels so fresh :o
If you have any suggestions on how to pull the color scheme off let me know! ;)

PS! I still like you as much as before even tho you don't like the white one ;) haha.

whilst i am sure you would make it look damn fine with the white one, i personally really like the industrial look of the bare mesh with the black chassis. and i do think with the orange on the mobo black works better. but as Feronix said, it is ur build. and as it is art, and art is and can't be wrong. you must build what apeals to you. or build em both :)

The steel-mesh with black does look awesome indeed - the contrast is extremely good. Even tho the black case would suit my desk better (black monitor, black speekers etc.etc.) the white feels so damn fresh.

Thank you for understanding! Something with the color white caught my eye and I felt forced to use it, haha. So expect the final case to have a white exterior! :)

A side note as I will use this GPU in the build:

I'm now done with a video I've been working on the past weeks.
I'm doing some benchmarking on my GPU (GIGABYTE GTX 780) where I show the tests/games, the results and such stuff.


Let me know what you think! :)

Thanks in advance
Best Regards
Nikkop
 
The first time we dissagree! :o Get ready to fight! Just kidding ;)

Imagine this theme, but with the Prodigy instead:

I'm totally in love with it and the white color feels so fresh :o
If you have any suggestions on how to pull the color scheme off let me know! ;)

PS! I still like you as much as before even tho you don't like the white one ;) haha.


A side note as I will use this GPU in the build:

I'm now done with a video I've been working on the past weeks.
I'm doing some benchmarking on my GPU (GIGABYTE GTX 780) where I show the tests/games, the results and such stuff.

Let me know what you think! :)

Thanks in advance
Best Regards
Nikkop


Get ready... FIGHT!


I like that theme, but the main reason for that is the strong black & white contrast in it. You will also be using a lot of grey mesh which will make the contrast fade. Secondly, you'll have a lot less black in your build, and most black components will be hidden behind your motherboard tray :(

As said before though, do what you think looks good! :D

This changes nothing in our relationship hunney-
ohwait.... awkwaaaaard! :lol:


Nice video btw :)
 
Last edited:
Get read... FIGHT!


I like that theme, but the main reason for that is the strong black & white contrast in it. You will also be using a lot of grey mesh which will make the contrast fade. Secondly, you'll have a lot less black in your build, and most black components will be hidden behind your motherboard tray :(

As said before though, do what you think looks good! :D

This changes nothing in our relationship hunney-
ohwait.... awkwaaaaard! :lol:


Nice video btw :)

Thanks!

*Preparing knuckles* :rolleyes:

What you say is true about the black inside the case being pretty important. However, I'm thinking about how it would be if I painted the mesh black. In that case there would be some black on the inside as well and let's not forget that the pump and GPU are both black :)
It wouldn't be as industrial as before with black mesh but it would blend in better with the colors since the case is now white.
It'll maybe work out, what do you think? :o

I'll probably try it out on a small part first and see how it turns out :)

I'm still trying to figure out which tubing and liquid would be the best for the looks.
Some examples:
  • Transparent tube, orange liquid
  • Orange tube, distilled water (non-colored)
  • White tubes, distilled water (non-colored)
  • White tubes, orange water (so you see the color in the reservoir)

I'm sure there are more combos that would work out. Any suggestions? ^^

Thanks in advance
/nikkop
 
Hiya guys!
Hope you're all good.

Just want to let you know that I'm not dead! ;) I just have a lot of things going on in my life at the moment. Also, since I switched to a white Prodigy I had to do the steps all over again but it's coming together! ;)

I should however be able to post an update this weekend, hopefully.
The project ain't far away from finished! ;)

Thanks
Best Regards
Nikkop
 
Good to hear you're alright! Take all the time you need :)

Btw, just curious, are you the same nikkop as I spotted on the TonyMacX86 forums? Typing this from my new Mavericks machine ;)
 
I remember looking at this right near the start, I'd forgotten about it until just now. Looks great! :D
 
Good to hear you're alright! Take all the time you need :)

Btw, just curious, are you the same nikkop as I spotted on the TonyMacX86 forums? Typing this from my new Mavericks machine ;)

Thanks! However I've terrible at bringing an update as I haven't done so yet, I'm extremely sorry and I'm ashamed, a lot lol.
However, I'm working harder on the project than ever before. I actually have to have the project finished this Wednesday. I will be showing "Big Bro' Prodigy" at worlds largest LAN-party, DreamHack here in Sweden, in GIGABYTE's booth.

That said I'm very far in and soon to be finished with the project. However, I'm sorry you haven't been able to see the procedure since a time back. When I come back from DreamHack I will be doing the updates that are left to do. I will of course show you the procedure like I've been doing so far, just a little later than expected haha.

Yeah I'm registered at Tonyx86. Not active any longer as I have no interest in Hackintoshes any more, however I'm having my project log over there :)

I remember looking at this right near the start, I'd forgotten about it until just now. Looks great! :D

Thanks a bunch! :D
 
Good to hear from you man, was just wondering where you'd gone a few days back. It's alright, you know what they say; Better late than never ;)

Have fun at Dreamhack, though I'm sure you will!
 
cool you went to dreamhack ;o always wanted to go there once ^^

You should! It's very nice in case you like LAN-party's and stuff a like :)

Good to hear from you man, was just wondering where you'd gone a few days back. It's alright, you know what they say; Better late than never ;)

Have fun at Dreamhack, though I'm sure you will!

DreamHack was fun! Definately a must go once if you like LAN-party's. I have however grown up from it and don't enjoy it as much as before, but I was there fore the booth so it's fine!

Are you by the way a moderator now? I need some help with this project log as I can't edit my first post any longer and keep it updated. Tried to get in contact with the staff at the forums multiple times but no answer :/ Would love to get help!

Here's something fun for you! :)


update_zps05bf9981.jpg


UPDATE 14/12 2013 - The case and it's parts are done

UPDATE 14/12 2013 - The case and it's parts are done

Hiya everyone!


Finally I've gotten the time to do an update! As I've mentioned the project is finished. However, this project log isn't yet so I'll update as soon as I have time! :)

I actually showcased this project on DreamHack, worlds largest LAN-party, so those who (mainly swedes) had the chance to see this project live in action! :)

I apologize for the time it has taken for me to do this. A lot of stuff in school and very little time overall have led to me not being able to do these updates.

Today it will be about mounting of the case parts, motherboard tray and mesh. Also about the side panels, the front and stuff alike. Let's go!

Competition!
Would like to inform you that I've entered a competition with this mod. It's a competition that is being held by a modder and friend of mine - Johan Nyman @ MinimalisticPC. This competition is a case mod/scratch build competition so check it out if you are interested in entering :)
______________________________________________________

A notice!
My last update was when I had the black Prodigy. I won a white Prodigy in a competition and I decided to use that instead as I thought it looked better. Therefor I won't document all steps from the start since I've already done so on the black one. I will continue from where I last stopped on the black case.

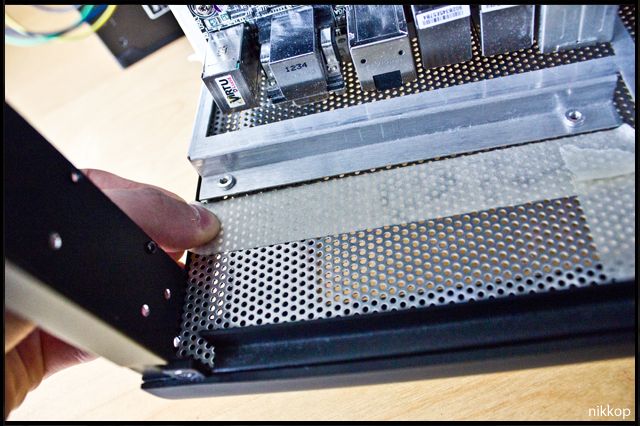
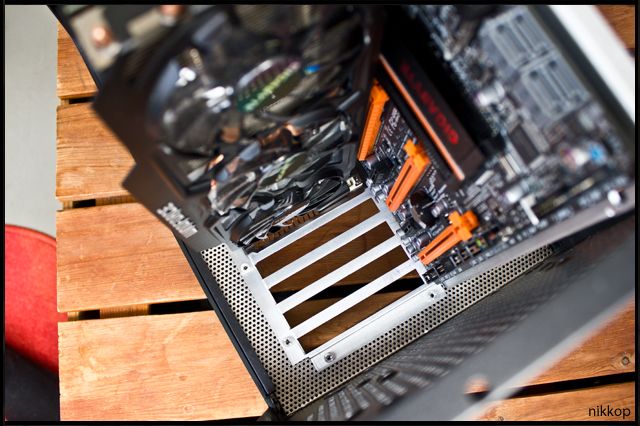
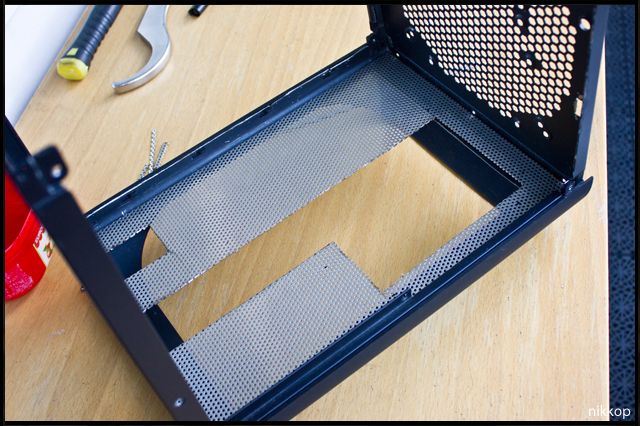
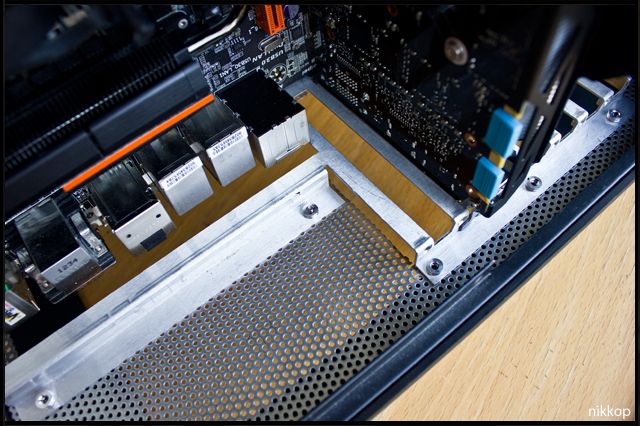
The motherboard tray and the mesh
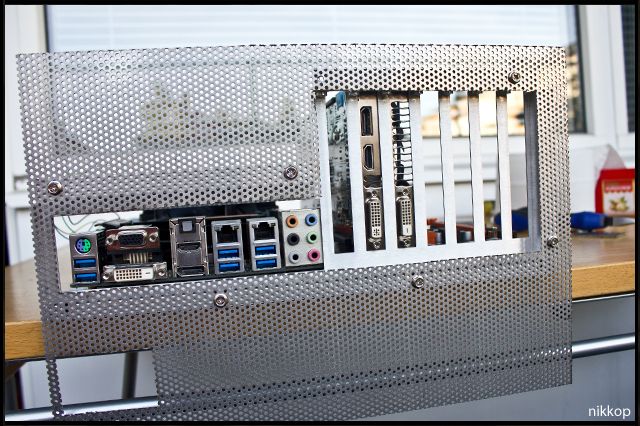
Here's where I ended the last time. I test mount the motherboard tray in the mesh and the mesh in the case. The
holes in the bottom are of course cut out to be able to reach all the ports.
1_zpsac4c892a.jpg

2_zpsc675d0fe.jpg


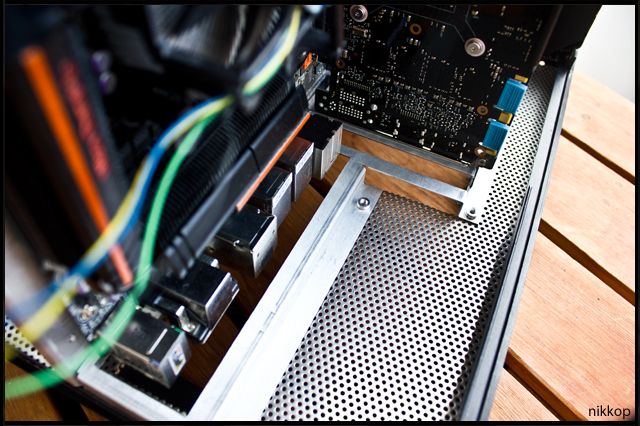
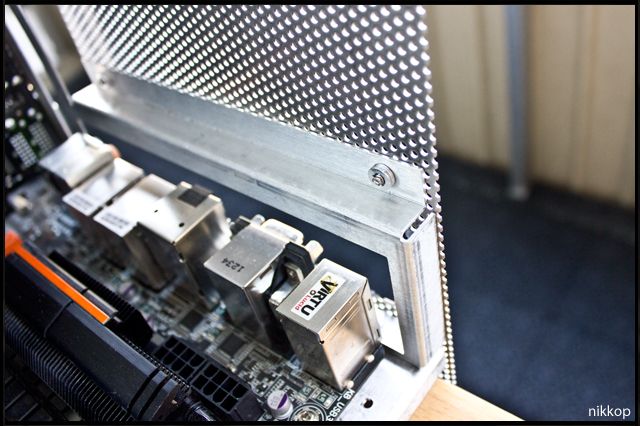
The motherboard tray is mounted with screws. I wanted to get away from this as rivets makes it more strong and sturdier while they take up less space. That's why I had to remove the thread where the screws are set.
1_zps2428f734.jpg


I then shot a rivet to try it out and I liked it. This led to that I mounted the whole motherboard tray with rivets and I also mounted the mesh in the case with rivets for stability. It's now rock solid!
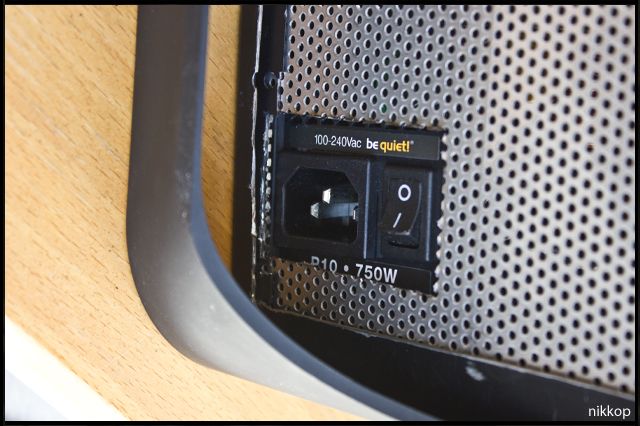
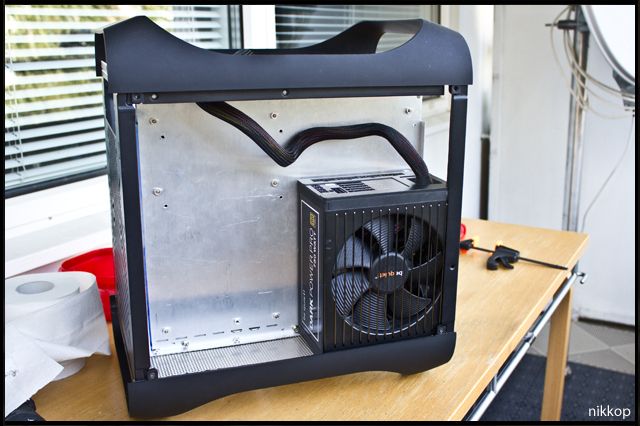
9_zpsd796c889.jpg

12_zpsc8d3f59c.jpg

3_zpsb4c7ef85.jpg


The power supply
The mounting of the PSU was something I was wondering about how to do. I knew where it was going to sit (behind the motherboard tray) but I had no idea how to mount it.
10_zpsd8997e79.jpg


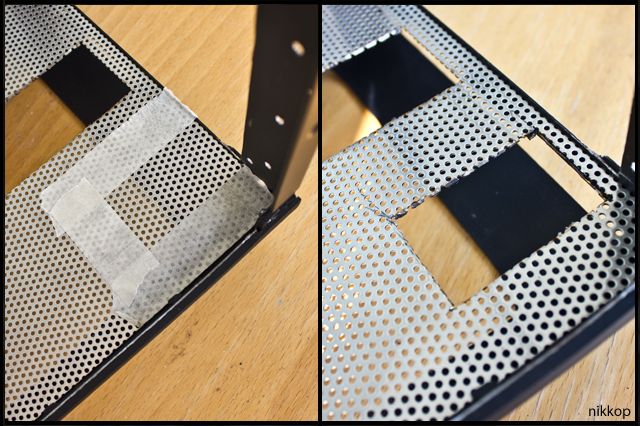
I then remembered that my PSU has this rubber frame you can take off. I used this frame as a template of where the holes for the mounting should be set, a nice solution! :)
6_zps29c66d8f.jpg

7_zps536a0b84.jpg


I then drilled the holes and used screws to mount the PSU. Works perfect!
8_zps8773dd80.jpg


The top and the mesh
I cut the hole in the top as I wanted it to be - a little difference from the black case where the hole was bigger. I realized I didn't need such a big hole so I made it smaller for stability.
2_zps4f57dcf4.jpg

3_zpsbf209676.jpg


The mesh is of course going to be attached to the top. This picture is a old one but it shows how the mesh is going to look while on the top.
16418976.jpg


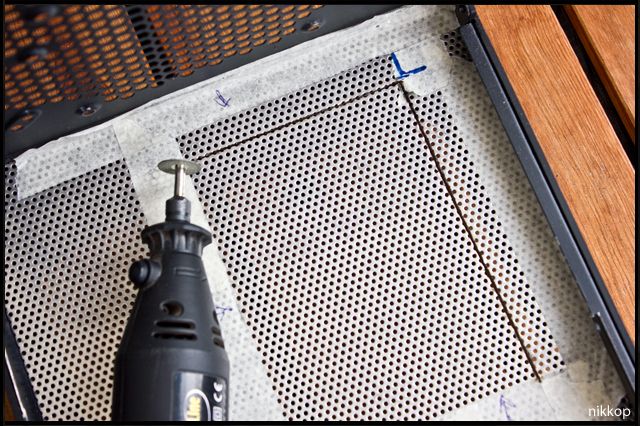
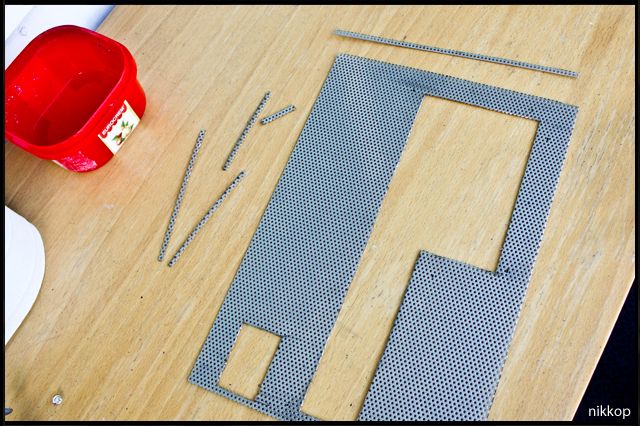
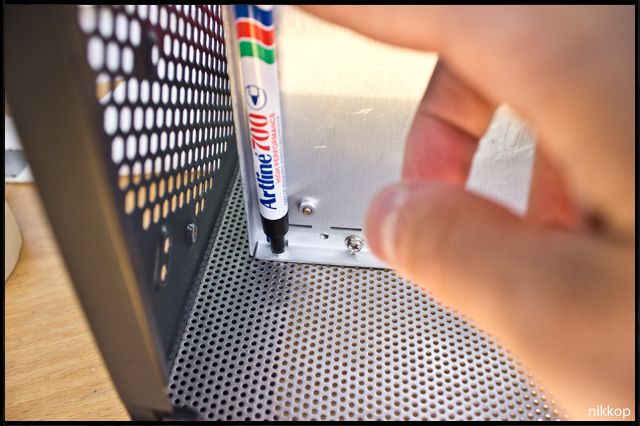
However, I had a revolutionary thought of what I wanted to do with the top as it felt pretty empty. I took the mesh and marked a couple of holes. My dad came by with a tool that would make some big holes easily. I have no idea what the tool is called but it worked perfect.
1_zpse57914cb.jpg

3_zps64d00dab.jpg


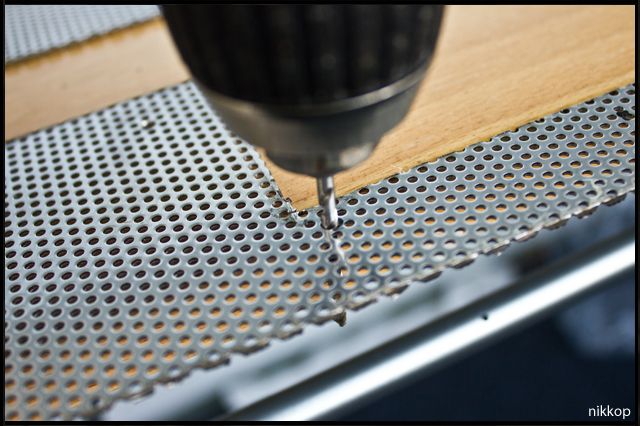
I drilled some small holes so the tool could be used. The tool is then inserted in the hole and being used.
2_zpsdf275bc2.jpg

4_zpsded1911b.jpg


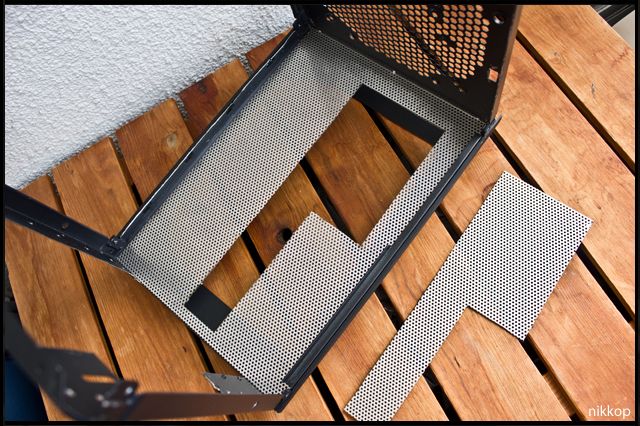
These are the results! The tool did an amazing job with cutting the holes and making them look good. The question is however, what will the holes be used for?! ;) I will show you in the upcoming update! :) I promise, they have a very meaningful usage.
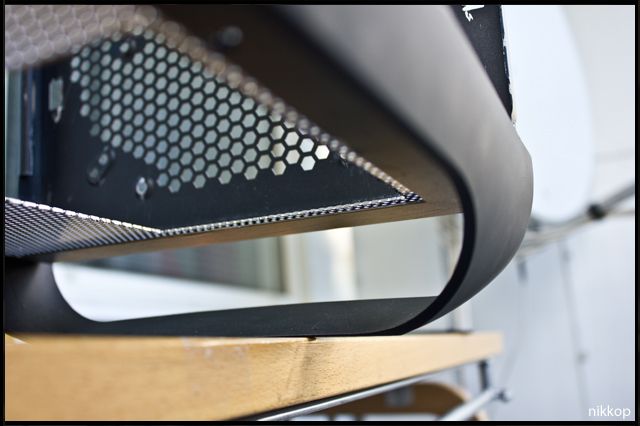
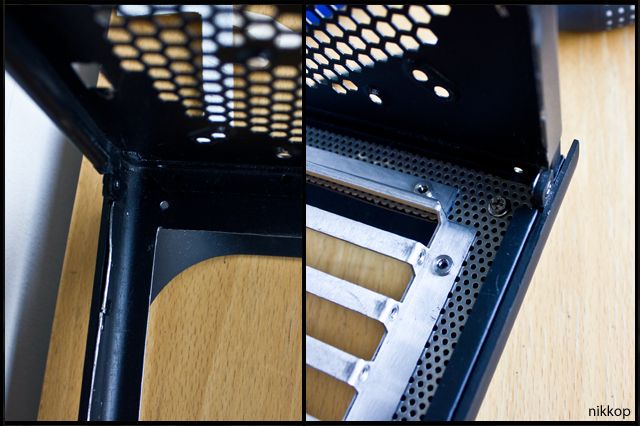
4_zps94e742a9.jpg


The side panels
One of the side panels is made the same way as the black one - a window with a edge.
6_zpsd25e43b3.jpg


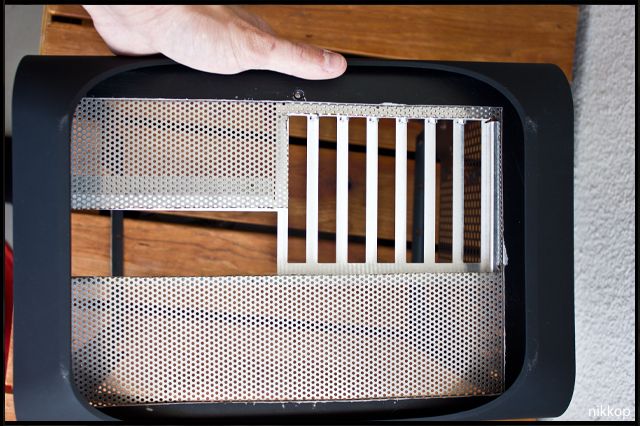
The other side panel is getting modified as well. I put it on my kitchen table and did a hole with my saw. It was pretty hard to line it up as I wanted but I finally managed to.
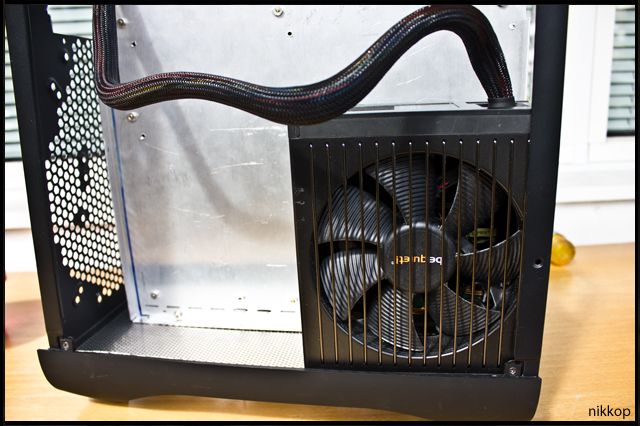
I then mounted a 240 fan grill for the radiator that is being put behind. Sexy!
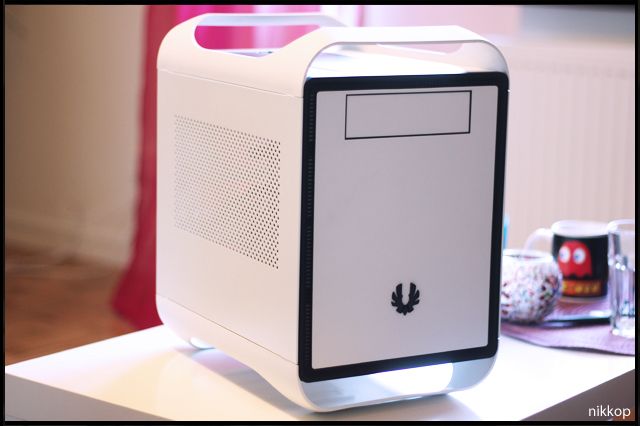
1_zpsfddbf777.jpg

5_zps11ba144b.jpg


The front
The front on the white and black Prodigy are actually quite different. The white Prodigy has a better front for me as I can fit my piece of mesh a lot better while it looks better at the same time. The holes on the left side I had to make for future mounting, you'll see why in the next update.
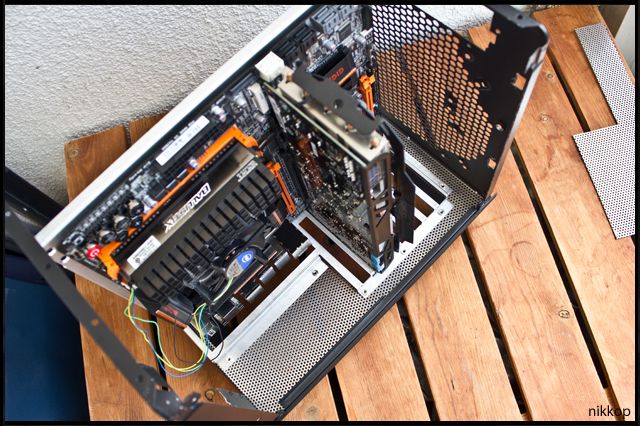
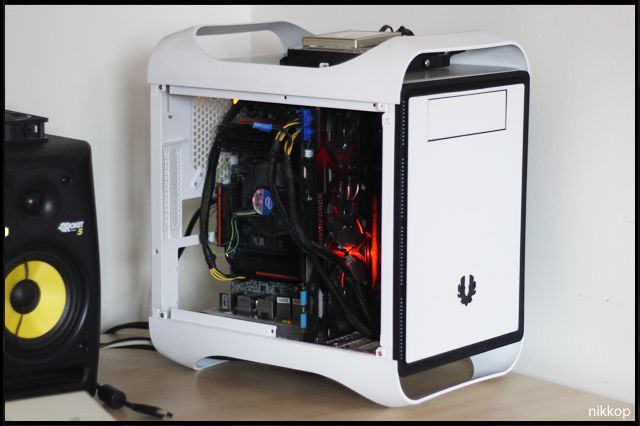
7_zpse3e91a1f.jpg


The empty case
This is what the case looks like while it's empty with only the motherboard tray and the mesh (not the top).
12_zps0d46b969.jpg

11_zps3d87ea3b.jpg

9_zps7b09dfa4.jpg

10_zpse1880074.jpg

______________________________________________________________

To wrap it up:
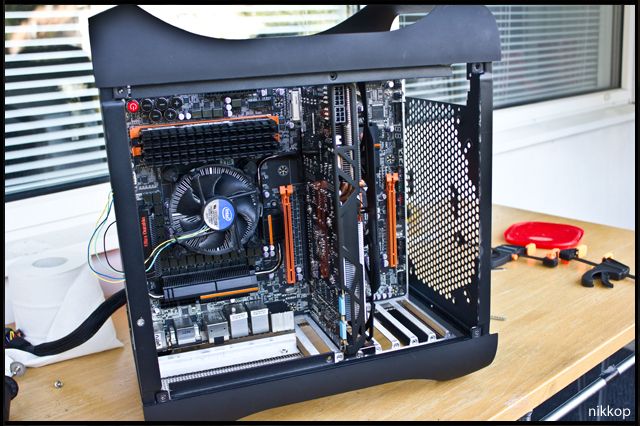
It's very nice to have started on the project log again and to be able to finish it off soon enough and show you the final results! As you can see in this update the case itself and it's parts (sidepanels, front, etc.etc.) are done! What is left to do is all the mounting of the components as the motherboard (Z77X-UP7) and graphics card (GTX 780) from GIGABYTE, as well as the water cooling loop from Aquatuning.

The next update will be done soon. I promise you you won't have to wait for months! :P
Let me know what you think! :)

Thanks for following this project log!
Best Regards
Nikkop
Nikkop
 
Seeing this in the recent threads section just literally put a grin on my face!

You've been busy I see, I like the window mod and the rad grill isn't bad either. Decided to go with the white case after all, eh? ;)

And yeah, I am. Honestly though, the OP doesn't really need to be edited with with every update and I think there's a limit on images anyway so you won't be able to fit everything in.
 
Back
Top