UPDATE 24/01 2014 - Installation of the Water cooling from AquaTuning.
oh nice cant wait for the update

Big holes in the mesh... but what are they for?..... tease! Looking forward to the next update.
Here's the update guys!
UPDATE 24/01 2014 - Installation of the Water cooling from AquaTuning.
Hiya all!
Finally I've had time to make another update! I'm sorry for the time taken since last time. I've had the toughest time in my studies so far so my spare time do work on this project has been minimal, if not non-existing. Anyways, I'm now back on track and I will finish this project log before January 31st!
Let's get down to business!
Below will be a update containing pictures of the products I'm being supplied with by
AquaTuning and how I then install them all. There's however one thing with the pictures. Since I was super stressed before the exhibition I attended to I didn't have time to take any photos back then. That said, I had to take all these pictures in reverse, when I was taking the parts off. Therefore it might look a little weird out of a chronological order but I guess you understand
") The first part will be about which water cooling components I will use and the second part how I install them all
The first part will be about which water cooling components I will use and the second part how I install them all
I want to thank
AquaTuning a lot once again for the products provided. Without you this project and the outcome wouldn't be possible.
____________________________________________________________
The second package I receive from
AquaTuning with a lot of good stuff!
Clear/transparent
tubing from Masterkleer with a diameter of 16/10! Nice, thick edges that will look amazing with the coolant.
Masterkleer Slang PVC 16/10mm (3/8"ID) Klar 3,3m (10ft) "Retail Package"
Fittings, to attach the tubing to the different parts, with the diameter of 16/10 in different shapes.
8x
16/10mm compression fitting 90° revolvable G1/4 - knurled - matte black
3x
16/10mm compression fitting 45° revolvable G1/4 - knurled - matte black
2x
16/10mm compression fitting G1/4 - knurled - matte black
To be able to connect some things I had to get my hands on a pair of
special fittings, with the same connector in both ends.
2x
Alphacool HF L-connector 90° - G1/4 revolvable - 2x outer threads - Deep Black
This on as well to be able to connect to different parts.
Alphacool double nipple G1/4 outer thread to G1/4'' outer thread with O-ring - deep black
Fillports that's going to be used for something very special. Interesting!
6x
Fillport black nickel - knurled - Universal
______________________________________________________________
Enough about fittings! Here's some more fun stuff.
High-performance
CPU-block to cool the CPU. Package with the block, installation parts, thermal paste and instructions/manual.
Alphacool NexXxoS XP³ Light - Black Chrome - Edition
Reservoir/tank for the loop. I ordered a extra tube since of 15cm the one of 25cm was a little too long I realised.
Alphacool HF 38 Cape Cyclen 250 +
Alphacool Plexi Tube 60x150mm
Thin and great performing
radiators. Only 30mm thick which will be perfect for this compact build.
2x
Alphacool NexXxoS ST30 Full Copper 240mm
Powerful and surprisingly quiet
pump.. The size and orientation will be perfect for this build.
Laing DDC-pump 12V DDC-1T
"Top" for the pump that enables installation of fittings. It also improves the flow and sound-level, a nice extra thing
Alphacool Laing DDC Acetal top
Coolant of high quality. Looks like milk and I love it!
Mayhems Pastel - Ice White 1000ml
Mounting for a 240 radiator. I'll need it for one of the radiators and it will fit perfectly.
Phobya radiatorstöd - svart - Dual - 2x120mm
___________________________________________
Those were the products that I will use, supplied by AquaTuning.
Shall we take a look of how I installed it all?
The
cPU-block in place.
Very clean and stylish and it fits great with the looks since the copper-sticker blends well with the orange color of the motherboard
Alphacool NexXxoS XP³ Light - Black Chrome
The pump,
Laing DDC with
Alphacool's top installted with fittings, a
double-sided G1/4 in the top and a
90c fitting as output.
Also attached on a self-adhesive
vibration-absorbing mat.
Laing DDC-pump 12V DDC-1T
This is the reason I needed that
special fitting in the top of the pump!
I built a
pump/res-combo myself where the pump will suck water from the reservoir.
I think it looks great and is practical at the same time since it takes up less space than if installed separately and I can fit a big reservoir.
http://www.aquatuning.se/product_info.php/info/p6155_Alphacool-HF-38-Cape-Cyclen-150.html
I install the pump with some mounting I made myself, consisting of skrews, nuts and bricks that goes thru the case. A little hard to get on picture but I guess you understand.
The radiators, 2x
240mm which I know is overkill for a CPU but I mostly do it as a challenge to fit them both
Alphacool NexXxoS ST30 Full Copper 240mm
Radiator #1 will be put in the front next to the motherboard.
It may look like the radiator is blocking all the ports of the motherboard but it isn't.
With a little modification of a few contacts from fans the connectors fit without problems. One of the PCI-E ports is unreachable, however since I only use 1x GPU and no other expansion cards it won't be a problem at all
Radiator #2 is attached to the radiator-mount and it's the one to be placed behind the motherboard tray.
The radiator.mount is needed so I can attach it in the front from the inside with help of rivets. It was pretty hard to get it inside but I finally managed.
Picture of the radiators, pump + res and fittings plus all fillports in the case are attached! As you can see there's a couple of fittings in the top of the case.
Have you started to understand what the holes in the mesh and the fillports are used for?
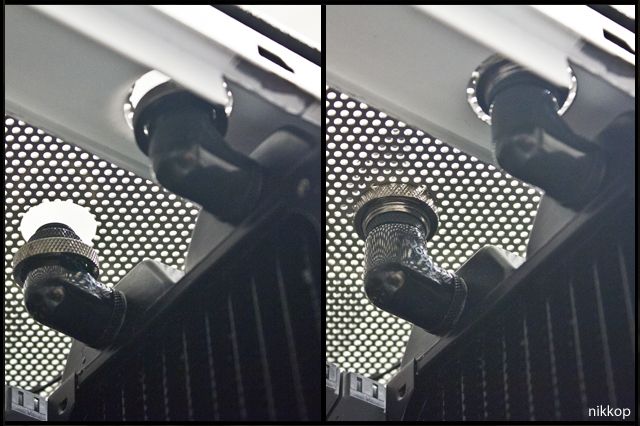
") The fillports
The fillports are used to attach the fittings to the mesh in the top. But why? Let's find out!
On the top of the mesh there's now
6x 90c fittings!
And here you can see it with tubing. Yes, I've chosen to have tubing on the top of the case that will go thru all components!
The reason is first of all because I think it looks great, it suits the
industrial feeling that I've given this mod. Second, it's actually practical as the tubes doesn't need to be inside of the case which would have been very narrow. I'm very satisfied with the outcome.
I won't reveal more than this about the water cooling yet! In the next update, which will be the very last where I show the final pictures, is where you will see it all togheter
Below are a few other installations that are essential, of course
___________________________________________________
Installing the enormous GPU -
GIGABYTE GTX 780 OC Windforce 3x 450W. It wasn't an easy task to be honest, haha. Took 10 minutes and a lot of brain- and muscle-power. It felt like I was playing Tetris with circles - impossible. However I managed to get it in, but damn it's tight!

The back of the motherboard tray with
the radiator, SSD and power supply. A little messy with the cables since I didn't have the time to fix it perfectly before the exhibition, but as it's not seen with the side-panel on I didn't feel it was critical.
Since I've cut a hole for the grill where the original
power-/reset buttons were I was in need to get a new button, of course. I did it with the help of this nice looking
switch that I made a hole for in the mesh.
White
120mm Spectre Pro PWM-fans from BitFenix that was to be used for the exhibition. Unfortunately I didn't manage to get them in time, but here they are!
Sleeved extenders in different shapes and sizes from BitFenix.
http://www.bitfenix.com/global/en/products/premium-modding/alchemy-cables/
___________________________________________________
At last:
Once again it feels nice to have posted this update!
The water cooling from
AquaTuning was indeed very fun to install as it was an extreme task to accomplish. The hardest part was to find out how I was going to make it all work and in which order to install it - I didn't have too much spare place to use, haha. As I've said this project has been at least 80% planning and figuring stuff out while the rest has been the modification itself. A lot to think about before making that final cut!
The next update that will be released will be the last one of this project log, containing the final photos of the finished mod/product! That's why I don't want to reveal it all in this update, I want the last one to be a little special!
Thanks for following and supporting my project log. It's you, my readers, that makes me want to continue and finish this even tho there have been some tough times
Thanks for reading and supporting me.
Best regards
Nikkop


 Needs a bit more orange imo! Are those cable extensions even going to fit?