CaseLabs STH10

The filters took about 10 days from my order, I used the FedEx option:- FedEx (Zone D)(3-5days) (I live in a remote part of the uk)
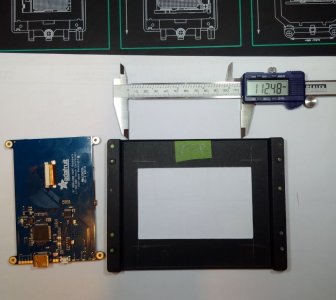
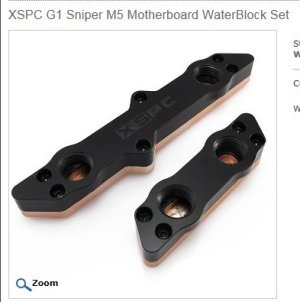
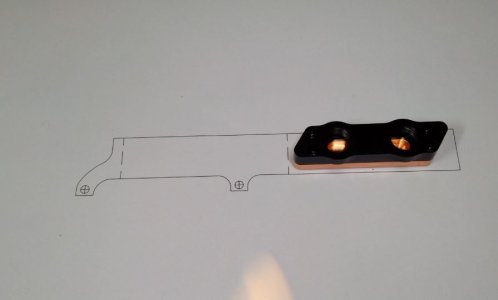
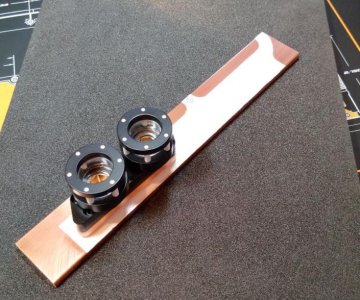
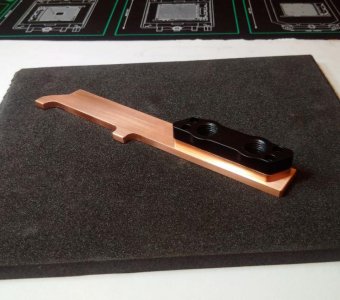
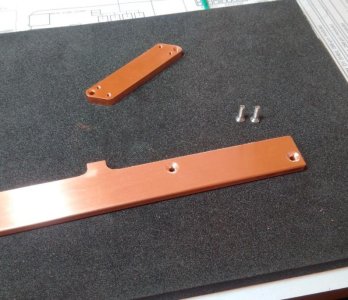
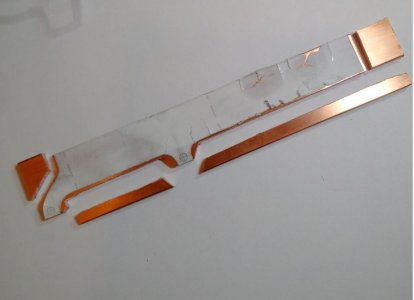
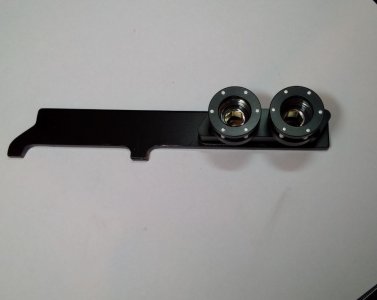
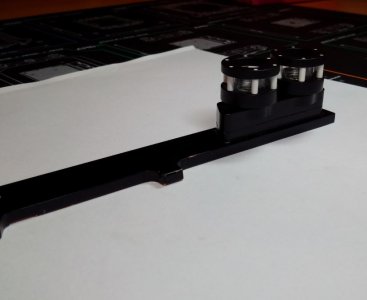
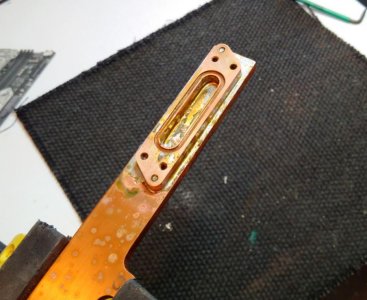
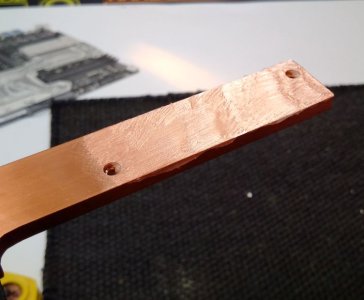
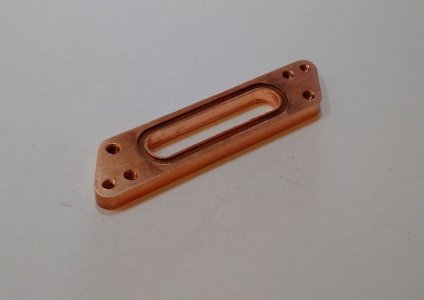
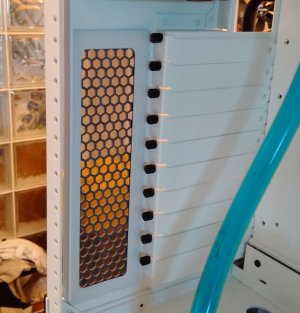
I did think on using a ram waterblock but as my M.2 is mounted directly flat to the board and will be nearly all covered by a GPU, I need a waterblock that extends out past the side of the motherboard/ GPU to give me space to fit the derlin block that the 1/4 fittings and the pipes attach to.

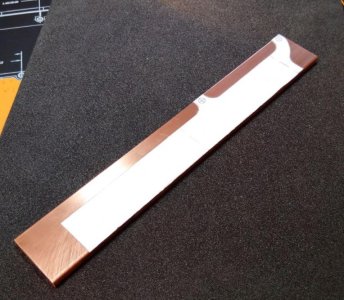
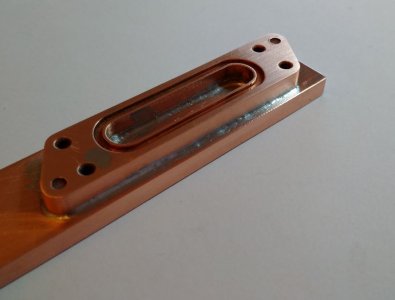
The 80mm M2 will need about 120mm of flat bar to cover it and reach the mounting screws I am planning on using and then I will need about another 60-80mm to fit the block/ pipes to. All in I think the overall length of the heatsink copper bar will be in the region of 200mm.

i was asking from caselabs themselves :P

wow sounds like you're putting a lot of work into the SM951 alone, i would of thought it would be easier to get an intel NVME 750 ssd instead.
 
I got the M.2 measured up this week to allow me to cut the copper flat bar to fit.

I had bought an Alphacool mosfet cooling plate that I was going to use the derlin waterblock from but when I tried the Chaingun fittings, they would not fit.

A quick search on OCUK and I found an XSPC two part waterblock for a G1 Sniper mobo that had been reduced from £49.99 down to £9.98!

I drew up the shape I needed on cad and printed it out on sticker paper which I have stuck to the flat bar.

Its just a case of lots of cutting and filing now which I hope to do over the weekend.
 

Attachments

  • M.2 XSPC_G1SniperSet.JPG
    M.2 XSPC_G1SniperSet.JPG
    28.1 KB · Views: 183
  • M.2_PaperTemplate.JPG
    M.2_PaperTemplate.JPG
    26.7 KB · Views: 168
  • M.2_WaterblockWithFittings.JPG
    M.2_WaterblockWithFittings.JPG
    38.2 KB · Views: 189
  • M.2_TemplateOnCopperBar.jpg
    M.2_TemplateOnCopperBar.jpg
    97.9 KB · Views: 189
  • M.2_TemplateOnCopperBarWithWaterBlock.jpg
    M.2_TemplateOnCopperBarWithWaterBlock.jpg
    97.7 KB · Views: 184
Got the M.2 water block mostly finished over the weekend, I am not drilling the 2 holes on the lugs yet until I finally decide which type of screw/ bolt/ other fixing I use to attach it.

The other thing left to do is solder the XSPC copper block to my copper bar, I need some flux to do that properly so I will pick some up tomorrow.
 

Attachments

  • M.2_Waterblock9.jpg
    M.2_Waterblock9.jpg
    95.7 KB · Views: 183
  • M.2_Waterblock8.jpg
    M.2_Waterblock8.jpg
    78 KB · Views: 153
  • M.2_Waterblock7.jpg
    M.2_Waterblock7.jpg
    98.1 KB · Views: 158
  • M.2_Waterblock6.JPG
    M.2_Waterblock6.JPG
    56.4 KB · Views: 192
  • M.2_WaterblockFile5.JPG
    M.2_WaterblockFile5.JPG
    71.8 KB · Views: 209
  • M.2_WaterblockFile4.JPG
    M.2_WaterblockFile4.JPG
    72.7 KB · Views: 154
  • M.2_WaterblockFile2.JPG
    M.2_WaterblockFile2.JPG
    79.4 KB · Views: 167
  • M.2_WaterblockRoughCutout.JPG
    M.2_WaterblockRoughCutout.JPG
    44 KB · Views: 155
I really want to try and keep as much dust out of this case as possible, the full set of filters from DEMCifilter was bought for that reason. I then realised that the 2 small long grilles on the front panel and the vent on the rear of the case beside the exhaust fan were not filtered.

Measuring these 3 up established that they would have to be custom made so I sent off the dim's to DEMCifilter and they quoted me prices that were virtually the same as similar sized standard filters. I ordered the 3 filters last Thursday and they were delivered on Wednesday this week! Custom made, from South Africa to a remote part of the UK in less than a week - Excellent service.

Finally got the flux to solder the M.2 water block together so I drilled out the centre of the bought part to ensure that the water would come into direct contact with my custom copper plate. This also had the effect of increasing the "bore" of this fitting making it less restrictive in the loop.

Once I had cleaned off all the traces of flux I have given it a few coats of satin black which should see it blend in quite well with the rest of the water blocks/ motherboard.

P.S. Still waiting on the full cover water block for the Asus X99 E-WS motherboard which is holding me up from transferring everything from my work PC into the Caselabs build. I think the manufacturers have been swamped with orders for them, they are the first and AFAIK only full motherboard block for the E-WS.
 

Attachments

  • M.2_Waterblock17.JPG
    M.2_Waterblock17.JPG
    39 KB · Views: 160
  • M.2_Waterblock16.JPG
    M.2_Waterblock16.JPG
    40.4 KB · Views: 180
  • M.2_Waterblock15.JPG
    M.2_Waterblock15.JPG
    47.9 KB · Views: 172
  • M.2_Waterblock14.jpg
    M.2_Waterblock14.jpg
    79.2 KB · Views: 170
  • M.2_Waterblock13.JPG
    M.2_Waterblock13.JPG
    52.1 KB · Views: 176
  • M.2_Waterblock12.JPG
    M.2_Waterblock12.JPG
    31.9 KB · Views: 204
  • M.2_Waterblock11.JPG
    M.2_Waterblock11.JPG
    75.2 KB · Views: 173
  • CustomFilterB.JPG
    CustomFilterB.JPG
    75.9 KB · Views: 195
  • CustomFilterA.JPG
    CustomFilterA.JPG
    50.9 KB · Views: 159
While I am waiting on the mobo water block I have been tidying up a few things that have not been quite right.

In the bottom chamber I have 4 Monsoon Light Port Rotarys, to which I had fitted pre assembled white LED bulbs. The trouble was that they were not very bright so I got some Ultra-Bright 18,000mcd 5mm LEDs and made them up to fit.

As it turned out when I took one of the old LEDs out to fit the new ones I noticed that it was damp - a very small leak that was being hidden by the LED bulb evaporating the tiny amount of fluid before it could drip.

I drained off the mobo section of the loop on that side and replaced the rubber washer and re fitted the led holder. I think I had over-tightened it before so I took it easier this time and will monitor it for a while.

It does explain why that loop had dropped about 10mm more than the other over the last couple of months; I had thought that loop just had more air trapped in the system.

It's difficult to see in the pictures but these bulbs are at least 3 times as bright as the old ones and really light up the fluid in the pipes down there.

-------------------------------------------------o0o---------------------------------------------------------------------------------

I have seen a few builds with small monitors on the front of the case and I liked the idea, trouble was that I could not find a thin enough monitor that would fit in one of the Flex-Bay blanks without sticking out the back too much and being seen in the main chamber which I am trying to keep super clean.

I chanced upon the Adafruit website and found this little 5" touchscreen monitor which is HDMI input and USB powered which should be quite straightforward to wire up. I am going to fit it to a triple solid Flex-Bay cover which should keep me busy for the next few days......
 

Attachments

  • MiniMonitor2.JPG
    MiniMonitor2.JPG
    46.8 KB · Views: 167
  • MiniMonitor1.JPG
    MiniMonitor1.JPG
    68.9 KB · Views: 171
  • SuperBrightLED_7.jpg
    SuperBrightLED_7.jpg
    94.6 KB · Views: 173
  • SuperBrightLED_6.jpg
    SuperBrightLED_6.jpg
    86.5 KB · Views: 171
  • SuperBrightLED_5.jpg
    SuperBrightLED_5.jpg
    87.2 KB · Views: 179
  • SuperBrightLED_4.JPG
    SuperBrightLED_4.JPG
    62.6 KB · Views: 154
  • SuperBrightLED_3.JPG
    SuperBrightLED_3.JPG
    57.7 KB · Views: 194
  • SuperBrightLED_LeakyHolder.JPG
    SuperBrightLED_LeakyHolder.JPG
    88.5 KB · Views: 166
  • SuperBrightLED_2.JPG
    SuperBrightLED_2.JPG
    45.3 KB · Views: 161
  • SuperBrightLED_1.jpg
    SuperBrightLED_1.jpg
    87.7 KB · Views: 189
I really want to try and keep as much dust out of this case as possible, the full set of filters from DEMCifilter was bought for that reason. I then realised that the 2 small long grilles on the front panel and the vent on the rear of the case beside the exhaust fan were not filtered.

Measuring these 3 up established that they would have to be custom made so I sent off the dim's to DEMCifilter and they quoted me prices that were virtually the same as similar sized standard filters. I ordered the 3 filters last Thursday and they were delivered on Wednesday this week! Custom made, from South Africa to a remote part of the UK in less than a week - Excellent service.

Finally got the flux to solder the M.2 water block together so I drilled out the centre of the bought part to ensure that the water would come into direct contact with my custom copper plate. This also had the effect of increasing the "bore" of this fitting making it less restrictive in the loop.

Once I had cleaned off all the traces of flux I have given it a few coats of satin black which should see it blend in quite well with the rest of the water blocks/ motherboard.

P.S. Still waiting on the full cover water block for the Asus X99 E-WS motherboard which is holding me up from transferring everything from my work PC into the Caselabs build. I think the manufacturers have been swamped with orders for them, they are the first and AFAIK only full motherboard block for the E-WS.

holy sh*t that looks good, i'm doing an STH10 build myself soon and it's not going to look as good as this... not even sure if i'm going to do a build log...
 
Thanks for the kind words Permafrost and you MUST do a build log; there are not many STH10 build logs on the interwebs, it would be rude not to..:D

Continuing my sorting out of things I was not quite happy with; I thought that the plain LEDs in the filters were also too dim and with being quite close to the AMPs I could turn them into RGBs without massive re-wiring.

To go down the RGB route meant making up a splitter from the Jeak Amp and then running another split cable up to close to the filters. Finally I made up a couple of short custom length cables with RGB lights and fitted it all together.

The idea of the short cables to the RGB LEDs is so when a bulb blows in the future it will be quite easy to change without having to go all the way back to the AMP area. This stops disturbing the bundle of wires that runs up the right side of the rear of the case which, when the case is finished, will be neatly cable tied together.
 

Attachments

  • FilterRGB_5.JPG
    FilterRGB_5.JPG
    74.5 KB · Views: 194
  • FilterRGB_4.JPG
    FilterRGB_4.JPG
    82.9 KB · Views: 175
  • FilterRGB_3.JPG
    FilterRGB_3.JPG
    63.7 KB · Views: 173
  • FilterRGB_2.JPG
    FilterRGB_2.JPG
    49.7 KB · Views: 195
  • FilterRGB_1.JPG
    FilterRGB_1.JPG
    58.6 KB · Views: 179
You should consider respraying the pump housings as yellow breaks the theme completely. Everything is sleak, smooth and uniform and seeing the yellow pump, I feel like shouting c-c-c-c-c-c-c-c-COMBO BREAKER! ;)
 
You should consider respraying the pump housings as yellow breaks the theme completely. Everything is sleak, smooth and uniform and seeing the yellow pump, I feel like shouting c-c-c-c-c-c-c-c-COMBO BREAKER! ;)

My son said the very same thing a couple of weeks ago and looking at it again you are both right. They stand out like a sore thumb....:huh: how did I miss that...:undecided1:

The question is, black or white? Or black in the centre and white round the outside or the opposite? The shape of the moulding would make a two colour paint job quite easy to mask up.

What do you think?
 
I don't think you can go wrong either way. You already have a great balance of black and white components so which ever you choose, it won't be too much or affect the overall picture at all. Maybe black would add more stealth to it, as it won't take away the focus of the loop itself and will also blend in with the pump cable braiding
 
I think I will try black Warchild, with discrete GPU and CPU stickers in white on their respective pumps.

Another little job out of the way; I had one fan channel empty so I thought I would add a little 60mm fan to the SSD cage in the rear of the case. I wanted to keep with PWM Noctua fans to match the rest but they don't do the black Industrial PCC type this small so I had to go with their "normal" range.

This too created a bit of a colour dilemma; I thought I could live with the standard cream and brown....yuck but I couldn't, so black spray time it was again.

I don't think that painting the blades like this will cause any problems because of the small diameter. I will just have to see if I have created an out of balance blade once it is working properly.
 

Attachments

  • SSD_Fan_9.JPG
    SSD_Fan_9.JPG
    77.3 KB · Views: 80
  • SSD_Fan_8.JPG
    SSD_Fan_8.JPG
    59.9 KB · Views: 81
  • SSD_Fan_6.JPG
    SSD_Fan_6.JPG
    53.1 KB · Views: 81
  • SSD_Fan_5.JPG
    SSD_Fan_5.JPG
    58.6 KB · Views: 96
  • SSD_Fan_4.JPG
    SSD_Fan_4.JPG
    63.4 KB · Views: 83
  • SSD_Fan_2.JPG
    SSD_Fan_2.JPG
    54.8 KB · Views: 83
  • SSD_Fan_1.JPG
    SSD_Fan_1.JPG
    61.1 KB · Views: 83
Last edited:
this looks so nice! I cant wait to see the temps for the loops with those rads!

Amazing build - Very inspiring!

Very awesome build indeed. Loving the colors! And the water block mod ain't nothing to sneeze at either in my book. :D

Thanks guys :)

Update; Got the mini monitor mounted on the front of the case on a FlexBay 3 slot blank plate.

It took quite a bit of careful measurement and cutting as this was the only 3 slot blank plate I have, I did not want to make a mistake and have to ship one from the USA... The pressure was on ;)

I got some small edge trim from ebay but when I tried it against the monitor it was too wide so a quick trim with the Stanley Knife and it was good to go.

I was stuck with the mounting hole positions as they are fixed by the monitor itself. I wanted this to look at home with the Aqua Computer face plates below so I used countersunk allen head screws that match the AQ ones.

It is now a case of getting a HDMI and a USB cable wired from the back into the rear of the case. This is not as easy as it sounds as the HDMI output from the monitor clashes with part of the chassis....It will keep my busy this weekend...:)

ETA Picture of the HDMI and USB outlet clash with the case chassis. Looks like a job for the junior hacksaw and drill, I refuse to use a dremel on this chassis :eek:
 

Attachments

  • Monitor_5.JPG
    Monitor_5.JPG
    81.9 KB · Views: 87
  • Monitor_4.JPG
    Monitor_4.JPG
    61.7 KB · Views: 78
  • Monitor_3.JPG
    Monitor_3.JPG
    92.8 KB · Views: 80
  • Monitor_2.JPG
    Monitor_2.JPG
    66.6 KB · Views: 83
  • Monitor_1.JPG
    Monitor_1.JPG
    69.2 KB · Views: 76
  • Monitor_6.JPG
    Monitor_6.JPG
    49.4 KB · Views: 88
  • Monitor_6b.JPG
    Monitor_6b.JPG
    40.6 KB · Views: 79
  • Monitor_7.JPG
    Monitor_7.JPG
    71.2 KB · Views: 84
  • Monitor_8.JPG
    Monitor_8.JPG
    71.1 KB · Views: 73
  • Monitor_9.JPG
    Monitor_9.JPG
    85.7 KB · Views: 79
Last edited:
Some exceptional craftsmanship and excellent ideas in this build Blade Runner.

I bet you must be itching to get it running; that's the problem with projects - when they are apart for measuring, modding or whatever, you can't use it.

A little note of caution with your SLI bridge - you may run in to problems if the wires aren't matched precisely in length. There are some high frequency signals that pass through and any mismatch will cause you problems. I hope your's is okay, just thought I'd leave a note.

Anyway, keep up the good work!

Thanks Mysterae and yes I am itching to get it finished, the trouble with that will be I will want to do another build :D - My sons Corsair 900D looks like it could do with some modding but talking him into it will be a problem. Don't worry about the SLI bridge, its an EVGA one, I just painted it.......;);)
 
The mini monitor needs a USB cable to power the backlight and take the data from the touch screen. As this cable will be on show in the motherboard chamber area I had to make it custom length and sleeved to match the other cables in there. I had a spare USB 2 type A to Micro B cable lying around so I just cut off the Type A end and fitted the motherboard connector in its place.

It has also meant drilling 2 holes in the motherboard chamber shelf as the 2 cutouts down there do not line up with the USB2 sockets on the motherboard; I want these 2 cables to be plumb.

The HDMI cable will not be seen so I can use it as it came, its a super slim round cable and I can hide it in the rear of the case pretty well.

Tomorrow will be more cutting back of the chassis to allow these two cables to clear the frame. The first part of the cutting on the Flex Bay blank was quite easy, the aluminium is thin, the next bit on the actual chassis will be a lot harder.

ETA Picture of monitor fired up.
 

Attachments

  • Monitor_11.JPG
    Monitor_11.JPG
    44.7 KB · Views: 72
  • Monitor_10.JPG
    Monitor_10.JPG
    96.1 KB · Views: 70
  • Monitor_Custom_USB2_h.JPG
    Monitor_Custom_USB2_h.JPG
    48.6 KB · Views: 73
  • Monitor_Custom_USB2_g.JPG
    Monitor_Custom_USB2_g.JPG
    74.3 KB · Views: 72
  • Monitor_Custom_USB2_d.JPG
    Monitor_Custom_USB2_d.JPG
    49 KB · Views: 67
  • Monitor_Custom_USB2_c.JPG
    Monitor_Custom_USB2_c.JPG
    65.9 KB · Views: 79
  • Monitor_Custom_USB2_b.JPG
    Monitor_Custom_USB2_b.JPG
    48.4 KB · Views: 83
  • Monitor_12.JPG
    Monitor_12.JPG
    95.1 KB · Views: 84
Last edited:
Back
Top