Build log: OTD - 1000D

More goodies came in today.

Watercooling Bonanza

jQ5xb2Ch.jpg


ID/OD 12/16mm Tubes x6
EK Cryfuel Navy Blue x3
EK FC1080Ti FE Waterblock. x1
Bitspower bomb of fittings and rotaries


CHo8165h.jpg


So many to go through. I absolutely love these fittings. Such good quality.

Nau4o58h.jpg


20 mins later.. I know it shouldn't take that long but I was enjoying the Ol' classic Bladerunner as I unraveled these packs

W5t1pGGh.jpg

qxg9NSRh.jpg


They added a nice little gift this time as opposed tot he table mats I usually get. Little "Dranog" baby as they always seem to label it ;)

KsQS0nCh.jpg


And no sooner did I unpack this little thing. I got another little things attention. So yeah, I don't get to keep the gift very long.

zQdNh9hh.jpg


Grabbed myself another SSD as well which was on offer.

KColWyth.jpg
 
Nice ! love those fittings, classic BP. Cute dog too man, I would probably get distracted too :D we used to have a Yorkie, he was great fun.
 
Nice ! love those fittings, classic BP. Cute dog too man, I would probably get distracted too :D we used to have a Yorkie, he was great fun.

If I am on my knees working on the case (cant use it on table or desk because its too effing heavy with it fully loaded) He lays inbetween my legs on his back wanting cuddles haha. He is awesome.
 
If I am on my knees working on the case (cant use it on table or desk because its too effing heavy with it fully loaded) He lays inbetween my legs on his back wanting cuddles haha. He is awesome.

Aww lol. I've been toying with getting me a wee dog for ages. Problem is my landlady said no pets but I am starting to think jeff her tbh. Don't want anything big though, so a chihuahua would do (short haired).

Managing to hold off atm but I don't really fancy another winter alone. So we'll see :)
 
Aww lol. I've been toying with getting me a wee dog for ages. Problem is my landlady said no pets but I am starting to think jeff her tbh. Don't want anything big though, so a chihuahua would do (short haired).

Managing to hold off atm but I don't really fancy another winter alone. So we'll see :)

Love him to bits, best company ever. Whenever I argue with my partner, he comes over and settles alongside me.

So yeah as some may know I already had a 1080ti card that was underwater ;)
Considering I bought a waterblock only means one thing. Overkill time.

I have been planning this case for a while and during that time I put my gpu on ice, and popped my old 980ti into a spare rig.

e2kAtdmh.jpg

yq8YJvZh.jpg


Have to admit, I tested the exhaust cooler on the Gainward. It runs temps 15C lower than the FE at higher clocks. Very impressed with it to be honest. Obviously the cards will sync once in SLI, but still, I wish I had grabbed another golden sample from Gainward.

Price wise I picked this one up for around 6990Nok. That is around £650. I do believe the rumours of prices returning to Normal are try. For those in Norway, there are still around 15 of these cards left on Komplett so get them while you can! Very good little performer.

Also did a little test fit with the fittings on my recoloured waterblock. Quite happy with it. Managed to get the gentle fade of black to silver on the outlet just right.

gywJwj1h.jpg


My only concern now, is that I am not sure if Navy Blue coolant is going to look right with this build. Black and blue has gone together nicely in the past but may look better with some green coolant instead. I'll have to give it a small test.
 
Last edited:
So today was blocking day. About time to start on the assembly of the build.

Grabbed some terminals to see how it would look.

jxQ7YMZh.jpg


First thing I did was block up my current 1080ti once again. And straight away it hit me...
We have a problem. Had to block up the second card to confirm.


Old version of the FC Titan/1080ti Founders edition

CxaEC0jh.jpg


Additional card blocked up with default terminal. Yep... plain as day. The new version of the block has the terminal inlet/outlet shifted further along so cannot align them properly.

LnU741Ph.jpg


An unnecessary expense but had to be done. Saw a few additional parts which I thought I would pick up.

8Z6C2R9h.jpg


I think its a bit of a disgrace that we don't get these provided with the blocks by default. Cannot understand why I have to pay for these.

hK9ptNGh.jpg


aiym9tsh.jpg

HGbeYiqh.jpg


New blocks added, along with multi GPU terminal connector.

lrO7GUOh.jpg

q24kkkah.jpg


eH5HF2Lh.jpg


Cascade reservoir assembled ready to be added to the radiator.

VrdNpGbh.jpg

8usouchh.jpg


ozAAZMyh.jpg

N8XEJFah.jpg


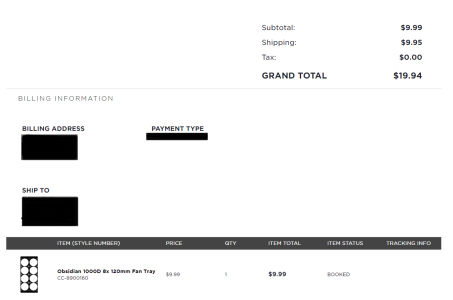
That is all for today. I'm still limited from achieving my end goal as I need to get the top fan tray from Corsair. Luckily I have a good friend visiting family there at the moment so she will receive the package and bring it back with her. I don't want to wait that long so I will begin working on a intermittent solution while I wait for it and some mirror vinyl on its way next week.

Next stage for me is to figure out how I mount my Aquaaero 6XT in the case, and also utilise the mirror vinyl to reflect the LEDs I intend to use.
 
Thanks to a good friend visiting her family in the US. She was willing to accept the order from me and bring it back with her when she returns to Norway

So a $95 dollar order just dropped to a measly $19.94 :)


I also have some mirror vinyl on its way and some premium black wood vinyl to cover my horrid pine desk which i have used as a painting/work station longer than I should have. These should arrive later today.

I just hope thie mirror quality finish is as true as they stated. I tried ordering one previously and it looked more like silver/chrome finish which is no where near a true mirror depiction.
 

Attachments

  • Corsair_fan.png
    Corsair_fan.png
    45.3 KB · Views: 411
That's awesome man. Should save some headaches that :)

I just hope she isnt packing heavy and forces the fan tray to warp.

Based on my current setup so far, I don't think 2x 480s in the top will work as it will jam the Q Block at the top of my reservoir. Since I need that clear for coolant filling I might go for dual 360s.

On top of that, I am toying with the idea of 2 360s in the top, with one being a thick rad and one thin to get a staggered approach when you look in. So thick rad at the back and thinner one in front. No idea how it will look but a tiered radiator inverted step "might" look cool.
 
If it does warp it should be pretty easy to get straight again. Just bolt it directly to the rad without any fans etc and it should be fine :)

As you probably know "A goal without a plan is just a wish" so I would get anything you want in there in there to save you seriously messing around later. That's one thing I learned about water cooling, don't f&@k with it after the fact...
 
I'm a little confused... the top radiator mount... is it impossible to mount a 360 rad without buying a completely new rail/mount?

The corsair website clearly states it should take a 360.

I thought from the pictures I've seen the holes would accept a 120 or 140 size radiator.

I'm considering buying a 1000D in the next few weeks but this is massively putting me off as the case is pricey enough as is.

Default top tray accepts 140mm fans so you would need to buy the 360 fan tray instead. One provided is 420mm radiator mount. You dont need new rails. Just the tray itself.
 
Time to revisit this case.

Parts have changed, loop altered, GPU orientation switched etc etc. and... I bought a 3D printer!

So pics to follow soon, but What I am thinking, now that the GPU is vertical is to "attempt" to build a shroud that bridges the gap between the CPU block and the GPU waterblock.

My aim is for none of the motherboard PCB to show. It will be interesting, because the CPU block includes an M.2 block cooler, with 2 recesses deep enough that I can use these holes as an anchorpoint for this shroud.

It will make more sense when I add some edited pictures.

In addition to that, I want to also make a multi piece plate to cover all cables on the right side of the motherboard, 24pint, sata, usb etc.

Also...

My Aquaaero is shoved in the back and not mounted anywhere. I'm thinking of created a drive bay inside the main case, but also serving as a shelf for 2 MCP 35x pumps. In other words, I can look at the side of my case, and stare at the LCD display for the fan controller, which also serves as a flat shelf for the pumps to rest on.

I have so many ideas for this case regarding 3D printed mods. The only thing holding me back right now is my CAD skills.


Other things I am considering.

* RGB strip trays and corner supports attached around the case. Yeah I am not a fan of RGB as many know, but I usually use a monotone colour, or just white light. Either way objects obstruct the lighting from shining
so some extensions may help. And, more shrouds and cut outs for hiding cables, also acting as tube support.

* Front side Oculus rift/Vive Cosmos mount to hang the headsets smoothly


It probably sounds all vague and cryptic, but I hope some edited pictures, scribbles and images will help clear it up.
 
Last edited:
So until I get some basic models up, here are the doodles I was talking about

Top shroud will be hollow allowing for all those messy cables to be wrapped up and tucked away, or easy to feed through from the back side to the front side. It will also extend the entire shelf inside the case, but split into segments with interlocking pieces. Makes it easier to build in pieces.


The mother board shroud won't be flat, I want to make it interesting with some pattern or angled structure, think Lambourghini style angles. Also there will be some overhangs to cover the 24pin socket. I might even embed the Aquaraero controller here. Not decided yet.


Other option was to build a piece to extend outwards from the already made corsair shelf that would allow me to add the Fan controller, and also hide all cables away. The shelf is just a frame and completely hollow.


And the challenging piece. This will be the trickiest one of all. A shroud to bridge the GPU and CPU blocks. I want it to flow with the shape of the GPU block, and also wrap around the Power connectors. As well as that, I want the water cooling tubes to pass through it (not shown) to give it support and spice it up.


The shroud will not be fixed in place firmly, but will have two pins that insert inside the CPU block screw holes which are quite deep and should be good enough to secure the model.


I have more ideas too, but im thinking, one step at a time :)
 
Well I am a complete novice in this area so ill be doing alot of test fits and wasting plastic most likely. For example. I could build the top shroud in one go, but before I do. I made a test fit to see if i got the measurements right for the grommet hole

 
Last edited:
If you have cardboard laying around, you could cut pieces of that up for quick and dirty measurements. I've seen lots of guys use cardboard to get the dimensions for little boxes, etc.
 
If you have cardboard laying around, you could cut pieces of that up for quick and dirty measurements. I've seen lots of guys use cardboard to get the dimensions for little boxes, etc.

I had some calipers so quick measurements and I think I got it spot on.


And then test fit

 
Back
Top