X99 D Frame Mini "And Dont Call Me Shirley"

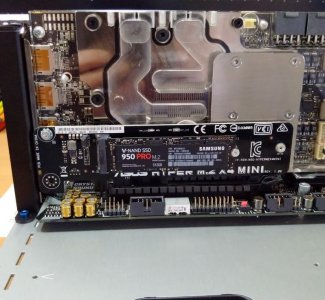
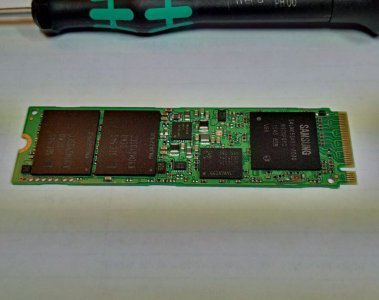
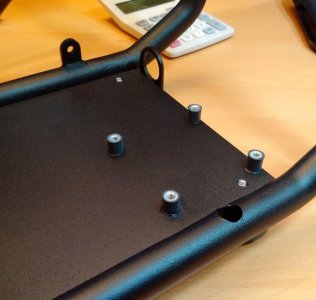
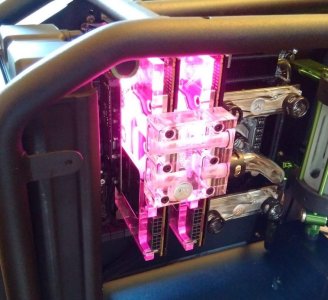
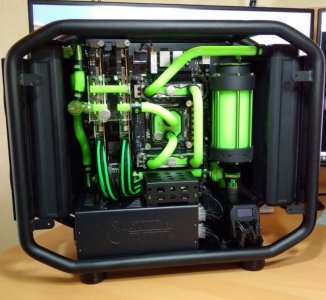
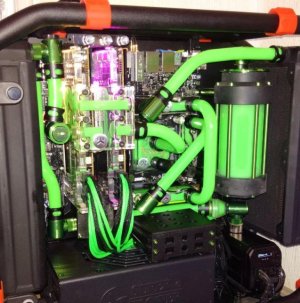
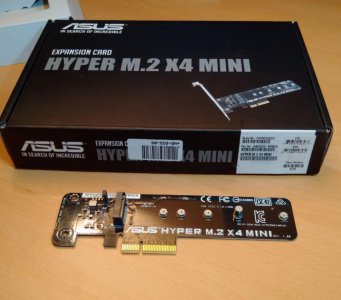
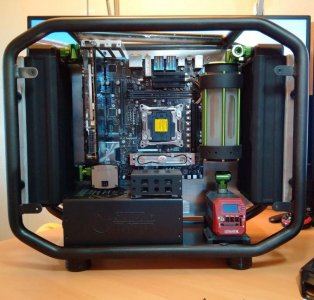
When I drilled the motherboard plate standoff holes I moved them slightly to the right to give a little more clearance for the Asus Hyper M.2 adaptor which now fits in the third PCI-E slot between the second GPU and the rad.

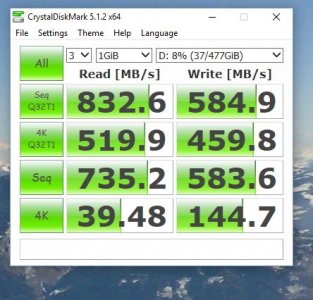
Im not sure how fast this will run, the M.2 on the mobo is not a x4 type; but even if its only SATA 3 speed its a good place to get some storage without cables and bulk in the limited space I have.

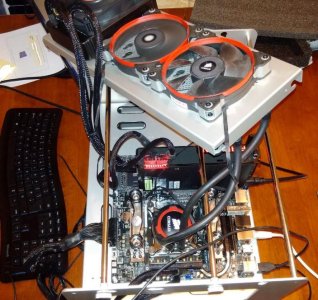
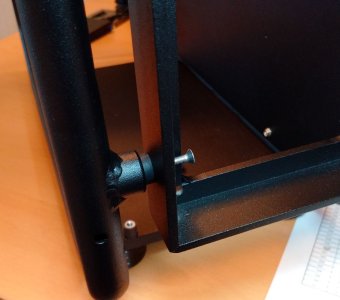
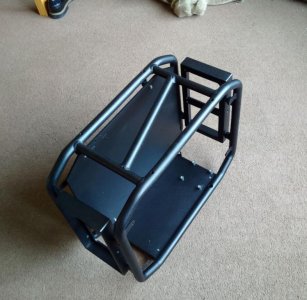
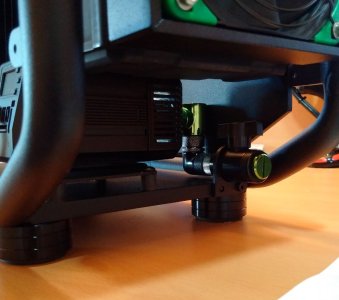
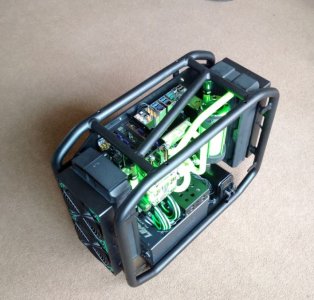
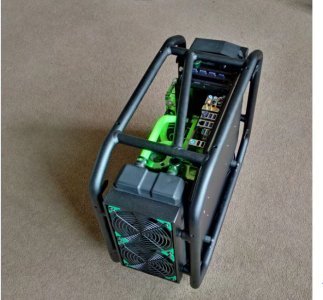
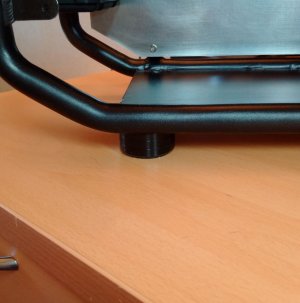
The MNPC Tech feet get the case a bit more off the floor which will also give me the option of some LED strips under there to light it up and give it that floating look in the dark.

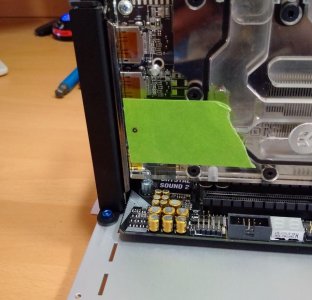
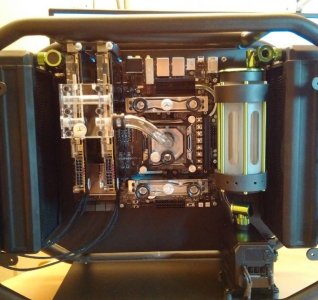
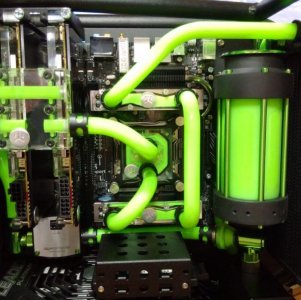
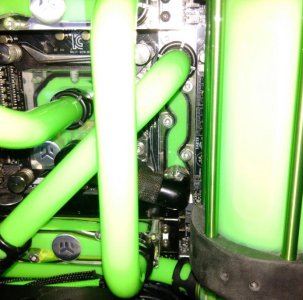
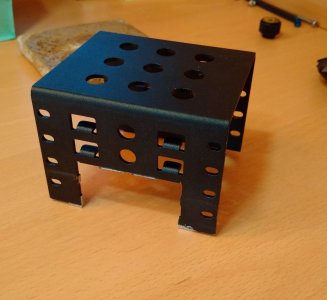
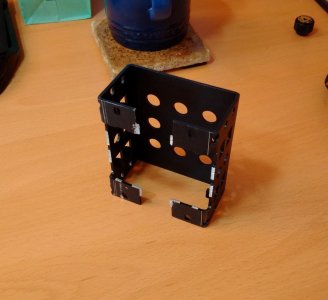
I found a nice SSD cage on Amazon, as good a quality as the one that came with my STH10. It needed cutting down to fit below the lower RAM water block and pipework. It was quite soft aluminium so bending some fixing tabs was pretty straightforward.

I then I tidied it up with a file, it fits on top of the PSU using one of the PSU case screws, lengthened, to fix it. With 2 SSDS in place there is still plenty of clearance below to not stop air getting into the PSU.

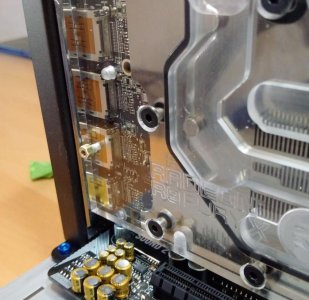
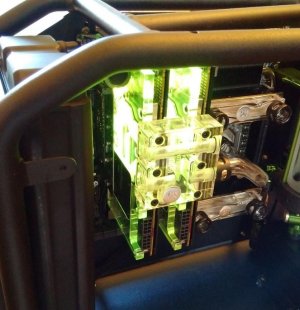
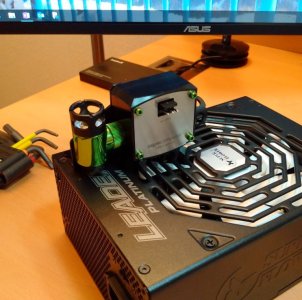
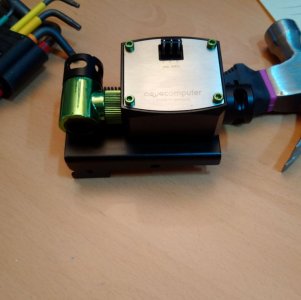
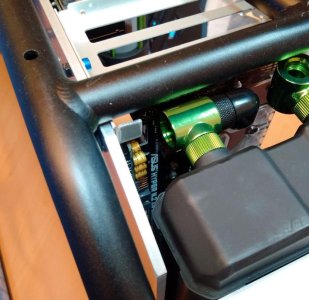
Although it was not an item that was critical I really wanted a proper flow sensor to supply info to the Aquastream and be set up to turn off the PC if it detects a problem. The short Fury X cards have allowed me to fit it just below them. When it is properly fitted it will be fixed off the PSU inlet, again so as not to impede airflow.

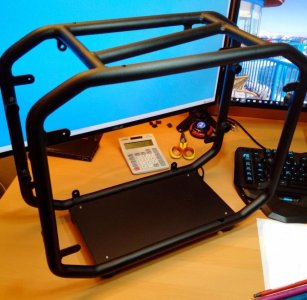
After I was happy that everything fitted I have now stripped everything down and put the main case, the 2 radiator/ Fan mounts, the SSD cage, the mobo panel and the PCI-E bracket in a box ready to go to the powder coaters on Monday.
 

Attachments

  • Trial_Fitting_11.jpg
    Trial_Fitting_11.jpg
    84 KB · Views: 145
  • Trial_Fitting_12.jpg
    Trial_Fitting_12.jpg
    84.9 KB · Views: 199
  • Trial_Fitting_13.JPG
    Trial_Fitting_13.JPG
    88.2 KB · Views: 148
  • CAGE.JPG
    CAGE.JPG
    88.2 KB · Views: 136
  • CAGE2.JPG
    CAGE2.JPG
    79.1 KB · Views: 152
  • CAGE3.JPG
    CAGE3.JPG
    85.7 KB · Views: 168
  • ALL_FITTED.jpg
    ALL_FITTED.jpg
    90.3 KB · Views: 166
The position of the Asus Hyper Mini M.2 adaptor card being so close to the radiator inlet fittings meant that I could not fit a pci-e bracket to screw it to.

I used the water block of the second GPU which I drilled and tapped an M3 hole and then screwed in a standoff that I had filed shorter to suit the gap.

The card is now rock solid in the third slot. I had not realised this slot is x16 so the Samsung 950 Pro should run at full speed and also hopefully not thermally throttle due to the airflow from the radiator/ fans blowing directly onto it.

I will most likely now fit a PM951 M.2 in the motherboards M.2 slot as it is only a 10GB/s slot so the slower PM951 M.2 will not matter and it is nearly half the price of a 950 Pro.

I have fitted the mobo and main components into my workbench to allow me to start cutting and bending the pipes which should keep me busy for a few days. The 180 bends between the RAM and the mosfet block (A scale cardboard cut out at the moment) are very very tight so will likely take a few attempts to get right :-)
 

Attachments

  • M.2_Fitting5.jpg
    M.2_Fitting5.jpg
    89.2 KB · Views: 197
  • M.2_Fitting4.jpg
    M.2_Fitting4.jpg
    91.1 KB · Views: 152
  • M.2_Fitting3.jpg
    M.2_Fitting3.jpg
    86 KB · Views: 136
  • M.2_Fitting2.jpg
    M.2_Fitting2.jpg
    85.6 KB · Views: 196
  • M.2_Fitting1.jpg
    M.2_Fitting1.jpg
    86 KB · Views: 141
Last edited:
I decided to go with the 5930K in the end, the Broadwell e CPUs are a few weeks off yet and I am getting impatient.

To be honest it has taken a year of BIOS updates on my E-WS to get it running really nice (mostly USB problems) so I don't really want to maybe go through the same with the M-WS when they get round to releasing a BIOS for the new CPUs.

Anyway the CPU arrived so I fired it up and put windows 10 on just to see if there are any problems. Windows update did its thing and everything is working bar one driver missing which will most likely be on the disc that came with the mobo so I will sort that if its still a problem when I do the full build and fresh install.

Yet again win 10 went straight onto the 950 Pro without any problems and I did not realise but the Hyper Mini Card has an onboard LED to show SSD use which is a nice touch.

I do like small flashing lights on a build :-) it must be something to do with growing up watching Start Trek/ Space 1999 and their "Computers"

Its all stripped down again and I am just waiting on the gpu water block to dry off overnight after edge polishing to let me drill out the LED holes and then fit it to the GPU card. Then it will be the build proper, if the case is back from the powder coaters tomorrow.

ETA. The frame is back from the powder coaters, they have done an excellent job on it and the other parts (The finish is called "Fine Textured Matt Black"). I am glad I went down this route as this will be far more hard wearing than my home painting could ever be.

The PM951 also turned up today so I have fitted that to the mobo M.2 slot. Its a lot of storage in a small package. :-)

Now the fun starts, the build proper and hope I didn't measure anything wrong..........
 

Attachments

  • Its Alive!...........................jpg
    Its Alive!...........................jpg
    94.7 KB · Views: 179
  • Powder Coated.jpg
    Powder Coated.jpg
    83.4 KB · Views: 133
  • PM951.JPG
    PM951.JPG
    76.6 KB · Views: 163
Last edited:
Got quite a bit fitted today, the rubber mounts for the pump had a bit of thread glue put on them last night so they would not come loose. So I started with the radiator mounts, fitting them to their rubber mounts and then fitting the rads/ fans.

I have managed to wire the fans through the chassis with the cables emerging in front of the pump fan terminal. The temperature sensor mounted on the reservoir inlet and then also runs to the pump terminal.

I have now really just got a lot of wires to make up with sleeving. Due to there being no "hiding" place for any of the wires, (there are no wires going behind the motherboard panel) and their mostly short length, this will be a little more tricky than normal to get to look right so will likely take some time.

The Mosfet water block is not likely to be ready for a few weeks yet so I have decided to go-ahead without it. I will likely fit it in the future if I have to drain the system for some reason.
 

Attachments

  • PumpMountGlued.jpg
    PumpMountGlued.jpg
    84.1 KB · Views: 144
  • Rubber Mounting.JPG
    Rubber Mounting.JPG
    73 KB · Views: 151
  • fitting.5.jpg
    fitting.5.jpg
    96.4 KB · Views: 148
  • DrainOff.JPG
    DrainOff.JPG
    78.5 KB · Views: 151
  • Fitting1.jpg
    Fitting1.jpg
    88.9 KB · Views: 141
Last edited:
Sweet Jesus this is coming together so neatly, what do you have planned for the lining and fluid.
 
Sweet Jesus this is coming together so neatly, what do you have planned for the lining and fluid.

Thanks Wraith :-)

I am going with Mayhems pastel green fluid and the sleeving? from the GPUs will be black and bright green to match.

With this motherboard having 2 x 8 pin CPU sockets and a 6 pin auxiliary power socket for the GPUs I am a bit tight for space for fully sleeved cables.

I may have to just run these 3 power supplies without sleeving although the silicon wire I use looks pretty good and does not kink like normal 18AWG, I'll have to see what it looks like.
 
Looking very neat and well thought out. You must lie awake at night going over it again & again in your mind until every detail is covered?
 
Looking very neat and well thought out. You must lie awake at night going over it again & again in your mind until every detail is covered?

Thanks Sheroo

There is and has been a lot of thought gone into it, just not at night :-)
 
Last edited:
I got the RGB LEDs in the GPUs connected to the Farbwerk this week.
 

Attachments

  • RGB1.jpg
    RGB1.jpg
    86.6 KB · Views: 143
  • RGB2.jpg
    RGB2.jpg
    85.2 KB · Views: 140
  • RGB3.jpg
    RGB3.jpg
    86.5 KB · Views: 147
  • RGB4.jpg
    RGB4.jpg
    87.6 KB · Views: 213
I started making the cables this week, the pair of 8 pin CPU cables and the 6 pin GPU motherboard cable. As I thought there was just not enough room to individually sleeve them so I went with partial sleeving using E22 Sata sleeve on the bundles. This has blended in really well with the mobo and rear panel and they are very hard to see.

I had to re make the 24 pin motherboard cable and its 3 resistor? wires, using the silicone cable it made the new cable very compliant and it has tucked away behind the SSD cage quite well.

The GPU cables will be sleeved but on the very last pin on the motherboard cable my crimp pliers broke so I am waiting on some new ones coming from Amazon.

With the delay in the wiring I thought I would finish the loop. I first needed to make a mounting bracket for the flow monitor and fixed it to the GPU case. It was then just a case of cutting and bending the pipes to fit.

I had real trouble with the GPU to CPU pipe, the 90 bend and the 45 are very close together and when doing one the other would mess up, it ended up taking 7 attempts until it was right :-(

I had flushed the rads a while ago and also have an inline filter fitted, so it was just a case of filling with Mayhems and checking for leaks which is still ongoing but so far so good.

I have hot wired the pump to bleed the system and the display is a lot better than I had expected, its very sharp white letters/ images on a jet black background and is really crisp, a better display than on the full blown Aquero on my STH10.

I will now reinstall windows and get the system running while I wait on the pliers using the Super Flower cables on the GPUs
 

Attachments

  • FilledUp.jpg
    FilledUp.jpg
    83.1 KB · Views: 141
  • ones I made earlier...........JPG
    ones I made earlier...........JPG
    97.6 KB · Views: 164
  • FlowBracketFitted.JPG
    FlowBracketFitted.JPG
    93.2 KB · Views: 152
  • FlowBracket.JPG
    FlowBracket.JPG
    54.5 KB · Views: 149
  • 24pinb.JPG
    24pinb.JPG
    59.6 KB · Views: 123
  • 24pin.JPG
    24pin.JPG
    85.5 KB · Views: 117
Got it up and running last night, not without a big scare though........

I had managed to drip some fluid into the top of the PSU, it landed on the fan blades, or so I thought and I carefully cleaned it off with cotton buds through the grill. There must have been more that got past the blades, when I plugged in the cable and turned on the switch there was a hissing sound, then nothing then a huge bang. I thought that's it, the PSU, Mobo and CPU will be fried.

I was very lucky, I don't know why or how but everything is fine and running normal :-)

I have installed most of my work apps and have run a few tests with Crystal Disk Mark and Firestrike. I was not 100% sure how the 950 Pro would work but its just as fast in the adaptor as it is in my STH10 M.2 slot.

The PM 951 in the mobo slot is not as fast, the slot is only 10Gb/s but it is not exactly slow either. I have to buy and install a couple of SSDs for the front cage and that should be all the storage taken care of.

I have never tried firestrike before, it does give the GPUs a good workout..... The CPU has overclocked to what so far seems like a stable 4.6Ghz, I used the AI suite then uninstalled it as it always gives me "Dip Away Mode" errors on reliability history.

Still plenty to do, the GPU cables, the USB cables to the pump and Farbwerk, the power to the SSD cage and power to the Farbwerk. I have some paint that matches the fluid which I want to try and paint the rubber bumpers with, just not sure how well it will stick if anyone has any tips for getting paint to stick to silicone rubber? It would be appreciated.
 

Attachments

  • 950PRO.JPG
    950PRO.JPG
    49.3 KB · Views: 174
  • SM951.JPG
    SM951.JPG
    51.3 KB · Views: 201
  • Firestrike 23134.jpg
    Firestrike 23134.jpg
    66.8 KB · Views: 193
Last edited:
Everything is fitted and working now bar the rubber bumpers. I have run Prime95 on torture settings and the temp on the CPU seems to top out at 65 degrees C (ambient is about 25)

Running Firestrike on a loop sees the GPUs no more than 40 degrees so I am pretty pleased with the cooling of the 2 Hardware Labs radiators.

The Aquastream Ultimate pump is really good, I have it setup on target temps but it has lots of other ways of controlling the water temps. When the system is ticking over it turns to pump down to 3000rpm and the fans to the minimum I set of 300rpm.

When it puts the fans and pump on 100% the noise is quite loud but this is only happening when I am stressing everything, in normal and medium use its as good as silent. The PSUs fan when switched to auto from eco is far more noisy, so it stays on eco most of the time.

I have some plans for the rear of the case which I will undertake in the next couple of months. In the mean time I am really pleased that it has turned out as portable as I had hoped as that was the reason for building it.

The final spec is as follows :-
Mobo - Asus X99 M WS
CPU- i7 5930K
RAM- 32Gb G Skill
EK Water blocks on CPU, RAM and GPUs
Monsoon pipes, fittings and modular reservoir
Aquacomputer Aquastream Ultimate pump
Aquacomputer Farbwerk RGB LED controller
2 Hardware Labs Black Ice Nemesis radiators
Super flower 1000W PSU
2 Fury X GPUs
OS Drive M.2 SSD Samsung 950 Pro 512 GB
M.2 SSD Samsung PM951 512 GB
SSD Samsung 850 EVO 1TB
SSD Samsung 850 EVO 512GB
 

Attachments

  • Capture3.JPG
    Capture3.JPG
    85.8 KB · Views: 158
  • Capture2.JPG
    Capture2.JPG
    90.5 KB · Views: 163
  • Capture1.JPG
    Capture1.JPG
    91 KB · Views: 151
Last edited:
I had a small weep on one of the pipes from the CPU block so I decided to take the opportunity to drain the system, change the fluid and fit the Liquid Extacy mosfet block that I bought for the build but did not fit because it had not been delivered.

The water block is an almost perfect match with the EK blocks on the other parts so quite pleased overall even if it did take months to be delivered.

Its been a while since I bent any acrylic so it took a few attempts but I finally got it back together and leak free!

While the graphic cards were out I also fitted a mobo to serial port socket which I can use with my plotter/ cutter.
 

Attachments

  • 2.jpg
    2.jpg
    86.2 KB · Views: 111
  • 3.jpg
    3.jpg
    91.3 KB · Views: 170
  • 4.JPG
    4.JPG
    89.4 KB · Views: 113
Back
Top