Project: Toshiro Hitsugaya

remember300

Active member
Seeing all these themed builds i wanted to make my pretty average build (for this site anyway) and make it my own.

I unfortunately want a theme based on Toshiro from Bleach:
0Jba5D2.jpg

Which is an issue with a rog board ;)

I could of gone for a white case but id like a darker theme.
im working with my Corsair C70 and will be using some "Peugeot Tivoli Blue" on the main back plate with this little lot:
1KYmHqt.jpg

this will be my first painting that is not little models so im not sure apart from cleaning it well how to get a good coverage that is nice and even will be using the primer to get it nice and smooth looking.
ymorhQB.jpg

I have also cleared my hdd bays out 1 for better air flow and 2 ill be making a nice panel which will be back lit by more corsair RGB leds
Fyzvpp8.jpg

I will use white/ light blue lighting inside the case and will be redoing the front IO with blue accents and im going to steal the tights idea for my fan filters.
sorry for lack of pics but id rather show the progress than what im with atm :D


Any tips would be great hope you enjoy this

Edit:
I also want to get my hands on those dom plat bars for a mod don't wanna mess mine up and and ruin them.
 
Last edited:
Got my eye on this, going to hopefully tear my Alienware case down this weekend, clean it, sand it then begin spraying, really nervous!
 
Got my eye on this, going to hopefully tear my Alienware case down this weekend, clean it, sand it then begin spraying, really nervous!

Plastidip.
If you don't trust your paint skills use plastidip. I used it on my GPU shroud with very little prep (I just cleaned it down) and it looks fine.
 
Last edited:
thanks guys my biggest worry is not the case... its removing the red from my mobo... might crack out the old warhammer paint and manually paint them,,, obv not in the slots just the out side.
 
Plastidip.
If you don't trust your paint skills use plastidip. I used it on my GPU shroud with very little prep (I just cleaned it down) and it looks fine.

Not really nervous about my painting skills, used to be quite good with the old warhammer but never done a case before. The inside needs black but I'm not sure how I want the outside plastic yet so I'll look at plastidip now. :)

Edit: Actually this plastidip looks easier and quicker!
Edit: Do you need primer plastidip? It'lll be for bare metal and if needed which I doubt, the plastic Alienware design that covers the metal case.
 
Last edited:
just need to key up the old paint surface with a scotch-brite pad or some 400/500 grit paper, then clean the surface with panel and apply primer leaving it to tack off between coats and then once it has dried flat it back with some 800grit paper on a sanding block to remove the orange peal finish and if you wish you can also you a light coating of a matt colour over the top of the primer as i guide coat like the bit on top of the bonnet you dont need anymore than that, its only there to show you the low spots so you can sand it out. then once you have that all sanded back nice and smooth with no low spots then your ready to clean the surface again with some more panel wipe and apply your colour how many coats depends on what shade of blue you want so just keep going until its the shade you want all over remembering to let it tack off between coats but this time when your finished with the colour wait for it to tack off and start applying the lacquer.

depending on how fussy you are once the lacquer is dry you can then flat that back with 1000 grit paper until you have removed the orange peal again better off using a sanding block when flatting the lacquer back and you also wont need guide coat for this due to the high spots becoming dull after sanding and the low spots will still be shiny until sanded (so once the whole panel is the same dull matt finish all over you know its flat) you can than use a cutting compound (such as 3m perfect-it III fast cut compound or farecla G3 compound which can be used by hand or machine, the fast cut compound dose not require water as a lubricant where as the G3 compound dose) to remove the marks that the 1000+ grit sand paper left behind.

also two other tips -

1st: - when using a sanding block to flat paint, key up a surface or shape and sand filler always use the block at a 45 degree angle to the direction your going in and also change direction from time to time this way you have less of an edge on the outside of the sanding block. by doing the above two things this helps to stop whats called tram lining, which is where the sides of the sanding black dig in to the work piece and create two parallel lines

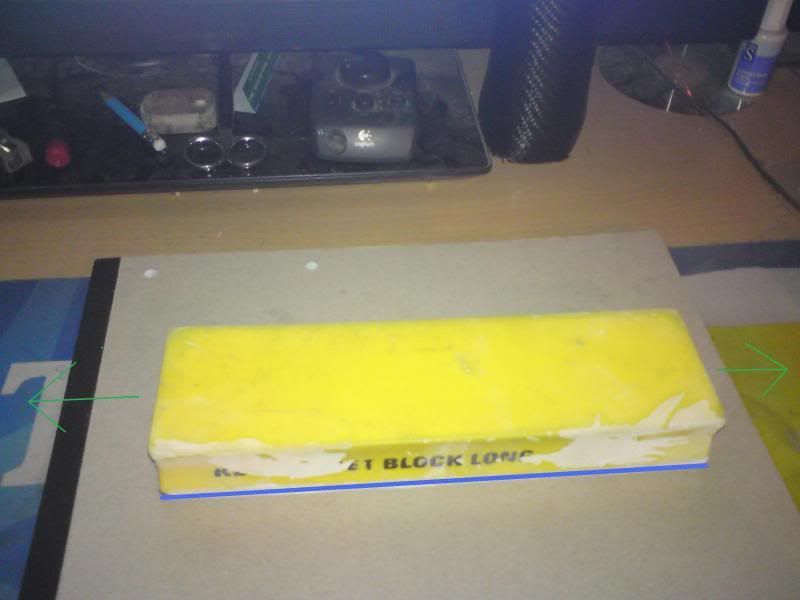
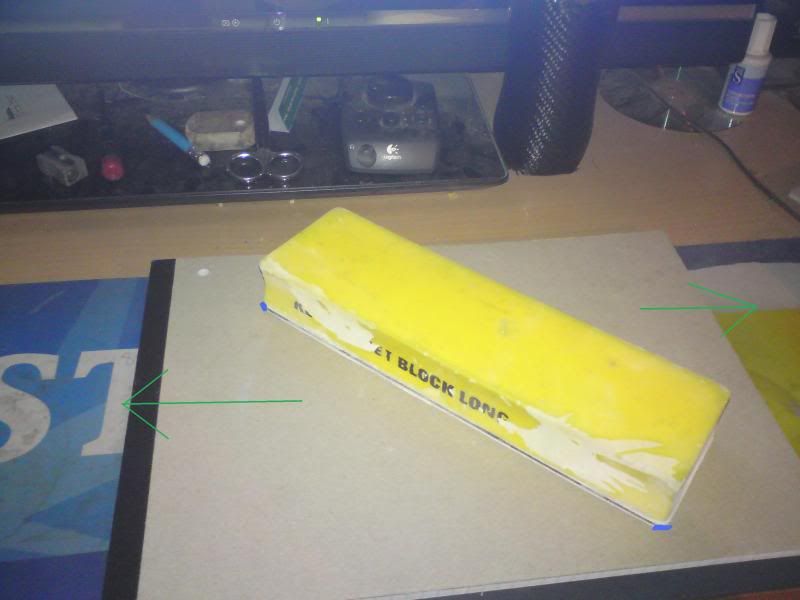
two quick photos to help explain

1: - most people use a sanding block in this fashion pushing it in the direction of the green arrow which leaves you with a large edge on the sanding block illustrated by the blue line, so any uneven pressure can cause the sides of the block to dig in and cause the tram lines.
2: - the better way to use a sanding block

note the direction in which the block is being used which is illustrated by the green arrows again but notice now how small the edge surface is compared to before and yet again this is illustrated by the blue line.

2nd: - is when applying your paint put one coat on and then change direction by 90 degrees for the next coat as this helps to get an even coat. so if you do your first coat from left to right or right to left then for the next coat change so your applying from top to bottom or bottom to top and keep changing like this until you have applied all your coats, if you can move the part you painting throw 90 degrees after each coat that will work to
 
Last edited:
nice little guide there and ya kenny is awesome, ill get a sanding block in a fortnight

one quick thing will the clear laquer be non conductive? it says its acryllic based so im assuming it will be.
 
nice little guide there and ya kenny is awesome, ill get a sanding block in a fortnight

one quick thing will the clear laquer be non conductive? it says its acryllic based so im assuming it will be.

yep ive done far to much gob work and painting :) but if it helps i dont mind sharing.

id not like to say if acrylic paint was gonna be conductive or not as different manufactures use different ingredients. to test id just paint a strip of random metal and get a friend to test it on an electric fence around an animal pen to be sure :D

nah i have some non conductive polystyrene like acrylic, which ill do 2 coats under 2 blue 2 laq then ill use a multimeter to test for electrical conductance.

EDIT:
2Ddo27F.jpg

Tis tool was awesome :D
USRM1Rp.jpg

Wqzxac3.jpg

bD7W7h3.jpg

nQqhGx4.jpg

I have done some colour testing, using the paints, i did not treat the material before or care about the overall finish right now, i mainly trying to see how it will roughly look along with doing an electrical test on each stage, to make sure it won't risk my mobo.
And i really really like this blue!

Edit 2:
Ldn1vjC.jpg

24wL8cX.jpg

first i have to make sure my probes are ok
IIRK6s2.jpg

Now to check the primer
7cOzcoW.jpg

Then the bit i was worried about, the paint its self... and again no problem
uboB4Q4.jpg

And thankfully also the lacquer is non conductive and shiney!

I think as the case is smooth i may not need to sand it down, just make sure its clean i should still get a nice clean and shiney coat.
 
Last edited:
the case may look smooth but id bet once you start to take some sand paper to it it wont be so good unless it was flatted at the factory.

you will need to key the surface up for the new paint to stick to tho but like i said you can use a scotch brite pad or sand paper to do this. scotch brite wont make the saurface flat and smooth tho all it will do is give you a key where as the sand paper will make the surface flat and smooth if you block it
 
so would wire wool with 200 grit then 800 then 2500 Sand paper be ok and this sounds so dumb but im assuming you use a machine oil to use it as "wet" paper? would that give me the finish that would look best?
 
so would wire wool with 200 grit then 800 then 2500 Sand paper be ok and this sounds so dumb but im assuming you use a machine oil to use it as "wet" paper? would that give me the finish that would look best?

wire wool is pretty course and could leave some deep scratches in the surface. 200 grit for keying up is a bit much for rattle can primer so id play safe and use the 400 or 500 grit paper, you could try 320 grit but that may also be a bit much. rattle can paints are so thinned down in order to get it to spray out the tin that you end up with less solids and more thinners than if you was using it from a spray gun so build is not as good from a rattle can hence why you dont want to go to mad with the grit as you might not be able to fill the scratch marks out.

a friend of mine had a go at refurbing his wheels but went to heavy on the sand paper grit and could not get the coverage with a rattle can to remove the marks this was 40 grit on aluminium tho. when he asked me to save them i was like sure how bad can they be but when i saw them in person i shocked. i had to sand them again working from 120 to 240 grit just to get a fair amount of it out, even then they still had 1 to 1.5 ltr of primer to get them smoothed


flatting and keying up the old surface 400/500 grit paper
for primer use 800 grit paper
for flatting the lacquer back 1000 + grit wet and dry paper, use some warm water with some washing up liquid in it for wet use

you dont want to be using any oils on it as it could cause the paint to reacted if you dont get all the oil off and you also run the risk of it not sticking. you want to keep the panel as clean as you can while prepping it and before painting clean it with panel wipe. Using wet and dry paper wet is not to bad as the washing up liquid in the water will help to clean the surface and keep it cleaner. even the oil from from a bacon sandwich can cause issues as the grease/oil is transferred to hand and then from your hand to the panel.

here is a better photo of guide coat use
 
cool ill be going halfords in the morning to get the SP before work so ill look at that ill probs be doing 2 coats base 3 coats paint 2 laq.
 
Back
Top