You are using an out of date browser. It may not display this or other websites correctly.
You should upgrade or use an alternative browser.
You should upgrade or use an alternative browser.
Project SparklePony - Thermaltake 2020 Case Mod Challenge
- Thread starter AcuteJungle66
- Start date
The_Crapman
New member
Cable management just means you managed to fit them in :rollinglaugh:
AcuteJungle66
New member
Has it already been a week since the last update?
Well, I better get cracking then!
So the next thing I wanted to get sorted out was the panelling/trim on the 'business side' of the case. I kind of had an idea of how I wanted it in my head, but thought it safe to try with foamboard first.
Which is just as well, since the prototype was a fair bit wonky:
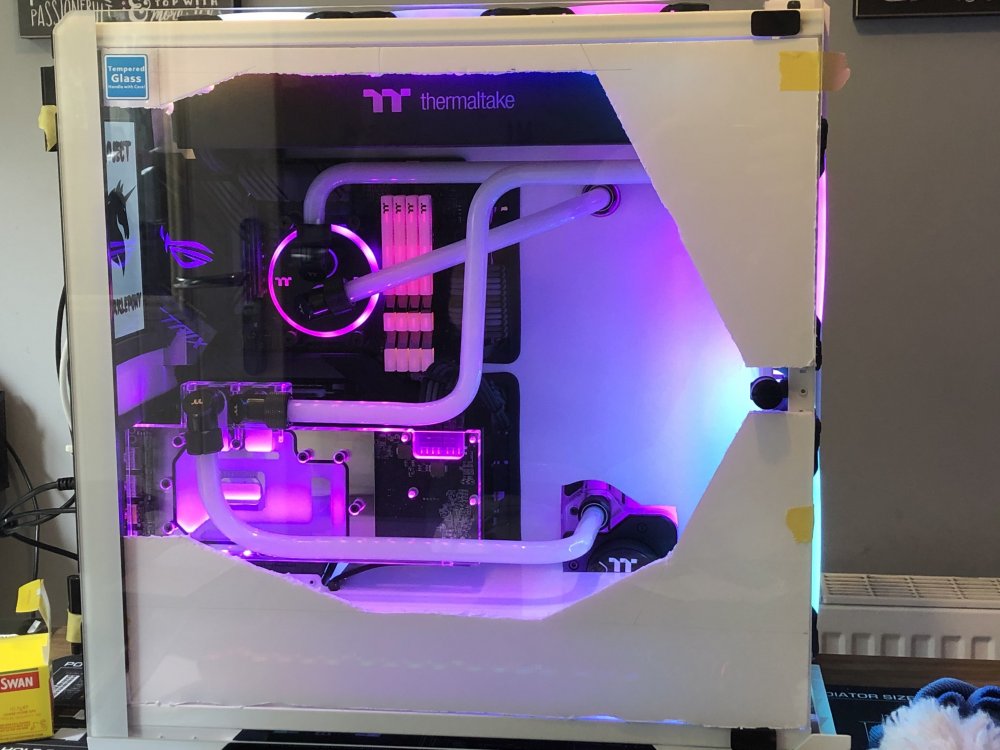
But at least it served its purpose, it enable me to fine tune things a fair bit before moving on to the actual acrylic pieces.
So a little bit of jigsaw action resulted in:
.thumb.jpg.013231f7de75eefe34bce1b5d9de0038.jpg)
So my inital thoughts were that I was at least happy with the shape and relative symmetry of it, and I like that some of the lighting was coming through the acrylic; but ultimately I decided that I would like it better if I painted it.
Which then gave me an idea. What if I put on some stars (as in the stickers we used to get at school for doing a good job), painted over it and then peeled them off? I wonder if that would work:
.thumb.jpg.8867362c5af2e1458a0d7a305cc8f604.jpg)
So slapped some primer on it and put it to one side for now, as I wanted to turn my attention to the front and top panels:
.thumb.jpg.9ba34608a5caac8ddda2e47dcd1ece74.jpg)
Managed to get it bonded at least, but I knew that getting the seams all smoothed out would require a little bit of elbow grease later on.
.thumb.jpg.a552a8d63c4ac794870df9c27973eb26.jpg)
Same with the front, quite a bit messy here as I was slapping it on there a fair bit. But it was nice to see how the front would look with the panel filled in like that. Frankly I quite like the look, was exactly what I was going for!
So I put both of those panels to the side for now, so they could cure, and moved on to putting some paint down on the trim panels from earlier:
.thumb.jpg.6124fdaee426521b728dce6407f318fc.jpg)
Not too shabby. Some slight imperfections due to not having a sealed painting booth, but only really noticeable if you really get up close and personal. These should hopefully do the trick.
The last week or so we've had fairly wet weather up in our neck of the woods, so when I got a brief dry spell I took advantage of it and cut out the acrylic for the other side panel:
.thumb.jpg.3a24774f467634708d58e8e455f33eb7.jpg)
With that cut at least, I just need to get it bonded to the panel then smooth out the seams. Then we can get cracking on making a stencil for it and getting it painted. But there's a good chance that will be one of the last items we tackle.
With more dry weather this week, it was then time to keep working on the top and front panels. I knew from the get-go that this was going to be tricky for me, and would require building up the seams/sanding down/rinse repeat.
.thumb.jpg.51b1d8b6774a79f856bd4ba4da92b8ca.jpg)
So not quite done with them yet, but I'll get there. I'm just hoping that the weather is dry when I am finally ready to slap primer on them.
With those sitting outside to dry, I figured I would turn my attention back to the interior; as there are still a few things to take care of.
First up was seeing how the stars turned out:
.thumb.jpg.0741f9aa54e8a92808af5014b129b262.jpg)
Sorry about the reflections, it's a bright day so the TG makes it a bit tricky. Crappy photo aside, the stars turned out pretty well. Whilst not exactly my cup of tea, my stepdaughter absolutely loves them; so that's the important thing! I also think that the black edging (which is just a roll of rubber moulding) really just sets it off, just needs some slight tweaking so it is nice and straight. I'm also going to clean up that area on the right close to the latch for the glass, so it looks a little bit more streamlined.
Originally we were planning on using Armour Etch to engrave a design on the glass, but I am not convinced at all.
We (it's not just me) feel that once we take care of some of the other decorations in there, that it would then just become 'too busy' or detract from the interior. But once all the other bits are done we might change our mind.
Please feel free to let us know what YOU think.
I cannot take credit for this next small alteration, as it was actually my partner's idea; and in my opinion it was a really good one:
.thumb.jpg.620b4929a2e33e9341d5ee38c9a0a6eb.jpg)
Just a little bit of black mesh at the front, just for a bit of contrast. Plus of course it does serve the functional purpose of collecting some of the dust, so that is bonus. Whilst it looks fairly black from that angle, once you shift a bit it then lightens up a fair bit:
.thumb.jpg.d29121cddb43f58018308d0bdc3dd402.jpg)
Not too shabby at all.
Well that is all for now, I just have a few more finishing touches for the interior as well as tidying some things up; and then I can focus on getting these exterior panels all sorted out.
With only 2 weeks left, I was really hoping to be done this week so I would have all of next to work on the final video; but depending on the weather, I very well may be cutting it close!
As always, thanks for the support and feedback, it has been great fun so far.
Stay safe!
Well, I better get cracking then!
So the next thing I wanted to get sorted out was the panelling/trim on the 'business side' of the case. I kind of had an idea of how I wanted it in my head, but thought it safe to try with foamboard first.
Which is just as well, since the prototype was a fair bit wonky:

But at least it served its purpose, it enable me to fine tune things a fair bit before moving on to the actual acrylic pieces.
So a little bit of jigsaw action resulted in:
.thumb.jpg.013231f7de75eefe34bce1b5d9de0038.jpg)
So my inital thoughts were that I was at least happy with the shape and relative symmetry of it, and I like that some of the lighting was coming through the acrylic; but ultimately I decided that I would like it better if I painted it.
Which then gave me an idea. What if I put on some stars (as in the stickers we used to get at school for doing a good job), painted over it and then peeled them off? I wonder if that would work:
.thumb.jpg.8867362c5af2e1458a0d7a305cc8f604.jpg)
So slapped some primer on it and put it to one side for now, as I wanted to turn my attention to the front and top panels:
.thumb.jpg.9ba34608a5caac8ddda2e47dcd1ece74.jpg)
Managed to get it bonded at least, but I knew that getting the seams all smoothed out would require a little bit of elbow grease later on.
.thumb.jpg.a552a8d63c4ac794870df9c27973eb26.jpg)
Same with the front, quite a bit messy here as I was slapping it on there a fair bit. But it was nice to see how the front would look with the panel filled in like that. Frankly I quite like the look, was exactly what I was going for!
So I put both of those panels to the side for now, so they could cure, and moved on to putting some paint down on the trim panels from earlier:
.thumb.jpg.6124fdaee426521b728dce6407f318fc.jpg)
Not too shabby. Some slight imperfections due to not having a sealed painting booth, but only really noticeable if you really get up close and personal. These should hopefully do the trick.
The last week or so we've had fairly wet weather up in our neck of the woods, so when I got a brief dry spell I took advantage of it and cut out the acrylic for the other side panel:
.thumb.jpg.3a24774f467634708d58e8e455f33eb7.jpg)
With that cut at least, I just need to get it bonded to the panel then smooth out the seams. Then we can get cracking on making a stencil for it and getting it painted. But there's a good chance that will be one of the last items we tackle.
With more dry weather this week, it was then time to keep working on the top and front panels. I knew from the get-go that this was going to be tricky for me, and would require building up the seams/sanding down/rinse repeat.
.thumb.jpg.51b1d8b6774a79f856bd4ba4da92b8ca.jpg)
So not quite done with them yet, but I'll get there. I'm just hoping that the weather is dry when I am finally ready to slap primer on them.
With those sitting outside to dry, I figured I would turn my attention back to the interior; as there are still a few things to take care of.
First up was seeing how the stars turned out:
.thumb.jpg.0741f9aa54e8a92808af5014b129b262.jpg)
Sorry about the reflections, it's a bright day so the TG makes it a bit tricky. Crappy photo aside, the stars turned out pretty well. Whilst not exactly my cup of tea, my stepdaughter absolutely loves them; so that's the important thing! I also think that the black edging (which is just a roll of rubber moulding) really just sets it off, just needs some slight tweaking so it is nice and straight. I'm also going to clean up that area on the right close to the latch for the glass, so it looks a little bit more streamlined.
Originally we were planning on using Armour Etch to engrave a design on the glass, but I am not convinced at all.
We (it's not just me) feel that once we take care of some of the other decorations in there, that it would then just become 'too busy' or detract from the interior. But once all the other bits are done we might change our mind.
Please feel free to let us know what YOU think.
I cannot take credit for this next small alteration, as it was actually my partner's idea; and in my opinion it was a really good one:
.thumb.jpg.620b4929a2e33e9341d5ee38c9a0a6eb.jpg)
Just a little bit of black mesh at the front, just for a bit of contrast. Plus of course it does serve the functional purpose of collecting some of the dust, so that is bonus. Whilst it looks fairly black from that angle, once you shift a bit it then lightens up a fair bit:
.thumb.jpg.d29121cddb43f58018308d0bdc3dd402.jpg)
Not too shabby at all.
Well that is all for now, I just have a few more finishing touches for the interior as well as tidying some things up; and then I can focus on getting these exterior panels all sorted out.
With only 2 weeks left, I was really hoping to be done this week so I would have all of next to work on the final video; but depending on the weather, I very well may be cutting it close!
As always, thanks for the support and feedback, it has been great fun so far.
Stay safe!
yassarikhan786
New member
This is an absolute beast, amazing work. If I was being picky, I'd say use thinner trim on the side panel and maybe paint it white?
AcuteJungle66
New member
With only a week left to go, yep it looks like I will be cutting things close after all!
So since the last update I have been spending a fair bit of time with the front and top panels:
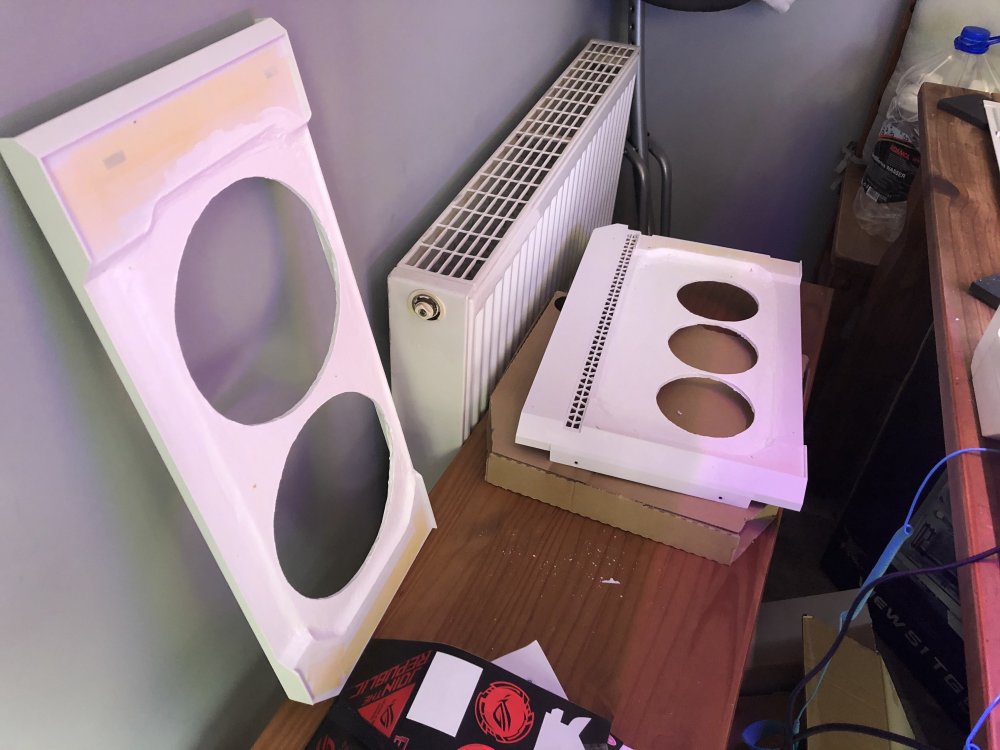
But we'll get back to them in a moment, as they have been quite a pain.
I also bonded the acrylic to the rear panel, made sure to leave it to set for a good day or so:
.thumb.jpg.f059489f0c4bec99202ad557f8451080.jpg)
This panel also caused me slight headache, or rather I gave myself a headache by forgetting about something. I made sure I had plenty of clearance on all of the edges...
...except for the rearmost part by the locking screws. So the panel wouldn't actually go on properly due to hitting the chassis, huge mistake on my part. So it was time to dust off the Dremel and trim some more case, which was quite frightening to be completely honest; since the chassis had already been painted and the system was assembled. But plenty of dust sheets made sure I didn't damage anything.
.thumb.jpg.81d5940a161061370b8cfc95adb6b0f5.jpg)
Ahh now it fits!
Needs some more things done to it of course, tidy up the seams where the acrylic meets the metal; and freehand a stencil then paint it of course.
Whilst I was looking at the rear of the case, I thought that a little bit of mesh would look quite nice in the hard drive caddy area:
.thumb.jpg.7094eebef7bec35b8a93d8117852a88c.jpg)
Yep, much better.
Another eyesore that needs dealing with is the area where the LCD panel resides:
.thumb.jpg.c1a25c8b79a89e24e70700722632b152.jpg)
I toyed around with a few ideas for this, initially thinking I would just have solid box-like structure painted and slapped on. But after a few mockups, I think I am going to go a different route.
I put some motherboard standoffs on the screws holding the panel in, which give me the perfect spacing to use my old friend acrylic:
.thumb.jpg.bc7247d269f1fba53505a20bc4025dcb.jpg)
The plan is to just use a single small rectangle of acrylic with mesh on the top and sides (leaving the bottom open for the cables).
Should tie in nicely with the rest of the scheme.
I'm not going to show any pics of the 'final interior' just yet, you'll have to wait for the final video I'm afraid! (I'll do a write-up after that goes live) But I worked for a fair while getting that sorted out, with the big obstacle being the exterior panels at the moment.
.thumb.jpg.5d618133892a562fccc59b8b12ee51a7.jpg)
.thumb.jpg.53e1150f0703f9b52b1a4f0e01ae336e.jpg)
I'm currently trying to get them to look as presentable as I can before getting them painted. To be honest it is really pushing the limits of my skill with this type of thing, to the point that I almost regret deciding to do this to these panels; well, with hand tools and common materials at least.
But I will try my best to get them looking decent, until time becomes a factor and I end up HAVING to paint them regardless!
Right, so I believe I am going to leave it there. I do not think I will be posting another update prior to the video going live and the voting opening, as I do want the final product to be a little bit of a surprise. But I will most certainly make another post about everything I did between now and then.
Once again, thank you for all the kind words and feedback, it has been greatly appreciated. Hopefully you'll enjoy the final product, I know my stepdaughter certainly will!
Take care folks, and stay safe!
So since the last update I have been spending a fair bit of time with the front and top panels:

But we'll get back to them in a moment, as they have been quite a pain.
I also bonded the acrylic to the rear panel, made sure to leave it to set for a good day or so:
.thumb.jpg.f059489f0c4bec99202ad557f8451080.jpg)
This panel also caused me slight headache, or rather I gave myself a headache by forgetting about something. I made sure I had plenty of clearance on all of the edges...
...except for the rearmost part by the locking screws. So the panel wouldn't actually go on properly due to hitting the chassis, huge mistake on my part. So it was time to dust off the Dremel and trim some more case, which was quite frightening to be completely honest; since the chassis had already been painted and the system was assembled. But plenty of dust sheets made sure I didn't damage anything.
.thumb.jpg.81d5940a161061370b8cfc95adb6b0f5.jpg)
Ahh now it fits!
Needs some more things done to it of course, tidy up the seams where the acrylic meets the metal; and freehand a stencil then paint it of course.
Whilst I was looking at the rear of the case, I thought that a little bit of mesh would look quite nice in the hard drive caddy area:
.thumb.jpg.7094eebef7bec35b8a93d8117852a88c.jpg)
Yep, much better.
Another eyesore that needs dealing with is the area where the LCD panel resides:
.thumb.jpg.c1a25c8b79a89e24e70700722632b152.jpg)
I toyed around with a few ideas for this, initially thinking I would just have solid box-like structure painted and slapped on. But after a few mockups, I think I am going to go a different route.
I put some motherboard standoffs on the screws holding the panel in, which give me the perfect spacing to use my old friend acrylic:
.thumb.jpg.bc7247d269f1fba53505a20bc4025dcb.jpg)
The plan is to just use a single small rectangle of acrylic with mesh on the top and sides (leaving the bottom open for the cables).
Should tie in nicely with the rest of the scheme.
I'm not going to show any pics of the 'final interior' just yet, you'll have to wait for the final video I'm afraid! (I'll do a write-up after that goes live) But I worked for a fair while getting that sorted out, with the big obstacle being the exterior panels at the moment.
.thumb.jpg.5d618133892a562fccc59b8b12ee51a7.jpg)
.thumb.jpg.53e1150f0703f9b52b1a4f0e01ae336e.jpg)
I'm currently trying to get them to look as presentable as I can before getting them painted. To be honest it is really pushing the limits of my skill with this type of thing, to the point that I almost regret deciding to do this to these panels; well, with hand tools and common materials at least.
But I will try my best to get them looking decent, until time becomes a factor and I end up HAVING to paint them regardless!
Right, so I believe I am going to leave it there. I do not think I will be posting another update prior to the video going live and the voting opening, as I do want the final product to be a little bit of a surprise. But I will most certainly make another post about everything I did between now and then.
Once again, thank you for all the kind words and feedback, it has been greatly appreciated. Hopefully you'll enjoy the final product, I know my stepdaughter certainly will!
Take care folks, and stay safe!
The_Crapman
New member
You having the same problem as me then mate? Those bricks just will not flush will they 
AcuteJungle66
New member
You having the same problem as me then mate? Those bricks just will not flush will they
If I was a time served plasterer I'd be alright!
Yeah, I've attempted a variety of methods, the perfectionist in me just wanted to get them looking as if they were oem; but I think I've hit my limits.
It likely would have worked flawlessly with acrylic pieces and a laser cutting machine, but doing it all by hand has been a pain.
I've got it as good as 'I can' for now, but I think I have a few ideas for hiding the imperfections.
Last edited:
The_Crapman
New member
Modding is less about how good you can make the mods look good, more how you can cover up the parts that aren't so good. :lol: Although I'm hiding one of my best bits behind the GPU, so go figure??? :headscratch:If I was a time served plasterer I'd be alright!
Yeah, I've attempted a variety of methods, the perfectionist in me just wanted to get them looking as if they were oem; but I think I've hit my limits.
It likely word have worked flawlessly with acrylic pieces and a laser cutting machine, but doing it all by hand has been a pain.
I've got it as good as 'I can' for now, but I think I have a few ideas for hiding the imperfections.
Modding is less about how good you can make the mods look good, more how you can cover up the parts that aren't so good. :lol: Although I'm hiding one of my best bits behind the GPU, so go figure??? :headscratch:
I see modding as nothing more than making something to fit the aesthetic and functional needs you have. If its for yourself, you make it how you would like to have it.
If its for customers, then its based on their requirements. As you say, doesnt always have to look good. But in most cases, thats the whole point
AcuteJungle66
New member
Phew, I'll tell you what; the final week was incredibly interesting. It was filled with minor issues and having to think quickly and readjust, but in the end the build was finished by the deadline.
If you want to just get straight to the end result, then the voting page has now launched: vote via gleam
But if you want to read the final build log and see how I got to the end result, then stick around!
18 July 2020
I tried as hard as I could to get the front and top panels to look as pristine as possible; but as I mentioned, I basically hit a wall in terms of my own skill. This was exceedingly frustrating, as these panels could effectively make or break the build. So it was time to get my thinking cap on......


Then it hit me.
I could armour etch the glass panels in order to hide the imperfections, possibly with some stars over the fans in order to tie in with the side trim. Plus with the glass frosted, it should give a really nice lighting effect. Of course once I read the directions on the bottle of Armour Etch, I realised that it was not suitable for large areas; so instead decide to go with the spray-on glass frosting. Whilst it wouldn't look as good, at least there was no risk of the glass shattering.
Having a plan in motion, I felt reinvigorated about everything (I was honestly a little deflated with these panels not turning out the way I hoped) and got the panels primered and painted. I then turned my attention to another side of the case:
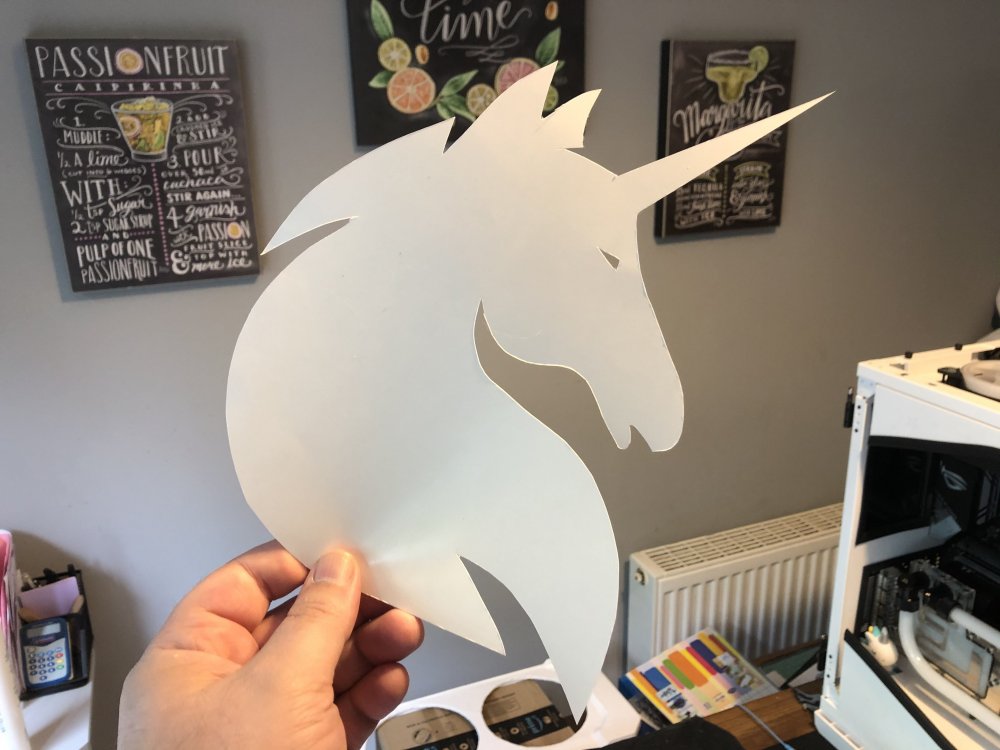
Turns out I'm not too bad with a blade, always knew that my military training would come in handy one day!
This of course was the stencil for the side/rear panel, so went ahead and slapped that on:
.thumb.jpg.3d4baf867fefd11a6b912302e7b39dec.jpg)
Once again I found myself up against my mortal enemy, trying to make smooth transitions between materials. I once again thought to myself that I might not be able to get this part of the build looking quite right, but figured I would sleep on it and revisit things the next day.
19 July 2020
Feeling a little better about things, first up was cleaning up the mess that I had made the day before:
.thumb.jpg.2d538d194aefe4e53e22d39b0d960a69.jpg)
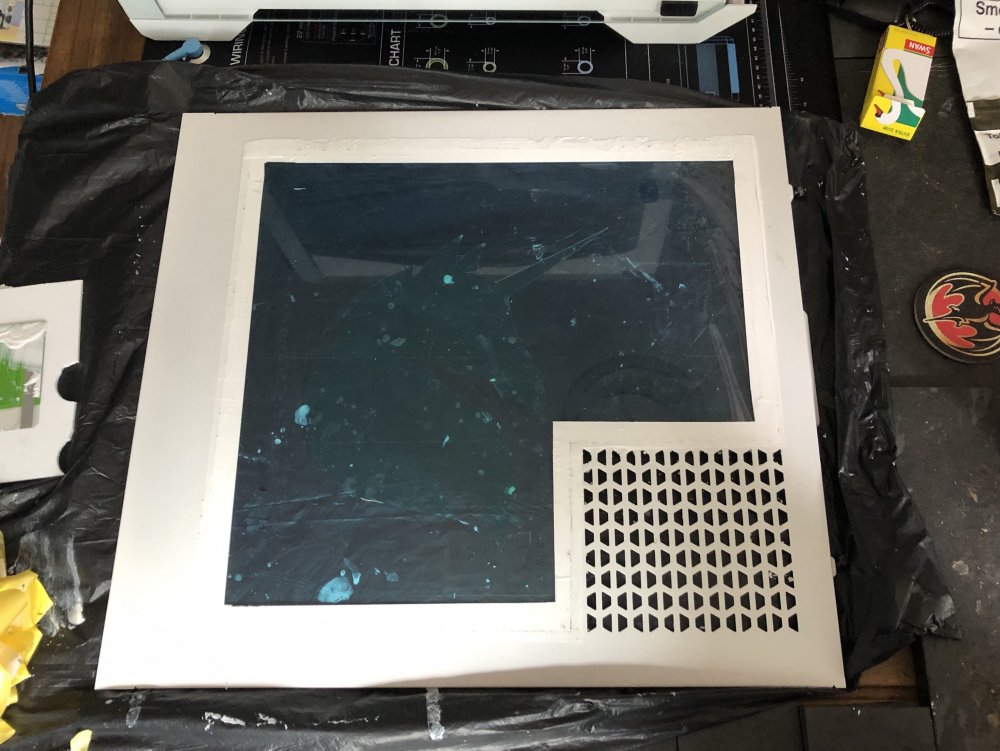
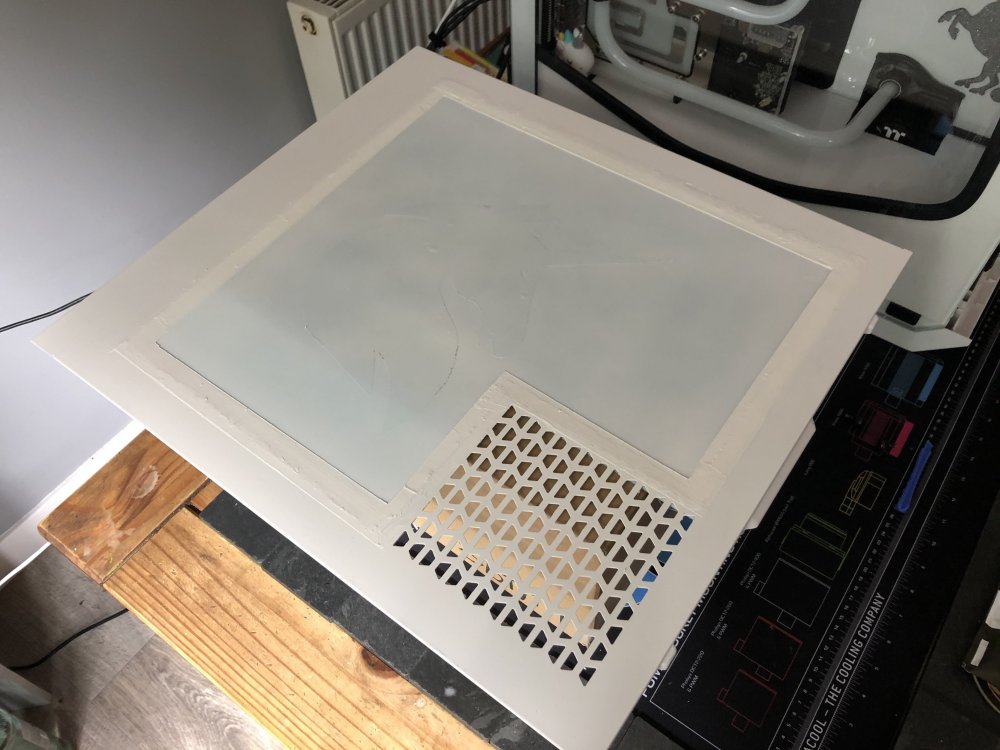
I wasn't too concerned about transition here, as we had a plan for the back panel. Whilst the inside of the case was monochromatic and fairly sleek, the plan was to go a little crazy back here and have some fun with it. So the next job was to get it painted at least:
20 July 2020
With the rear/side panel painted, I thought I better paint the other side of it as well in an effort to minimise light bleed:
.thumb.jpg.2ffaeadbc4d3e86f64dfebbbeb40b7fc.jpg)
Whilst this was drying, the front and top panels were ready to have the glass fixed back on; as the final coat of clear had been applied to them the day before and the frosting had been applied to the underside of the glass:
.thumb.jpg.c06026b44eb32bff77a951115ad16750.jpg)
.thumb.jpg.964d04bec8a0156d75fec47f803cec07.jpg)
By this point the rain had reappeared, so brought the rear panel inside to dry:
.thumb.jpg.edcbbc0cab20c28a4dd8dc93f726cbdb.jpg)
With everything either drying or setting, it was time to call it a day and see how things would be looking tomorrow.
21 July 2020
First order of business was putting the front and top panels back on the case. Which actually took much longer than it should! I couldn't get the front panel to slot back in, along the bottom edge there is a tab that slots in to the bottom piece; and it did not want to go in at all! So just a quick bit of cutting and giving the bottom slots more of a V profile rather than a U seemed to do the trick.
.thumb.jpg.eeecc4816252f9557e20fb0b4ccab6b7.jpg)
The frosted glass has certainly accomplished what I wanted it to. You can still see that both panels have been modified/filled in, but the imperfections are fairly well covered up by the frosting. It also radiates the light quite well. The only thing that bothered me was that you could peer through the gap between the glass and the chassis, seeing the imperfections. So I had a think and looked around to see what materials we still had laying around.
.thumb.jpg.44ba20cc4a194d4714f675060ea82a8e.jpg)
I still had some mesh kicking about, so thought this would be ideal. Not only would it somewhat mask those imperfections, it would be functional and also provide a little bit of contrast; tying in with the black trim throughout. So cut them to size, used some clear silicon craft glue and
.thumb.jpg.c573e8321a3afa9744925320339f1104.jpg)
.thumb.jpg.1a1499a35fce3a7651ef7af250ee95d2.jpg)
Just a small detail like that really makes a difference in my opinion. Whilst working on the exterior, we also put the build's name on the front:
.thumb.jpg.75a1a70fd0b6baae596f4177b0e132f9.jpg)
The last thing for the day was to have a look at how much light bleed there was on the rear/side panel:
.thumb.jpg.03e6acaead030671bbb5c77068c3331f.jpg)
Ooft, that is certainly a lot of it! Okay, no big deal. We'll pop down to the shops and get this sorted tomorrow.
22 July 2020 -The day before the build MUST be finished and video submitted
Whilst I was definitely cutting things a little closer than I had planned, I was still feeling pretty good about things at this point. We had stocked up on some craft supplies (if you haven't caught on, this entire build used common off-the-shelf items for most things) and all that was really left was the panel above and some other minor cleaning up.
First job was to tackle some the light bleed, so some black foamboard should do the trick:
.thumb.jpg.a43fb521ae1447e26ce59d27c5a59e73.jpg)
When it came to decorating this panel it was all about having some fun and doing it in a manner that my step-daughter would like, competition be damned. Whilst of course it would be great if other people liked it, but at the end of the day I tackled this more like a client build.
In this case the client was an eclectic young lady, so it may not be for everyone.
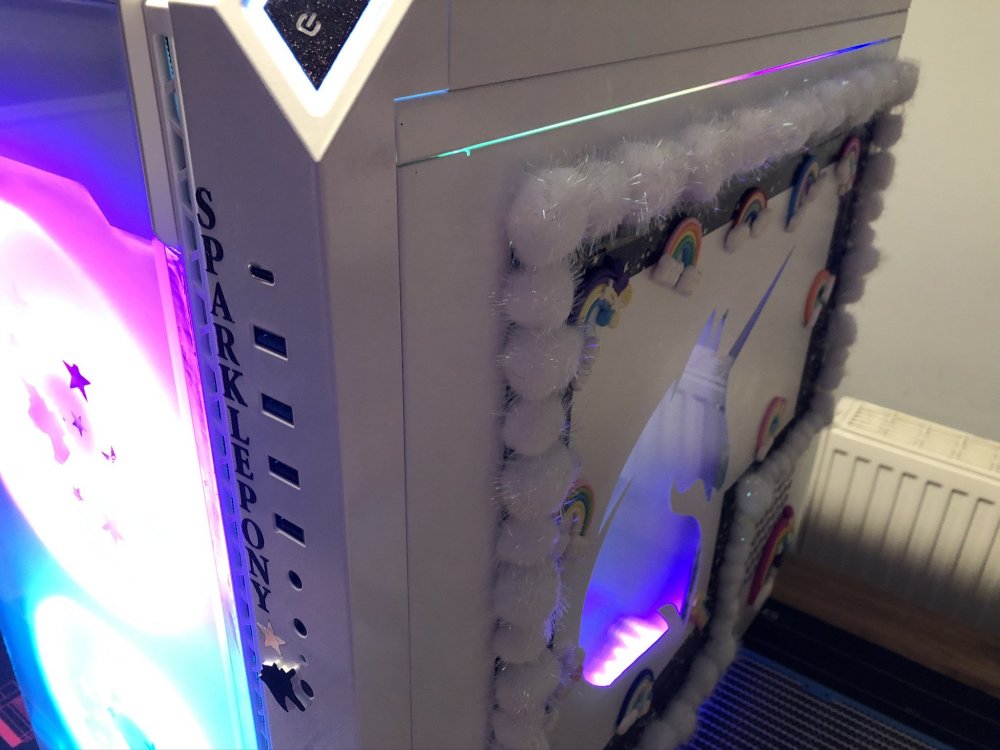
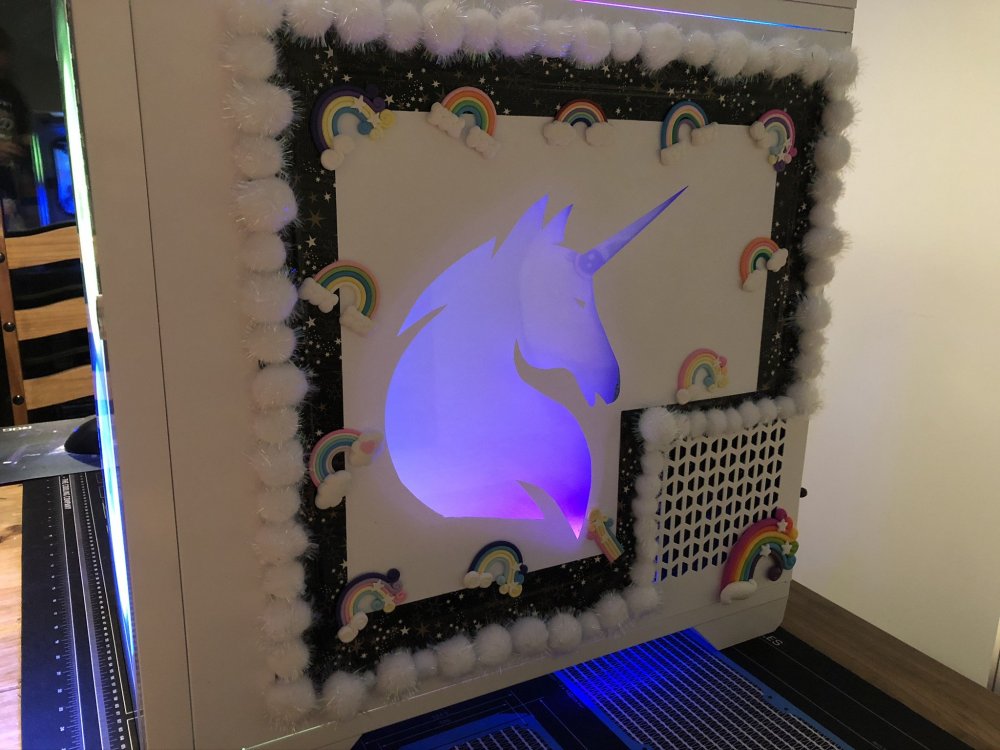
As I say, may not be everyone's cup of tea; but she absolutely loves it! First up was the use of actual Duck Tape (the brand) to hide the less than perfect seams between the acrylic and the metal, so pleased I found a way to include duct tape in the build; you can literally use it for anything! Joking aside, it also served as a nice backdrop for the pom-pom things; which sparkle quite a bit. The rainbows are actually cake toppers, which give it a nice little splash of colour; and of course the black foamboard has done the job of stopping the light bleed. You still get a little bit of light bleed right at the top between the panel and the chassis, but it is bearable.
With that panel done, the last thing on the agenda was the very rear of the case and covering up back of the LCD panel. Once again, we figured we would have a little fun back there.
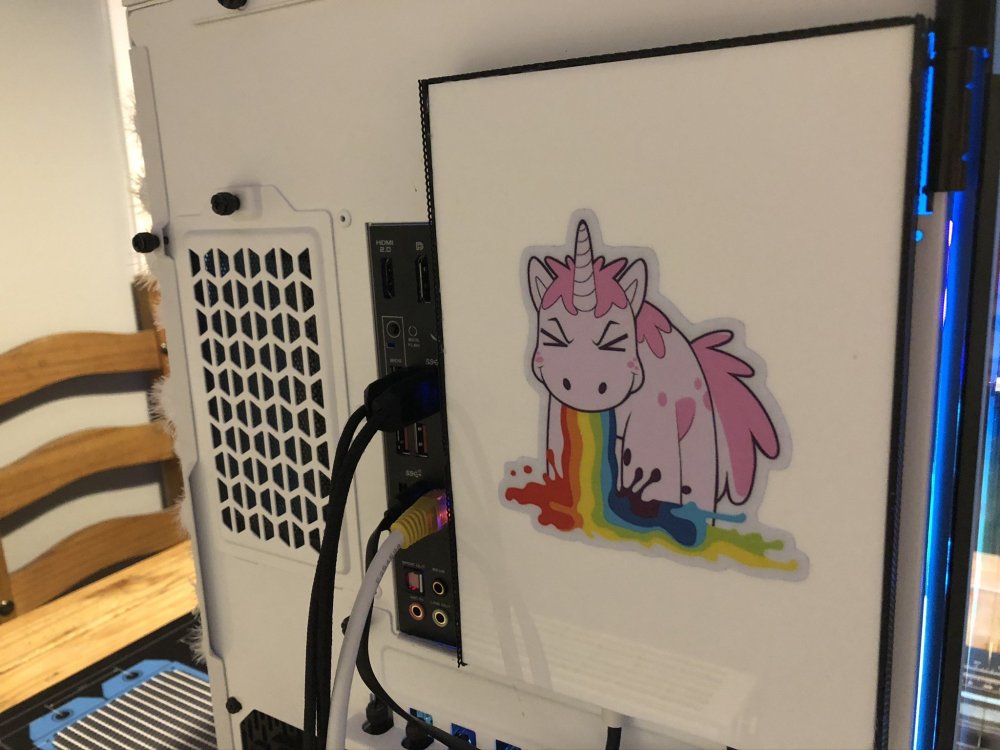
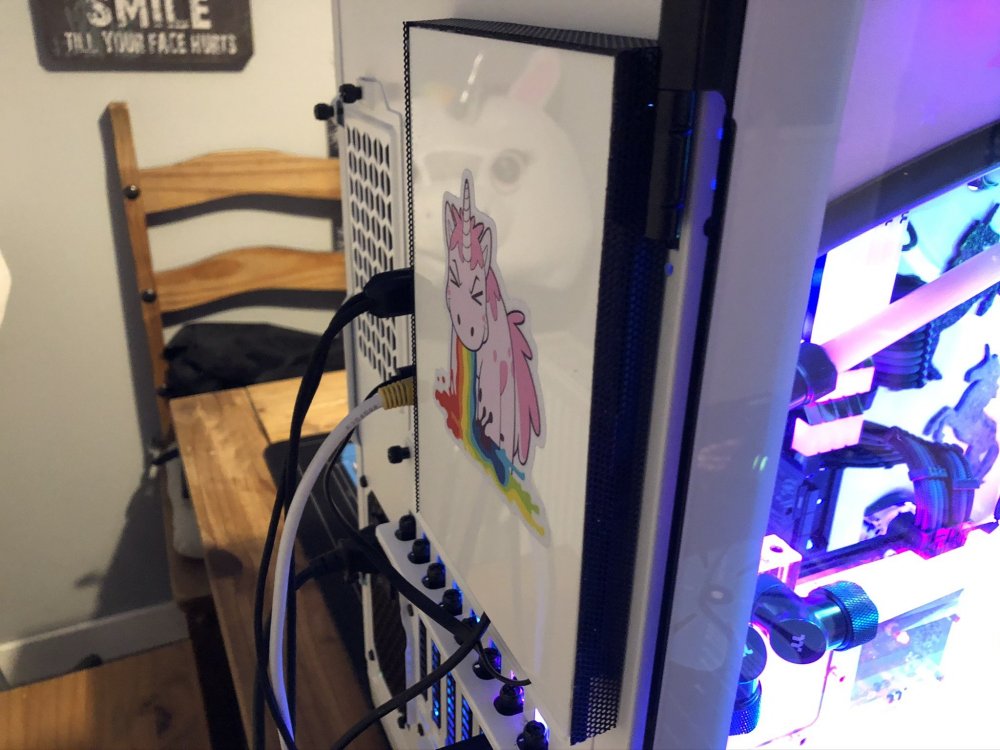
We used white acrylic and mesh once again, just to tie it in with the build; but slapped a colour sticker on just to give it a little pop. If you recall, I had used motherboard standoffs back here. So in order to fix on the acrylic panel I first took a piece of foamboard and glued it to the acrylic. Once that had set I then lined it up with the standoffs and made holes in the foamboard so the standoffs would somewhat slot in. Glued it all in place and then fixed on the acrylic. Fairly simple but does the job.
With everything done, all that was left was to take some pictures...
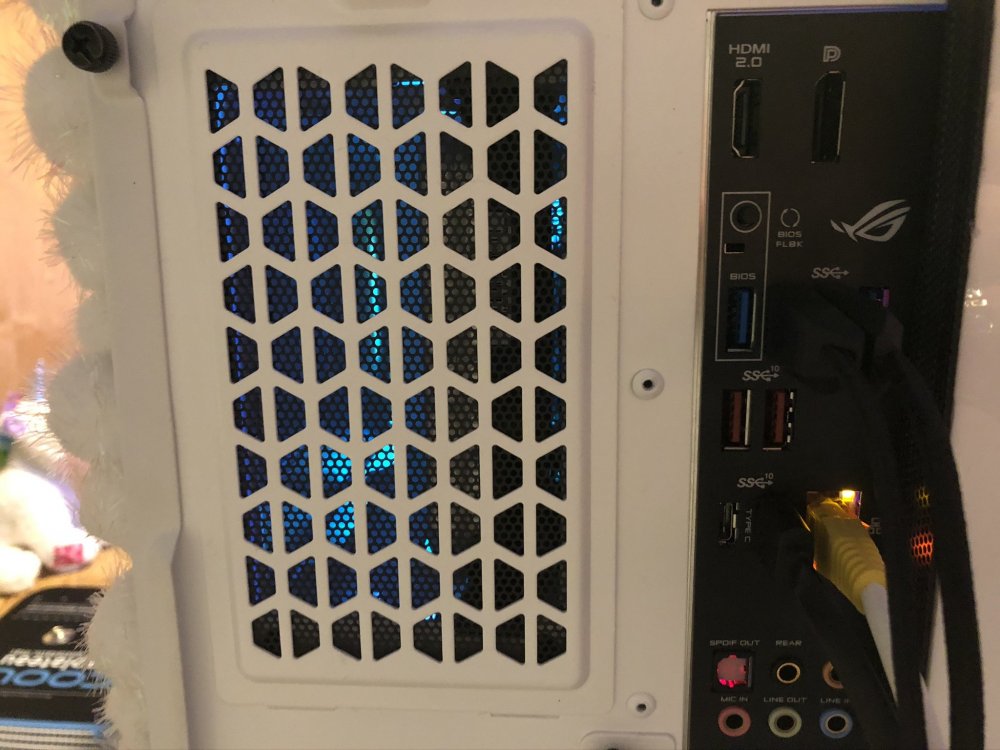
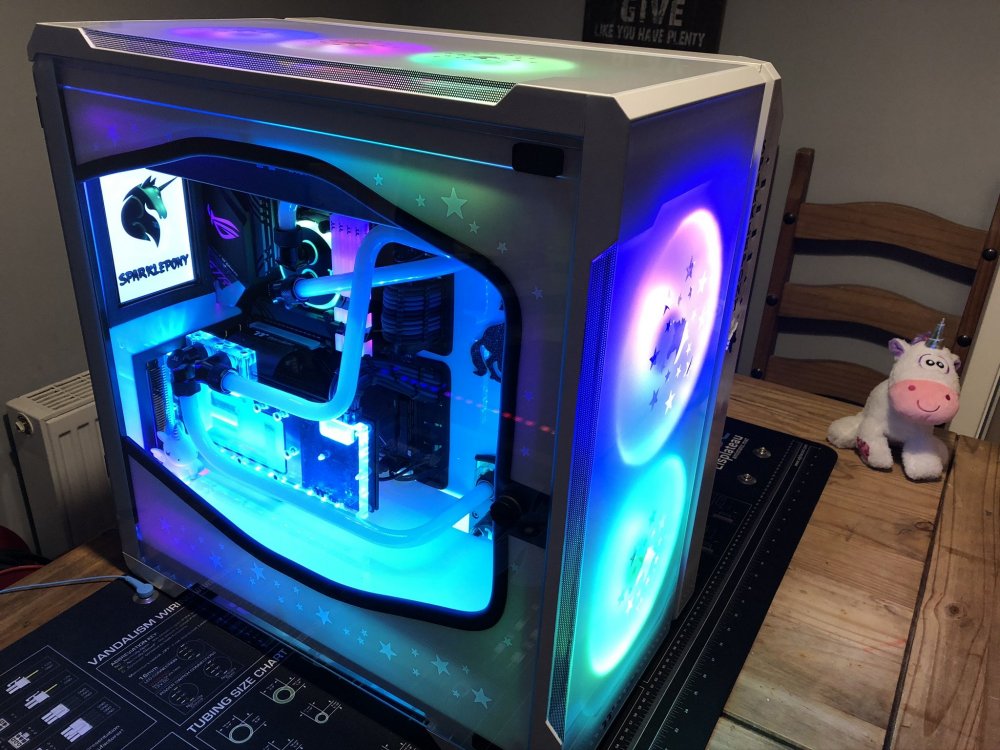
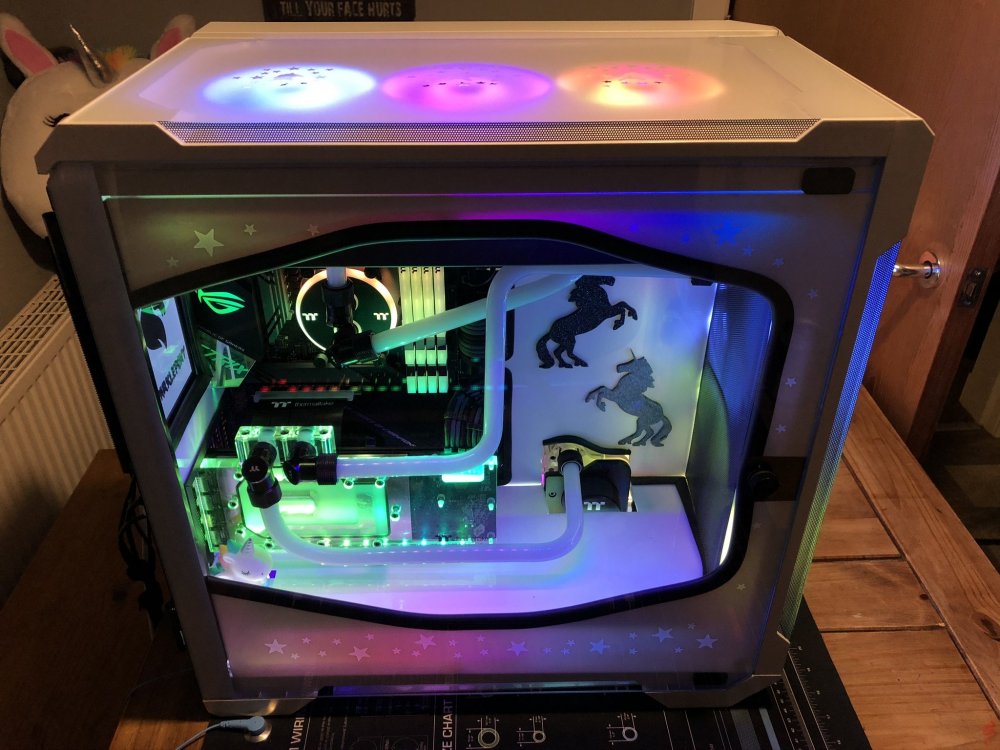
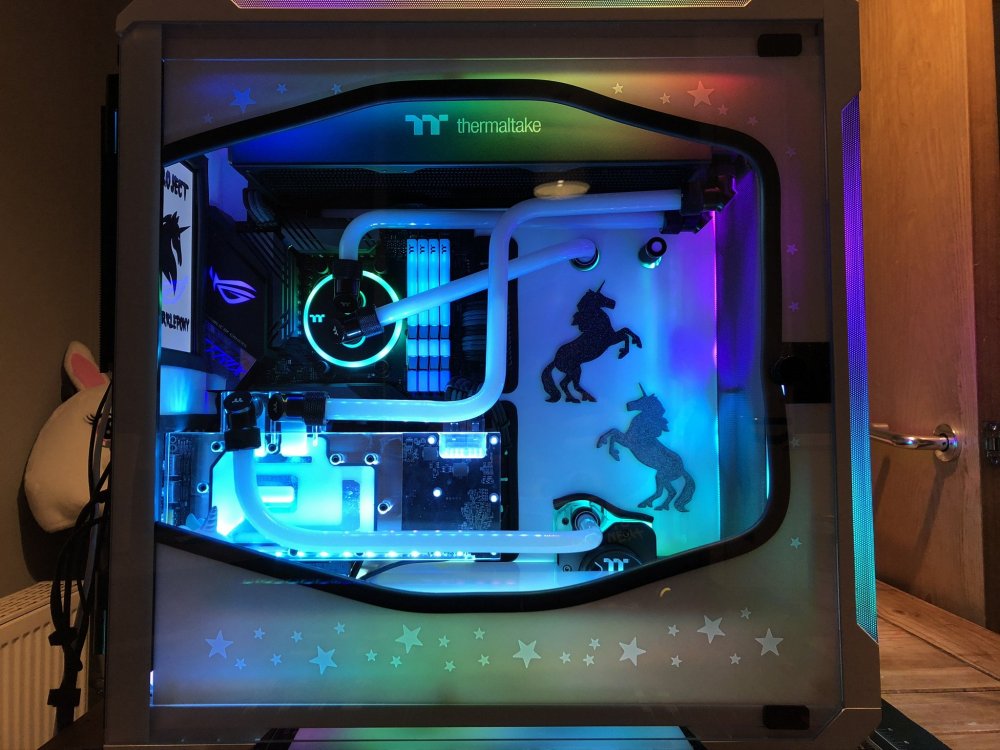
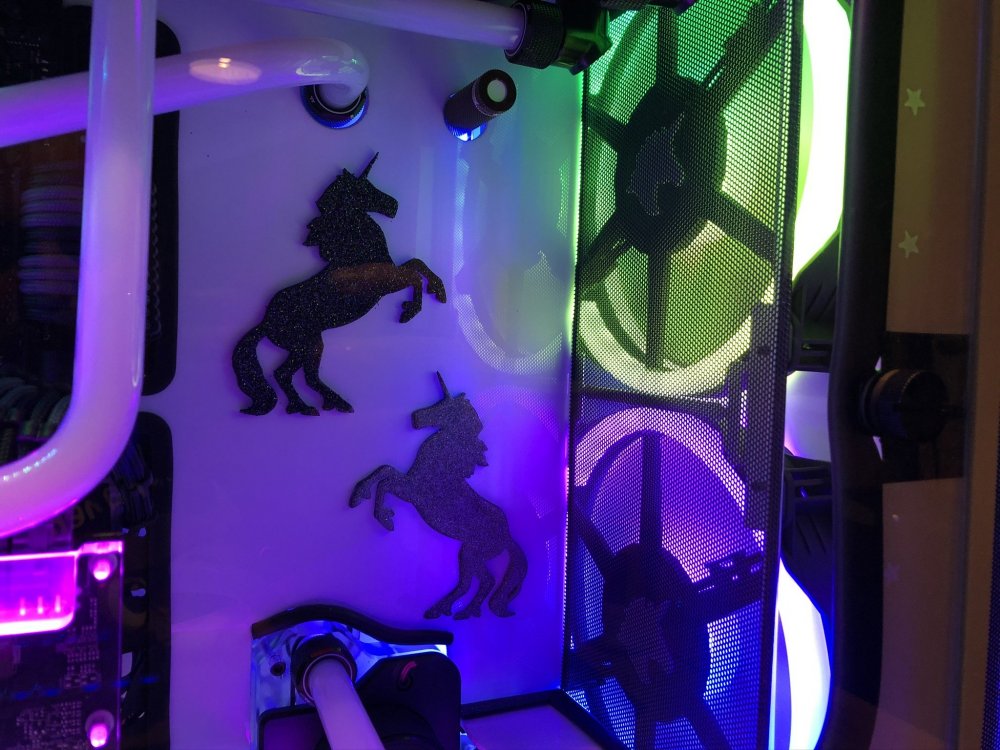
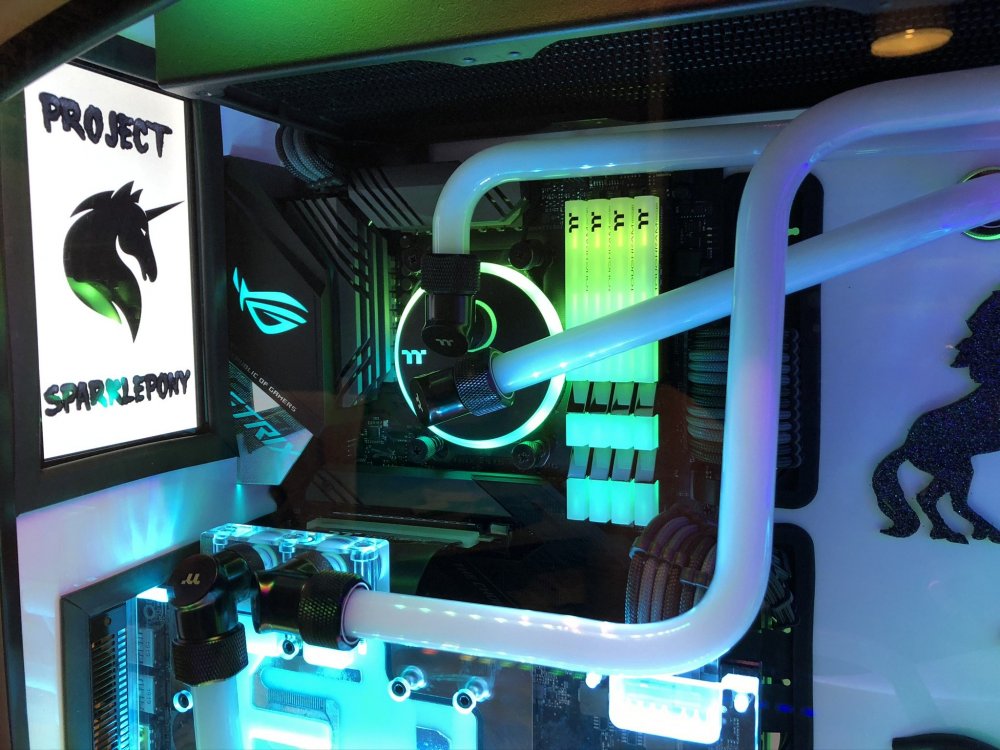
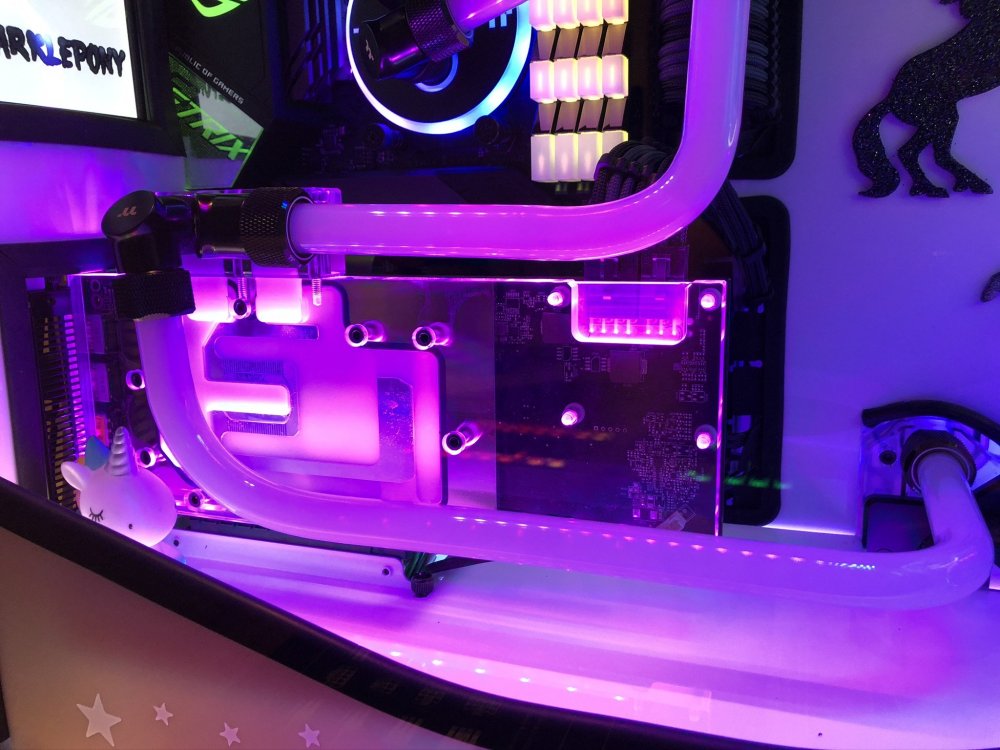
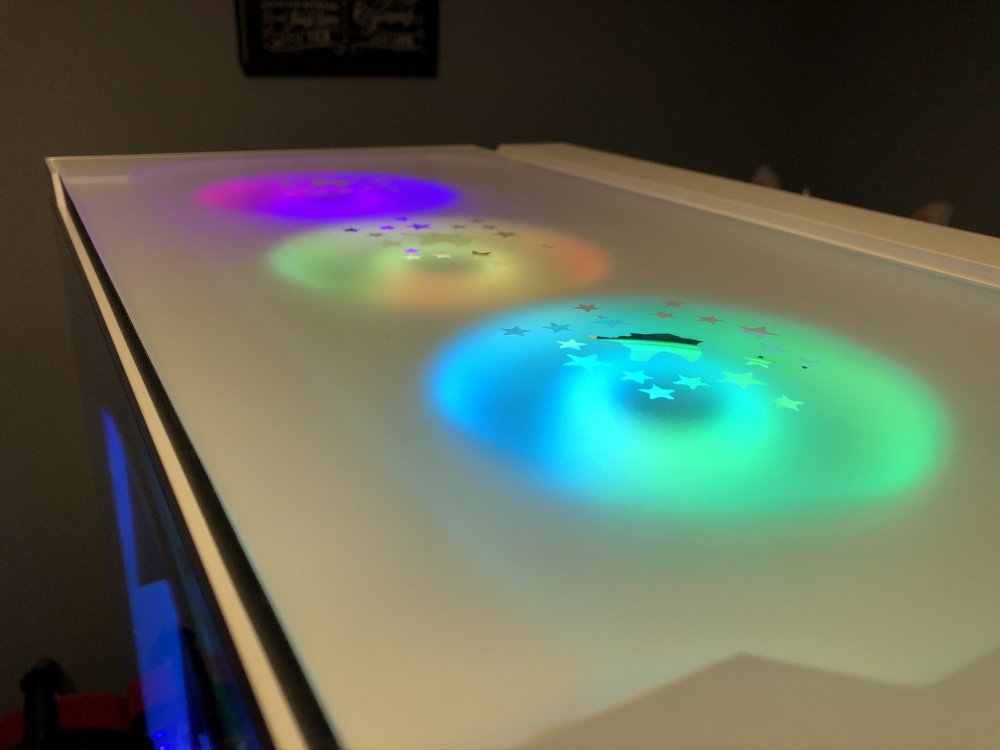
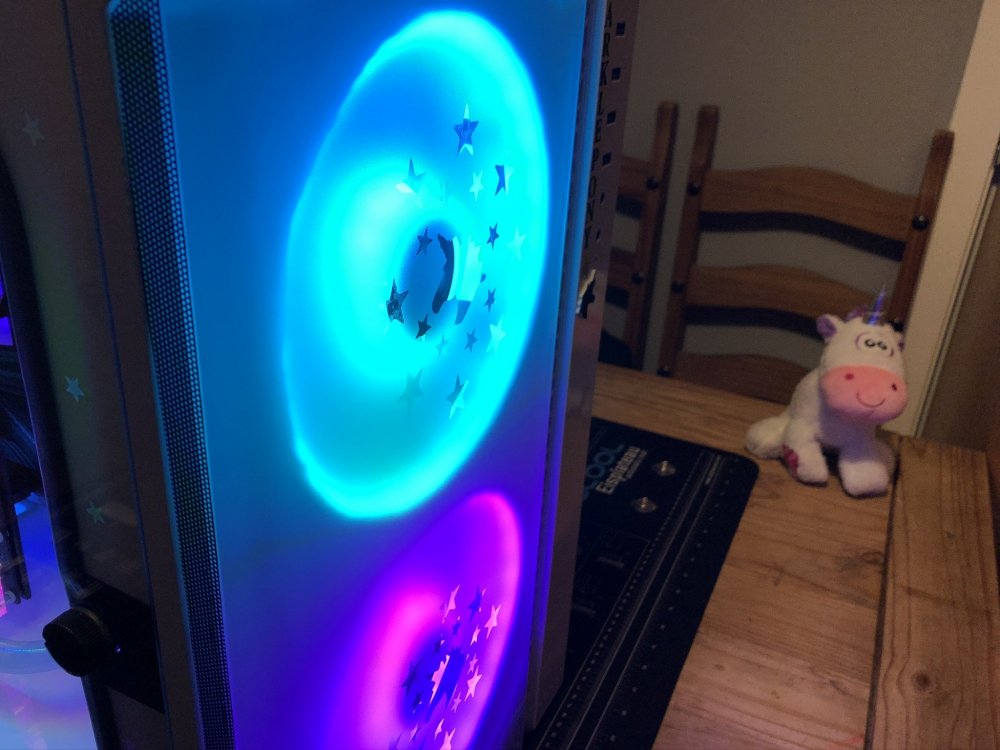
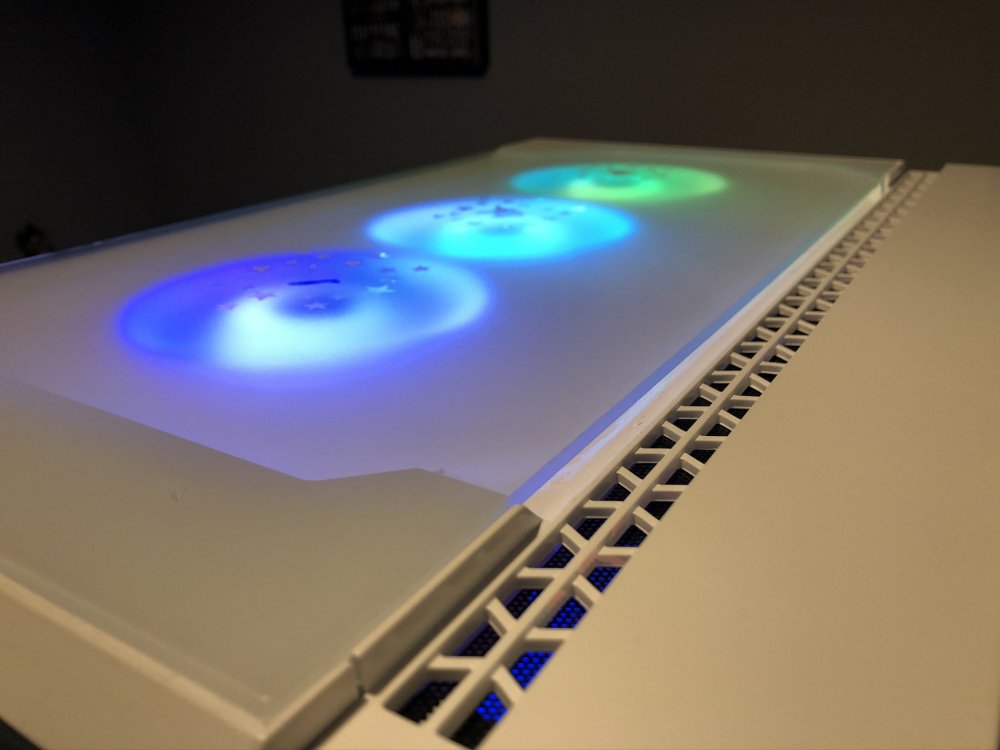
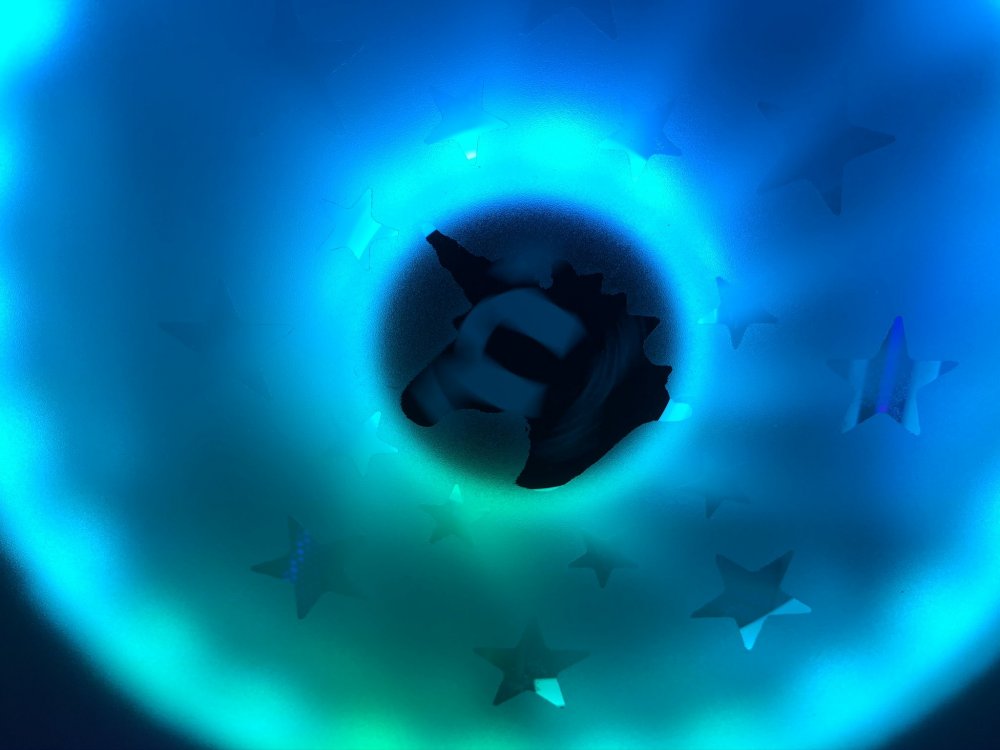
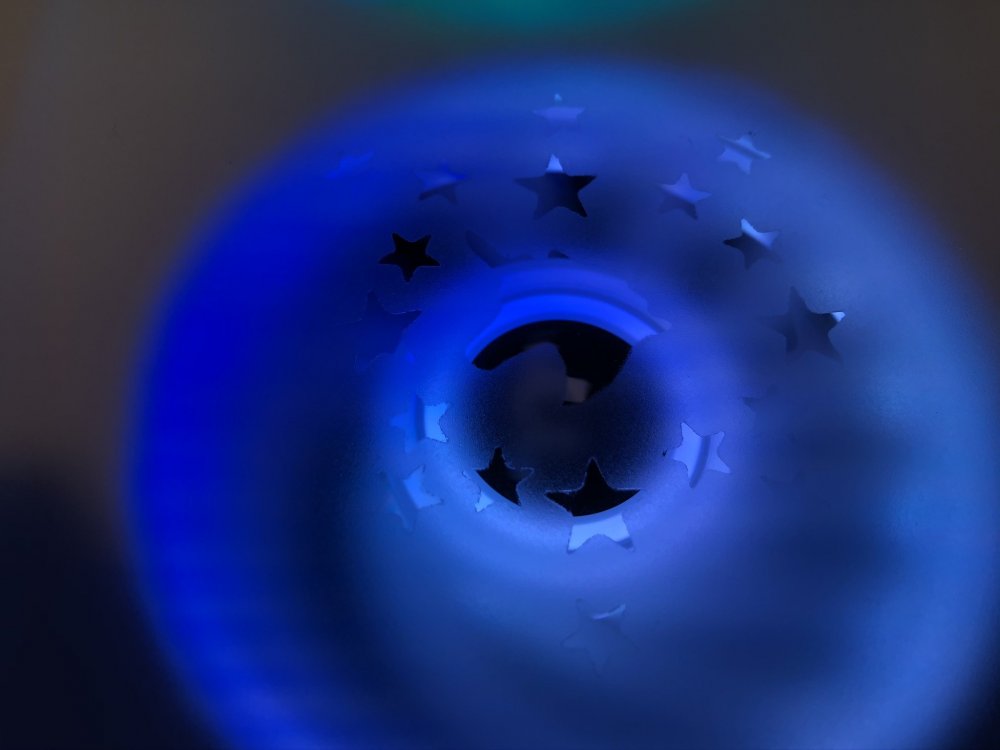
...and wait until that night to record and then edit the video to submit.
This experience has been absolutely amazing, once again I just want to thank everyone involved. Thermaltake were amazing to deal with and were always available if I had any questions or concerns. Scan Computers did an amazing job shipping all the components out to us, despite everything that was going on in the world. Seagate were extremely supportive as well, and of course AMD and ASUS provided some great components for the build.
SparklePony will be a huge upgrade for my stepdaughter, as she is currently sporting components from several years ago: CPU - AMD Athlon X4 750K Black Edition @4GHz, GPU - AMD Radeon R9 280. It took a little bit of tweaking and dialing down of settings to get her favourite game The Sims 4 to run at a steady 60fps.
Whilst she isn't using SparklePony just yet, as it is still on the dining table, I did give her a demonstration of how The Sims 4 runs (which is her favourite game atm). With everything maxed out, well over 200fps at 1080p (she only has a 1080p monitor atm). She also dabbles in Destiny 2 a little, so hitting about 180fps there also made her fairly happy!
I also want to wish the other competitors the best of luck, it has been awesome watching their progress and you should most definitely check their builds out.
All that's left to do is link to the voting page and the final build video. Thanks for all the support, please take care and stay safe!
If you want to just get straight to the end result, then the voting page has now launched: vote via gleam
But if you want to read the final build log and see how I got to the end result, then stick around!
18 July 2020
I tried as hard as I could to get the front and top panels to look as pristine as possible; but as I mentioned, I basically hit a wall in terms of my own skill. This was exceedingly frustrating, as these panels could effectively make or break the build. So it was time to get my thinking cap on......
Then it hit me.
I could armour etch the glass panels in order to hide the imperfections, possibly with some stars over the fans in order to tie in with the side trim. Plus with the glass frosted, it should give a really nice lighting effect. Of course once I read the directions on the bottle of Armour Etch, I realised that it was not suitable for large areas; so instead decide to go with the spray-on glass frosting. Whilst it wouldn't look as good, at least there was no risk of the glass shattering.
Having a plan in motion, I felt reinvigorated about everything (I was honestly a little deflated with these panels not turning out the way I hoped) and got the panels primered and painted. I then turned my attention to another side of the case:

Turns out I'm not too bad with a blade, always knew that my military training would come in handy one day!
This of course was the stencil for the side/rear panel, so went ahead and slapped that on:
.thumb.jpg.3d4baf867fefd11a6b912302e7b39dec.jpg)
Once again I found myself up against my mortal enemy, trying to make smooth transitions between materials. I once again thought to myself that I might not be able to get this part of the build looking quite right, but figured I would sleep on it and revisit things the next day.
19 July 2020
Feeling a little better about things, first up was cleaning up the mess that I had made the day before:
.thumb.jpg.2d538d194aefe4e53e22d39b0d960a69.jpg)

I wasn't too concerned about transition here, as we had a plan for the back panel. Whilst the inside of the case was monochromatic and fairly sleek, the plan was to go a little crazy back here and have some fun with it. So the next job was to get it painted at least:

20 July 2020
With the rear/side panel painted, I thought I better paint the other side of it as well in an effort to minimise light bleed:
.thumb.jpg.2ffaeadbc4d3e86f64dfebbbeb40b7fc.jpg)
Whilst this was drying, the front and top panels were ready to have the glass fixed back on; as the final coat of clear had been applied to them the day before and the frosting had been applied to the underside of the glass:
.thumb.jpg.c06026b44eb32bff77a951115ad16750.jpg)
.thumb.jpg.964d04bec8a0156d75fec47f803cec07.jpg)
By this point the rain had reappeared, so brought the rear panel inside to dry:
.thumb.jpg.edcbbc0cab20c28a4dd8dc93f726cbdb.jpg)
With everything either drying or setting, it was time to call it a day and see how things would be looking tomorrow.
21 July 2020
First order of business was putting the front and top panels back on the case. Which actually took much longer than it should! I couldn't get the front panel to slot back in, along the bottom edge there is a tab that slots in to the bottom piece; and it did not want to go in at all! So just a quick bit of cutting and giving the bottom slots more of a V profile rather than a U seemed to do the trick.
.thumb.jpg.eeecc4816252f9557e20fb0b4ccab6b7.jpg)
The frosted glass has certainly accomplished what I wanted it to. You can still see that both panels have been modified/filled in, but the imperfections are fairly well covered up by the frosting. It also radiates the light quite well. The only thing that bothered me was that you could peer through the gap between the glass and the chassis, seeing the imperfections. So I had a think and looked around to see what materials we still had laying around.
.thumb.jpg.44ba20cc4a194d4714f675060ea82a8e.jpg)
I still had some mesh kicking about, so thought this would be ideal. Not only would it somewhat mask those imperfections, it would be functional and also provide a little bit of contrast; tying in with the black trim throughout. So cut them to size, used some clear silicon craft glue and
.thumb.jpg.c573e8321a3afa9744925320339f1104.jpg)
.thumb.jpg.1a1499a35fce3a7651ef7af250ee95d2.jpg)
Just a small detail like that really makes a difference in my opinion. Whilst working on the exterior, we also put the build's name on the front:
.thumb.jpg.75a1a70fd0b6baae596f4177b0e132f9.jpg)
The last thing for the day was to have a look at how much light bleed there was on the rear/side panel:
.thumb.jpg.03e6acaead030671bbb5c77068c3331f.jpg)
Ooft, that is certainly a lot of it! Okay, no big deal. We'll pop down to the shops and get this sorted tomorrow.
22 July 2020 -The day before the build MUST be finished and video submitted
Whilst I was definitely cutting things a little closer than I had planned, I was still feeling pretty good about things at this point. We had stocked up on some craft supplies (if you haven't caught on, this entire build used common off-the-shelf items for most things) and all that was really left was the panel above and some other minor cleaning up.
First job was to tackle some the light bleed, so some black foamboard should do the trick:
.thumb.jpg.a43fb521ae1447e26ce59d27c5a59e73.jpg)
When it came to decorating this panel it was all about having some fun and doing it in a manner that my step-daughter would like, competition be damned. Whilst of course it would be great if other people liked it, but at the end of the day I tackled this more like a client build.
In this case the client was an eclectic young lady, so it may not be for everyone.
As I say, may not be everyone's cup of tea; but she absolutely loves it! First up was the use of actual Duck Tape (the brand) to hide the less than perfect seams between the acrylic and the metal, so pleased I found a way to include duct tape in the build; you can literally use it for anything! Joking aside, it also served as a nice backdrop for the pom-pom things; which sparkle quite a bit. The rainbows are actually cake toppers, which give it a nice little splash of colour; and of course the black foamboard has done the job of stopping the light bleed. You still get a little bit of light bleed right at the top between the panel and the chassis, but it is bearable.
With that panel done, the last thing on the agenda was the very rear of the case and covering up back of the LCD panel. Once again, we figured we would have a little fun back there.
We used white acrylic and mesh once again, just to tie it in with the build; but slapped a colour sticker on just to give it a little pop. If you recall, I had used motherboard standoffs back here. So in order to fix on the acrylic panel I first took a piece of foamboard and glued it to the acrylic. Once that had set I then lined it up with the standoffs and made holes in the foamboard so the standoffs would somewhat slot in. Glued it all in place and then fixed on the acrylic. Fairly simple but does the job.
With everything done, all that was left was to take some pictures...
...and wait until that night to record and then edit the video to submit.
This experience has been absolutely amazing, once again I just want to thank everyone involved. Thermaltake were amazing to deal with and were always available if I had any questions or concerns. Scan Computers did an amazing job shipping all the components out to us, despite everything that was going on in the world. Seagate were extremely supportive as well, and of course AMD and ASUS provided some great components for the build.
SparklePony will be a huge upgrade for my stepdaughter, as she is currently sporting components from several years ago: CPU - AMD Athlon X4 750K Black Edition @4GHz, GPU - AMD Radeon R9 280. It took a little bit of tweaking and dialing down of settings to get her favourite game The Sims 4 to run at a steady 60fps.
Whilst she isn't using SparklePony just yet, as it is still on the dining table, I did give her a demonstration of how The Sims 4 runs (which is her favourite game atm). With everything maxed out, well over 200fps at 1080p (she only has a 1080p monitor atm). She also dabbles in Destiny 2 a little, so hitting about 180fps there also made her fairly happy!
I also want to wish the other competitors the best of luck, it has been awesome watching their progress and you should most definitely check their builds out.
All that's left to do is link to the voting page and the final build video. Thanks for all the support, please take care and stay safe!
Similar threads
- Replies
- 8
- Views
- 1K
