Hi,
This is my first post on this forum so please forgive if I miss any information out but I have a bit of a problem and am looking for some advice.
The config below is the my 3rd major build but the first with which I have had such a major issue. A you will see this is a major build and represents quite a significant investment
Here is a summary of my problems.
Having built and soak tested the system extensively, which as you can see includes water-cooling of both CPU and VRM board components, everything appeared well for a few weeks when out of the blue my power supply blew without warning. I have used the ax1200i before without any issues. However, I was not happy at that stage that the cause was not the psu as I did not have the system connected to the mains via a ups. So I invested in yet another psu. This was installed after checking that all remaining installed components were functioning correctly and had been working fine for a few weeks. The system was stable at rest and under reasonable load and the UPS was reporting stable power input.
The system had been left fully powered on for several hours without any issues. However, yesterday, after having the system powered off but still powered via the OC Ignition button for a few hours. My PSU suddenly blew, fizzed smoked and failed again. I emphasize that the system was not fully powered on, no excessive draw on the power and the UPS not reporting any input supply issues.
I don't pretend to be an expert but find myself at a bit of dead end, not wanting to spend my left saving on swapping components in and out, but I find it inconceivable for two failed as1200i PSU units to have failed in a similar fashion, both were sourced from different suppliers.
I feel therefore that there must be an issue with the motherboard. I was wondering if anyone else had any other thoughts or suggestions.
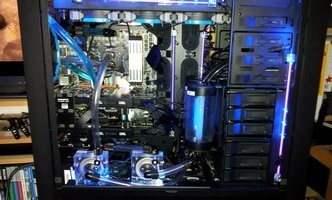
Here are details of the major components of my rig. I have attached a small image of the system nearing the end of the build just for an idea of what I am aiming for.
Intel Core i7 4770K, 1150, Haswell,
Gigabyte GA-Z87X-OC Force,
EK-FB GA Z87X-OC Force - Acetal+Nickel
EVGA GeForce GTX TITAN Superclock 6144MB GDDR5 PCI-Express Graphics Card
EVGA GeForce GTX TITAN Superclock 6144MB GDDR5 PCI-Express Graphics Card
Corsair Obsidian 900D Super Tower Case [CC-9011022-WW]
Dominator® Platinum with Corsair Link Connector — 1.65V 16GB Dual Channel DDR3 Memory Kit
Dominator® Platinum with Corsair Link Connector — 1.65V 16GB Dual Channel DDR3 Memory Kit
XSPC Photon 170 Tube Reservoir
XSPC Photon 170 Tube Reservoir
Corsair Dominator Platinum Light Bar Upgrade Kit Arctic White & Cerulean Blue : CMDLBUK02B
Koolance Flow Meter Adapter with Display : DCB-FM01
Koolance Flow Meter Adapter with Display : DCB-FM01
Creative Sound Blaster ZxR PCI-Express High Performance Sound Card
Corsair AX1200i Professional Series Digital AX 1200i ATX/EPS Fully Modular 80 PLUS Platinum
Crucial M500 480GB SATA 6Gb/s Solid State Hard Drive - (CT480M500SSD1)
Crucial M500 480GB SATA 6Gb/s Solid State Hard Drive - (CT480M500SSD1)
Crucial M500 480GB SATA 6Gb/s Solid State Hard Drive - (CT480M500SSD1)
Crucial M500 480GB SATA 6Gb/s Solid State Hard Drive - (CT480M500SSD1)
Icy Dock 4-in-1 SATA Hot Swap Backplane RAID Cage Hard Drive Case
Western Digital Caviar Black 2TB SATA 6Gb/s 64MB Cache - OEM (WD2002FAEX) HDD
Western Digital Caviar Black 2TB SATA 6Gb/s 64MB Cache - OEM (WD2002FAEX) HDD
Western Digital Caviar Black 2TB SATA 6Gb/s 64MB Cache - OEM (WD2002FAEX) HDD
Western Digital Caviar Black 2TB SATA 6Gb/s 64MB Cache - OEM (WD2002FAEX) HDD
Western Digital Caviar Black 2TB SATA 6Gb/s 64MB Cache - OEM (WD2002FAEX) HDD
LSI00330 - LSI MegaRAID SAS 9271-8i SGL - 8-Port Int., 6Gb/s SATA+SAS, PCIe 3.0, 1GB DDRIII
Optional LSI00297 - LSI LSICVM01 CacheVault Accessory Kit for 9266-4i and 9266-8i
Microsoft Windows 7 Ultimate, Full Version (PC DVD)
G19s Gaming Keyboard
G700s Rechargeable Gaming Mouse
Logitech HD Pro Webcam C920
Koolance G1/4" Thread Inline Flow Meter : INS-FM18
Koolance G1/4" Thread Inline Flow Meter : INS-FM18
EVGA GeForce GTX Titan Hydro Copper Waterblock
EVGA GeForce GTX Titan Hydro Copper Waterblock
APC Smart-UPS 1500 LCD 980W UPS (SMT1500I)
This is my first post on this forum so please forgive if I miss any information out but I have a bit of a problem and am looking for some advice.
The config below is the my 3rd major build but the first with which I have had such a major issue. A you will see this is a major build and represents quite a significant investment
Here is a summary of my problems.
Having built and soak tested the system extensively, which as you can see includes water-cooling of both CPU and VRM board components, everything appeared well for a few weeks when out of the blue my power supply blew without warning. I have used the ax1200i before without any issues. However, I was not happy at that stage that the cause was not the psu as I did not have the system connected to the mains via a ups. So I invested in yet another psu. This was installed after checking that all remaining installed components were functioning correctly and had been working fine for a few weeks. The system was stable at rest and under reasonable load and the UPS was reporting stable power input.
The system had been left fully powered on for several hours without any issues. However, yesterday, after having the system powered off but still powered via the OC Ignition button for a few hours. My PSU suddenly blew, fizzed smoked and failed again. I emphasize that the system was not fully powered on, no excessive draw on the power and the UPS not reporting any input supply issues.
I don't pretend to be an expert but find myself at a bit of dead end, not wanting to spend my left saving on swapping components in and out, but I find it inconceivable for two failed as1200i PSU units to have failed in a similar fashion, both were sourced from different suppliers.
I feel therefore that there must be an issue with the motherboard. I was wondering if anyone else had any other thoughts or suggestions.
Here are details of the major components of my rig. I have attached a small image of the system nearing the end of the build just for an idea of what I am aiming for.
Intel Core i7 4770K, 1150, Haswell,
Gigabyte GA-Z87X-OC Force,
EK-FB GA Z87X-OC Force - Acetal+Nickel
EVGA GeForce GTX TITAN Superclock 6144MB GDDR5 PCI-Express Graphics Card
EVGA GeForce GTX TITAN Superclock 6144MB GDDR5 PCI-Express Graphics Card
Corsair Obsidian 900D Super Tower Case [CC-9011022-WW]
Dominator® Platinum with Corsair Link Connector — 1.65V 16GB Dual Channel DDR3 Memory Kit
Dominator® Platinum with Corsair Link Connector — 1.65V 16GB Dual Channel DDR3 Memory Kit
XSPC Photon 170 Tube Reservoir
XSPC Photon 170 Tube Reservoir
Corsair Dominator Platinum Light Bar Upgrade Kit Arctic White & Cerulean Blue : CMDLBUK02B
Koolance Flow Meter Adapter with Display : DCB-FM01
Koolance Flow Meter Adapter with Display : DCB-FM01
Creative Sound Blaster ZxR PCI-Express High Performance Sound Card
Corsair AX1200i Professional Series Digital AX 1200i ATX/EPS Fully Modular 80 PLUS Platinum
Crucial M500 480GB SATA 6Gb/s Solid State Hard Drive - (CT480M500SSD1)
Crucial M500 480GB SATA 6Gb/s Solid State Hard Drive - (CT480M500SSD1)
Crucial M500 480GB SATA 6Gb/s Solid State Hard Drive - (CT480M500SSD1)
Crucial M500 480GB SATA 6Gb/s Solid State Hard Drive - (CT480M500SSD1)
Icy Dock 4-in-1 SATA Hot Swap Backplane RAID Cage Hard Drive Case
Western Digital Caviar Black 2TB SATA 6Gb/s 64MB Cache - OEM (WD2002FAEX) HDD
Western Digital Caviar Black 2TB SATA 6Gb/s 64MB Cache - OEM (WD2002FAEX) HDD
Western Digital Caviar Black 2TB SATA 6Gb/s 64MB Cache - OEM (WD2002FAEX) HDD
Western Digital Caviar Black 2TB SATA 6Gb/s 64MB Cache - OEM (WD2002FAEX) HDD
Western Digital Caviar Black 2TB SATA 6Gb/s 64MB Cache - OEM (WD2002FAEX) HDD
LSI00330 - LSI MegaRAID SAS 9271-8i SGL - 8-Port Int., 6Gb/s SATA+SAS, PCIe 3.0, 1GB DDRIII
Optional LSI00297 - LSI LSICVM01 CacheVault Accessory Kit for 9266-4i and 9266-8i
Microsoft Windows 7 Ultimate, Full Version (PC DVD)
G19s Gaming Keyboard
G700s Rechargeable Gaming Mouse
Logitech HD Pro Webcam C920
Koolance G1/4" Thread Inline Flow Meter : INS-FM18
Koolance G1/4" Thread Inline Flow Meter : INS-FM18
EVGA GeForce GTX Titan Hydro Copper Waterblock
EVGA GeForce GTX Titan Hydro Copper Waterblock
APC Smart-UPS 1500 LCD 980W UPS (SMT1500I)

")