cybermaniac
New member
hey guys
this is my first foray into the world of airbrushing.
I know it isn't much, but we all gotta start somewhere eh
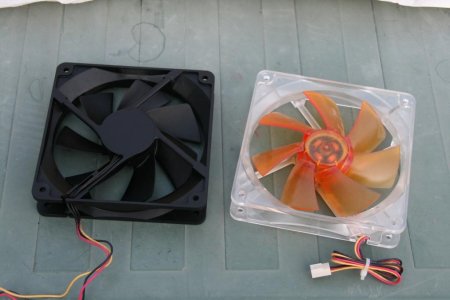
I had 2 of these fans lying around.
1 of them is the original (rather obviously the clear one), and the other was my victi.......erm......test subject (Both crappy pcworld/maplins akasa fans).
Rate as you will, and please....the more advice the better.
I used Liquitex Black Coloured Gesso surface prep with Liquitex airbrush medium to thin out the black. This was done with a 30psi compressor (airbrush/nailbrush compressor), and a cheapy airbrush kit from ebay.
This is the result of one coat, after it dried I unfortunatly realised the surface I left it on actually came apart once something was stuck to it (hence all the white bits (paper)). Also, there are a few bits on the fan that were not airbrushed, but that could have been solved at a later time had i intended to use it.
This was the application of pretty much 1 coat, just essentially spray spray spray until everything was covered.
My project in the end will be to get some Noctua fans, put masking tape on the blades and cabling, and just spray the frame of it with the same method I did with my test bed fan.
Again, please give ANY advise you can give, more the better.
this is my first foray into the world of airbrushing.
I know it isn't much, but we all gotta start somewhere eh
I had 2 of these fans lying around.
1 of them is the original (rather obviously the clear one), and the other was my victi.......erm......test subject (Both crappy pcworld/maplins akasa fans).
Rate as you will, and please....the more advice the better.
I used Liquitex Black Coloured Gesso surface prep with Liquitex airbrush medium to thin out the black. This was done with a 30psi compressor (airbrush/nailbrush compressor), and a cheapy airbrush kit from ebay.
This is the result of one coat, after it dried I unfortunatly realised the surface I left it on actually came apart once something was stuck to it (hence all the white bits (paper)). Also, there are a few bits on the fan that were not airbrushed, but that could have been solved at a later time had i intended to use it.
This was the application of pretty much 1 coat, just essentially spray spray spray until everything was covered.
My project in the end will be to get some Noctua fans, put masking tape on the blades and cabling, and just spray the frame of it with the same method I did with my test bed fan.
Again, please give ANY advise you can give, more the better.