i7-6700k ridiculously high temperatures with Noctua NH-D14

andypro

New member
Hi everyone,

I've just upgraded my old rig to a brand new one with the following configuration:

Processor: Intel Core i7-6700k 4.2Ghz
Motherboard: Gigabyte Z170X-Gaming 7-EU
RAM: Kingston HyperX Predator Black 16GB, DDR4, 3000MHz, CL15, 1.35V
Case: Fractal Design Define R5 Blackout Edition Window
Video Card: Gigabyte GTX970 G1 GAMING-4GD
Display: Asus ROG Swift PG278Q
CPU Cooler: Noctua NH-D14
Case fans: 2 x Fractal Design Dynamic GP14 fan, 1000 RPM

In this configuration with the RAM running at 3000Mhz via XMP and all fans running at max speed I get the following temps on the CPU:
Idle: 26-27C
Gaming: 75-76C
Prime96 Small FFT: 88-89C (at this point I decided to stop it, but I guess it could have gone higher)

When I run the ram at stock speeds 2400Mhz, I get the following temps:
Idle: 21-22C
Gaming: not sure, haven't tested
Prime96 Small FFT: 80C

As far as I know, these are not proper temps for the Noctua NH-D14 running an i7-6700k at stock speed. I used to run an i5-760 overclocked at 4Ghz on the NH-D14 and neved went above 54C under stress.

I've tried both the Noctua NT H1 and Arctic Silver 5 for thermal paste with pretty much similar results.

Weirdest thing though is that when running P95 and the CPU reaches 80+ temps, the case is blowing out cool air. I've reseated the CPU cooler, cleaning and repasting the CPU/heatsink plate every time a few times now with no changes.

I read posts on the Internet from people using the same CPU/cooler combination and having max temps of 43C when overclocking at 4.4Ghz.

I've just run out of options and I have no idea where to look for the culprit anymore. Can anyone help?
 
Last edited:
Silly question but you did pull off the protective layer from the cooler plate right? - edit can't be that if you had it on another CPU.

Have you checked the cooler plate's TIM for even distribution? made sure it isn't on skewed?

I don't think the NH can bend the CPU (Skylakes bend with heavy CPUs using older mounts). You have obtained the new mount right?

Saying that they are not cool chips once you start overclocking them, and you shouldn't really be using PRIME. Use Asus Realbench, it's far more "real world" and keep an eye on your temps as you go through the heavy multitasking test. That is what makes or breaks a stable PC.

You also have not delidded it (brings down the sun temps) and basically this is what Kaby sort of was, to fix Skylake.

Also. Check your voltage. Some boards massively over compensate if left on auto. Also check the load line cali and make sure its not on extreme. Look at your voltage using CPUID.
 
Well, what is your cpu voltage set to first of all? if on auto, that might be one of the things to look at straight away. Then the question is, did you clean out the D14, between the fins and fans and blew out all the dust, this to has a big impact on temperatures.
 
@AlienALX

Yes, the protective layer is pulled off the cooler plate. :) You assumed right, this is the same cooler I had on my old i5.

Have you checked the cooler plate's TIM for even distribution? made sure it isn't on skewed?

I don't think the NH can bend the CPU (Skylakes bend with heavy CPUs using older mounts). You have obtained the new mount right?

Not sure what you mean by these... :unsure:

Per your advice, I just ran Asus RealBench with Heavy Multitasking on an infinite loop for a few minutes and the results are:
CPU Vcore: 1.26V - 1.272V
CPU Max Temp: 66C

With Prime95 on Small FFTs, Vcore shoots straight to 1.32V.
I also checked LLC and it was set on Auto for both VCore and VAXG. The other options I have are High and Standard. As instructed I set it to Standard for both VCore and VAXG and rerun the stress tests with no changes in resulting voltages.

@Dark NighT
Haven't touched the VCore settings. By default it comes set to Auto. Idle VCore is 0.768V.

Yes I did properly clean everything when building the new rig, including the fins and fans of the CPU cooler.
 
Last edited:
What I mean is when you removed the cooler was the thermal compound evenly pressed over the whole CPU? Like, did you have a perfect full CPU shape pressed into the paste?

This would indicate there is no issue with the mounting.

66c in realbench is very good so stop using Prime.

1.32v sounds very high to me. Not overly sure about Skylake voltages but my 5820k hits max clock at 1.29.
 
I'm using the pea method of applying paste and I had a nice round even shape of paste on the CPU and heatsink plate that stretched almost all the way to the edge.

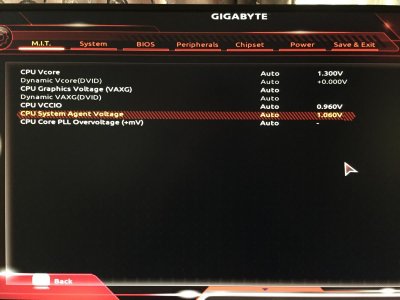
I think I may have found the problem. At @Dark NighT's suggestion I checked the VCore setting in BIOS. It was indeed set to Auto next to which 1.3000V was displayed.

I set it manually to 1.2V. Now CPU-Z shows 1.188V on idle and 1.104V during stress tests. Temps never rise above 61C now.

Should I stick with the 1.2V setting on the VCore in BIOS? The system seems stable. Haven't encountered any freezes or crashes so far. But now the CPU stays at around 1.188 volts at all times, whereas before it used to drop to even 0.768V when not under load. Sadly I have no way to tell the BIOS to Auto regulate the VCore but not go above 1.2V. :(
 
Last edited:
I had no idea the Auto setting could be this evil. This is the first time something like this happens to me. I could have fried my CPU going on defaults, had I not put a good cooler on it. :(

I guess this latest BIOS update from Gigabyte is shot and hence I will not rely on Auto settings moving forward.

Thanks a million guys for all the help! I very much appreciate it.

:beer:

No worries man, enjoy !

Boards, especially Gigas can be complete aholes. Jayz2 actually popped a FX8 AMD chip a few weeks ago because of load line. I'm pretty sure it was a Gigabyte board too...
 
Auto volts is terrible yeah. In any case, adjust the load line calibration so it doesn't dance around as much when the chip is being used a lot, and after that, start lowering the volts bit by bit until it becomes unstable, add a lil more and that should now be your baseline voltage, this is especially handy for when you decide to overclock, write that volt down though, in case you need to reset the bios.
 
That's exactly what I'm working on right now. As I mentioned above, with LLC set to Standard, VDroop is 0.08V and even on idle, VCore is 1.188V when set to 1.2000V in BIOS. :(

When set to High, I have exactly 1.2000V on idle and 1.188V under load, so only 0.012 VDroop. But with LLC set to High I also get roughly +5C under extreme load taking my CPU to a 70C max, and +1C on idle keeping it at a 30C. I guess that shouldn't be too big a problem, especially considering where I just came from. :)

On the other hand, I can confidently start overclocking my set up, now that Gigabyte practically did the CPU overvoltage testing for me. This has been a learning experience throughout!
 
The BIOS is definitely shot.

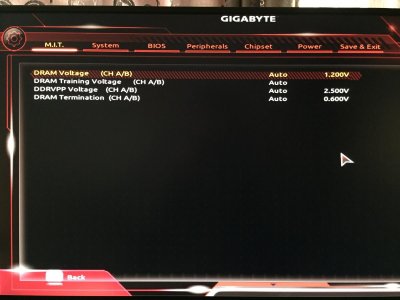
Seems to me that it mistakes the DRAM Voltage for CPU VCore. See attached screenshots for reference.

DRAM Voltage shows 1.2V and VCore 1.3V when it should be the other way around. Well, DRAM Voltage should actually be 1.35V, but still... since the CPU VCore went up to 1.32V I'm guessing this is a fair assumption.

I've placed a support ticket with Gigabyte to fix this.
 

Attachments

  • VCore.jpg
    VCore.jpg
    88.5 KB · Views: 141
  • DRAMV.jpg
    DRAMV.jpg
    86.1 KB · Views: 145
Last edited:
Gigabyte just replied to the support ticket I've submitted.

Dear Sir,

Please find here the latest BIOS F21 which has been updated to clear high vcore issue.

Hope this will solve your issue.

Thank you for your support case.

Best regards,

I wasn't expecting them to be this quick. :surprised2:

They haven't published the new BIOS on their website yet, but you can use the link above if you want quick access to it. I'm out of town currently and so I'm unable to test the new BIOS version before the weekend. I will come back with my results on Saturday.
 
Ok. So...
This is slowly starting to turn into a freaking nightmare.

This morning I anxiously went on to flash the new BIOS to check whether or not the Voltage issue has been resolved.

Well... surprise surprise! I could not flash the new BIOS using QFlash no matter what I tried.

Gigabyte says that if you want to use QFlash you should have an USB stick formatted to FAT32/FAT16 and you should place the new BIOS image on root. Check and check.
QFlash sees my USB stick, it sees the BIOS image file

8ba10fdc_l.jpeg


but when I hit Next I get this:

a697c824_l.jpeg


I went on the Internet looking for solutions and I tried every suggestion I could find. From using FAT instead of FAT32, to using other USB sticks (tried about 4 different makes and sizes), to using the back USB ports rather than the front. Same thing.

One thing that got me a step further, but still not to my final goal of flashing the BIOS, was to manually set the USB stick to be recognized as Floppy in BIOS.

115a82d6_l.jpeg


This way, QFlash managed to finally read the file but failed during the next step when it actually tried to flash the BIOS.

Note: when I updated to the current F20 version (which is the first version of this new shiny graphical BIOS) from that old text mode BIOS, everything went buttery smooth, I used the same USB stick I'm using now formatted to FAT32.

I also thought about flashing from Windows, but I found posts on the Internet strongly advising against flashing from Windows using @BIOS which they claim is very buggy and may lead to bricking your motherboard.

So ... once again I'm out of ideas. Is there anyone here that has had these problems and can offer a solution to my problem?
 
I've finally managed to flash the BIOS image Gigabyte gave me, using the Efiflash.exe DOS tool they provide.

Weirdly enough, after the update, the BIOS version is still F20, not F21 as expected. But... the overvoltage problem seems to have gone. Now, under extreme load, the CPU doesn't go above 1.284V, which still seems a bit steep to me. But, at this voltage the CPU doesn't go above 70C. Also the CPU idles at 23C now with the VCore fluctuating a lot from 0.132V to 0.7V.

So... I guess all is well now.
 
Back
Top