Grenade box project

xSpargo

New member
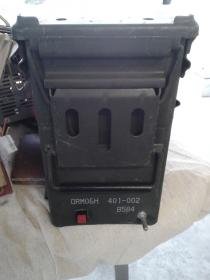
Currently an untitled project built as cheaply as possible for my dad's Christmas box. Uses a genuine US Army 40mm grenade ammo box capable of holding 32 grenades for a M16A2's M203. Tested the board and every else beforehand and everything works fine, the Xeons perform similar to a sandy i5 (in passmark). Gonna be pretty tight to fit everything into the case because of the hard drive which is needed to store stuff on because windows has already ate more than half of the SSD. I havn't done any metalwork before and only have a tiny cutting tool to use for this steel, so some areas at the start of the project will look a bit tatty which is unfortunate but luckily they are on the rear so won't be seen daily. Modded the front of my 600T with a 240mm radiator mount before to fit in two 120mm fans but that is pretty much everything I've modded before this. I bought all these parts second hand off ebay and the power supply is from my brother whose PC bust a while back. All the random scratches and scuffs on the case are from before I owned it.

Specifications
- Twin Xeon L5410s @ 2.33GHz.
w/ 1U Akasa LGA771 aluminium heatsinks.
- Supermicro X7DWT
- 10GB DDR2 FB-DIMM @ 667MHz
- OCZ 600W StealthXStream II
- Gigabyte HD6770 "Ultra Durable" edition.
- Kingston V300 60GB SSD
- Windows 7 Pro
- 250GB Seagate Barracuda 7200.12
- Custom analogue fan controller
- Dual 17" 1280x1024 VGA monitors.

attachment.php


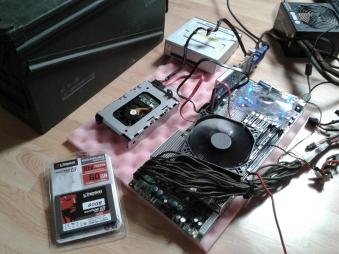
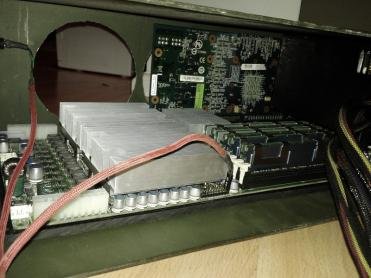
Photo before installing the SSD using a hard drive from a PC in the lab/office. The braided extension cable is actually a 24pin ATX to a non-standard variant the X7DWT motherboard requires, had to make it myself, first braiding job too.

attachment.php


Next up is the front of the case after drilling in some holes for the power button and potentiometer.

attachment.php


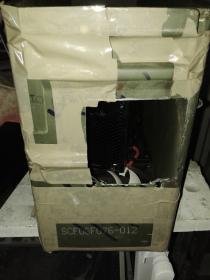
Tat-job on the back! (Looks much better now, will take a photo next time I do some work on the case.) The tape is so I cut exactly the right locations I marked.

attachment.php


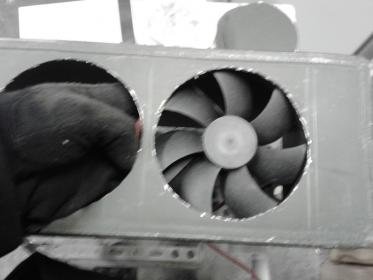
Photo of the first 120mm intake fan hole after cutting it.

attachment.php


And the second.

attachment.php


Final image for this post shows the interior with all the major components in, excluding the SSD and HDD. Gonna be tight for that HDD, will try and fit it on the inside of the front.

I'm planning on doing more on friday, need to get the polypropylene motherboard tray fixed in, graphics card stabiliser, 120mm fan holes and rubber feet in below the fan and on the base of the case. May or may not use some LED fans and put a hexagon mesh panel on the back.

Back is cut out already where I marked with tape, will upload a photo of it next time.
 

Attachments

  • GMG1.jpg
    GMG1.jpg
    20.4 KB · Views: 674
  • GMG2.jpg
    GMG2.jpg
    7.9 KB · Views: 508
  • GMG3.jpg
    GMG3.jpg
    9.6 KB · Views: 518
  • GMG4.jpg
    GMG4.jpg
    13.1 KB · Views: 505
  • GMG5.jpg
    GMG5.jpg
    12.5 KB · Views: 481
  • GMG6.jpg
    GMG6.jpg
    19.7 KB · Views: 511
Last edited:
That's one unique Build !

Props to you for even trying this . and look forward to the completed build .
 
Haha, the specs are a bit outdated. But it's more than capable enough for what it'll be used for. It could take a massive dual slot GPU if I wanted to fork out for it at least.

Small update here, was busy all weekend so didn't get much of a chance to do work on this.


i4yAHNV.jpg

Cleaned most the dust off the Batmobile... sorry, 6770.

OdLqVXI.jpg

Really tatty back side.

S4poCY3.jpg

GPU fixes securely in place with some screws and another shaped piece of steel from the casing. It will rest on some rubber feet and a bit of foam, helping reduce vibrations and bending stresses.
S1EQHuI.jpg


Rubber feet on the bottom too of course.
SvOxRYT.jpg


A bit of overlap from the graphics card over one of the 120mm intakes, maybe could fix in a 240mm radiator if I stuck one of these in: Asus GTX 670 DC Mini

I still need to drill the holes for the intake fans and for the motherboard since its just fixed in with some waterproof double sided foam. Going to be using some 20mm allen headed screws and some lock nuts on which are long enough to secure the motherboard tray and the motherboard itself in, so you could pick it up by the remaining carrying handle on the front. (Carry handle on the other side was damaged before it got to me.) Getting a little bit concerned for space too.
 
Last edited:
Haha, thanks for everyone's feedback and comments to far.

A couple of 40mm grenades might accompany it well, have a row of them fixed along the top of the case so it looks full when you take the lid off maybe.
 
Update in about an hour with plenty of photos, just finished the build and I'm about to put the lid on and test it. Managed to fit everything in I wanted which is good.

Update now! 12 images.


Reapplying some Noctua NT-H1 as I ran out last time. Temps were 10c cooler under the same conditions after I did this.

Straight from the garage:

Front


Top


Rear


Inside

And after doing some cleaning:


Started putting components in, was considering putting the secondary hard drive on the top of the power supply at this point.


Fairly clean airflow from the fan at this point.


Second drive in for mass storage. Tried it on top of the PSU but couldnt shut the lid.


Almost all the cabling is above the motherboard, only the 6 pin cuts across for the 6770.

And here is something I overlooked...

Yup...


All set up finally.


So that's it. Been a lot of problems getting this done and at the end it still isn't perfect but it is mostly there. The lid won't shut on both ends with the kettle plug in the power supply which is shame, could mod that to fit later though and at least it shuts properly when the lead isn't in. Everything is pretty secure in the casing and doesn't seem to be going anywhere. Booted up no problems just now. Temps are fine but the main cooling fan isn't starting so the temps are gradually getting hotter so I shut it down and I'm going to sort that out in the morning since it should just be a simple fix.

I can pretty much picture Tom cringing at the specs and back end! :lol:
 
Last edited:
think its very unique! its things like this that will get you feeling the creative juices flowing, and you want to do more and more, so i hope you do continue to find stuff to mod mate! will be good to see you evolution as a modder!
 
well done mate you've only gone and done it
thats crazy tight in there bet it cost a few knuckles
and do the specs really matter in a one off build like this for your Dad :)
 
It is really unique and well done to you. Personally I wouldn't have the two stickers on the front but that's just me.
 
Thanks a lot guys. :)

Nikhiljudge - I plan on doing something else later but not straight away, also planning on doing a heatsink from scratch using either micro heat pipes or standard heat pipes or a combination of the two and copper starting the end of January.

Mehere - Very tight, I thought I had some space above the power supply because I thought the lid had a small space in it. Build cost is about £200 for everything. It only has 2 USB ports so I have a 4 port hub connected to one on the back with an extension cable. Performance wise the CPU comes in at about the same level as a 2500K, so it isn't that bad really, I'll get some benchmarks from it.


QuietOne - To be honest, they do look kind of out of place really so I think I'll remove them after I've sorted the fan out.
 
Sorted the fan out now and put a second one in on top of the heatsinks for better cooling.


Using waterproof double sided foam.

Final pic of it all done:


Idle temps are ~50C which isn't bad considering that's what it was on open air. Was ~60C before I changed the paste over.

Cinebench 15 (CPU)
i5 2500K@4GHz: 537
i5 3570K: 504
i5 4670K: 526
i7 950: 491
Dual Xeon L5410: 499

Proof:


Cinebench i5 scores are based on what I could find, the Xeon score is from my testing. So it looks like it might be a tad better than a stock 2500K and coming close to a 3570K in Cinebench.

I forgot to say, putting the 120mm intake in this was the hardest part (apart from all the cutting with disks that broke every 5 minutes), no space at all to put the lock nuts on the screws! Had a right chew on with them.
 
Last edited:
Back
Top