You are using an out of date browser. It may not display this or other websites correctly.
You should upgrade or use an alternative browser.
You should upgrade or use an alternative browser.
Fun with RamDIsks
- Thread starter Scoob
- Start date
Scoob
Active member
Hi,
I might take my Ram Disk guide draft in Word format and just add it to this topic for people to read. It really is simple to set something up and the tool I use is FREE, which is nice.
Incidentally I'm still using a Ram Drive every time I game - I've set up little scripts for all the games I play to first create an appropriately sized Ram Disk, then transfer the game folder to it before launching the game - all with one click.
Scoob.
Scoob
Active member
Hi All,
Right, here's a copy/paste of my draft document describing how I create and use Ram Disks...
I recently posted about my experimentation with ram disks resulting in my purchase of an extra 16gb of ram solely for use as Ram Disk space. Original post is here: Link
This additional topic is just a little guide of how I did it so other can have a play if they so desire.
Requirements:
Setting up:
Download and install ImDisk from the link above, I’d recommend creating a shortcut on your desktop (or a toolbar if you prefer) to the ImDisk Icon in Control Panel.
Launching ImDisk from your shortcut (or direct from Control Panel) will present you with the basic ImDisk GUI. From here is very simple to create new Ram Disk following these steps:
Automating stuff
So, you have a new virtual drive available. You can simply copy stuff to it manually and then run what you’ve copied directly from it. Some apps will only run from their installed location; however the majority of stuff doesn’t seem to mind being copied and run from elsewhere in my experience. Just be aware of this though. Additionally, if you’re intending to copy a game, DRM might not like you running from a different location.
Now, you can copy stuff to your virtual drive and, via the GUI, easily save an Image of what you’ve added for loading later. This is fine and works well but in my case I’m doing this with a large (up to 16gb) ram disk for gaming purposes. I already have a working install of my games on my hard drive so I want that copied to my ram disk before I play. Rather than copying everything, saving the Ram Disk Image, then having to reload that image each time I decided to use a different method. This is because I mod my games so often change or tweak things, this means my saved Image would become obsolete fairly quickly and I’d need to create another.
With this in mind I decided to set up automated scripts (simple .bat files) to both initially create a Ram Disk of an appropriate size for the game I plan to run, as well as copy the data to the Ram Disk from my “master” game folder.
To create a simple ram disk you can use the following command line…erm, commands:
I’ll explain what that means:
ImDIsk – the tool we’re using
-a – Attach virtual Disk (required)
-s 1G – Size 1 GigaByte, 1M would be one Megabtye
-m H: - Mount as H:
-p “/fs:ntfs /q /y” – Format Parameters , File System (fs) NTFS, Quick Format (/q) and confirm (/y)
Label H: TESTDrive – Give your new virtual drive H: a label
Next you actually want to copy some content to the drive. You can do this manually of course as previously mentioned. However I chose to use RoboCopy (a fast windows file copy method run from the command line) to populate my ram disk. See my example below.
The above explained:
Robocopy – the copy command, run from a command prompt
“D:\Games\Skyrim” – the location of my Skyrim game folder on my hard drive.
“H:\Games\Skyrim” – where I’m copying Skyrim to on my new Ram Disk.
*.* - all files to be copied
/s – Include sub-folders
/purge – remove any folders in the destination that no longer exist in the source (just being tidy)
/MT:4 – Number of threads to use to manage the copy job – 4 for my quad core.
/r:1 – Number of retries if there’s an error – default is like a million for some reason.
/COPYALL – a copy method.
Pop the above two in a .bat file and you can just double click the create scripts to create the ramdisk and format it. Then you can double clock the second one to populate the drive. Personally I’ve set up a new toolbar to hold these for all my games. Note: I also, after the copy, create a shortcut the the game for ease of running once everything is in place. These shortcuts should NOT be on a virtual drive of course lol.
Now, powering off or resetting your system will of course kill the ram disk. However, you can also script this too, if for example you need to free up that ram for something else. See the following code:
This translates to:
-D – Force Detach Ram drive, no saving of Image!
-m T: - it’s the drive mounted as T: we’re interested in.
Ok, these are the dead basics off automating setting up a ram disk and loading data to it. I’ve not covered saving and using images, other than a brief mention, as that can be done via the GUI. For me the Robocopy method from my current hard drive “master” game folder works nicely. It means that my ram disk will always be created with the latest version of my game folder.
If you have very static content you always want to copy to the ram disk, or you’ve actually done a proper Install to the ram drive, you’d likely want to SAVE the drive image and reload from it. I can document this approach later if needed. Note: when you save an image it will save the ENTIRE ram disk, so, if you had a 16gb ram disk, but only 10gb of it used, it will save a full 16gb .img file to disk. During testing we found this to be a little slower than the Robocopy method – even when the ram disk and content sizes were bang on. Odd but true.
Cheers,
Scoob.
Right, here's a copy/paste of my draft document describing how I create and use Ram Disks...
I recently posted about my experimentation with ram disks resulting in my purchase of an extra 16gb of ram solely for use as Ram Disk space. Original post is here: Link
This additional topic is just a little guide of how I did it so other can have a play if they so desire.
Requirements:
- ImDisk, a FREE open source RamDisk Tool – available here: Link
Simply download the Windows Install package – it adds an ImDIsk Icon to your Control Panel – you can create a shortcut to this if you want, I did.
- Some spare ram. I tested initially with a 4gb maximum Ram Disk on my system with 8gb. I was just running applications / demos and testing. For my gamer I bought an additional 16gb of ram taking me to 24gb in total, so a plentiful 8gb for system and gaming and up to 16gb for my ram disk.
- An interest in playing around with a ram disk lol.
Setting up:
Download and install ImDisk from the link above, I’d recommend creating a shortcut on your desktop (or a toolbar if you prefer) to the ImDisk Icon in Control Panel.
Launching ImDisk from your shortcut (or direct from Control Panel) will present you with the basic ImDisk GUI. From here is very simple to create new Ram Disk following these steps:
- Select File -> Mount New Virtual Disk… or just click the “Mount New” button at the bottom.
- You can specify an Image File (to mount a previously saved Ram Disk) – leave blank for a new one.
- Pick a Drive Letter to use. (e.g. J)
- Enter the size of the drive, (e.g. 10)
- Select the unit to use from Bytes, Blocks, Kilobytes, Megabytes or Gigabytes
- Select Device Type, auto or Hard disk Volume work fine for a Ram Disk.
- Click OK.
- Your new Virtual Device will be mounted and you’ll be prompted to format it. Simply do a quick format, NTFS partition.
- Your drive is now ready to use as you see fit.
Automating stuff
So, you have a new virtual drive available. You can simply copy stuff to it manually and then run what you’ve copied directly from it. Some apps will only run from their installed location; however the majority of stuff doesn’t seem to mind being copied and run from elsewhere in my experience. Just be aware of this though. Additionally, if you’re intending to copy a game, DRM might not like you running from a different location.
Now, you can copy stuff to your virtual drive and, via the GUI, easily save an Image of what you’ve added for loading later. This is fine and works well but in my case I’m doing this with a large (up to 16gb) ram disk for gaming purposes. I already have a working install of my games on my hard drive so I want that copied to my ram disk before I play. Rather than copying everything, saving the Ram Disk Image, then having to reload that image each time I decided to use a different method. This is because I mod my games so often change or tweak things, this means my saved Image would become obsolete fairly quickly and I’d need to create another.
With this in mind I decided to set up automated scripts (simple .bat files) to both initially create a Ram Disk of an appropriate size for the game I plan to run, as well as copy the data to the Ram Disk from my “master” game folder.
To create a simple ram disk you can use the following command line…erm, commands:
Code:
ImDisk -a -s 1G -m H: -p "/fs:ntfs /q /y"

label H: TESTDrive
I’ll explain what that means:
ImDIsk – the tool we’re using
-a – Attach virtual Disk (required)
-s 1G – Size 1 GigaByte, 1M would be one Megabtye
-m H: - Mount as H:
-p “/fs:ntfs /q /y” – Format Parameters , File System (fs) NTFS, Quick Format (/q) and confirm (/y)
Label H: TESTDrive – Give your new virtual drive H: a label
Next you actually want to copy some content to the drive. You can do this manually of course as previously mentioned. However I chose to use RoboCopy (a fast windows file copy method run from the command line) to populate my ram disk. See my example below.
Code:
Robocopy "D:\Games\Skyrim" "H:\Games\Skyrim" *.* /s /purge /MT:4 /r:1 /COPYALL /log+:h:\Robocopylog.logThe above explained:
Robocopy – the copy command, run from a command prompt
“D:\Games\Skyrim” – the location of my Skyrim game folder on my hard drive.
“H:\Games\Skyrim” – where I’m copying Skyrim to on my new Ram Disk.
*.* - all files to be copied
/s – Include sub-folders
/purge – remove any folders in the destination that no longer exist in the source (just being tidy)
/MT:4 – Number of threads to use to manage the copy job – 4 for my quad core.
/r:1 – Number of retries if there’s an error – default is like a million for some reason.
/COPYALL – a copy method.
Pop the above two in a .bat file and you can just double click the create scripts to create the ramdisk and format it. Then you can double clock the second one to populate the drive. Personally I’ve set up a new toolbar to hold these for all my games. Note: I also, after the copy, create a shortcut the the game for ease of running once everything is in place. These shortcuts should NOT be on a virtual drive of course lol.
Now, powering off or resetting your system will of course kill the ram disk. However, you can also script this too, if for example you need to free up that ram for something else. See the following code:
Code:
ImDisk -D -m T:This translates to:
-D – Force Detach Ram drive, no saving of Image!
-m T: - it’s the drive mounted as T: we’re interested in.
Ok, these are the dead basics off automating setting up a ram disk and loading data to it. I’ve not covered saving and using images, other than a brief mention, as that can be done via the GUI. For me the Robocopy method from my current hard drive “master” game folder works nicely. It means that my ram disk will always be created with the latest version of my game folder.
If you have very static content you always want to copy to the ram disk, or you’ve actually done a proper Install to the ram drive, you’d likely want to SAVE the drive image and reload from it. I can document this approach later if needed. Note: when you save an image it will save the ENTIRE ram disk, so, if you had a 16gb ram disk, but only 10gb of it used, it will save a full 16gb .img file to disk. During testing we found this to be a little slower than the Robocopy method – even when the ram disk and content sizes were bang on. Odd but true.
Cheers,
Scoob.
Master&Puppet
New member
I'll be trying this out over the coming weeks

Goldskis45
New member
The only problem with software ramdisks is that they clear if you get a crash and also when you shutdown or reboot
So for anything that needs to write things that need to be kept (eg: savegames, configs, logs etc) onto the ramdisk you would need to use something to save the changes made onto the harddisk before reboot/shutdown.
The full version of this does it.
http://www.superspee...top/ramdisk.php
About a month or two ago I came across these guys and was practically jumping up and down at my computer reading about ramdisks as I was building the rig on my profile for a company... I convinced them to purchase it and they love it! The full program for servers is expensive but they have never lost an image yet even when I forced an error to shut it down.
The ramdisk they have is 120GB out of 1TB of ram and is used with their engineering software. the computer only reboots once a week but a backup image of the ramdisk is taken once a day.
They do have a (I don't think is an actual "free version") but a trial download somewhere on that page
Anyway, thats my two bits about the one I have used, somebody needs to make a list of all the free ramdisk software and list the pros and cons of each... hmmm sounds like a summer project for me...
EDIT: I forgot to mention that the "plus" version can use unmanaged memory in 32bit operating systems
For example you have 8GB in a 32Bit windows and it only recognizes 3.2GB the ramdisk can use the other 4.8 GB that windows won't use. (I have not personally tried it, but it says so on the website)
Double Edit: just came across this on corsair's youtube...
[media]http://www.youtube.com/watch?v=3oyLR6eVHPI&list=UUPy4EQ9HhP-g9xc4yDahhnQ&index=1&feature=plcp[/media]
Not trying to pump up this company (I don't work for them blah blah blah) I just think its sweet software.
Scoob
Active member
How I personally use a Ram Drive writing data back to disk is irrelevant. I'm just using it for gaming and a game folder is read-only other than the saved games - and saved games usually go to the user accounts My Documents now anyway. This is how Skyrim works.
The free (FREE!) ImDisk tool fully allows the writing of an image back to disk, as well as reading from an Image file previously created. However if you're doing this regularly you're going to potentially loose the speed benefits as the hard-drive copy syncs. I did try other software that works slightly better (the ram drive is seen as a physical drive at a lower level by the system - useful for other apps potentially) or has a nicer GUI etc. but ALL of the ones I tried were limited to 32 bit (4gb) with their free / trial versions so were no good to me.
It's perfectly possible to write a small automated script that uses Robocopy to simply update and data that's been changed on the Ram Drive copy to the Hard Drive copy if that's what you need. It could be scheduled to run every few minutes if need be. ImDisks power is largely in the scripts you can create - I never launch the GUI any more. Personally though I'd not be using a ram disk for any sort of important data.
While testing something the other day I loaded Skyrim from my HDD copy by mistake (was playing with mods) and I actually thought something was wrong when it didn't load my saved game within 6 seconds. The actual save is on my HDD but the assets being loaded of course a directly from the Ram Drive - it is soo much faster. As my game is modded and more stuff is loading it's become even more apparent.
As I said previously, even my friend who has a fast Vertex 3 SSD was impressed by the speed improvement during gaming. I would try more games myself but I don't have a very large collection. However for what I do play I'm happy I got that extra 16gb for this experiment.
The one thing to be aware of though is that loading is rarely instant. Sure, the game/application or whatever gets the data it needs as near instantly as you can get, however often that data then needs to be decompressed / processed etc. and that part still takes as long as it takes. Thing is, modern games - especially open-world titles such as Skyrim - are constantly loading assets as you play. Consider that the game has, at best, 4gb of system ram to its self (it's LAA but still only 32 bit) then you can see it will need to load data assets quite often when the game folder is much more than that - for the record my Skyrim folder is now 11.9gb with the various mods I have installed.
In theory, if we start getting true 64 bit titles, then I'd hope the game would load ALL assets where the machine has the physical ram to do so. That would eliminate the need for a Ram Drive for those titles. However, as things are, a Ram Drive really makes a difference. I've not run a game from my physical drive (except the above example) since I got my extra 16gb & set up all the scripts. I click the game from my "Ram Drive Games" toolbar, wait the 3 or so minutes it takes to load (I usually make a cuppa) and come back to the PC with my game launched and ready to go. After that my entire gaming session benefits.
Note: for the record I've not had any game crash (Skyrim still isn't always stable) take out the ram drive so have always been able to near-instantly re-launch the game.
Scoob.
First of all thanks for the amazing post and guide I have found it most engrossing and will definitely be playing around with it myself. I had a few Ideas and questions,
- Do you think you would get a worthwhile improvement in performance by using the faster ram kits I would be interested to see benchmarks with some different speeds of memory if anyone has some they can test.
- Second I would be interested to see how much faster you could get the load onto the ramdisk by using a ramcache for the HDD you have to try and cut down the load time a bit.
EDIT: I forgot to mention that the "plus" version can use unmanaged memory in 32bit operating systems
For example you have 8GB in a 32Bit windows and it only recognizes 3.2GB the ramdisk can use the other 4.8 GB that windows won't use.
correct, on a XP machine with 16gb, the recognized 3.2GB is system and the rest is just there. a
RAM disk prog should identify the remainder and utlize the rest for its use. even with just 8GB the
increased in perf was nuts fast..
airdeano
Scoob
Active member
Hi,
dotems:
1. Even "slow" ram is insanely fast vs. normal HDD and SSD's so I'm not sure you'd notice a huge difference - well, not in gaming. In serious apps you might.
2. Well the cache on a ramcache enabled device has to be cached in the first place, so it has to be read off the slower drive initially. Considering my particular gaming application for Ram Drives is basically: i) Switch machine on, ii) Load game to ram drive iii) play - the data is read ONCE, and likely cached, but not read again.
Point of interest though: I once started my PC and COPIED the Skyrim folder to a new instance for testing. The data was evidently cached by windows as when I then created my ram disk and copied Skyrim to it, it took about 5 seconds for the game to be running as it was going from Ram to Ram in effect. Amazing how much stuff W7 caches when it has the ram!
In my own testing using Robocopy to copy the data to the drive is as fast as I've managed to get it. Still, 3 minutes while Skyrim loads to the ram drive is well worth it for better game play for a several hour session

airdeano: I think ImDisk does this also - I've not tested it (all 64bit OS here) but it was mentioned in the documentation. A very good way to get some use of >4gb system ram on a 32bit OS - likely the only use in fact lol.
I'm still using ram disks for ALL my gaming. Literally I turn the PC on (with the intent to game) select the game from my "Ram Games" custom toolbar, go make a cuppa, and come back to the game loaded and ready to go.
Scoob.
dotems:
1. Even "slow" ram is insanely fast vs. normal HDD and SSD's so I'm not sure you'd notice a huge difference - well, not in gaming. In serious apps you might.
2. Well the cache on a ramcache enabled device has to be cached in the first place, so it has to be read off the slower drive initially. Considering my particular gaming application for Ram Drives is basically: i) Switch machine on, ii) Load game to ram drive iii) play - the data is read ONCE, and likely cached, but not read again.
Point of interest though: I once started my PC and COPIED the Skyrim folder to a new instance for testing. The data was evidently cached by windows as when I then created my ram disk and copied Skyrim to it, it took about 5 seconds for the game to be running as it was going from Ram to Ram in effect. Amazing how much stuff W7 caches when it has the ram!
In my own testing using Robocopy to copy the data to the drive is as fast as I've managed to get it. Still, 3 minutes while Skyrim loads to the ram drive is well worth it for better game play for a several hour session
airdeano: I think ImDisk does this also - I've not tested it (all 64bit OS here) but it was mentioned in the documentation. A very good way to get some use of >4gb system ram on a 32bit OS - likely the only use in fact lol.
I'm still using ram disks for ALL my gaming. Literally I turn the PC on (with the intent to game) select the game from my "Ram Games" custom toolbar, go make a cuppa, and come back to the game loaded and ready to go.
Scoob.
Master&Puppet
New member
That's essentially the idea - although there are variations on the process.Have you by chance tried saving the game images to a SSD and loading them onto the ramdisk? I know this is an old thread but I have been doing research on ramdisks and will probably implement one for my next build.
IMdisk allows you to save a copy of the RAMdisk as an image and then of course you can just copy it across to the RD when you want to use it.
Bang
New member
This thread has changed my build plan. I was originally going to get 8 gigs of ram, speed as yet to be decided. I think now I'm just going to get 16 gigs to start, followed by another 16GB a week or two later
As I play X3:AP too, I found your results with that title to be very compelling. Normal load times when entering a new sector can be annoyingly long. Sleeping Dogs is a great game and looks really nice, but it tends to be a bit laggy on my current rig. I anxiously await the new rig. Hopefully a ramdrive will improve performance in Eve Online as well
To ask a very nerd question, one the benchmark team might be interested in, have you ever tried running 3DMark 11 or 3DMark Vantage from your ramdrive? I cant help but think benchmarking from a ramdrive might set new records.
Master&Puppet
New member
Yea - the speeds are laughable when you compare it to SSDs! My only issue is that I have maxed out the 32GB on my 1155 rig and Shogun 2 is too big :/
SuB
The Webmaster
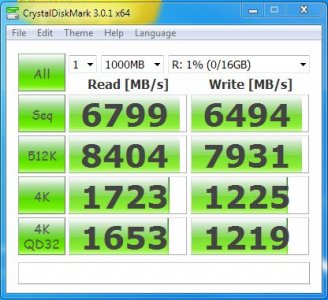
The numbers seem to say differently...
I did some testing and it seems very quick. I know it's not permanent storage which is kind of the beauty of it, but for map loading etc i bet it can be a useful place to cache your files during gaming, even if only chucking the maps in there and using a symbolic link.. it's so easy to setup and I have plenty of ram to try it in")
It saves I/O ops from burning up your SSD (limited number of read/writes in their lifetime) so in some ways it IS quite a bit better than using an SSD... If you make an image of what you want putting in the ram, it will load it in once per boot, or once per image mount.. instead of read/writing to the SSD it will just store it in the ram.
I'm afraid I fail to see how this is a bad thing?
I did some testing and it seems very quick. I know it's not permanent storage which is kind of the beauty of it, but for map loading etc i bet it can be a useful place to cache your files during gaming, even if only chucking the maps in there and using a symbolic link.. it's so easy to setup and I have plenty of ram to try it in
It saves I/O ops from burning up your SSD (limited number of read/writes in their lifetime) so in some ways it IS quite a bit better than using an SSD... If you make an image of what you want putting in the ram, it will load it in once per boot, or once per image mount.. instead of read/writing to the SSD it will just store it in the ram.
I'm afraid I fail to see how this is a bad thing?
yassarikhan786
New member
I have 16GB of RAM so I may try this soon.
rossi94
New member
I have 16GB of RAM so I may try this soon.
Thought about it too, but it is really needet - that high speed?

Similar threads
- Replies
- 2
- Views
- 553
- Replies
- 3
- Views
- 1K