Cold Fuzion.

alienware

Banned
Here we go then. Small project in order to get the side panel back on without turning the inside of the PC into a convection oven...

logo.jpg


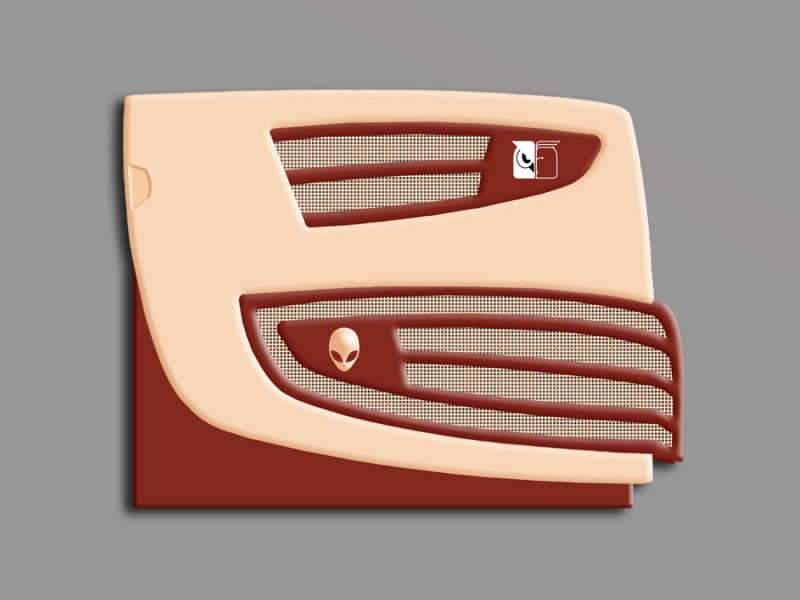
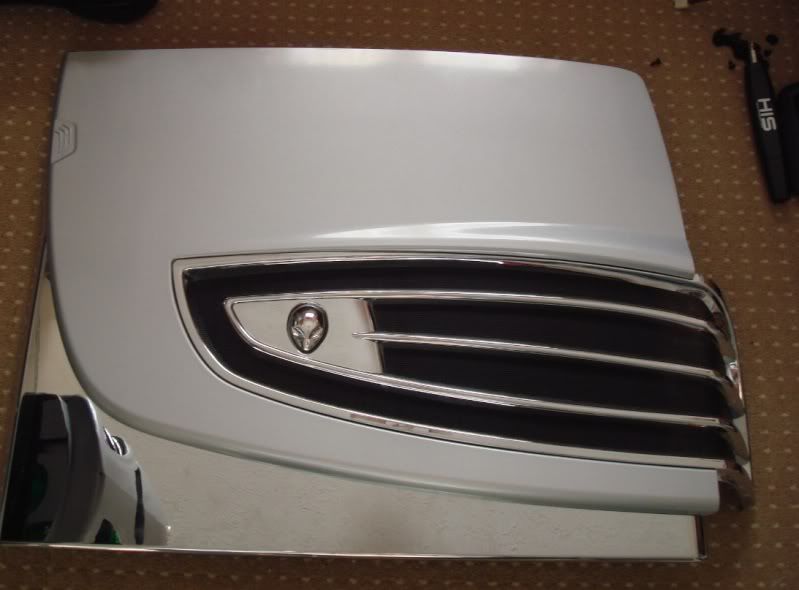
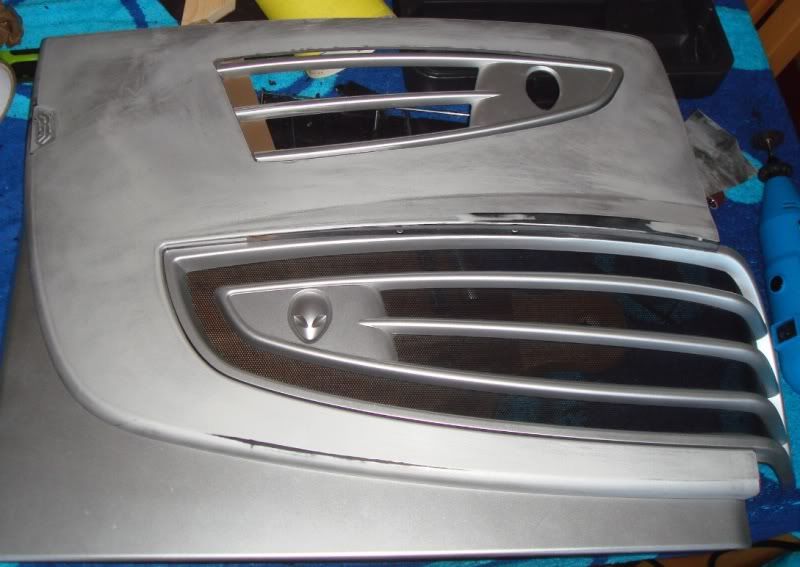
A standard Alienware side panel looks like this.

leftsidepanel.jpg


And on the backside it looks like this.

fanproblem.jpg


Which is usually no problem at all. But let's look at one of the pics I took before (GO GO POWER RANGERS !)

gogopowerrangers.jpg


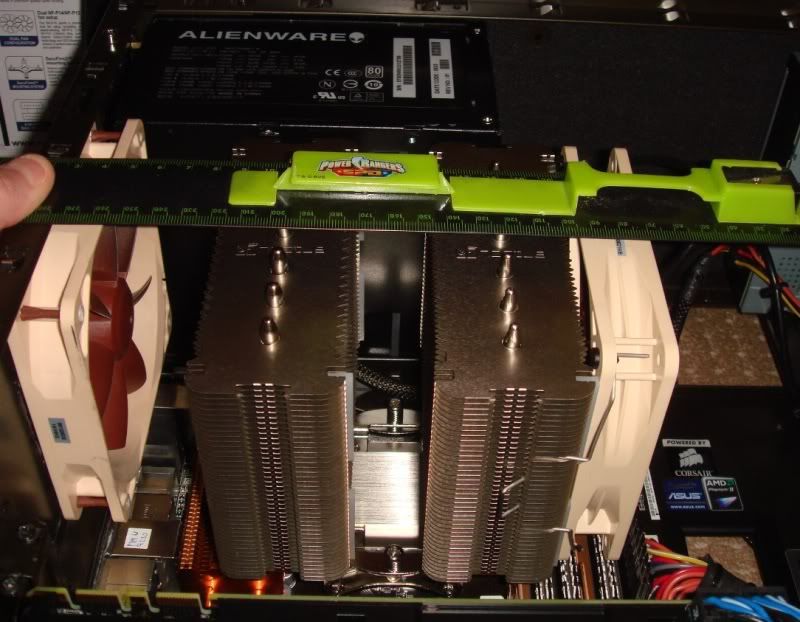
And we can see why the 120mm side fan on the panel is causing a problem. Well, either it or the Noctua is causing a problem but I won't blame it on the cooler. So if you simply remove that fan the side goes on. Sadly the temps go up. 5c across the board. Making what is acceptable at this overclock (3800 mhz out of a 3000mhz CPU) unacceptable.

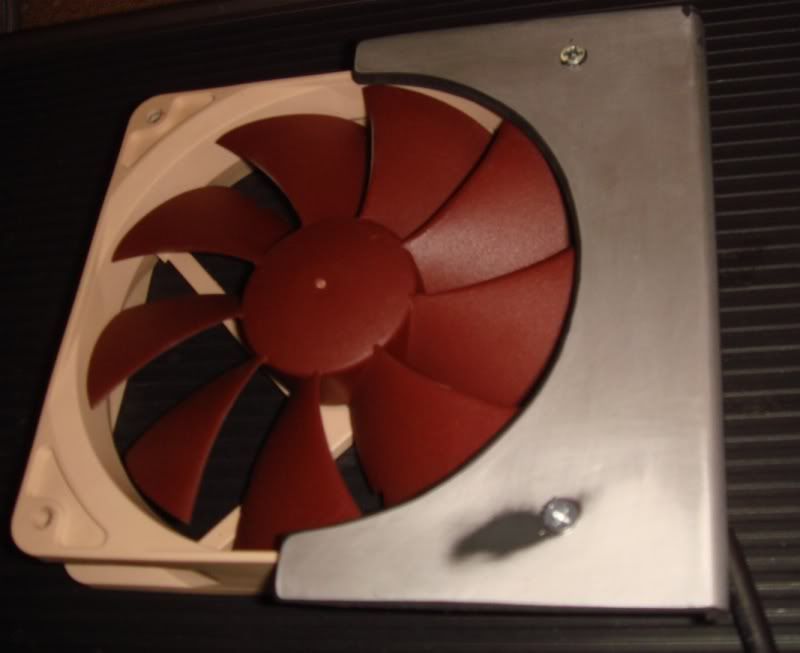
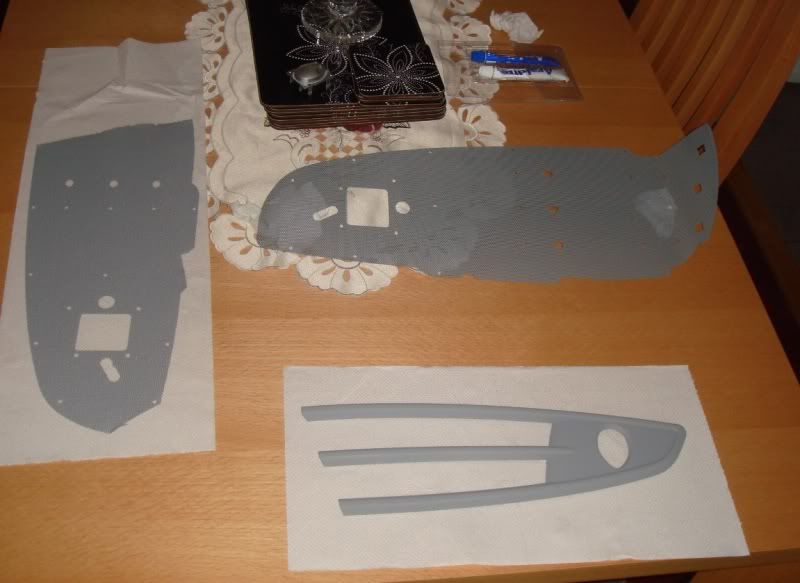
If you followed Re-ALX you would have noticed that I had a pile of panels on the living room floor. Long story short I had a complete spare set of panels that were not being used on either PC due to being completely spare. I recieved a badly damaged chassis with scratches ETC and chucked the spares in the loft. The idea is to fit a fan here. One does fit and I can easily fabricate brackets.

sideofffanfittingmark-1.jpg


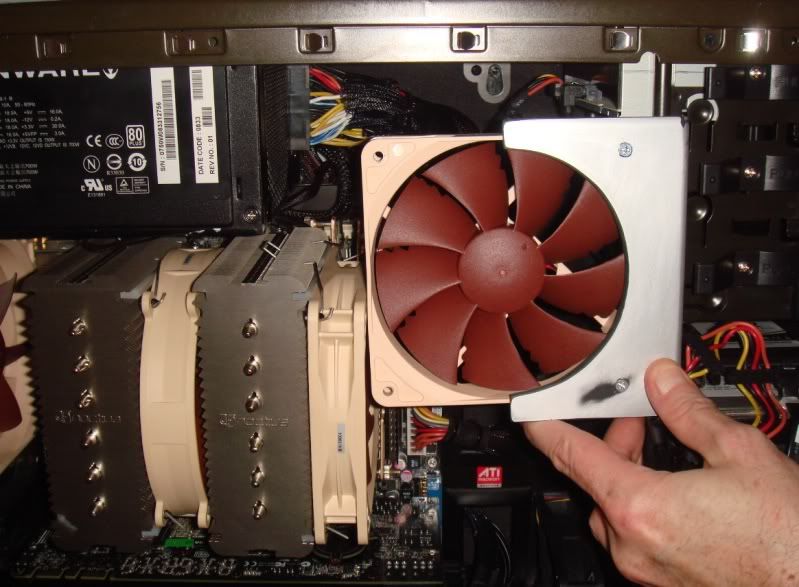
Problem is with the side panel on it cannot suck air in. Obviously the idea is to get it right next to the NH-D14 and then get it pulling it air from outside of the case. But, the problem is that fan would sit behind solid plastic and metal.

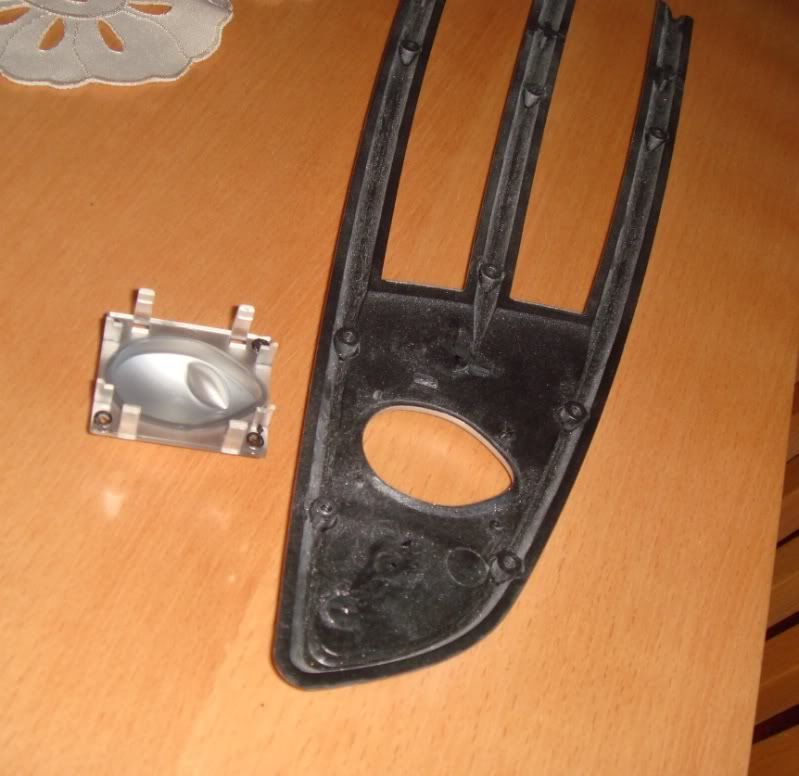
So, I got the spare parts out of the loft and came up with an idea. Here you can see a right side set of gills cut.

cutgillonmesh.jpg


I'd already done that. I didn't want to do any major mods until they were done and good (don't like tempting fate).

Before marking it up I had to remove the head because the LED board legs were stopping me laying it flat on the case.

gillheadremoved.jpg


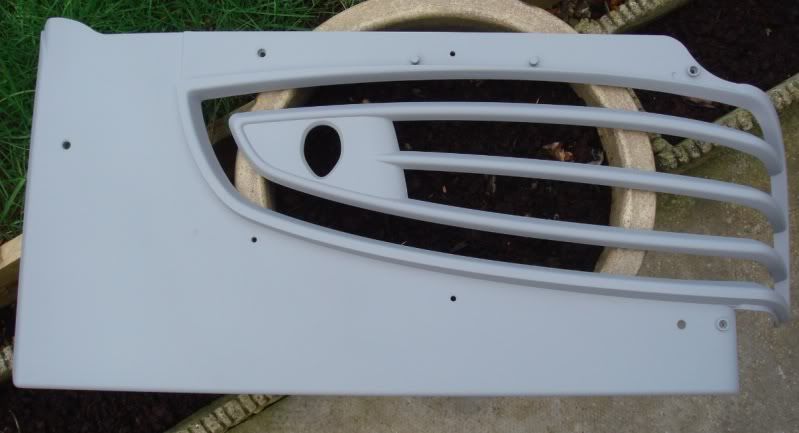
Then a markup and some serious cutting later and we have this.

sideholecut.jpg


Pacman? E-machines? I'll leave you to decide. The back needed serious cutting to allow for the extra mesh.

sidebacksmoothed.jpg


And we're then left with something like this.

sidemockup.jpg


Bit of paint prep and some colour schemes and the new intake fan will now be able to breathe
smile.gif


Now all I need is a ride to Homebase........
 
I'm a hot rodder at heart. Sadly that costs money
biggrin.gif


I've spent all gitting day trying to ID the browny orangey rusty brown that Noctua use.. Pigging nightmare !
 
I might just carbon vinyl the main parts and do the gills and mesh in satin black.

Depends on what I can find at homebase. Krylon do some great paints for plastic.
 
Dying art mate
sad.gif


As cases get better and ideas from modding are pinched and implemented there's less reason to get the tools out
sad.gif


So today seeing as the weather is so cack I decided not to even attempt priming up all the bits. Instead I decided to get out Photoshop (god damn I'm rusty !) and knock up an impression. Obviously the cold part of the project is self explanatory. What wasn't was the fuzion part.

coldfusionimpression.jpg


It should make sense now.
 
Still cold out still raining. I suppose I better just get used to it.

Took the old panel and marked out a fan bracket.

leftoverpanel.jpg


Cut it out, cleaned smoothed etc and put the fan in.

fanbracketonly.jpg


Will be black to match the case. When in place it will sit here.

faninbracket.jpg


Which is obviously totally not straight because it's nigh on impossible to hold it in the right place and take a pic with the other hand.

Ed. And I think the closest I am going to get to their whacky colour is red oxide primer. S'OK I can clear it.

redoxide.jpg
 
Ed. And I think the closest I am going to get to their whacky colour is red oxide primer. S'OK I can clear it.

redoxide.jpg

Error. Go to your local paint place and get the proper colour colour matched fella, you could even go with a metalic look then and make it epic rather than just 'nice'

If a job is worth doing its better to OTT
 
In rattle cans?

I know some places do them. Thing is that would be plastic melting stuff
sad.gif


I wish I still had my compressor and gun. It's super bent to have to use bleeding cans
sad.gif
 
Thankyou muchly
smile.gif


Had a right result earlier ! I didn't notice that with the NH-14 you get a really nice metal case badge !

Will be absolutely perfect for going over the filled in alien head (when I can get to Halpoos and get some filler).

It's also a nice regular brown, so I shall use a nice regular brown on the panels to match it
smile.gif


Got all the wet sanding to do this eve. Not looking forward to it
blink.gif
 
Been pretty busy with this over the past couple of days. First came all of the wet sanding to remove any marks or uneven edges (you can see them in the pics before, especially around the cut areas). That was a few hours work and left me with fingers that resembled prunes. Yesterday I put down the first coat of primer (followed by an hour of wet sanding) and then last night put down the second coat (and then an hour of wet sanding this morning). That was done using P800. Here they are fully primed and will now get a P1000 wet sand.

You'll notice I didn't bother with any of the intercoat sanding on small pieces as they are easier to hide things on. Large panels are not and need proper dressing before you go laying paint on them.

Main side panel.

sidepanelmainprimer.jpg


Main gills

largegillsprimer.jpg


Misc parts.

miscpartsprimer.jpg


I now have some body filler on order (and spot putty) and the small gills will be getting a fill in of the head cutout. Once that's filled and smoothed it will be painted over to remove that hole completely. Once the paint and laquer (not decided on glossy or satin yet mind !) goes down I can put this

noctuabadge.jpg


Where the flip side head used to be. That way it will fully resemble the mockup art of the completed panel
smile.gif
 
It'll need lots of work is all. At least three coats of topcoat with plenty of sanding in between.

Now that stuff is in primer I can focus on debadging the top gills. That's a lot of work there. Have decided not to clear coat it which means the finish needs to be perfect. You can't polish or buff flat colours.

Sadly it's getting expensive fast. The colours are going to cost £30 and then the filling products are another £10. Brilliant finishes can definitely be achieved with cans but you need to be prepared to spend the money and put in the work. With the primer I used by HOK it was like an epoxy based eggshell. It landed ultra smooth and didn't need any sanding until the final coat was on and that was only to key for the basecoat which was the same makeup. With cans you need to wet sand every single coat. Mostly because I'm obviously not using overspray extraction systems and thus it all needs to be sanded off. I also need to make a spray stand because final coats can not be sprayed downward due to them not being sandable. So they need as little overspray on them as possible.

This is why I said that excellent finishes can be had out of cans, but, it gets very expensive very fast if you're going to do it properly. This side panel alone has had two 500ml cans of primer (three coats) and will then need two 500ml cans of beige and two 500ml cans of rust. 6 cans (£30 without shipping) to do one panel. To spray an entire case? wow.. Bucks. And then you would need to add on 6 cans of clear laquer because you need to put on about 5 coats so that you can cut it back smooth by wetsanding and polishing for the perfect finish.
 
Slow progress now due to the weather.

Yesterday I cut a piece of plex and blocked in the head that needs to be filled. Sanded it rough so it bites and used some epoxy.

headfillback.jpg


Which now allows me to fill the hole with body filler without it sinking or falling through.

headfillfront.jpg


Still don't have the filler. Priorities got in the way (IE a new modem and a month up front for the new ISP).

I did decide to test spray the new paint though. Please bear in mind a few things -

1. It's bloody cold out. I'd be lucky if it's above freezing. This will stop the paint flashing and it's just sitting in a wet puddle ATM.

2. It's a high flow nozzle. I didn't know this so now it probably won't dry.

3. The test sample is an offcut that hasn't been sanded prepped or primed.

4. It's cellulose paint which is far stickier and slower to dry. This means that it still looks glossy but is actually flat (or supposed to be).

5. It's outside so looks way brighter than it is. However I do suspect it's a shade light but that won't matter due to it not being visible with a fan. It's close enough. I would rather have this than a poo brown tbh.

6. Due to the nozzle being high flow it's covered in orange peel. This will be allieviated when I get used to the flow and have it hung when I paint it (right now I am spraying pools of paint downward).

paintsample.jpg


If you go back to the actual can that is the finish and the colour when it is dry. The tops of the cans are painted with it.
 
See this is something i would have never thought of doing. I mean who would of thought of using an old alienware case and making it noctua themed? I really want to see the final product
 
Cold is the word lol. Just went outside to bring in the test panel and it's FREEZING lol.

Nice accumilation of moisture on it from bringing it in
biggrin.gif


It's gonna be a while before I can paint the panels
mad.png
 
Dude rattle cans dont melt plastic. Thats 2pack. For the love of god use a proper colour and not that prime shit please. All p[aint respect will be lost if you bodge it this way.

Cellulose wont melt plastic.
 
Back
Top