Midnight Smurf: Watercooled Edition

PapaSmurf6768

New member
Hello once again OC3D peoples!

The time has come for me to grow up and put in a custom water loop into my system. I've been wanting to do this ever since I started browsing these forums and seeing the awesomeness that is water cooling, and now I've finally got enough money to put in my very own loop (thanks summer job!) I put up a build log of my (air cooled) system a little while back which you can find in my signature, but because of the forum changes I can't edit any posts over there and it's just a mess, which is why I've decided to just start a new one. So anyway, without further ado...

Midnight Smurf: Watercooled Edition

The Hardware:
Corsair 650D
Intel 3570K (4.5GHz @ 1.195V on air)
MSI Z77A-GD65
ASUS GTX 670

XSPC Raystorm CPU Water Block
XSPC EX280 Radiator
XSPC D5 Dual Bay Pump/Res Combo
Distilled Water
Silver Killcoil
Black Chrome Compression Fittings
Various Angled Adapters (for tidiness)

Currently everything except the angled adapters are on their way, I will buy them when I can see everything in the case to check which is the cleanest way to run the loop. As a nice coincidence, these parts will be here tomorrow, August 22nd, which is my birthday :D Birthday present to myself I guess!

So here is what my system currently looks like:
IMG_0496.jpg


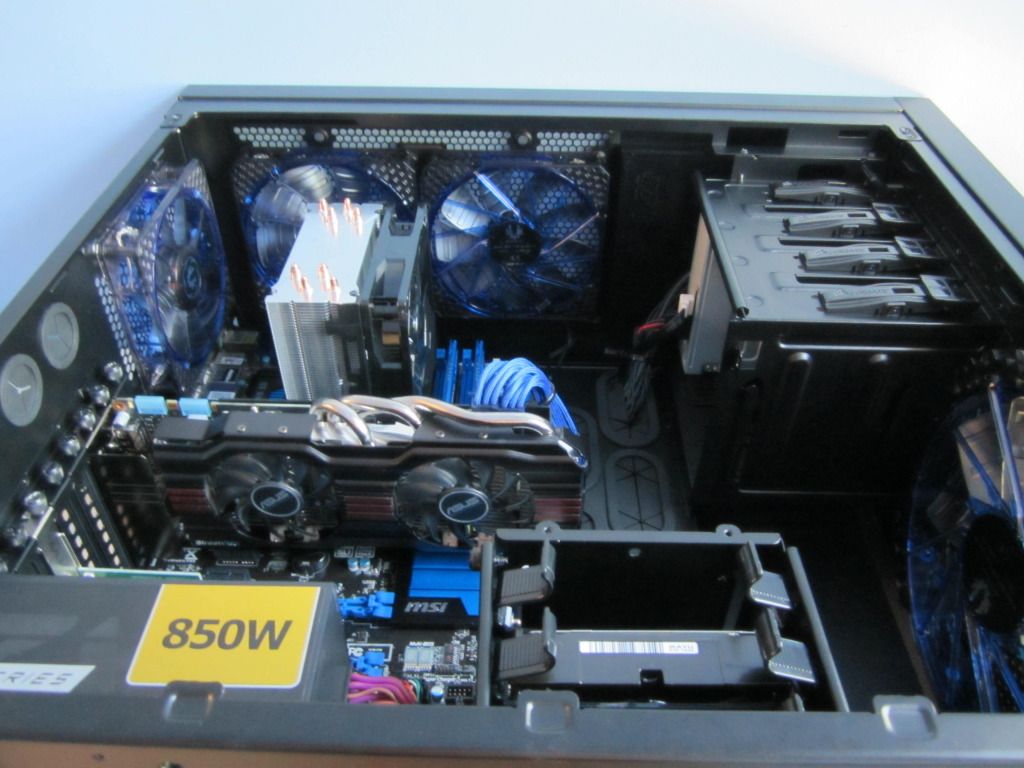
Well actually, currently it is stripped down ready for parts to be fitted tomorrow, but this is what the finished product would look like on air (minus DVD drive, I realized that thing was stupid a couple hours after I finished the build).

Also, I have more on my to-do list than just to water cool the system. I want to:
Water-cool
Swap white front LEDs for blue ones (LEDs are on their way)
Redo the cable managing in the back (my side panel bows a little bit)
Paint IO shield black (done)
Get an adapter for the 650D's passthroughs to a USB 3 header (done)
Get another two sticks of RAM (I'm getting some low memory errors every now and then)
Swap out 128GB SSD for 256GB (which is gonna have to wait til my next paycheck comes in)
Something else that I'm forgetting...

So yeah, those are the goals right there. Tomorrow I plan to put a ton of pictures up, so stay tuned everyone!

-Chris (PapaSmurf6768)
 
8/21:
What I've done so far:

Even though I won't be using my trusty Hyper 212 EVO, I've been wanting to paint the top of it black because the silver just stood out too much for me. So I decided to do it anyway cuz I was bored :)

All masked up and ready:
IMAG0350.jpg


Paint I will be using. I've always been a downright crappy painter but that's because I never have really tried to do a nice paint job. This time I actually tried, I bought a can of primer and everything!
IMAG0351.jpg


Primed:
IMAG0352.jpg


The final product, which is probably the nicest paint job I've ever done. Lot's of light coats really does the trick:
IMAG0358.jpg


Also, I painted the IO shield mainly to keep using my newfound paint knowledge though. I used "Satin" finish paint on this though instead of "Flat", since I thought it would blend with the 650D better. The satin seemed to be a lot harder to use though, but it still looks nice:
IMAG0363.jpg


Also, besides painting I've stripped down the front IO to get ready for some blue LED action:
IMAG0353.jpg


Heatshrink stripped, but unfortunately I forgot which LED was which and didn't label them... Oh well. Here's a nice shot of some 100 ohm resistors and what I'm hoping are 5mm LEDs, because that's what I ordered.
IMAG0357.jpg


I know none of this is particularly exciting, but I needed something to fill this "Reserved" spot before I can't edit it tomorrow :(
 
Last edited:
Reserved, but I probably won't get the chance to put anything here because the edit function is broken...

Edit: It works now!
 
Last edited:
They may be reserved, but remember that by the morning your posts shall not be editable :(
Unless things have changed during my brief break...

Regardless, I look forward to seeing more :)
 
The edit option is only available for a couple of hours I think at best :(

OT: Looking forward to seeing how you get on. I have a 650D as well so I have a special interest in this :p
 
USPS man just showed up, here're my new toys!

What was in my big box today, happy birthday to me!
IMAG0364.jpg


Things I will be using from the kit:
IMAG0365.jpg


And things I won't be using:
IMAG0366.jpg


All my new pretties out of the boxes. The aluminum on the front of the res and on the CPU block accents to aluminum on the front of the 650D really well:
IMAG0367.jpg


The stock compression fittings that came with the kit. These look really nice IMO and I don't think I'll be replacing them unless something is wrong:
IMAG0368.jpg


That's the only update for now, I'm actually running out with some friends for a little birthday bash in a couple minutes, but I'll get to work when I get back. Just from looking at everything, I've already seen some problems though. The spacing on the rad is 15mm, but the spacing on the 650D for 140mm fans is 20mm! What the hell? Looks like I'll be getting the drill out to mod my case, which I really didn't want to do but also don't want to sell the rad and wait to get one with the right spacing. Also, the back of the hard drive hotswap bay hits the rad too, but I was expecting that and I should only need to file the plastic back a little, which isn't too bad. I just need to figure out how to get the damn bay out of the top of the case, anyone know how to do this?

More updates later tonight hopefully, stay tuned!

PS: How do the pictures look? I'm doing my best to just use my phone as it's handy and I always have it on me, but if you all don't think the quality is there I could borrow my sister's Canon.
 
So something had to be done about the radiator not fitting, and I didn't want to return it, so I busted out the cordless drill to have a go at power tools.
IMAG0371.jpg


Now mind you, I've used all these tools before but have never been particularly masterful at executing anything. Nevertheless I planned it out as best I could and did a little research beforehand. Marking for drilling:
IMAG0372.jpg


The first one came out kind of alright, for my standards:
IMAG0373.jpg


The second one, not so much...
IMAG0375.jpg


So I filed it down a little and whacked it a couple times to try and straighten it, which worked alright but I scratched the hell out of it at the top...
IMAG0376.jpg


After dealing with that I still had two more holes to make bigger, which went OK and ended up looking something like this:
IMAG0379.jpg


Now a quick side note: I'm not trying to fool anyone, I know the drillwork on the top looks terrible. Had I really put some time into it I bet i could've done better, but I'm just not good with tools on top of the fact that I was a little pressed for time today, I got the result I did. I am acknowledging I did a bad job on drilling, so would appreciate it if you didn't flame me below :)

Anyway, now that the holes were drilled so that I could atleast screw the rad in, I needed to shorten up that hot swap bay as the clearance just wasn't there. Figuring out how to take the damn thing out took a little while, but once I had it I just took a hacksaw to the back end of it. Not the cleanest cut, but you'll never see it and it functions perfectly when I put it back in the case.
IMAG0380.jpg


Now that everything was ready to be fitted, I started fitting everything! First was the CPU block, which was a lot harder to mount than I thought it would be but ended up working out:
IMAG0383.jpg


Next was the rad, where I screwed the fans in a "push" configuration first then screwed into the top of the case with my newly made holes:
IMAG0385.jpg


IMAG0389.jpg


IMAG0386.jpg


Uhhg... Don't know why I' even showing you these pictures...
IMAG0388.jpg


Lastly was the res/pump, which slid nicely into place and looks very nice in the 650D, although is a little bit darker than the front panel:
IMAG0396.jpg


Except as soon as I had the thing bolted in and looking good (the 650D's quick attach things weren't working at all) I realized I still have to fill up the res to flush it out and leak test... Oh well.

So here's where I'm at as of tonight:
IMAG0397.jpg


I'm happy with the progress so far, minus the drilling at the top but I'm gonna have to live with it. Updates might slow down a little bit for now as the school year is approaching quickly and I still have a ton of summer work left :( The next phase is to rig the tubing and finish the LED mod on the front panel. I just ordered some angled fittings now that I see what I need and my LEDs should be here soon. Thanks for reading, I always tend to get carried away on these updates :D
 
Last edited:
Very nice, it's going to look really slick. Nice motherboard you have there too! Hint hint. But you might want to consider extending the hole with a file next time. I think that will look a little bit better than the torn holes. No gpu watercooling? Or is there no block that fits the 670?

m1cypgbw23pa.jpg
 
Yup, a file definitely was the way to go now that I see what the drill did. I'm not too worried about it though, my case is on my desk anyway so I'll never even see the top of it!

Currently I dont think there's a block that fits the ASUS 670, and even if there was I don't think it would be in the budget right now. It's something I want to do eventually though!
 
Nice build so far, when I'm gonna watercool my 650d next year I'd also like to use this res, maybe I'll also purchase some xspc 5.25'' bay covers that they match the res cover better.
It's a shame Corsair didn't use the ''correct'' fan spacing on the top 140mm mounts.
 
That's an awesome idea, you're talking about these right? I might pick some up in the future.

And yeah it kinda sucks about the rad, but it's also my fault for not checking the fan spacing before hand. If I had just done a little research I woulda found this schematic where it clearly says 15mm spacing... Live and learn!
 
Got the LEDs for the front panel IO in a little while ago.

So I get to snipping:
IMAG0399.jpg


And pop the new LED on. Thanks god I'm a little better at soldering than I am at drilling (not by much though)
IMAG0398.jpg


Both are done:
IMAG0400.jpg


Shoving all the wires back in the case. Forgot to get some heatshrink, so electrical tape will have to do.
IMAG0401.jpg


Reassembled and ready for action. Hopefully it works as I have no idea if I ordered the right kind of LEDs or soldered them the right way or what. Won't be able to test til everything is back together anyway, hopefully I have no issues!
IMAG0402.jpg


That's it for now, next update will be when my angled fittings get here in a day or two and I can start routing the hose!
 
That's an awesome idea, you're talking about these right? I might pick some up in the future.

And yeah it kinda sucks about the rad, but it's also my fault for not checking the fan spacing before hand. If I had just done a little research I woulda found this schematic where it clearly says 15mm spacing... Live and learn!

Yes exactly those, it still won't match the frontpanel of the case 100% but imo it would look better when at least all the bay covers look the same. tbh I'm glad you did the mistake because I just thought Corsair know what they're doing the rad will fit..., and I would have made exacly the same fault.
 
How to Do the 7V Mod on the 650D Fan Controller

Even at the lowest setting on the 650D's built in fan controller the fans still seemed too loud for me, so here's what I did to fix it!

First, connect a wire (paperclip) from the 5V pin to the Ground pin next to the 12V pin (Red wire to black wire next to yellow wire)
IMAG0403.jpg


Then, wrap it in electrical tape so you don't get shorts:
IMAG0405.jpg


Then on the power supply, remove the ground pin next to the yellow wire (12V) and wrap that in tape too:
IMAG0406.jpg


Then just plug it in and enjoy your quieter fans! They will now run at 7V on max, about 6V on medium, and 5V on low.

However, now that I've done this I don't think it's going to be a permanent solution as the 7V mod is kind of dangerous. I was just playing around with resistors as another way to get this to work and I think that will be the much safer method. Glad I figured out how to get this to work though!
 
if you get another birthday soon... and corsair gets inline with their plans.. the platinum dommies
in blue or the white would be a highlight.. im waiting on my funds to grow for my white dommies.

airdeano
 
I plan on having another birthday in about a year or so :) How do you know they're making blue Platinums? I couldn't find anything. These sticks look real purty though...
 
Last edited:
Back
Top