VPN's are cool and where it's at  !!! In short, they are a secure internal network established over the internet. In long, that means transferring files, playing games and doing things that are usually reserved for LAN's without having to drag boxes anywhere. If your lucky enough to be an ADSL subscriber whose ISP peers with PIPE, VIX, WAIX or allows free data between users of the same state (Australia), then a quota-free network is only a few steps away.
Software required
Rather than limit yourselves to the Windows platform with something like Hamachi http://www.hamachi.cc/ , or a client based program like WASTE http://waste.sourceforge.net/ , I suggest going for the transparent multi-platform OpenVPN, or rather the GUI variant found at openvpn.se . Start by downloading and installing the program-the default options should be fine. Along with the program files, an unsigned virtual Ethernet adaptor and driver is installed, so be prepared to 'Continue Anyway' a few times.
#Note: If the installation appears to stall, the likely culprit could be your firewall, querying as to whether to allow the new adaptor access in the background. You'll need to clear it for the installation to proceed.
The first step is to set up our new VPN adaptor (TAP-32) in bridged mode-this allows us to bind it to another Ethernet adaptor of our choice, so they share common network settings such as IP's. By attaching the virtual adaptor to a real one, we're also allowing packet broadcasting (so things like Neighbourhood browsing and non-TCP/IP games will work) and enabling those on the local network to access those on our remote network and vice versa.
You'll need a second network card to pull this off if you've already got an Ethernet modem hooked up-otherwise you'll need to set up in routed mode, which for general use is fine, but shall deny you all the benefits of bridged mode. To set up the network bridge, right click on the My Network Places icon on the desktop, choose Properties to open the Network Connections dialog, then select both the VPN connection and LAN connection you wish to bind to, right click, and then choose Bridge Network Connection.
#Note: You should not bridge a connection that has Internet Connection Sharing (ICS) as it is a kind of bridge anyway, or one that is connected to a modem directly.
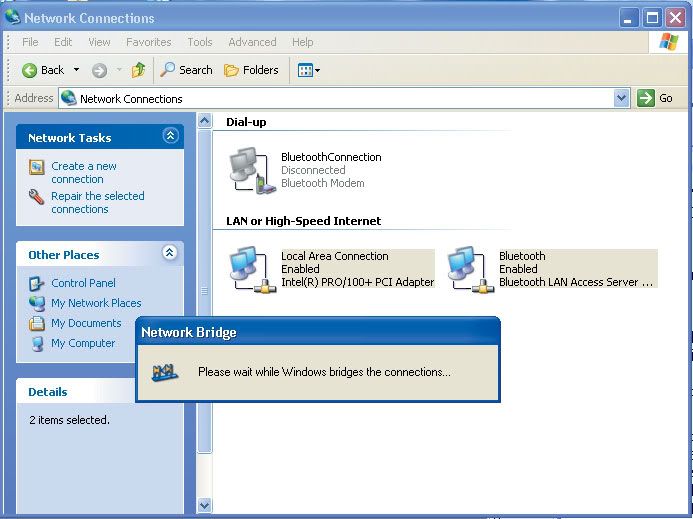
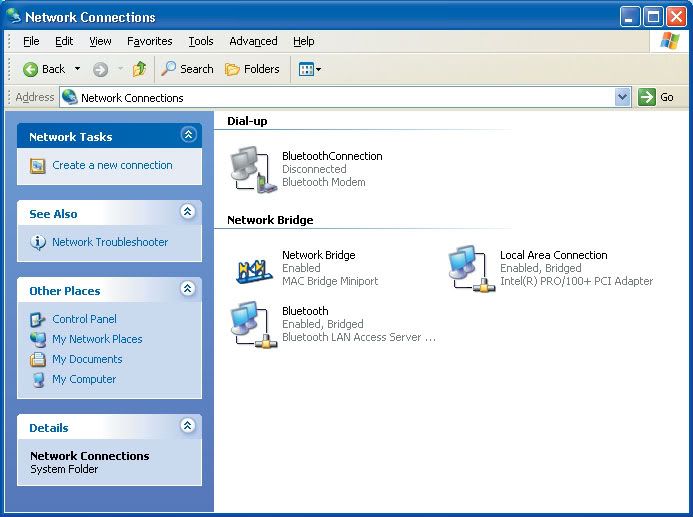
If all goes well you should have a new icon called Network Bridge, and your net connection should still be up and running") .
.
How to configure
Browse to where you installed OpenVPN and copy 'server.opvn' from the sample-config into the config folder. Open it with a text editor, and find the lines:
;dev tap
dev tun
and move the semi-colon from the top line to the second. Here we are uncommenting the 'tap' argument, which effectively enables it, while disabling the 'tun' argument. What we've done is told our server that we're running a bridged connection, as opposed to a routed one. Find the line:
server 10.8.0.0 255.255.255.0
and comment it by entering a semi-colon at the front, as this is used only for routed connections. Now uncomment the line:
;server-bridge 10.8.0.4 255.255.255.0
10.8.0.50 10.8.0.100
In it's current state, this line defines the server IP as 10.8.0.4 on a subnet mask of 255.255.255.0, and allocates connecting client IP's in the range of 10.8.50.100. Finally, if you wish multiple clients to see each other and not just the server, uncomment the client-to-client line. Save the file and exit your text editor. Return to the Network Connections dialog, right click on Network Bridge, choose Properties, and select Internet Protocol (TCP/IP) from the bottom box. Click the Properties button and enter the IP address 10.8.0.4 and the subnet mask 255.255.255.0. Click Ok and then Ok again to set the adaptor.
#Note: If you wish to use another IP you must ensure that both the Network bridge properties and the server.opvn server files are updated accordingly. It is also preferable to use an uncommon IP, so conflicts are unlikely to occur. Many home networks use the block 192.168.0.xxx for example-it's best to avoid this so home networks and your VPN don't conflict. Valid internal IP's exist in the following ranges: 10.0.0.0 - 10.255.255.255. 172.16.0.0 - 172.31.255.255 and 192.168.0.0 - 192.168.255.255 .
More configuration
Much like SSH servers, OpenVNC makes the use of public and private keys, with the addition of something known as the Certificate Authority. Anyone trying to connect to the server must have their key signed by the Certificate Authority - adding another layer of security. Open a command prompt and browse to the easy-rsa folder (under your installed OpenVPN folder) and type:
init-config
This will set up the configuration files. From the same folder, open up 'vars.bat in a text editor and adjust the KEY_COUNTRY, KEY_PROVINCE, KEY_CITY, KEY_ORG, and KEY_EMAIL parameters. These values represent your two letter country code (AU - Australia, for example), state, city, organisation and email respectively. They are also used to generate keys, and setting them in the batch file sets the entries as default so you don't have to enter the same details again and again. Save the file, jump back into the command prompt and type:
vars
clean-all
build-ca
This sets the variables as above, removes any existing keys and begins the build of the Certificate Authority file. You'll be quizzed on a number of parameters - simply hit Enter to use the defaults you previously set up in 'vars.bat' (shown between brackets). For the Common Name, enter server and hit enter. Next we want to generate the private and public key for the server:
build-key-server server
For the Common Name query enter server, enter a challenge password, then enter y to sign the certificate, and y again to commit. Finally we need to generate Diffie-Hellman parameters. This is essentially the protocol that allows us to switch protocols securely.
build-dh
This will take a little while. Once done, the server setup is complete.
Dealing with Clients
Now we need to build keys to distribute to the clients that will be connecting to our VPN. Type:
build-key <client>
Replacing 'client' with the name of the person who the key is going to be for. Be sure to enter a unique common name (you can use the same name as you used above), password and sign the certificate as well. Every connecting client will need their own keys. So now we have generated a whole bunch of files in our easy-rsa\keys folder. Your clients will need a copy of the 'ca.crt' file, as well as their own .crt and .key files that you generated for them. The rest (including the ca.crt) can stay on the server. Now we can setup OpenVPN on the client machines. Install as before, except instead of the 'server.opvn', copy the 'client.opvn' from the sample-config into the config folder. Open the file in a text editor and set the connection to dev tap, then find the line remote my-server-1 1194 and replace my-server-1 with the servers online IP. If the server doesn't have a static IP, try signing up with a service like www.dyndns.org and using the domain it allocates instead. Next, you'll need to find the following lines:
ca ca-crt
cert client.crt
key client.key
Replace 'client.crt' and 'client.key' with the key names for the client you generated earlier, making sure to provide the full path with double back slashes instead of just the file name. So for example, cert client.crt would become cert"C:\\Program Files\\OpenVPN\\easy-rsa\\keys\\client.crt" if you installed OpenVPN to it's default directory. Save the file. The basic setup is now done.
Return to the server machine, and go to START--> Control Panel--> Administrative Tools--> Services. Scroll down until you find 'OpenVPN Service. Right click on it, choose Properties, set the start up type to Automatic and click the Start button, then Ok. The OpenVPN server should now be running, and be started every time Windows does. You can right click on the OpenVPN GUI icon in the system tray and choose 'View Log' to see how the start-up progresses, and to troubleshoot along the way.
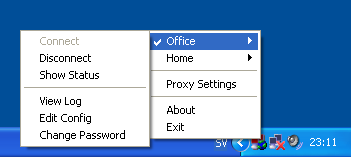
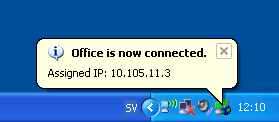
Back on the client machine, right click on the OpenVPN GUI icon, and choose 'Connect'. Luck and firewalls permitting, everything should go well and the client should be assigned an IP. Try pinging between the server and the client's VPN IP's to make sure everything is ok. If you have other machines on the local-server side network that share the VPN IP range, try getting your clients to connect to them, it should work easily.
If problems arise
Ok, let's face it, for home use there is only one thing a VPN is really good for - games! In particular old games that either don't support TCP/IP or internet play. The first step to increase our compatability with old games is to install the IPX/SPX protocol. Right click on My Network Places, choose Properties, right click on the Network bridge and choose Properties again. Click the install button, select Protocol and hit the Add button. Choose NWLink IPX/SPX/NetBIOS Compatable Transport Protocol and hit Ok. Select the protocol you just added and hit the Properties button. Set the Internal Network Number to a unique integer on every machine, and Frame Type to Ethernet 802.3 and the Network Number to the same as the Internal Network Number. Click Ok.

If further connection problems are run into, there may be a need to install NetBEUI. Add another protocol, except hit the Have Disk button. Put in your Windows CD, and browse to VALUEADD\MSFT\NET\NETBEUI (FOR Windows XP Pro), select NETNBF.INF and hit Open and then Ok. You may need to restart your PC after this. You may also find on some installations that when playing a game there is extreme lag - in the order of around a minute.

This is usually caused by the OpenVPN not getting the priority it requires to process the connection. This is an easy fix - open Regedit, and browse to the key HKEY_LOCAL_MACHINE\SOFTWARE\OpenVPN . Double click on the Priority string and change the Value Data to ABOVE_NORMAL_PRIORITY_CLASS and restart the service.
Enjoy-PV
Thanks goes to openvpn.se for the plethora of information about using OpenVPN. They have some troubleshooting documentation there about issues with firewalls, check them out.
!!! In short, they are a secure internal network established over the internet. In long, that means transferring files, playing games and doing things that are usually reserved for LAN's without having to drag boxes anywhere. If your lucky enough to be an ADSL subscriber whose ISP peers with PIPE, VIX, WAIX or allows free data between users of the same state (Australia), then a quota-free network is only a few steps away.Software required
Rather than limit yourselves to the Windows platform with something like Hamachi http://www.hamachi.cc/ , or a client based program like WASTE http://waste.sourceforge.net/ , I suggest going for the transparent multi-platform OpenVPN, or rather the GUI variant found at openvpn.se . Start by downloading and installing the program-the default options should be fine. Along with the program files, an unsigned virtual Ethernet adaptor and driver is installed, so be prepared to 'Continue Anyway' a few times.
#Note: If the installation appears to stall, the likely culprit could be your firewall, querying as to whether to allow the new adaptor access in the background. You'll need to clear it for the installation to proceed.
The first step is to set up our new VPN adaptor (TAP-32) in bridged mode-this allows us to bind it to another Ethernet adaptor of our choice, so they share common network settings such as IP's. By attaching the virtual adaptor to a real one, we're also allowing packet broadcasting (so things like Neighbourhood browsing and non-TCP/IP games will work) and enabling those on the local network to access those on our remote network and vice versa.
You'll need a second network card to pull this off if you've already got an Ethernet modem hooked up-otherwise you'll need to set up in routed mode, which for general use is fine, but shall deny you all the benefits of bridged mode. To set up the network bridge, right click on the My Network Places icon on the desktop, choose Properties to open the Network Connections dialog, then select both the VPN connection and LAN connection you wish to bind to, right click, and then choose Bridge Network Connection.
#Note: You should not bridge a connection that has Internet Connection Sharing (ICS) as it is a kind of bridge anyway, or one that is connected to a modem directly.
If all goes well you should have a new icon called Network Bridge, and your net connection should still be up and running
.
How to configure
Browse to where you installed OpenVPN and copy 'server.opvn' from the sample-config into the config folder. Open it with a text editor, and find the lines:
;dev tap
dev tun
and move the semi-colon from the top line to the second. Here we are uncommenting the 'tap' argument, which effectively enables it, while disabling the 'tun' argument. What we've done is told our server that we're running a bridged connection, as opposed to a routed one. Find the line:
server 10.8.0.0 255.255.255.0
and comment it by entering a semi-colon at the front, as this is used only for routed connections. Now uncomment the line:
;server-bridge 10.8.0.4 255.255.255.0
10.8.0.50 10.8.0.100
In it's current state, this line defines the server IP as 10.8.0.4 on a subnet mask of 255.255.255.0, and allocates connecting client IP's in the range of 10.8.50.100. Finally, if you wish multiple clients to see each other and not just the server, uncomment the client-to-client line. Save the file and exit your text editor. Return to the Network Connections dialog, right click on Network Bridge, choose Properties, and select Internet Protocol (TCP/IP) from the bottom box. Click the Properties button and enter the IP address 10.8.0.4 and the subnet mask 255.255.255.0. Click Ok and then Ok again to set the adaptor.
#Note: If you wish to use another IP you must ensure that both the Network bridge properties and the server.opvn server files are updated accordingly. It is also preferable to use an uncommon IP, so conflicts are unlikely to occur. Many home networks use the block 192.168.0.xxx for example-it's best to avoid this so home networks and your VPN don't conflict. Valid internal IP's exist in the following ranges: 10.0.0.0 - 10.255.255.255. 172.16.0.0 - 172.31.255.255 and 192.168.0.0 - 192.168.255.255 .
More configuration
Much like SSH servers, OpenVNC makes the use of public and private keys, with the addition of something known as the Certificate Authority. Anyone trying to connect to the server must have their key signed by the Certificate Authority - adding another layer of security. Open a command prompt and browse to the easy-rsa folder (under your installed OpenVPN folder) and type:
init-config
This will set up the configuration files. From the same folder, open up 'vars.bat in a text editor and adjust the KEY_COUNTRY, KEY_PROVINCE, KEY_CITY, KEY_ORG, and KEY_EMAIL parameters. These values represent your two letter country code (AU - Australia, for example), state, city, organisation and email respectively. They are also used to generate keys, and setting them in the batch file sets the entries as default so you don't have to enter the same details again and again. Save the file, jump back into the command prompt and type:
vars
clean-all
build-ca
This sets the variables as above, removes any existing keys and begins the build of the Certificate Authority file. You'll be quizzed on a number of parameters - simply hit Enter to use the defaults you previously set up in 'vars.bat' (shown between brackets). For the Common Name, enter server and hit enter. Next we want to generate the private and public key for the server:
build-key-server server
For the Common Name query enter server, enter a challenge password, then enter y to sign the certificate, and y again to commit. Finally we need to generate Diffie-Hellman parameters. This is essentially the protocol that allows us to switch protocols securely.
build-dh
This will take a little while. Once done, the server setup is complete.
Dealing with Clients
Now we need to build keys to distribute to the clients that will be connecting to our VPN. Type:
build-key <client>
Replacing 'client' with the name of the person who the key is going to be for. Be sure to enter a unique common name (you can use the same name as you used above), password and sign the certificate as well. Every connecting client will need their own keys. So now we have generated a whole bunch of files in our easy-rsa\keys folder. Your clients will need a copy of the 'ca.crt' file, as well as their own .crt and .key files that you generated for them. The rest (including the ca.crt) can stay on the server. Now we can setup OpenVPN on the client machines. Install as before, except instead of the 'server.opvn', copy the 'client.opvn' from the sample-config into the config folder. Open the file in a text editor and set the connection to dev tap, then find the line remote my-server-1 1194 and replace my-server-1 with the servers online IP. If the server doesn't have a static IP, try signing up with a service like www.dyndns.org and using the domain it allocates instead. Next, you'll need to find the following lines:
ca ca-crt
cert client.crt
key client.key
Replace 'client.crt' and 'client.key' with the key names for the client you generated earlier, making sure to provide the full path with double back slashes instead of just the file name. So for example, cert client.crt would become cert"C:\\Program Files\\OpenVPN\\easy-rsa\\keys\\client.crt" if you installed OpenVPN to it's default directory. Save the file. The basic setup is now done.
Return to the server machine, and go to START--> Control Panel--> Administrative Tools--> Services. Scroll down until you find 'OpenVPN Service. Right click on it, choose Properties, set the start up type to Automatic and click the Start button, then Ok. The OpenVPN server should now be running, and be started every time Windows does. You can right click on the OpenVPN GUI icon in the system tray and choose 'View Log' to see how the start-up progresses, and to troubleshoot along the way.
Back on the client machine, right click on the OpenVPN GUI icon, and choose 'Connect'. Luck and firewalls permitting, everything should go well and the client should be assigned an IP. Try pinging between the server and the client's VPN IP's to make sure everything is ok. If you have other machines on the local-server side network that share the VPN IP range, try getting your clients to connect to them, it should work easily.
If problems arise
Ok, let's face it, for home use there is only one thing a VPN is really good for - games! In particular old games that either don't support TCP/IP or internet play. The first step to increase our compatability with old games is to install the IPX/SPX protocol. Right click on My Network Places, choose Properties, right click on the Network bridge and choose Properties again. Click the install button, select Protocol and hit the Add button. Choose NWLink IPX/SPX/NetBIOS Compatable Transport Protocol and hit Ok. Select the protocol you just added and hit the Properties button. Set the Internal Network Number to a unique integer on every machine, and Frame Type to Ethernet 802.3 and the Network Number to the same as the Internal Network Number. Click Ok.
If further connection problems are run into, there may be a need to install NetBEUI. Add another protocol, except hit the Have Disk button. Put in your Windows CD, and browse to VALUEADD\MSFT\NET\NETBEUI (FOR Windows XP Pro), select NETNBF.INF and hit Open and then Ok. You may need to restart your PC after this. You may also find on some installations that when playing a game there is extreme lag - in the order of around a minute.
This is usually caused by the OpenVPN not getting the priority it requires to process the connection. This is an easy fix - open Regedit, and browse to the key HKEY_LOCAL_MACHINE\SOFTWARE\OpenVPN . Double click on the Priority string and change the Value Data to ABOVE_NORMAL_PRIORITY_CLASS and restart the service.
Enjoy-PV
Thanks goes to openvpn.se for the plethora of information about using OpenVPN. They have some troubleshooting documentation there about issues with firewalls, check them out.
