"d00D" Corsair 900D Reverse

If it still looks wrong, I will just take off the display and use it without, with the panel going over it. I have not used the touch screen on my Aqueros since I installed the Aquasuite so its not really essential, a sort of Aquero 6Lt? :D

I wish the 6LT was a legit thing. I really hate the idea of having a screen on it and mounting it somewhere external. 5LT's were excellent and at least made it somewhat affordable to go with an Aquaero, I do want to use them again for Lightning. How did you find they got on with PCB splitters and iPPC's any control issues at all? I'm still sort of tempted by dual 5LT's and voltage control like my current setup.

JR

The 6 XTs/ PCB splitters have been faultless for running the fans the only problem I've had being the plastic touch screen covers which keep unsticking themselves and looking untidy.

The low speeds I'm getting I think are a combination of the iPPC's motor type and the PWM options on the Aquero, you can set how many pulses it outputs per second which I figured would be best as a high number for low speeds and so far its worked.
 
I thought about building a box and mount it under the 5.25 bays in my 900D. But I'm with you, I never touch the screen, its software only adjustments.

I'm curious if they will ever launch a version 7 any time soon.
 
Just a small update today, I got the recut back panel so it has allowed me to dry trial fit some of the loop to finalise the positions of the 2 pumps. The filter in/ outlets and the reservoirs outlet dictated the position of everything below.

I have used the middle feed on the reservoirs this time which will give a fountain effect. It has meant a bit more head scratching to get the pipes hidden from the front but I think I have it cracked.

Ignore the shiny silver aquapipe and 2 double bends, they were just what I had in the drawer, they will be black in the final assembly.

With doing the above and trying to work out the best routes for the pipes to avoid clashes, it's taken most of the night to screw in place the 2 pump tops!

ETA.

Got the pipes behind the pumps done tonight, (they are angled to the right to keep the pumps ends clear), including the second drain down valve on the GPU loop which will discharge into the CPU loop, then out of that loop's drain down point, meaning only one pipe having to exit the rear of the case.

The return pipes on the front of the pumps are being a bit tricky, well the right hand one anyway. I need to be able to get my hand to the Aquero rear past the side of this pump so I am having to play around with fittings/ spacers/ bent pipe etc to find the best solution without it looking contorted.
 

Attachments

  • DryFit_1.JPG
    DryFit_1.JPG
    89.5 KB · Views: 167
  • DryFit_2.jpg
    DryFit_2.jpg
    94.4 KB · Views: 149
  • JointDrainPoint_2.jpg
    JointDrainPoint_2.jpg
    93.3 KB · Views: 158
  • JointDrainPoint_3.jpg
    JointDrainPoint_3.jpg
    80.3 KB · Views: 169
Last edited:
A bit out of sync but I wanted to get it done before the case got heavy and difficult to turn upside down; I have fitted a few strips of LEDs which should give that floating look when lit in the dark on their own.

I had all sorts of problems bending the 2 pipes from the pump inlets to the bulkhead fittings above. I needed to keep the right of the pumps clear for access to the Aquero so a double bend was called for on that side so another would be needed on the other side to match.

For some reason every time I got the first bend nice, the second would either be too slow or have a bulge. It took 2 attempts to do the first and 3 times to do the second. I got the second attempt perfect but I had forgotten to add 16mm to the centres measurement so my jig was wrong............ :eek:

I decided to take off the front off the Aquero and move it into the chassis a little so the new front panel will just go over it. As mentioned the other day, it just did not look right down there and as I cant see the buttons being used, it will be better like this. I just need to repaint the brackets as they got scratched when I was elongating the holes to allow the Aquero 6 LT! to sit further back..

I am assuming that it will work like this with no front, if it doesn't I will have to put it back on but I will loose a bit of space moving it further back into the chassis, anyone know if it will be okay?
 

Attachments

  • FinallyBent.jpg
    FinallyBent.jpg
    93.8 KB · Views: 148
  • Aquero6LT...jpg
    Aquero6LT...jpg
    85.6 KB · Views: 148
  • Aquero6LT.jpg
    Aquero6LT.jpg
    79.1 KB · Views: 180
  • FloorLightLED_5.JPG
    FloorLightLED_5.JPG
    94 KB · Views: 159
  • FloorLightLED_4.JPG
    FloorLightLED_4.JPG
    90.5 KB · Views: 140
  • FloorLightLED_3.jpg
    FloorLightLED_3.jpg
    78.4 KB · Views: 141
  • FloorLightLED_2.jpg
    FloorLightLED_2.jpg
    88 KB · Views: 137
  • FloorLightLED_1.jpg
    FloorLightLED_1.jpg
    88.1 KB · Views: 159
Looks good. Do you think it may have been a little easier to use a rotary fitting out of the pumps to the rad making your tubing a straight line?
 
Looks good. Do you think it may have been a little easier to use a rotary fitting out of the pumps to the rad making your tubing a straight line?

Thanks Kong, I'm not sure which pipes you are talking about though, I'm open to suggestions on straight runs of pipe :D

I tried some of that new PETG pipe last night too and I had a worse time with that.

Has anyone got any tips on bending that stuff? It seems to bend easier but I just cant get a decent, even bend with no ripples etc. Am I using too much heat? Do you have to use a mandrel to bend it around? I prefer doing freehand bends with acrylic.
 
I'm looking at the very last picture with the clear S bends. You could get an appropriate rotary to make the bend on each side and use a straight piece of pipe.

https://youtu.be/w3bQagayA64?t=10m50s

See if that helps.

They are bending at 13:44 with a good explanation of of kinks a minute later.
 
Last edited:
I'm looking at the very last picture with the clear S bends. You could get an appropriate rotary to make the bend on each side and use a straight piece of pipe.

https://youtu.be/w3bQagayA64?t=10m50s

See if that helps.

They are bending at 13:44 with a good explanation of of kinks a minute later.

Thanks for the link Ill have a look at that later.

I understand where you mean now, I did think about doing that but it would have meant more fittings.

My late father was a plumber by trade and I always remember him telling me to use bends in preference to "elbows" where ever possible to reduce the risk of leaky joints. That has sort of stuck in my mind, even if it has meant wasting several lengths of tube .....:D
 
The paint had dried on the Aquero brackets so I decided to fit that properly and then set about working out the best locations for the USB hub, needed for all the Aquacomputer stuff, and the Farbwerk LED controller.

The shelf directly above the Aquero seems best for the hub, I can run the USB cable from the mobo very stealthy in a void beside the filter and it is very easy to access when the front filter/ panel is removed. The Farbwerk only could really go where it ended up, the space behind the motherboard panel is too narrow.

I made up 4 of the 6 custom USB cables I need, (2 for the reservoirs, 2 for the pumps, 1 for the Farbwerk and one for the Aquero)

While the mid plate is still easily removable I took the chance to get some wires run, the USB from the Farbwerk, the USB from the Aquero and the LED cable from the LED strips under the case.

I finalised the locations of the inlet/ outlet points on the mid plate so I know now exactly what fittings I need to finish the bottom chamber plumbing.

Tomorrow I will get the reservoirs setup and fitted along with their top brackets to the back panel which will allow another couple of cables to be made and fitted back to the USB hub.
 

Attachments

  • BottomChamber_1.jpg
    BottomChamber_1.jpg
    93.6 KB · Views: 147
  • USB_HubFitted.jpg
    USB_HubFitted.jpg
    83.7 KB · Views: 152
  • FarbwerkFitting_2.jpg
    FarbwerkFitting_2.jpg
    92.8 KB · Views: 150
  • CustomUSB_Cables.JPG
    CustomUSB_Cables.JPG
    89.7 KB · Views: 145
  • FarbwerkFitting.jpg
    FarbwerkFitting.jpg
    89.3 KB · Views: 156
The pumps and Real Time Clock turned up today, the RTC went on very easily and has the benefit of an additional Aquabus terminal which will mean less splitting of cables.

I was planning of fully fitting the pumps but as I found out, they don't come with O Rings and neither did the pump tops....:mad: 
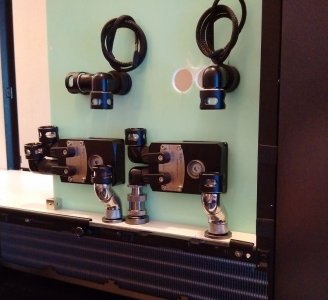
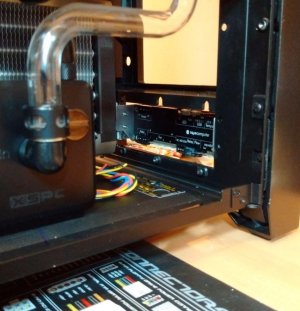
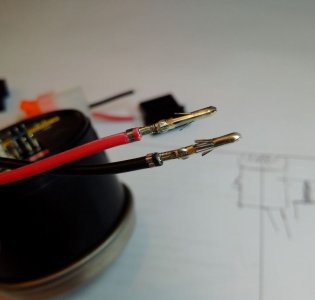
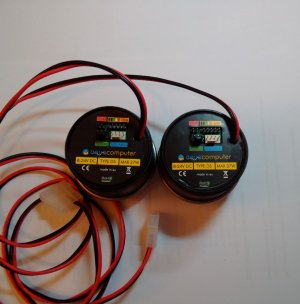
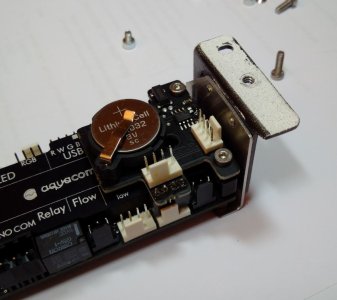
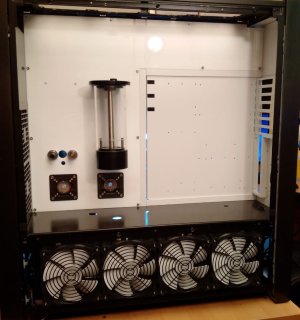
so I am now waiting on another delivery to allow me to install them properly.

I measured up and shortened the cables adding sleeve and 2 quality Molex connectors from E22. These will plug into a couple of Molex connectors that will run along the bottom of the mid plate.

I now need to cut to length and run the USB cables I made the other day from both pumps back to the hub and finally a couple of Aquabus cables from the pumps back to the Aquero. All these cables will fit on top of the radiator with clips, keeping them tidy and out of sight.
 

Attachments

  • D5_Pumps_5.jpg
    D5_Pumps_5.jpg
    92.6 KB · Views: 178
  • D5_Pumps_4.JPG
    D5_Pumps_4.JPG
    64.7 KB · Views: 173
  • D5_Pumps_3.JPG
    D5_Pumps_3.JPG
    45.8 KB · Views: 180
  • D5_Pumps_2.JPG
    D5_Pumps_2.JPG
    45.1 KB · Views: 192
  • D5_Pumps_1.JPG
    D5_Pumps_1.JPG
    78.9 KB · Views: 162
  • RTC_2.JPG
    RTC_2.JPG
    69.5 KB · Views: 179
  • RTC_1.JPG
    RTC_1.JPG
    60.8 KB · Views: 180
Nice, its a shame they disabled the low Aquabus port on newer firmware. I can't wait to see more cable work.

Thanks, I have never used the low speed plug, does it do anything now?

While waiting for the pump seals I decided to get the LED mounting frame made and fitted which will light up around the edge/ rear of the front panel. I just have a bit of soldering to do now with the template as a guide to wire together the strips.

When I was putting the O rings in the pumps I realised that the screws supplied with the pump top would be just about impossible to unscrew when the pumps are in place due to there not being enough room to get a screwdriver in there. Allen keys would be okay so I countersunk the derlin and fitted those in place.

Bar the fan cables most of the cables are now fitted to the Aquero. I made up the power supply cable with a splice off to power the USB hub. This cable just needs a PSU connector on the other end which I will do once the PSU is in place and I can get the length right.

The radiator has provided a great flat surface to run the cables along the top and down to the Aquero and with the mid plate fitted it keeps the cables out of sight too.
 

Attachments

  • OneEndFitted.jpg
    OneEndFitted.jpg
    89.9 KB · Views: 172
  • ReadyToCutToLength.JPG
    ReadyToCutToLength.JPG
    87.5 KB · Views: 183
  • Heatshrinked&NonHeatshrinked.JPG
    Heatshrinked&NonHeatshrinked.JPG
    75.1 KB · Views: 181
  • Crimped.JPG
    Crimped.JPG
    59 KB · Views: 204
  • MolexToAquero&USB_Hub.JPG
    MolexToAquero&USB_Hub.JPG
    78.9 KB · Views: 163
  • HoldBackSleeve.JPG
    HoldBackSleeve.JPG
    49 KB · Views: 177
  • PairOfPumps.jpg
    PairOfPumps.jpg
    82.7 KB · Views: 182
  • PumpCountersunkAllenScrews.JPG
    PumpCountersunkAllenScrews.JPG
    63.2 KB · Views: 185
  • FrontLEDs.JPG
    FrontLEDs.JPG
    45.2 KB · Views: 179
  • FrontLED_Frame.JPG
    FrontLED_Frame.JPG
    95.9 KB · Views: 203
Have you given any thought to changing the face plate screws on the Aquaero to a hex counter sunk black screw?

If it still works, I am planning on not fitting the front of the Aquero at all. The front panel is going over it now. You got me thinking with your comment and it was right. It would have looked all wrong at the bottom of the front panel.

It is surprising the 6 Pro has proud normal allen/ hex screws; the 6 XT has countersunk ones which match other Aquacomputer stuff.
 
You can pull the screen and it will work as an LT version all software controlled with no trouble.

It's a shame they do not make a screen extension cable. There have been some that tried making one, but it would not work for them. Maybe something they can incorporate into the 7 version.
 
You can pull the screen and it will work as an LT version all software controlled with no trouble.

Thanks for the info', that's good to know, I did not fancy having to move it again.

After spending all day yesterday re-installing apps and setting up things how I like them on my STH10 I have not got a lot done on the 900D this weekend.

I did get the pumps, Aquero and the Farbwerk fully wired with power and USB connections back to the hub and connectors ready to plug into the PSU (I measured the PSU to get the right cable lengths)

I also water tested the pipes that are in the bottom of the case as when the mid plate is fitted any leaks will be difficult to sort out. Everything was water tight so it has allowed me to fit the aluminium mid plate, which has allowed the installation of the rear mobo panel.

I have had to make a late alteration to one of the channels for the slide out mobo tray so that has been painted again which means it wont be able to fit for a couple of days.

I therefore decided to get the top Radical radiator ready for fitting which meant super gluing the inserts again. One side tonight and I'll do the other tomorrow.

ETA. I had not seen the 90 bend from the reservoir to the filter in the picture from this angle before; I will have to make a new one that is actually 90 degrees, not something nearer 80 like that one!..............:rolleyes:
 

Attachments

  • SuperGlueRadInserts.jpg
    SuperGlueRadInserts.jpg
    84.5 KB · Views: 169
  • MidPlate4.JPG
    MidPlate4.JPG
    85.2 KB · Views: 170
  • ChanelCut.JPG
    ChanelCut.JPG
    38.3 KB · Views: 172
  • MidPlate3.JPG
    MidPlate3.JPG
    94.4 KB · Views: 163
  • MidPlate2.jpg
    MidPlate2.jpg
    82.6 KB · Views: 190
  • LeakTested&WiredUp1.JPG
    LeakTested&WiredUp1.JPG
    73.5 KB · Views: 173
Last edited:
Just a quick update, I got the slide out motherboard channel all fitted so slid in the tray. It may not slide as smooth as the CaseLabs version but it is removable and that makes putting the motherboard and its parts together a lot easier out of the case.

In case anyone in wondering the small gap at the left of the tray is a copy of the way CaseLabs do their slide out; it allows Sata and other small cables to be fitted really stealthly and its not really noticeable once everything is fitted in place.

It looks like there is lots of room but once the top rad and its push pull fans are fitted, they come down nearly to the top of the channel above the mobo tray.
 

Attachments

  • SlideOutFitted.JPG
    SlideOutFitted.JPG
    94.2 KB · Views: 181
It's coming together. Looking good.

Cheers man, its getting there.

The top rad in push pull was something I was not looking forward to fitting. I had to move the top mount holes toward the front of the case to get clearance so it was going to be tight, never mind heavy. I did that a while ago and used the redundant fan mount from the bottom chamber which worked a treat.

I laid the case on its back and firstly drilled the holes for the 8 fan cables. I then packed up the rad from the acrylic with the packing from the Aquacomputer box which just happened to be the right thickness to line up the rad with the mounting holes. The super glue trick worked again, the screws went in with little hassle and it fits, which is always a bonus :D

The logo on the rad also ended up the right way up and at the front which was just lucky, there is only one so you are stuck with where it ends up. Lots of wiring to do now and which should keep me busy to the weekend.
 

Attachments

  • TopRadFitting_1.jpg
    TopRadFitting_1.jpg
    87.4 KB · Views: 171
  • TopRadFitting_2.jpg
    TopRadFitting_2.jpg
    81.5 KB · Views: 152
  • TopRadFitting_3.jpg
    TopRadFitting_3.jpg
    80.7 KB · Views: 172
Back
Top