Xrqute
New member
#Creating new thread as the OP in my old had lost its pics and I couldn't edit the post to fix them. And my Rig now has a name which it didn't before. Cheers Xr.
Repost- Originally posted 22-10-13
Hi Guys,
This is the Rig as it stands atm. Some big big changes are ahead over the next month with some amazeballs new part being released so i thought id share before the changes and in a month or so ill share the new setup.
|Cpu- Intel I7 3930k OC'd to 4.4ghz|
|Mother Board- Asus X79 Sabertooth|
|Ram- 32gb Corsair Vengeance (1866Mhz 9-9-9-24 latency)|
|Graphics- 2x Gigabyte GTX660|
|Main HHD- Kingston 120gb SSD|
|Storage HDD's- 3x Seagate Barracuda 2tb drives|
|PSU- Corsair AX1200i|
|Case- Nzxt Switch 810|
|Screens- Samsung 46" LEDTV (Series 6) and 2x 24" Asus LED Monitors|
|Mouse- Naga|
|Keyboard-G19|
|Cooling- Xspc AX360, Xspc AX240, Xspc Dual bay + D5 Combo, Xspc Raystorm Water Block, Xspc Uv Red and Uv Orange 1/2"-3/4" tubing, Xspc 1/2"-3/4" compression fittings, Koolance no spill quick release x1, Bitfenix spectre pro 140mm fan x1(hdd cage), Xspc Xinruilian 1650 120mm fan x2 (front) and Coolermaster Sickle Flow X Red x11|
|Lighting- Xspc Blue Led x3, Xspc Red Led x4 and Bitspower UV 20cm Cathode x2|
|Coolant- 1/2 Xspc Ec6 Blood Red and 1/2 Xspc Ec6 Uv Clear|
|Audio Production Gear- Krk Rockit 10-3's x2 (3 way studio monitors\speakers), Roland Octacapture (external 8I/O 192k soundcard), Maudio Oxygen 49 (midi interface), Pioneer Hdj-2000's (Studio Headphones), Stienberg CMC-PD (Drum Pad), Rhode N1TA (Studio Mic), Cubase 7 (Production Software)|
Some of the things didn't turn out exactly as i had envisioned in my head (like having 2 diff colour tube or that loop sort thing coming out of the bottom rad) but we live and we learn and regardless its been a shit load of fun and has caused me to catch the Mod-bug.


Some of the changes ahead will likely include- 1/2" Copper tubing, Braided Cables (if i can find somewhere that sells the new AXi kits), R9 290x or R9 280x x2 (undecided), Rampage Extreme IV Black Edition, a new lighting color scheme and maybe some new fans.
*For those who are unaware (most of you i dare say) Iqon is a Hardstyle Music Festival unique to Australia
----------------------------------------------------------------------------------------------------------------------------
Repost originally posted 28-07-14
Spec's for the rig at this time are as follows-
|Cpu- Intel I7 3930k OC'd to 4.4ghz+XSPC Raystorm|
|Mother Board- R4BE+EKWB|
|Ram- 16gb Corsair Vengeance (1866Mhz 9-9-9-24 latency)|
|Graphics-Asus R9 280x Direct CUII TOP+EKWB FC+Back Plate|
|Main HHD- Asus Raidr 240gb|
|Storage HDD's- 3x Seagate Barracuda 2tb drives|
|PSU- Corsair AX860|
|Case- Nzxt Switch 810|
|Screens- Samsung 46" LEDTV (Series 6) and 2x 24" Asus LED Monitors|
|Mouse- Naga|
|Keyboard-G19|
|Cooling- Epic Custom|
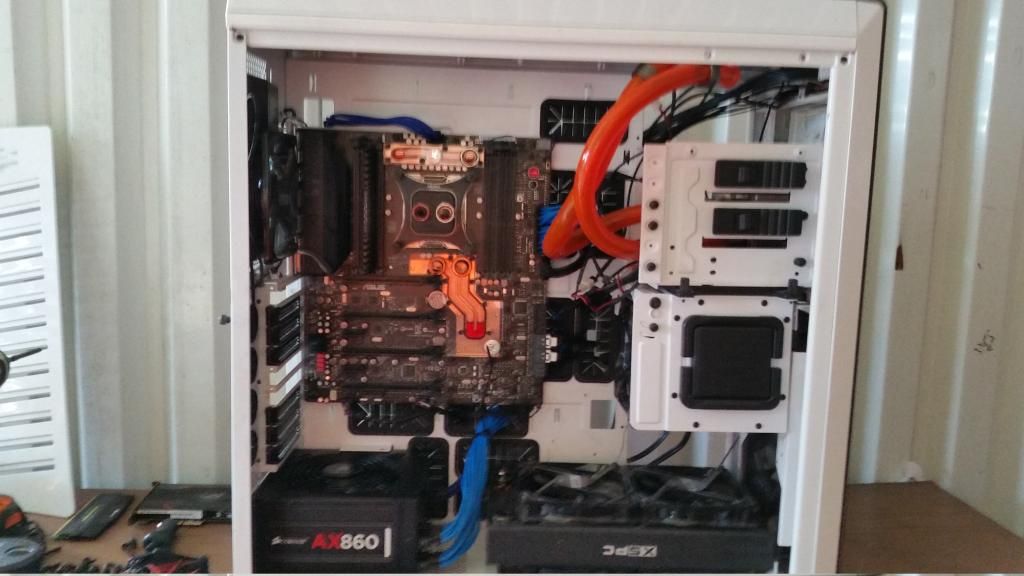
My dear AX1200i and some of my Ram got murdered by a leak. Which was caused by a faulty compression fitting which i twisted on until tight but there was something amiss with the threads so it might of gone down half as far as it normally would. it leak tested fine but a few days down the track is started leaking and causing a very very big bang when it got into my PSU.
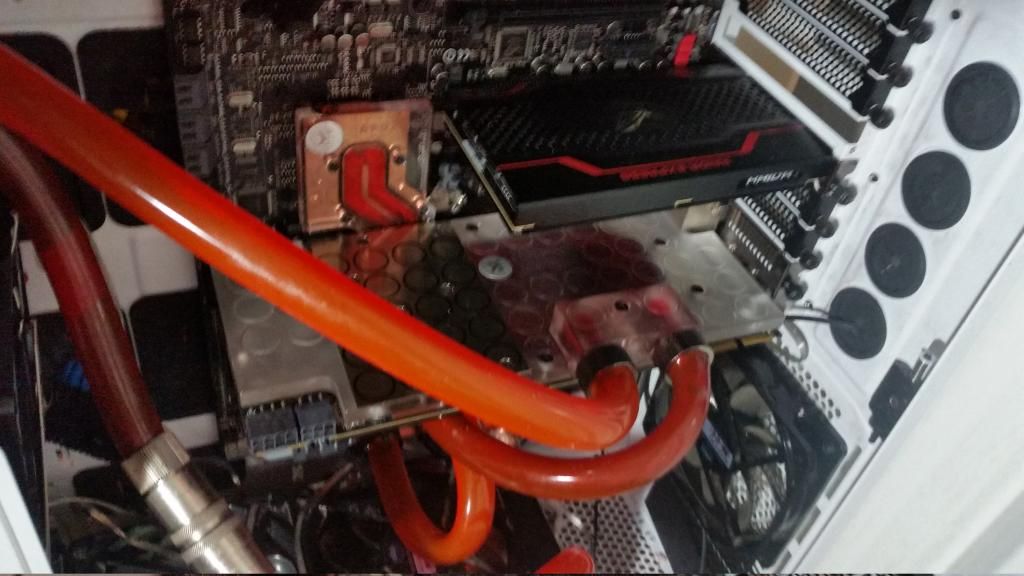
And yes i am aware of the mega hack job on tubing! Actually rocking 3 different types in there!
1. 7/16ID 5/8OD
2. 1/2ID 3/4OD
3. 3/8ID 1/2OD
Yes i know i need to sort it out lol the reason its like that was because when i was adding in the Gpu + Mobo it turned out that i either didn't have enough fittings or hose in each of the various sizes and at this point the blocks were already mounted so i had to come up with this hack job to get my system back up and running.
Bleeding it literally took hours.......... That's why I've been so hesitant in pulling it apart as i remember how difficult it was to get the air out of the mobo blocks. But it is on the to do list.
But yea update on where my rig is at Complete")


----------------------------------------------------------------------------------------------------------------------------
NEW POST Updates!!!
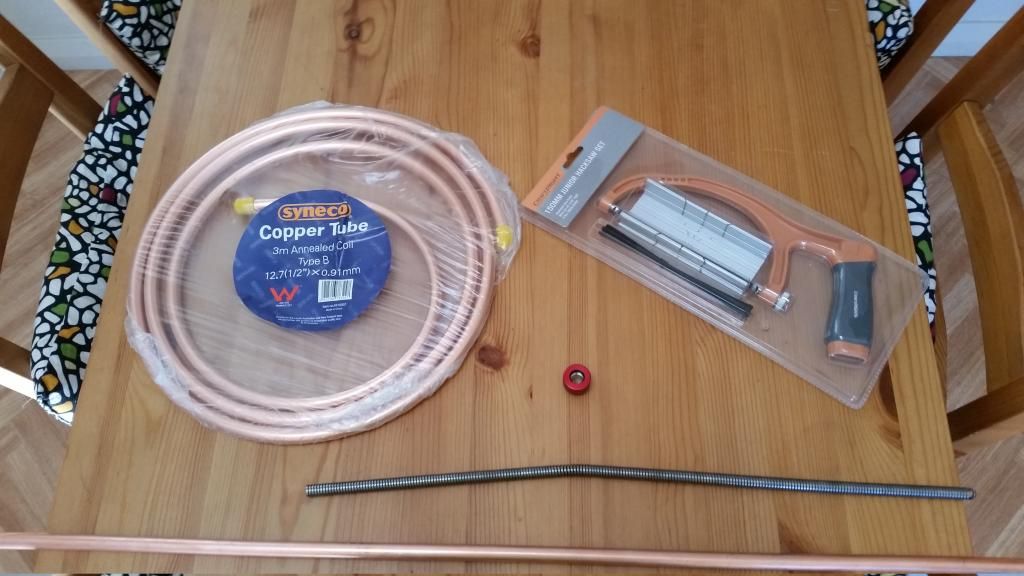
So I've got abot of time of work so what better time then now to give the rig some TLC. I'm finally going to change out the mungrel mix breed tubing job that I've got going on and I am going to be changing to 12.7mm OD Copper tubing. I've wanted to do this for along time but have never gotten around to it. So no time like the present!
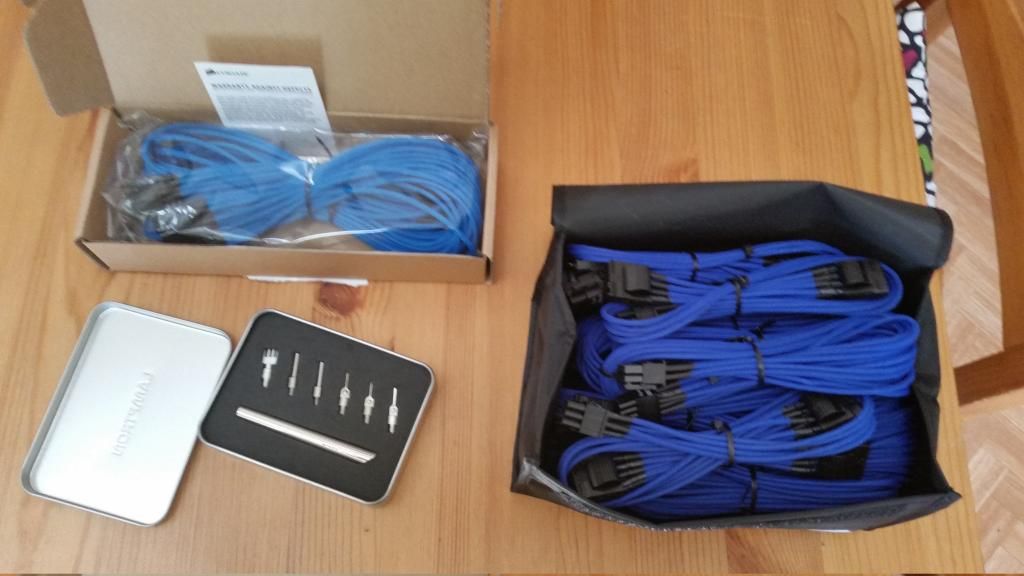
10min after getting home from picking up some of the gear I need to do the tube. Low and behold a courier turns up with the corsair sleeved cables I ordered. Funny thing about these cables is that they are Gen-1 specifically for the AX1200 Gold PSU. But here in Aus a set of Corsair Sleeved cables deliverd your looking at about $160 Aus..... I got these cables plus delivery for $25 Aus. BARGIN!!!!! I knew they weren't just going to plug and play into my AX860 I knew about of pin/plug juggling was going to be involved. Did I realize how much and how fiddly it was going to be....No. Either way saving $100+ seems like a win to me and they look awesome!
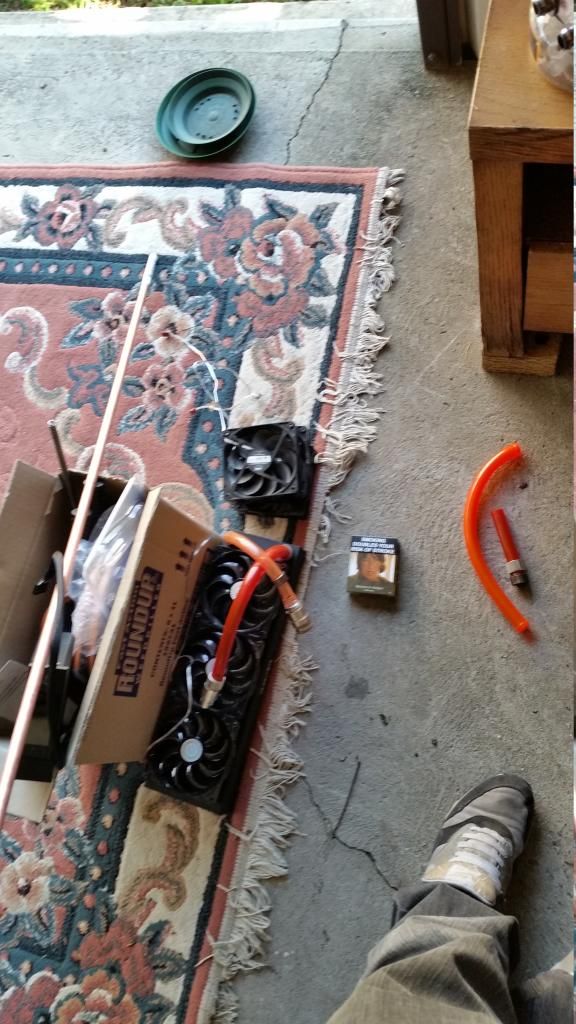
I took these yesterday! Watercooling tubing rebuild commencement!
Stage 1- The strip down
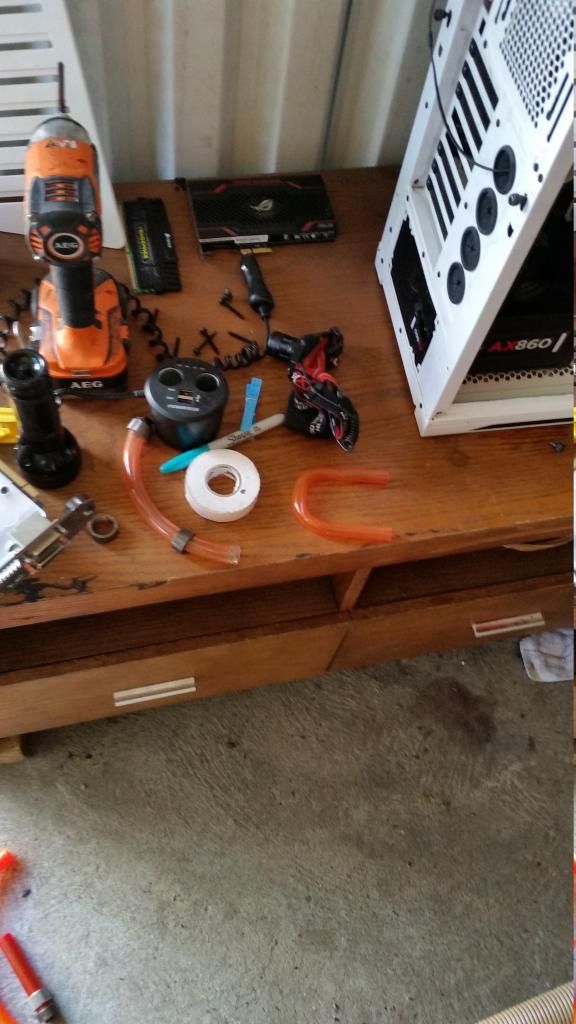
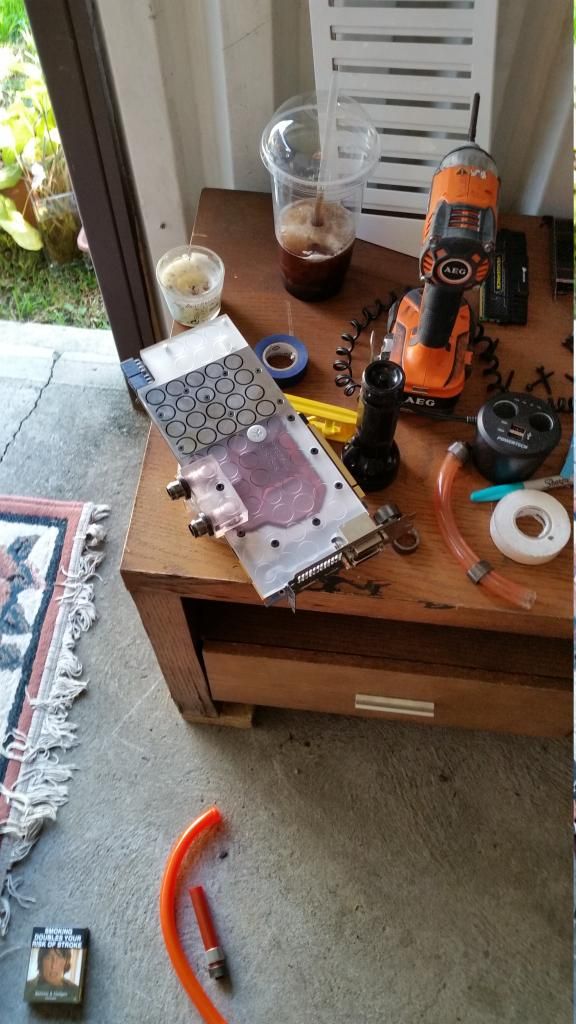
I have progressed substantially since I took these photos! I shall update more later on today!
Repost- Originally posted 22-10-13
Hi Guys,
This is the Rig as it stands atm. Some big big changes are ahead over the next month with some amazeballs new part being released so i thought id share before the changes and in a month or so ill share the new setup.
|Cpu- Intel I7 3930k OC'd to 4.4ghz|
|Mother Board- Asus X79 Sabertooth|
|Ram- 32gb Corsair Vengeance (1866Mhz 9-9-9-24 latency)|
|Graphics- 2x Gigabyte GTX660|
|Main HHD- Kingston 120gb SSD|
|Storage HDD's- 3x Seagate Barracuda 2tb drives|
|PSU- Corsair AX1200i|
|Case- Nzxt Switch 810|
|Screens- Samsung 46" LEDTV (Series 6) and 2x 24" Asus LED Monitors|
|Mouse- Naga|
|Keyboard-G19|
|Cooling- Xspc AX360, Xspc AX240, Xspc Dual bay + D5 Combo, Xspc Raystorm Water Block, Xspc Uv Red and Uv Orange 1/2"-3/4" tubing, Xspc 1/2"-3/4" compression fittings, Koolance no spill quick release x1, Bitfenix spectre pro 140mm fan x1(hdd cage), Xspc Xinruilian 1650 120mm fan x2 (front) and Coolermaster Sickle Flow X Red x11|
|Lighting- Xspc Blue Led x3, Xspc Red Led x4 and Bitspower UV 20cm Cathode x2|
|Coolant- 1/2 Xspc Ec6 Blood Red and 1/2 Xspc Ec6 Uv Clear|
|Audio Production Gear- Krk Rockit 10-3's x2 (3 way studio monitors\speakers), Roland Octacapture (external 8I/O 192k soundcard), Maudio Oxygen 49 (midi interface), Pioneer Hdj-2000's (Studio Headphones), Stienberg CMC-PD (Drum Pad), Rhode N1TA (Studio Mic), Cubase 7 (Production Software)|
Some of the things didn't turn out exactly as i had envisioned in my head (like having 2 diff colour tube or that loop sort thing coming out of the bottom rad) but we live and we learn and regardless its been a shit load of fun and has caused me to catch the Mod-bug.
Some of the changes ahead will likely include- 1/2" Copper tubing, Braided Cables (if i can find somewhere that sells the new AXi kits), R9 290x or R9 280x x2 (undecided), Rampage Extreme IV Black Edition, a new lighting color scheme and maybe some new fans.
*For those who are unaware (most of you i dare say) Iqon is a Hardstyle Music Festival unique to Australia
----------------------------------------------------------------------------------------------------------------------------
Repost originally posted 28-07-14
Spec's for the rig at this time are as follows-
|Cpu- Intel I7 3930k OC'd to 4.4ghz+XSPC Raystorm|
|Mother Board- R4BE+EKWB|
|Ram- 16gb Corsair Vengeance (1866Mhz 9-9-9-24 latency)|
|Graphics-Asus R9 280x Direct CUII TOP+EKWB FC+Back Plate|
|Main HHD- Asus Raidr 240gb|
|Storage HDD's- 3x Seagate Barracuda 2tb drives|
|PSU- Corsair AX860|
|Case- Nzxt Switch 810|
|Screens- Samsung 46" LEDTV (Series 6) and 2x 24" Asus LED Monitors|
|Mouse- Naga|
|Keyboard-G19|
|Cooling- Epic Custom|
My dear AX1200i and some of my Ram got murdered by a leak. Which was caused by a faulty compression fitting which i twisted on until tight but there was something amiss with the threads so it might of gone down half as far as it normally would. it leak tested fine but a few days down the track is started leaking and causing a very very big bang when it got into my PSU.
And yes i am aware of the mega hack job on tubing! Actually rocking 3 different types in there!
1. 7/16ID 5/8OD
2. 1/2ID 3/4OD
3. 3/8ID 1/2OD
Yes i know i need to sort it out lol the reason its like that was because when i was adding in the Gpu + Mobo it turned out that i either didn't have enough fittings or hose in each of the various sizes and at this point the blocks were already mounted so i had to come up with this hack job to get my system back up and running.
Bleeding it literally took hours.......... That's why I've been so hesitant in pulling it apart as i remember how difficult it was to get the air out of the mobo blocks. But it is on the to do list.
But yea update on where my rig is at Complete
----------------------------------------------------------------------------------------------------------------------------
NEW POST Updates!!!
So I've got abot of time of work so what better time then now to give the rig some TLC. I'm finally going to change out the mungrel mix breed tubing job that I've got going on and I am going to be changing to 12.7mm OD Copper tubing. I've wanted to do this for along time but have never gotten around to it. So no time like the present!

10min after getting home from picking up some of the gear I need to do the tube. Low and behold a courier turns up with the corsair sleeved cables I ordered. Funny thing about these cables is that they are Gen-1 specifically for the AX1200 Gold PSU. But here in Aus a set of Corsair Sleeved cables deliverd your looking at about $160 Aus..... I got these cables plus delivery for $25 Aus. BARGIN!!!!! I knew they weren't just going to plug and play into my AX860 I knew about of pin/plug juggling was going to be involved. Did I realize how much and how fiddly it was going to be....No. Either way saving $100+ seems like a win to me and they look awesome!

I took these yesterday! Watercooling tubing rebuild commencement!
Stage 1- The strip down


I have progressed substantially since I took these photos! I shall update more later on today!
") .
.