TheSinding
New member
Hi there.
As Im new to this forum, I just want to make an short presentation of myself and my background.
My name is Simon, I´m from Denmark (so don´t mind my English), 20 years old.
I got into computers and so on, because of my dad, and my video game passions.
When I was 4 years old and clever enough to handle a screwdriver (don't mock me!) I started to disassemble everything (and I mean everything!), just to see how it works, and I could never put it back together (you know how it is ).
).
My dad was often mad at me because I couldn't keep my fingers to myself.
So as I grew older and I got my dads old PC´s I couldn't help myself to open it up an see what was inside.
I quickly discovered how a computer worked, how to disassemble it, and this time, put it back together again!
I found that putting together computers was like building Lego, everything had its right place, and if it didn't work I loved troubleshooting it.
As the internet got more and more common I've found a lot hardware forums, and learn a lot through there. At this time I've must have been 13 or 14 years old, and I had a job in the local supermarket. I was saving up for my first mid-high end computer build. At this time my older brother was living at home with my mom (my parents are divorced), my baby brother, my stepdad, and me.
My older brother and me, both liked building and playing with computers.
He had recently bought a Intel Q6600, running it on a XFX motherboard (can't remember the exact model, but pretty sure it was a Nvidia N680 chipset), with some DDR2-800MHz ram and a 8800GTS. We put a Xigmatek HDT-S1283 on the CPU and we overclocked it as far as we could on air. Pretty sure we hit 3.8GHz with the air cooler.
But sadly we burned the motherboard BIOS.
The time came where I've saved enough up for my own build. There was (and still is) this great danish hardware forum, that had a buy and sell part.
Here I bought most of my equipment for my first real computer build.
I bought:
I got it all working and now it was my turn to see how far I could overclock that Q6600 on water.
I got it to 4.4 or 4.5GHz and was very proud of that build!
That build served my right up to 2008 (the build must have been from 2004).
Where I got an HP Pavilion dv7-2130 (what a piece of shit!) because I had to use it for school, and because the lovely Asus Striker Extreme motherboard had thrown the towel in the ring and died on me. That was a sad day for everybody
That brings us to my current build.
Right now I got a very budget build that consist off:
So now you heard my background in computers.
Here is what gonna be in this build!
Project WhiteFox!

So I recently picked up a second hand Cooler Master Cosmos S.
When I first saw this case back in 2008 I fell in love with it!.
I was recently browsing on a danish equivalent to craigslist, and I found a guy that had one just sitting collecting dust, and in almost new condition. I picked it up for something like 67-, what a bargain!
So I got the case last week, and because I always wanted to do a casemod, so I figured why the hell not.
I have never done a casemod, but have done a lot of other mods on different stuff.
So I know how a Dremel works
So my plan as of right now is:
But first of all, I've gotta clean up my "workshop"!
IN MY DEFENCE, some of that mess is my landlord not cleaning up after he moved my rack, and just left it like that!
But else, all the other mess is me :lol:


So after a good half an hour to an hour I came up with this result")

My work desk


All of the bags (except the one filled with wires) are going to the recycling plant.
So not the cleanest job, but can live with it !.
----------------------------------------------------------------------------
Casemodding part.
So today, I couldn't decide what color I wanted to paint the case.
Matt black with some orange (because I'm gonna buy the Gigabyte Z87 Overclock board at some point)
Or if I should paint it matt white with some blue thrown into the mix (just because I like the look of white and blue together).
I was heading to my local hardware shop to pickup some paint, sandpaper, primer and so on.
I got to the hardware shop and they was so kind to decide for me, (mainly because the didn't have any matt black or orange left) so it became matt white with blue.
As the stupid dumbass I am, I got home and started to disassemble the case, and forgot to take any picture before I started. :banghead:
But you all know how to use Google, so just do a Google search for Cosmos S and see what it looks like.
I got the case disassembled and started to messure where the CPU cutout should be. I used my Dremel to cut it out, after that I used a file to clean it up. It was the first time I ever used my Dremel to cut round corners.
The result isen't the cleanest but I like it.


I started sanding the chassis with grid 100 (they didn't have any grid 80) and thats where Im currently at now. After 3 hours of sanding I got tired, and started to look at the I/O panel.
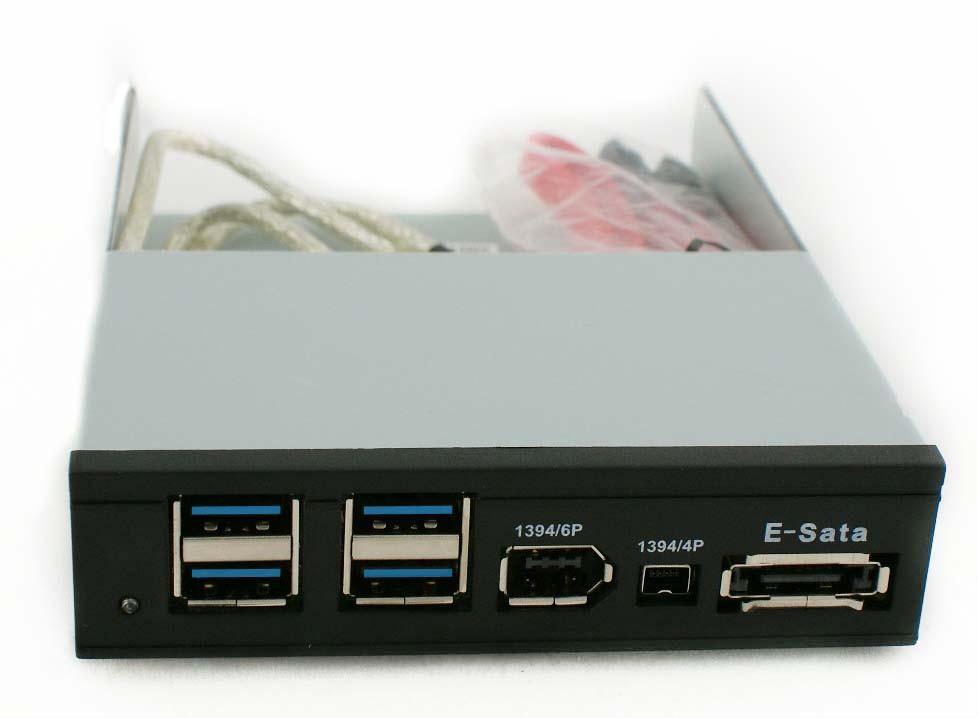
As you see here is the unopened I/O panel

Here is the shell, Im wondering how it would look I removed the paint/sanded it, and painted it white?
What would you think?

Here Im looking, how its wired and what size LED's there are inside.
Im gonna swap these red LED's with some 3mm white ones, when I get around to order some.

Anyone have any ideas how I could put USB 3.0 in the I/O panel here?
I looked around to see what options I have.
Im considering cutting out the original I/O panel, and buying an separate I/O panel from a another case and fit it some how. But if you guys got any ideas, Im all ears.

This is it for me today.
I've just spent like an hour writing this post and right now its 2:00AM for me, so Im off too bed!
Goodnight sir!
As Im new to this forum, I just want to make an short presentation of myself and my background.
My name is Simon, I´m from Denmark (so don´t mind my English), 20 years old.
I got into computers and so on, because of my dad, and my video game passions.
When I was 4 years old and clever enough to handle a screwdriver (don't mock me!) I started to disassemble everything (and I mean everything!), just to see how it works, and I could never put it back together (you know how it is
).My dad was often mad at me because I couldn't keep my fingers to myself.
So as I grew older and I got my dads old PC´s I couldn't help myself to open it up an see what was inside.
I quickly discovered how a computer worked, how to disassemble it, and this time, put it back together again!
I found that putting together computers was like building Lego, everything had its right place, and if it didn't work I loved troubleshooting it.
As the internet got more and more common I've found a lot hardware forums, and learn a lot through there. At this time I've must have been 13 or 14 years old, and I had a job in the local supermarket. I was saving up for my first mid-high end computer build. At this time my older brother was living at home with my mom (my parents are divorced), my baby brother, my stepdad, and me.
My older brother and me, both liked building and playing with computers.
He had recently bought a Intel Q6600, running it on a XFX motherboard (can't remember the exact model, but pretty sure it was a Nvidia N680 chipset), with some DDR2-800MHz ram and a 8800GTS. We put a Xigmatek HDT-S1283 on the CPU and we overclocked it as far as we could on air. Pretty sure we hit 3.8GHz with the air cooler.
But sadly we burned the motherboard BIOS.
The time came where I've saved enough up for my own build. There was (and still is) this great danish hardware forum, that had a buy and sell part.
Here I bought most of my equipment for my first real computer build.
I bought:
- My brothers old Q6600
- Asus Striker Extreme (Nvidia 680i Chipset)
- Thermaltake ToughPower 700W
- My brothers old 8800GTS
- kingston 4GB 1066MHz ram kit
- An old cheiftec case (nothing special)
- And A LOT of watercooling parts.
I got it all working and now it was my turn to see how far I could overclock that Q6600 on water.
I got it to 4.4 or 4.5GHz and was very proud of that build!
That build served my right up to 2008 (the build must have been from 2004).
Where I got an HP Pavilion dv7-2130 (what a piece of shit!) because I had to use it for school, and because the lovely Asus Striker Extreme motherboard had thrown the towel in the ring and died on me. That was a sad day for everybody
That brings us to my current build.
Right now I got a very budget build that consist off:
- Asus P8Z77-V PRO
- Intel i5-3450
- Kingston HyperX 8Gb @1800MHz
- 8800 GTX (old bastard that is dying)
- The same cheiftek case as my old build
- XFX Pro Series XXX 650W
- Samsung 830 128Gb
- Toshiba 500Gb drive from the laptop
So now you heard my background in computers.
Here is what gonna be in this build!
Project WhiteFox!
So I recently picked up a second hand Cooler Master Cosmos S.
When I first saw this case back in 2008 I fell in love with it!.
I was recently browsing on a danish equivalent to craigslist, and I found a guy that had one just sitting collecting dust, and in almost new condition. I picked it up for something like 67-, what a bargain!
So I got the case last week, and because I always wanted to do a casemod, so I figured why the hell not.
I have never done a casemod, but have done a lot of other mods on different stuff.
So I know how a Dremel works
So my plan as of right now is:
- Paint the case
- MAYBE Put USB 3.0 (somehow) in the top I/O panel
- Change the LED color of the Power on button
- Make a motherboard cutout for the backplate
- Make a piece of aluminium/acrylic in the front that fits 3 120mm fans (so its 360 rad ready)
- Put RGB LED strips inside the case and find a spot for an arduino controller
- Get new hardware along the way (saving up for a 780 but I'm going to start at the university in September, so I need some money for moving)
- Start doing water again maybe!
- Maybe more
But first of all, I've gotta clean up my "workshop"!
IN MY DEFENCE, some of that mess is my landlord not cleaning up after he moved my rack, and just left it like that!
But else, all the other mess is me :lol:
So after a good half an hour to an hour I came up with this result
My work desk
All of the bags (except the one filled with wires) are going to the recycling plant.
So not the cleanest job, but can live with it !.
----------------------------------------------------------------------------
Casemodding part.
So today, I couldn't decide what color I wanted to paint the case.
Matt black with some orange (because I'm gonna buy the Gigabyte Z87 Overclock board at some point)
Or if I should paint it matt white with some blue thrown into the mix (just because I like the look of white and blue together).
I was heading to my local hardware shop to pickup some paint, sandpaper, primer and so on.
I got to the hardware shop and they was so kind to decide for me, (mainly because the didn't have any matt black or orange left) so it became matt white with blue.
As the stupid dumbass I am, I got home and started to disassemble the case, and forgot to take any picture before I started. :banghead:
But you all know how to use Google, so just do a Google search for Cosmos S and see what it looks like.
I got the case disassembled and started to messure where the CPU cutout should be. I used my Dremel to cut it out, after that I used a file to clean it up. It was the first time I ever used my Dremel to cut round corners.
The result isen't the cleanest but I like it.
I started sanding the chassis with grid 100 (they didn't have any grid 80) and thats where Im currently at now. After 3 hours of sanding I got tired, and started to look at the I/O panel.
As you see here is the unopened I/O panel
Here is the shell, Im wondering how it would look I removed the paint/sanded it, and painted it white?
What would you think?
Here Im looking, how its wired and what size LED's there are inside.
Im gonna swap these red LED's with some 3mm white ones, when I get around to order some.
Anyone have any ideas how I could put USB 3.0 in the I/O panel here?
I looked around to see what options I have.
Im considering cutting out the original I/O panel, and buying an separate I/O panel from a another case and fit it some how. But if you guys got any ideas, Im all ears.
This is it for me today.
I've just spent like an hour writing this post and right now its 2:00AM for me, so Im off too bed!
Goodnight sir!
Last edited:
 )
)