Ragnar_Mike
New member
Hey there, everybody.
This is where I shall chronicle the assembly of my first from scratch PC. I’ve upgraded plenty and even modded a bit, but I’ve never had the funds or requirement to build a higher end rig. Now that I’m studying to enter the world of CG and animation, having a desktop that can handle CAD and rendering will be a godsend at home and it will have the added benefit of allowing me to enjoy some of the modern PC games when they come out.
I’m using the Fractal Arc Midi as my case. It arrived a few days ago and man…it’s pretty. I was conscerned about the plastic front, but it’s a very nice finish and I like the stylings of the case in general as well as its features, hence why I picked it up.
The general plan for this rig is based off of my need for a home PC workhorse that can render HD resolution CGI for my work at school. I do a lot of work in Photoshop, Maya, Zbrush and After Effects so I need a system that can keep up with the types of performance I require.
So let’s get to the roll call, shall we?
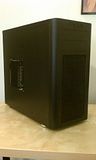
Arc Midi case to jam everything into. As far as I can tell everything should fit in fine. I’m not going dual PSU or Quad SLI or anything so nearly any mid tower would probably have sufficed, but I love the minimalistic and well thought out design of Fractal’s stuff and I thought I’d take a crack at watercooling, so the ability to fit in a big honking rad into the Arc was a big selling point.
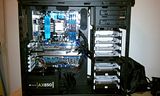
Speaking of Rads, I picked up an XSPC Rasa kit. 750 RX240, that’s the one with the 60mm rad instead of the 47mm, and a stronger pump. Got some blue steel PC Ice coolant as well since most of my parts are blue. I’m considering what to do about lighting. I have a pair of Bit Fenix Spectre Green LED’s for the front and I’m considering two 120mm Blue Cooler Masters to give the inside of the case a bit of a teal/blue-green glow, but for now the stock kit fans will suffice.
The watercooling kit will chill an i7 2600K. Maya’s rendering and a few other programs I use support multithreading so that’s a welcome addition.
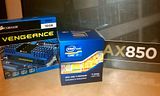
For memory I got ahold of 16 gigs of 1600mhz Corsair Vengeance RAM for $98, which is ridiculous! I think that’s something like 65 Euro/GBP but who knows how much that really is with tax. Probably like 500 quid.
Driving the display will be an MSI GTX570 Twin Frozr III PE/OC.
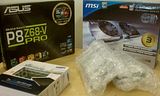
All this will be mounted onto an Asus P8Z68-V Pro Motherboard. The integrated graphics/cpu support will help with my second monitor for working and when SSD prices come down a bit or I can find a deal on the right type of them, I plan on getting one for the SSD caching feature.
Speaking of storage, I put int two 1TB Hitachi 7k3000's in raid 1.
I went a little overkill with the PSU because I don’t know what I’ll be doing with this in the future. Seeing as how the Ivy Bridge chips will fit in this mobo and with that and new card(s) could push me over the 750 mark I just decided to go one step better and get an AX850. I was going to get an HX model, but I like the ability for the PSU fan to shut off during idle power consumption and that’s only in the AH models.
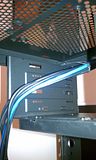
The Arc has two bays up front, and will be taken up by the rez and pump. However, I needed a way to burn CDs and read DVDs to install various programs, so I picked up an external drive.
I also just ordered Steel Series 6V2 keyboard and am shopping around for a 24inch monitor but I haven’t tied down what model yet. Currently, I’m leaning towards the Dell Ultrasharp U2410.
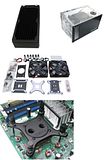
I didn’t realize the Arc comes with a fan control. That’s a nice bonus, it’s your basic controller: fits in an Atx slot, has a knob, a 3pin fan plug, a molex for power, and a splitter for 3 fans. Not sure which fans to hook up to that yet.
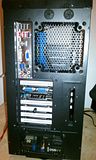
Tom didn’t quite show this, but I found it interesting. Fractal crammed a ton of choices into this case, but not all are available to use at once. For instance, the front mount on the roof can hold a 140mm fan, BUT just barely. If you have both 5.25 drive bays filled, it will literally just be sitting on the top bay and may not even fit because of the front panel cables. So, if you want to use the front fan for extra flow, you’re basically limited to keeping those bays open.
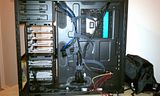
The CPU, Ram, and PSU finally showed up so, naturally I couldn’t resist starting to throw stuff in there.
I haven’t decided if I’m going to remove the second drive bay for airflow or turn it sideways for like a wind vein type thing, or just remove it altogether.
Had my first real experience tying down cables. Modular is so much more “fun” to deal with. It’s still a bit rats-nesty and nothing is cinched down because I still have to run fan and pump cables but it’s getting better each time I realize I messed up and redo it. =/
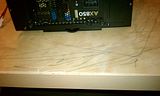
Also, here’s my 20 buck IKEA desk receiving the birthing pains of my rig. A little spit shine and she’ll be as good a new.
With any luck I’ll have more to post soon because the cooling kit should be in today.
This is where I shall chronicle the assembly of my first from scratch PC. I’ve upgraded plenty and even modded a bit, but I’ve never had the funds or requirement to build a higher end rig. Now that I’m studying to enter the world of CG and animation, having a desktop that can handle CAD and rendering will be a godsend at home and it will have the added benefit of allowing me to enjoy some of the modern PC games when they come out.
I’m using the Fractal Arc Midi as my case. It arrived a few days ago and man…it’s pretty. I was conscerned about the plastic front, but it’s a very nice finish and I like the stylings of the case in general as well as its features, hence why I picked it up.
The general plan for this rig is based off of my need for a home PC workhorse that can render HD resolution CGI for my work at school. I do a lot of work in Photoshop, Maya, Zbrush and After Effects so I need a system that can keep up with the types of performance I require.
So let’s get to the roll call, shall we?

Arc Midi case to jam everything into. As far as I can tell everything should fit in fine. I’m not going dual PSU or Quad SLI or anything so nearly any mid tower would probably have sufficed, but I love the minimalistic and well thought out design of Fractal’s stuff and I thought I’d take a crack at watercooling, so the ability to fit in a big honking rad into the Arc was a big selling point.
Speaking of Rads, I picked up an XSPC Rasa kit. 750 RX240, that’s the one with the 60mm rad instead of the 47mm, and a stronger pump. Got some blue steel PC Ice coolant as well since most of my parts are blue. I’m considering what to do about lighting. I have a pair of Bit Fenix Spectre Green LED’s for the front and I’m considering two 120mm Blue Cooler Masters to give the inside of the case a bit of a teal/blue-green glow, but for now the stock kit fans will suffice.

The watercooling kit will chill an i7 2600K. Maya’s rendering and a few other programs I use support multithreading so that’s a welcome addition.

For memory I got ahold of 16 gigs of 1600mhz Corsair Vengeance RAM for $98, which is ridiculous! I think that’s something like 65 Euro/GBP but who knows how much that really is with tax. Probably like 500 quid.
Driving the display will be an MSI GTX570 Twin Frozr III PE/OC.

All this will be mounted onto an Asus P8Z68-V Pro Motherboard. The integrated graphics/cpu support will help with my second monitor for working and when SSD prices come down a bit or I can find a deal on the right type of them, I plan on getting one for the SSD caching feature.
Speaking of storage, I put int two 1TB Hitachi 7k3000's in raid 1.
I went a little overkill with the PSU because I don’t know what I’ll be doing with this in the future. Seeing as how the Ivy Bridge chips will fit in this mobo and with that and new card(s) could push me over the 750 mark I just decided to go one step better and get an AX850. I was going to get an HX model, but I like the ability for the PSU fan to shut off during idle power consumption and that’s only in the AH models.
The Arc has two bays up front, and will be taken up by the rez and pump. However, I needed a way to burn CDs and read DVDs to install various programs, so I picked up an external drive.
I also just ordered Steel Series 6V2 keyboard and am shopping around for a 24inch monitor but I haven’t tied down what model yet. Currently, I’m leaning towards the Dell Ultrasharp U2410.
I didn’t realize the Arc comes with a fan control. That’s a nice bonus, it’s your basic controller: fits in an Atx slot, has a knob, a 3pin fan plug, a molex for power, and a splitter for 3 fans. Not sure which fans to hook up to that yet.


Tom didn’t quite show this, but I found it interesting. Fractal crammed a ton of choices into this case, but not all are available to use at once. For instance, the front mount on the roof can hold a 140mm fan, BUT just barely. If you have both 5.25 drive bays filled, it will literally just be sitting on the top bay and may not even fit because of the front panel cables. So, if you want to use the front fan for extra flow, you’re basically limited to keeping those bays open.
The CPU, Ram, and PSU finally showed up so, naturally I couldn’t resist starting to throw stuff in there.

I haven’t decided if I’m going to remove the second drive bay for airflow or turn it sideways for like a wind vein type thing, or just remove it altogether.
Had my first real experience tying down cables. Modular is so much more “fun” to deal with. It’s still a bit rats-nesty and nothing is cinched down because I still have to run fan and pump cables but it’s getting better each time I realize I messed up and redo it. =/

Also, here’s my 20 buck IKEA desk receiving the birthing pains of my rig. A little spit shine and she’ll be as good a new.

With any luck I’ll have more to post soon because the cooling kit should be in today.


