alienware
Banned
Bitfenix Survivor : Core
Before we begin today's review let's take a look at who Bitfenix are.
Bitfenix are relatively new to the computer part scene but from what I have heard have hired some of the industry's top guns when it comes to design. As time progresses so do Bitfenix, with an ever widening product range that now includes lighting and other modding supplies (including but not limited to gorgeous braided cable extenstions to add those mod look finishing touches to any PC).
In today's review we take a look at the Bitfenix Survivor : Core edition. There are a few differences between the Core and the full fat version so let's get them out of the way so we can begin. The core edition is exactly what it says on the tin. You get the case and that's about it. It comes with a 200mm fan in the top aswell as four USB2 ports on the top, an ESATA port and the basics you would expect from any PC case (power button, reset button and a switch to control the LEDs in the case). The full fat version comes with two USB2 ports and two USB3 ports in place of the extra USB2 ports. This is fine because a motherboard these days carries enough USB ports on the back plate to run pretty much every USB device you can lay your hands on. Personally I wanted something with a little scope. The full fat version comes with both of the 200mm fan locations filled, and also has some snazzy LED fans that can be wired to the LED switch in order to turn off the LEDs. The logo on the front of the case can also be switched on and off should you decide to sit in darkness. Also on the full fat version is a lockdown unit to lock your cables in place to prevent any one stealing your peripherals should you use this case for what it was intended for, taking to LAN parties. That is why it sports a rather excellent fold down handle in the top that you can hide out of view, or, lift up and make transporting your precious rig very easy (think suitcase).
Now that we have that out of the way let's take a look at it shall we? Here it is in all of its glory.
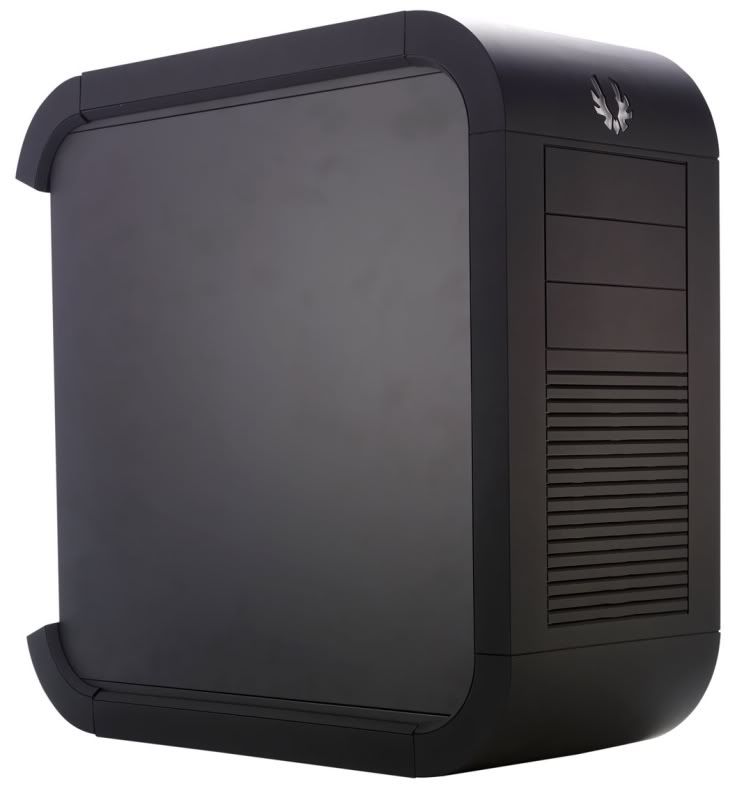
The case is clean, contemporary and will appeal to those looking for something different. What is excellent about this case is Bitfenix's choice of coating. It's something I have never seen done to a case before and is pretty much the same coating that Razer and other companies are now using to coat their peripherals with. It's a very soft silky type rubber and feels cool and smooth to the touch. Looking at the case kind of reminds me of two things. Firstly the slatted front reminds me of workstation powerhouses that IBM and others used to build. Plain, simple, intimidating. The flush fit and feel really bode well and the design curves at the top and bottom and swoops around to continue the smooth look. This was what sold me on the case in the first place. I can't do sharp and flat edges as it makes the case harder to blend into its surroundings. With something that has curved lines it looks less like a computer and more like a work of art. Not that the Bitfenix is over understated, but it stands out just enough to make an impression whilst not looking like a box van.
Something that does need to be said now though is that the Core edition is not intended to be taken out of the box, built, and used. You need to add some cooling as there are two empty fan locations. This has been left up to you, and the case priced accordingly. It's irked me a little reading reviews of this case that reviewers have come down hard on the case, marking it down due to poor cooling. Obviously I find annoyance with that because no professional should ever test a product with fans missing from their designed locations. I mean, it's kind of like reviewing a Prolimatech Megahalems and not bothering to fit any fans to it just because it didn't come with any and then whining that your CPU blew up under load. Any one with half an ounce of sense can look at the Core edition's price, then at the full fat version's price, add two and two and come up with four. I was fully aware of all of that when I punched my credit card numbers into the checkout and so should you. So again, I will reitterate, do not buy this case if you do not want to buy the fans it needs in order to operate in the way it was designed to.
Cooling.
Now obviously straight out of the box the Survivor Core does not offer an awful lot of cooling. It comes with a no frills fan in the top with no LEDs and two empty spaces for fans in the front and back. The front accepts a 200mm fan whilst the back takes an every day 120mm fan. Should you choose to go down the Core route then expect to pay £4 for a basic 120mm fan (Yate will do) and upward of £15 for a front fan. However take care when ordering the front fan as the case has been designed to accept a slim fan. This isn't a problem if you are not adverse to a good bit of old fashioned modding but should be mentioned none the less.
Personally I fitted a Cooler Master Megaflow fan to mine, but obviously Bitfenix leave that up to you. I fitted a Xilence fan in the back and I was all ready to go.
Building.
I don't know if it is me but I did find the Survivor hard to work with. Getting the corners off the back needed some research as the case did not include a manual. I don't know if this is intentional on Bitfenix's behalf or whether it was a mistake in packaging, but do bear in mind if you buy this case that you'll need to do your homework first. Once those corners are off of the case you can then remove the sides. However, as every single review mentions they don't come off easily. There is no way to get a grip on them or a hold that makes it easy to slide them backward, so expect to lose fingernails. I wouldn't suggest using a screwdrier to pry them loose either as it will scratch the case. The best way I found was to breathe into your hand to make it clammy, press firmly onto the center of the side panel and pull backward. This should create enough friction to get the job done.
Once the sides are off you can take a look around the interior.
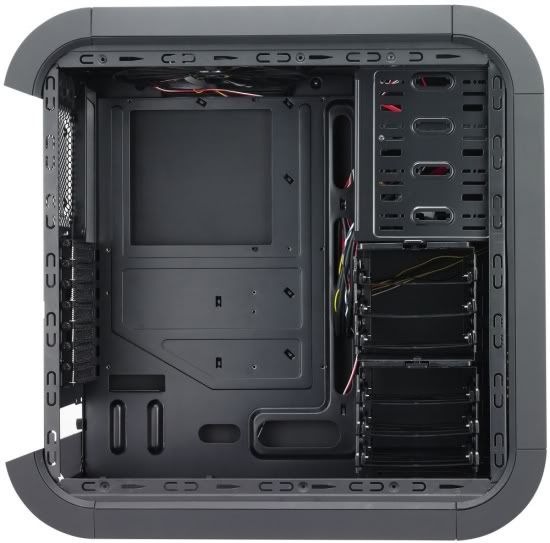
The internal layout is very good. It's more spacious than it seems from outside and the layout for your components has been very well thought out. It also includes all of those things we expect from a case these days such as cable management holes, removable sliding drive trays and a very nice painted interior. However due to the principals behind the case some of the component designs are not tool less. Personally I applaud this, as I am not lazy enough to expect to just be able to pull the drives in and out. This has never really made sense to me (the tool less thing) as it takes around thirty seconds to screw a component in. Honestly are people that pushed for time and lazy these days?
One thing I do need to mention about the Survivor though is that it is a midi ATX design. This means that if you are used to working in large towers then you are really going to have to engage your brain if you are thinking about putting in a big powerful set of components. It's not as easy as throwing a sausage down the London Underground and due to the compact nature this really does need to be planned out. If you fit the components in the wrong order you will find yourself continually taking them back out in order for a perfect cable job. This may not matter to some as the Survivor is designed to be used as a workhorse to cart your gaming rig to LAN meets. However, if you do have an obsession for neat then I would allocate at least double the time you usually spend on building a case for this one. Mind you, let's face it, if you bought the Survivor you did so because you wanted something more portable than a skyscraper. There is plenty of space for hard drives inside, but personally I removed the top hard drive bay in order to accellerate the airflow. Once built (if you have taken your time to meticulously plan things in the right order and taken time to hide your work) you should end up with something like this.
One thing I do need to mention about the Survivor though is that it is a midi ATX design. This means that if you are used to working in large towers then you are really going to have to engage your brain if you are thinking about putting in a big powerful set of components. It's not as easy as throwing a sausage down the London Underground and due to the compact nature this really does need to be planned out. If you fit the components in the wrong order you will find yourself continually taking them back out in order for a perfect cable job. This may not matter to some as the Survivor is designed to be used as a workhorse to cart your gaming rig to LAN meets. However, if you do have an obsession for neat then I would allocate at least double the time you usually spend on building a case for this one. Mind you, let's face it, if you bought the Survivor you did so because you wanted something more portable than a skyscraper. There is plenty of space for hard drives inside, but personally I removed the top hard drive bay in order to accellerate the airflow. Once built (if you have taken your time to meticulously plan things in the right order and taken time to hide your work) you should end up with something like this.
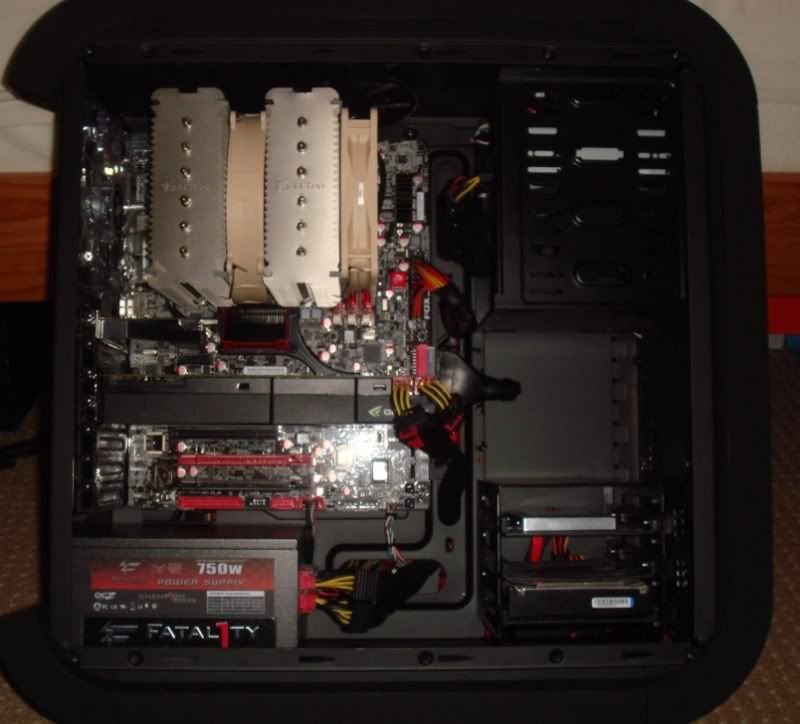
Again let me remind you that the Survivor is a case that brings up the thought "get out what you put in". If you are in a rush and lazy and didn't think to buy that large pack of cable ties then it will probably look bad and offer poor airflow.
Talking of airflow, let's move onto that now shall we?
I had heard some horror stories about the Survivor offering poor cooling. Thankfully I can happily report that those findings were incorrect and basically a pile of crap. If you are stupid enough to build this thinking you could get away with leaving fan mounts empty then you deserve everything you get. Once the fans have been added the case offers absolutely great cooling. Again, this comes back to the fact that it is a compact design with enormous fans pulling and pushing the air through well.
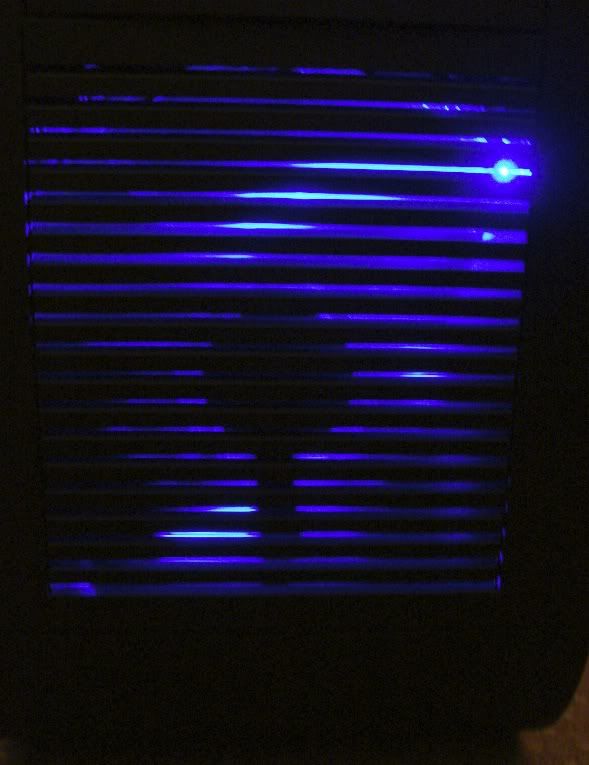
Now let's talk about noise, or the lack of it. 200mm fans (if you didn't know) are far quieter than the small designs of old. Once fitted it really begins to sink in just how big they are for a case this compact.
Talking of airflow, let's move onto that now shall we?
I had heard some horror stories about the Survivor offering poor cooling. Thankfully I can happily report that those findings were incorrect and basically a pile of crap. If you are stupid enough to build this thinking you could get away with leaving fan mounts empty then you deserve everything you get. Once the fans have been added the case offers absolutely great cooling. Again, this comes back to the fact that it is a compact design with enormous fans pulling and pushing the air through well.
Now let's talk about noise, or the lack of it. 200mm fans (if you didn't know) are far quieter than the small designs of old. Once fitted it really begins to sink in just how big they are for a case this compact.
What's also nice is that even though the front slats look rather tight they are actually quite open and thus allow for great air induction.
Be aware that the case does come with fan filters for the power supply and front panel, however from my experience with filters they are a pointless entity. There is no true way of preventing dust from entering your case completely and filters tend to be more problematic than letting the dust in. When they start to become dirty they actually block air flow and create a blanket around your fans preventing the air from getting in. A small problem with the Survivor is that to remove the front you need to remove the wiring for the fan. And to do that you need to unplug it and cut away any cable ties you have managing that wire. you also need to do the same for the logo LED and tbh this is all way too much hassle just to clean a filter. So, the simple answer for me (being the sort of person that believes cleanliness is next to godliness) I simply removed it.
Fact is you are either going to treat this case in one of two ways.
1. As a cherished focal point of the room it sits in because you love the design.
2. As a portable workhorse. At which point you're really not going to care about it getting dirty scratched or marked.
The finer points of building into the case.
The hard drive sleds are an excellent design. They do feel rather flimsy and light when empty but once the drive fits in (which is really rather easy and pain free) it really is a doddle to get them in and out. They have been well thought out so that 2.5" SSD and 3.5" hard drives alike can go in with minimal fuss whilst still looking good. The 5.25" drives are fixed into place with screws which as I mentioned earlier I have no problem with at all, I really am not that lazy. The cards themselves are held in with nice chunky thumbscrews that are easy to do up. However I do suggest cranking them at the last bit with a screwdriver just to make sure your components are safe and sound. The back plates on the case are meshed which is a brilliant idea, again, making the airflow work even better. There are a couple of water cooling rubber grommets but TBH they are a bit of an 'over design' and seem a bit out of place considering that this case is rather small and not really suited to water cooling. However, I won't argue because they actually got me out of a design jam earlier which I will explain at a later date in my project thread.
Finally, a detailed description of the things I do not like about this case. There is going to come a time, whether you like it or nor, that you are going to have to remove the top. This is in all honesty a bit of a nightmare. There are four screws holding it in place which would not usually be a problem but sadly they are black, in a tight space, in a black case. This means you will need to flip the case upside down, remove the screws praying that they stick to your magnetised screwdriver and then very gingerly flip the case back over and remove the top. However, here lies another problem. The wiring for the buttons, USB ports and LEDs are all fixed to the top. Again, if you have cable managed all of this with cable ties to do the job properly it means a plethora load of work that you won't be in the mood for. The fix for this is really rather simple. Firstly the button panel should be mounted to the case seperately so that it stays in place (along with your wiring) when you remove the top. Secondly all it needed was four of the expanding snap in clips that the front uses and it would have been perfect. See also - the LED for the front. This should have been mounted onto the chassis so that when you pull the front it stays in place, allowing the front to come free without needing to take any wires out of their positions. This wouldn't have cost much more than it did already but would really rocket this case to stratospheric levels. However, let's be honest and kind here, there is no such thing as a perfect product and a perfect design and any product is going to have its niggles.
Final thoughts.
Make no bones about it this case is absolutely gorgeous. It's so pretty that you will continually keep looking over at it, throwing it fond glances that can be compared to sitting at a dinner table in a fine restraunt with a woman you have affections for. The feel of it is also top class. It's rather hard not to keep reaching over and fondling it. It's very compact and neat and very easy to take it where you want to go. However, due to the compact nature of this case it is also a bit fiddly to work with and getting into it can be a pain. But, again this case is just not designed for Sid Fiddler from the Carry On movies. If you continually like to mess with your rig and bolt things onto it? this isn't the case for you. I think, though, that case design speaks a lot about people. We all know that computers are very personal things to us (hence the namesake, duhhh) and speak a lot about us as a person. When I built my I7 rig I did not build it with any wicked intentions. I had no plans to run multiple GPUs again. I had no plans to continually fiddle with it and no plans to constantly take it apart. So with that said it was and is remains perfect for my needs. If you do want something you can get into easily? it's not the case for you.
The good.
It's stunning. Honestly it really is a work of art. It has a BMW sort of look and a BMW sort of feel.
Price isn't bad for a work of art. Sure you could get a basic case without cooling for about half of the price but don't expect the look or feel. I would imagine it is also quite rugged, though I like it too much to put those aspects into testing.
Airflow is very good so long as you use some brain matter and like, actually fit some fans into the intended locations.
Drives all fit flat and flush blending into the front panel seemlessly.
The not so good.
Fitting lots of poweful large hardware into it needs a lot of planning and can be frustrating having to keep removing it in order to get it right.
I don't like the fan filters.
The bad.
Getting the top off and the fact that you can't easily get the front off to clean said fan filters once the rig is fully built. This really needs to be addressed and a second revision put forward.
No manual. Again, this needs to be sorted out.
Front fan mount is not compatible with all fans. The dimensions of what you can actually fit in the front of the case really need to be taken down and pointed out in the manual (when you actually get a manual). I did raise a point in my feedback that Bitfenix should have ordered one of each of the 200mm fans available (because let's face it there aren't that many) but simply giving you the dimensions of what you can actually fit in there would help a lot. All fans that you can order will list their depth in the specs and at least then you could check before ordering so that you know if your fans are going to fit. Bitfenix could wash their hands of this if there were fans in there, but in the Core version they are not.
Final thoughts.
I am sure with time Bitfenix will continue to blossom and the thought of products they could actually get onto the market with the problems all ironed out is quite frankly terrifying if you are another case manufacturer. These cases really are completely different to everything I have ever used and because of that I am sure many others will see them in the same way. After years and years of using the same old cases these really do make a statement, and top marks to Bitfenix for not just coming along and giving us more of the same. Sure, they do have their issues but the reason they have those issues is because they are trying to do something different. If they simply copied what most of the other manufacturers are putting out their lives would have been far easier. So hats off to them for that.
I give this case an 8/10. As much as I love it aesthetically and am constantly in awe of its beauty I just can't get over the small flaws it has. And I simply can't bring myself to ignore them just because I own the case.
------------------------------------------------------------------------------------------------------------------------------
Notes.
You will notice that I have not raised a lot of the other problems I had with this case during this review. The reason for that is simple. The case when it arrived with me had suffered shipping damage. It would be rude and inconsiderate of me to sit here and slag off Bitfenix due to this. They have also been fantastic about it, and, are working as we speak to cater to my problems and provide me with a satisfactory solution to them.


