Leviathan - X99, SLI 980ti's and watercooling!

the pokemon kid

New member
20556864281_6f4ee9c613_h.jpg


Hi All and welcome to the build log of Leviathan my PC! In my last build I went with a Black and Green colour scheme and I now want to mix things up a little and go with a custom rigid tubed loop with blue coolant! Follow the thread for the full build log of the computer!

I would like to say a big thanks to the companies which have made Leviathan possible!

Reason for the name "Leviathan", what is more of an apt name for a giant watercooled beast than the name for a giant sea beast!

Parts List
Case: CaseLabs Mercury S8
CPU: Intel i7 5930k
Motherboard: Asus Sabertooth X99
RAM: 32gb DDR4 GSkill Value (4x8gb)
GPU: 2x Zotac GTX 980ti
SSD: 4x Crucial M550 256gb (RAID 0)
HDD: 3tb Western Digital Green
PSU: Corsair AX1200i
Fans: 5x Phobia E-loops, 2x Corsair AF120's

Watercooling
CPU block: EK Supremecy EVO in Black
GPU block: 2x EK Titan X blocks with backplates
RAM Block: 2x EK Monarch X4 RAM Blocks
Reservoir: EK X-RES X3 250
Pump: 2x EK D5 Vario's in a dual pump top
Radiator 1: Alphacool NexXxos Monsta 240mm
Radiator 2: Alphacool NexXxos Monsta 360mm
Rigid Tubing: Monsoon 16mm tubing
Rigid Fittings: Barrow 16mm fittings and EK 45/90 degree rotary fittings
Rigid Flex: XSPC 19/13mm flexible tubing
Rigid Fittings: XSPC 19/13mm compression Black Chrome
Extra fittings: Koolance Flow meter, EK-AF passthrough
Coolant: De-Ionised water with Mayhem's Dark blue dye

Extras
Cables: Fully custom Sleeved cable set by Shakmods (Thanks Sali)
LED's: Monsoon g1/4 LED, two modded 30cm white strip LED's

Make sure you are subscribed to the build log to see all the updates for this build!
 
All all and here is the first update to the Leviathan build log! Not going to be a long one as I am currently getting things ready for the build! However I do have two rather beautiful graphics cards from Zotac here!

I haven't been able to use them but I have had them out of the boxes a hand full of times just to stare at them! They are really beautiful cards! I have held cards with custom coolers and these cards feel solid in comparison!

Zotac GTX 980ti's
20520184210_185381c67b_b.jpg


A nice bit of side box action!
20087195233_65652c7305_b.jpg


These two cards are sporting the lovely reference cooler (Black and silver). It does seam a shame that I am going to have to be taking these coolers off.
20681714266_639f31868d_b.jpg


A nice shot of the cards side by side. They are chunkier than I expected them to be!
20521351079_744a1b24d9_b.jpg


At this point I was getting a bit too into the photos saying things like "Oooo yeh, hold that pose" and "You dirty cards, I bet you love it"
20708009905_2a072fe202_b.jpg


Look at that tasty PCB! Dont look too long though, they are naked on that backside ;)
20520047368_20460ab4df_b.jpg


Cheer guys for checking out this first update on the log! Much more to come, however here is a little sneaky peaky of the next stuff coming. Can anyone guess what it is?

20718976871_4ea488e4fa_b.jpg
 
Last edited by a moderator:
Well I have got some plans but I am also interested to see how it ends up!

If this is a sponsored build Id suggest you put a lot more effort into your forum posts. Just posting some pics is pretty lazy compared to the high caliber of other sponsored builds posted here.
 
If this is a sponsored build Id suggest you put a lot more effort into your forum posts. Just posting some pics is pretty lazy compared to the high caliber of other sponsored builds posted here.

duly noted!

Make sure you are subbed to the thread though Tom, at least then you can make sure I am keeping up the hard work :P

Just made a little update to the post! Bet you cant guess what the next pictures are going to be of :D
 
Last edited:
Hello all and welcome to update number two. Unfortunately no one guessed what the picture was so the 980ti which was the prize will just have to be given away another time... There isn't really a give away!

None the less it is update time for you all! The picture was of the EK titan block which are going onto the GTX 980ti's!

I think that EK has updated their packaging since last time I got their parts. The boxes do look pretty swanky! However the block boxes do weigh more than you might expect!

20085334354_bddbe0b1e9_b.jpg


I had the choice between going for black blocks and the plexi ones and I could help but choose the stealthy look, these blocks just look amazing! and also, they have Titan X on the blocks so I can make out that I have got two Titan X's :D
20085291794_eebdc6dbbe_b.jpg


Had to take the sexy close up of the engraving job they have done onto the inside of the block. It is so shiny! the amount of times I needed to clean this was annoying though! It is a complete finger print magnet, especially when I split my mountain dew and had to touch it with my Dorito encrusted hands.

20714634231_8a0104b861_b.jpg


Another close up, but this time the full picture of the one, none of you could guess... If only someone had guessed, they would be a 980ti better off now... There isnt really a giveaway, who would just give away a 980ti! If I had another one I would put them in three way SLI!!

20698493812_e3c730dd77_b.jpg


"Dont look at me! I am naked!"
20681473126_e6fda9a353_b.jpg


A nice closeup of the GM200 core powering this monster of a graphics card!
20519654668_e8b762aa11_b.jpg


20707609375_15bc39a68e_b.jpg


Catching the rays, side by side... Naked
20520808839_f53f4e42c0_b.jpg


Not the best technique but we got there in the end! Got the blocks onto the GPU's and everything was looking sweet!
20681222366_2b7cf27d5a_b.jpg


Backplates are on and installed onto the cards, however they dont seam to have used the same metal as last time, these seam a little sticky to the touch and real finger print magnets. The other issue is, I had to really scrub to get my finger prints off the cards as they were almost imprinted in!

20086406433_24fd7be82d_b.jpg


20698128472_4ec4fbc4be_b.jpg


The cards looking skinny!
20681066616_0d9d35a55b_b.jpg


A little close up on the power delivery!
20714082531_8c5e16b9a1_b.jpg


Another close up on the GPU's
20520463309_05ae2fd43f_b.jpg


Now I wanted to do a little mod to the SLI bridge, It was very easy actually! I thought I would be taking things apart! But hope I have done you proud Jay!

20707162955_8718782cac_b.jpg


It may not look as blue here but in person it looks spot on with what I was going for! Very happy with the colour!
20713925231_c7c73a1cd9_b.jpg


Well guys, that concludes another build log update... I hope you have enjoyed so far! Make sure that you subscribe to the thread and most of all, get involved! You might win an imaginary GTX 980ti! Til the next time!

TPK awayyyyyy

EDIT: God damn this blue background!
 
Last edited by a moderator:
Hey all and here is update number three of this build log!

The build is now in full swing and the updates are going to be coming hot and heavy! I am stoked on all the stuff I have done so far and looking forward to getting this build completed! I have now got all the parts I need to the build except for some of the smaller bits like the spray paints I am going to need...

Well here is the first look at the 5930k! I have had it booted already and a quick prime95 run just to make sure it wasn't a dead chip!

20519061488_391d50dc0f_b.jpg


I dropped the CPU into the motherboard to make sure it was in a safe spot! The retention arms on the CPU socket were kinda scary! It felt like I was putting a lot of pressure down on it! However everything was fine and it was just me being overly scared about killing a £400+ processor!

20746632116_cd38ac4b2d_b.jpg


The only thing that is killing my OCD is that the CPU is actually upside down in the CPU socket. I spent like 20 minutes making sure it was correct and then dropped it into place! but WHHHHYYYY do you have the socket upside down! It is killing me a little inside right now!

20584871138_c0c8d9e6dc_b.jpg


Here is a little close up of the CPU in situe! It is one big CPU and one big socket!
20150230564_f86b8496ce_b.jpg


Here is a little closeup of the Asus Sabertooth! I absolutely love this motherboard! It is strong as heck but they have got these little dust covers! It is a really great though as as it cleans the look of the motherboard so much! I have the Z87 version of the Asus Sabertooth motherboard and I really only had one choice for my X99 motherboard. The thing is an absolute tank!
20763363192_33e3aae957_b.jpg


A quick closeup of top thermal armour!
20772714885_d0a33430da_b.jpg


ARGGGGHHHHHHHHH! This upside down socket is killing me!
20772662115_8171a31ddd_b.jpg


Another little closeup of the CPU in its socket!
20150023214_b308fa3e47_b.jpg


Here is the 8 pin EPS and the 4 pin EPS in the background! After a little researching I was able to find out that I can use both so the cabling of is going to be looking awesome! However, if anyone has anymore information other than just me making it look pretty I would be interested to know!
20779235641_0257fc8c53_b.jpg


The good old X99 plate to show off the Sabertooth board!
20585473749_aa9878ce1a_b.jpg


Another tasty little closeup of the dust defenders on the internals of the motherboard, however I do wish they made enough for all the ports/ pins on the motherboard as there isnt enough for all of them!

20585286259_7f9b044a77_b.jpg


Some more shots of the dust defenders, just the externals of it! These things are so strong. I think that they actually need to make the sound dust defenders a little less rigid! They are really difficult to get them out of the ports!

20149399164_cea36d82d3_b.jpg


The back of this looks so sexy!
20778867281_467c495aec_b.jpg


Here are the dust defenders for the PCI-E Sockets. Again these things are great! My previous build got filled with dust because of negative airflow and these saved the extra PCI-E sockets because I can pretty much garuntee that it would have killed them! There was a serious amount of dust!

20745607116_825fed94d3_b.jpg


Yes, this truly is the Ultimate force!
20583834570_20dba259fa_b.jpg


Thanks for checking out me putting the processor in the motherboard and doing an overview of the CPU socket and motherboard! I am really really happy with this motherboard! I cannot wait until it is in use because it has a tonne of features! Also, my last overclock on my 4770k was awesome and I can put that down to an awesome CPU but also a brilliantly made motherboard!

Well this is TPK out again! It is Friday night and it is beer o'clock! Stay tuned for more updates for this as I have some stuff in the works for this weekend! The case might even make an appearance if the weather is as forecast tomorrow!

20584415950_b27fb5b0dc_b.jpg


Thanks for checking out my build log and make sure you get involved! I am interested to know of your thoughts on the build so far!

TPK Awwwwwaaayyyyy!
 
Last edited by a moderator:
Hey guys and it is update time yet again! This is update four of the build log!

This update is focusing on the CPU/ RAM and the watercooling associated with the CPU/ RAM!

Here is the EK Supremacy EVO that is going to be used in the build! It was used in my last build and it did a great job in that!

20778638401_ae524ef438_b.jpg


Hello guys!
20762250802_10e1b9496d_b.jpg


Not the cleanest it has been but it was as clean as I could get it after 4 cleans with Isoproplyn... Again, this has been used before and would be the reason it isn't a complete mirror.

20771607675_e568f52d8b_b.jpg


Now its the RAM's time to shine!

I bought a 32gb (4x 8gb) DDR4 set for the system! It is a 2400mhz kit but I intend to overclock this to at least 3000mhz! I had the choice between the value RAM or paying a little more for the Ripjaw branded ones. I went for these as the heat spreaders were going to be coming off anyways...

20762762102_442c341fa6_b.jpg


I am glad that they chose to have the PCB black! It makes it a lot easier to hide under the EK heat spreaders unlike previous RAM I used which was blue...

20762711282_07e3fa3890_b.jpg


I gave the system a boot with the RAM in before putting the heat spreaders on to make sure that they werent bricked on arrival or that I had bricked them while putting the EK heat spreaders on...

I just love the aesthetics of RAM with the monarch kit attached! It just looks amazing compared to all this super aggressive looking RAM. I love a minimalist style and this fully ticks the box for me!

20585332889_497f81b577_b.jpg


A little look at the outer packaging of the Monarch RAM waterblocks!

20584571990_447c1983ca_b.jpg


Here are the RAM waterblocks for the system! These things again tick the box for looking so sick!

20584532120_4afc50a792_b.jpg


One of these came from my last build but I have also got a new one!

20584504360_8a6510a307_b.jpg


Here is the RAM installed into the motherboard! It looks so amazing! I am loving it!

20150783873_77c8827ecc_b.jpg


I did a little research and found that the best method for applying thermal paste for 2011 CPU's is to use the X shape on the processor. It allows the thermal paste to be spread out evenly and not have any air bubbles within it...

20771573365_4ae2d3573c_b.jpg


The CPU waterblock has landed! I have installed it up side down because I am going to have the CPU/ RAM pointing one way as you will usually view it from the left side and will look the right way up.

20778499801_55373cacb8_b.jpg


I had to look at this picture/ computer multipe times after installing the blocks onto the RAM as it just didnt look straight! I had the spirit level out many times and I can confirm that they are straight and it is just the lens distortion causing the bend!

20584485770_de80541bd2_b.jpg


Here is another angle for the RAM and CPU blocks! I am so happy with how this is looking! I cant wait to be putting the fittings/ tubing in place to make this look awesome!

20149740604_87238a116c_b.jpg


Finally here is a look at the fittings I will be using. These are the 16mm Barrows fittings. These things look great!

Realistically these are just copies of bitspower multi link advance fittings. However these don't cost an arm and a leg!
20763026332_94b1a52f52_b.jpg


20585626999_1e536e299e_b.jpg


Thanks guys for checking out this fourth update of my build log! There is loads more stuff coming so make sure you subscribed to the thread but also make sure you drop a comment in! Its always nice to talk to you guys! I am always open to ideas!

Thanks again guys!

TPK Awwwwaaayyyyy
 
Last edited by a moderator:
Everything looks great so far dude kudos to you on the photography.

Although you may want to reconsider this.
20771573365_4ae2d3573c_b.jpg


That looks like far too much paste, if you want smooth precise application of TIM I suggest either the "pea" method or use your finger wrapped in Clingfilm (seran wrap) and spread it evenly and thinly.

URFm8he.jpg
 
Everything looks great so far dude kudos to you on the photography.

Although you may want to reconsider this.


That looks like far too much paste, if you want smooth precise application of TIM I suggest either the "pea" method or use your finger wrapped in Clingfilm (seran wrap) and spread it evenly and thinly.

I think that I might reduce the amount of Thermal paste used. I was thinking it was a lot. But I was following this:

https://www.pugetsystems.com/labs/articles/Thermal-Paste-Application-Techniques-170/

However, I think I am going to try your method... Have you noticed any thermal difference between using this vs the other methods? (Pea sized)
I get much better results with the spread method, so long as it is thinly spread and evenly coated. The reason I went for that method was simply by looking at the OEM coolers that come pre-pasted, I've pasted this way for the last 5 years and while it's only maybe 1 - 2C difference compared to the pea method, I have noticed that when you move from 100% load to Idle, the temps fall much smoother.

Prior to getting the i5 4440 I had the G3258 overclocked to 4.6Ghz on 1.25v and at 100% load rarely ever went above 36C, with the Corsair H100i in balanced mode.

Interesting, I have actually got the CPU in a temporary loop making sure I haven't bricked everything so I will pull it up later to give it a little test!

The temps are currently at 31C idle and about 45C after 30 minutes of Prime95...

I do want the Idle temps down a bit...
 
Everything looks great so far dude kudos to you on the photography.

Although you may want to reconsider this.
20771573365_4ae2d3573c_b.jpg


That looks like far too much paste, if you want smooth precise application of TIM I suggest either the "pea" method or use your finger wrapped in Clingfilm (seran wrap) and spread it evenly and thinly.

URFm8he.jpg

Oh my goodness, I wouldn't suggest EITHER ONE OF THOSE METHODS?! What a waste!


EDIT:

I've also gone through and removed all the Flick link spam from under your photos, please make sure you don't include that in your future posts. There's really no need for it to be there

Thanks
 
Last edited:
Each to their own ;) SuB, I can confirm there is little waste in my applications, it looks a lot but it's honestly not and I have tonnes of paste (bulk buys).
 
Each to their own ;) SuB, I can confirm there is little waste in my applications, it looks a lot but it's honestly not and I have tonnes of paste (bulk buys).

It's not so much the waste of paste, the amount is.. borderline okay, but it's still quite a bit, you should but absolutely as little on as you possibly can, like a super thin film :)

But yeah, your method is 1000x better than that honking great cross on that chip lol

Also, I've gone through again and just removed links on the images.

Please just use the img url wrapped in tags in future, there's really no need to put 3 links to every photo in a post like this.

Thanks
 
Oh my goodness, I wouldn't suggest EITHER ONE OF THOSE METHODS?! What a waste!


EDIT:

I've also gone through and removed all the Flick link spam from under your photos, please make sure you don't include that in your future posts. There's really no need for it to be there

Thanks

I was just following what puget said was best to do. but I will try using the spread method with very little thermal paste!

Flickr provides the BB code which I have used with the links to get to my flickr account, I will use the direct link to the image instead. I used the BB code as I have had quite a few people who then go on to following me of Flickr/ looking at my previous builds via the Flickr links.
 
Personally I prefer the "small pea" method my self :)

Im going to give the spread method a try out and see how that goes, from what I understand/ read, the line method/ cross method is the best for 2011 processors. However the dot/ pea method is the best for smaller processors like the 115x series.
 
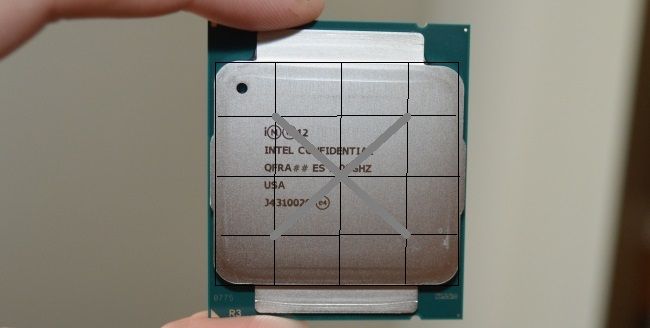
The die on the Halsell-E processors is pretty much a square, and is roughly quarter the size of the IHS. So imagine your IHS divided into sixteen squares, you want an X of paste on the central four squares.

Cue the bad MS Paint diagramme...

5960x%20paste_zpsw5utw2ob.jpg


Any more than this is a waste.
 
Back
Top