wotevajjjj
New member
I bought the Bitfenix Outlaw for a low budget, everyday use computer. It was only €40.
Review
The case comes in a brown box, probably to save manufacturing costs where ever possible. Albeit a bit simple, it does give all the information you need should you pick it up in a store.

As always, specifications are printed on the box, along with some pictures explaning the key features.


When you open the box, you'll find the instruction manual and the case itself.

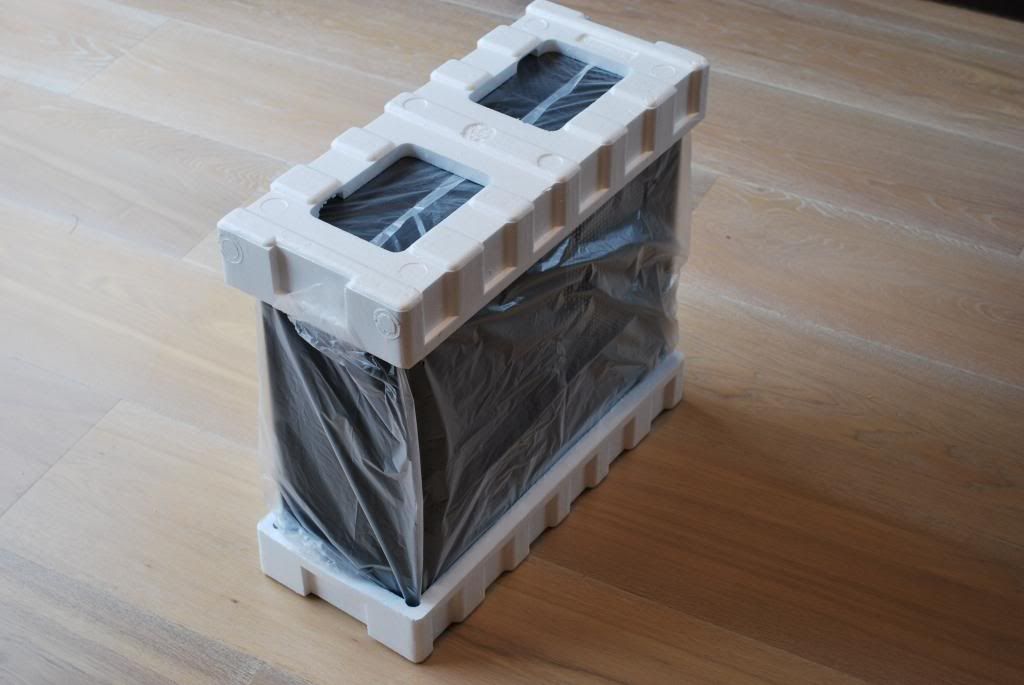
The case is pretty well packaged in the typical plastic bag + styrofoam configuration. No soft foam, but given the price, one should expect that.
And this is what she looks like


The colors of the soft-touch plastic front and the metal panels are slightly different but they match a lot better than many other cases, even the more expensive ones. The insides and the back both have been painted which is a good thing. Sadly the fan hasn't got any braiding on it.

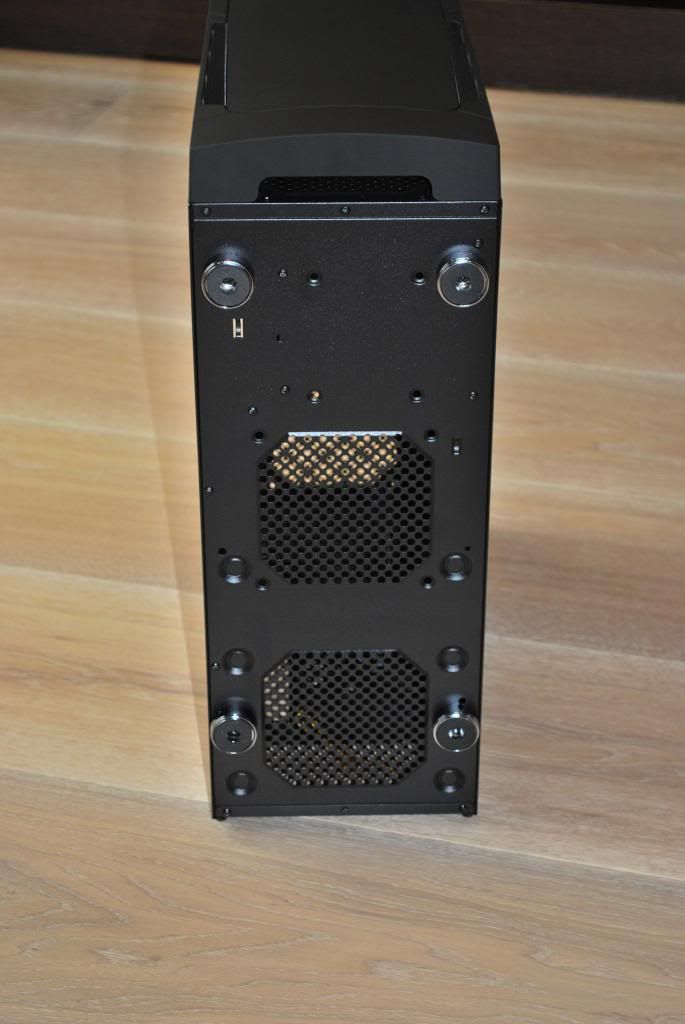
The power supply can be fitted both fan up or down, depending on user preferences.
The top has a circular mesh cut out in case you want to install fans, sadly the case only comes with 1 120mm fan in the rear. Spacing is also off should you want to install 240mm liquid coolers. This isn't much of a problem since no sane person would put a €100+ cooler in a €40 case.
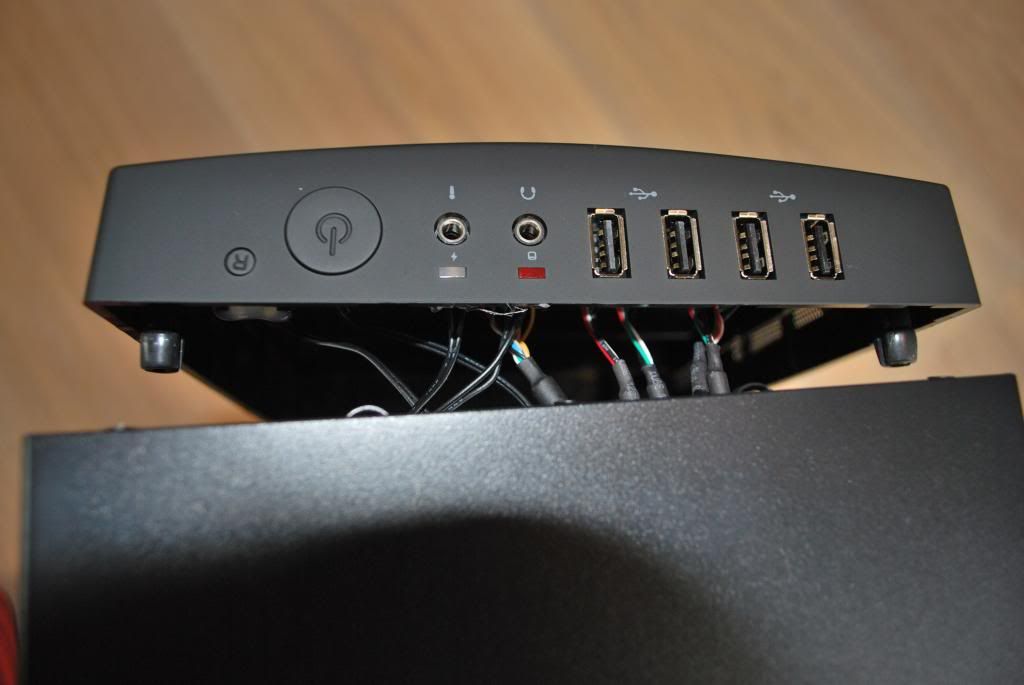
The front panel has the power and reset switch, microphone and audio jacks along 4 usb 2.0 ports. I don't see why not having usb 3.0 would be a problem for most people since it's likely to be a cheaper board going in, and those don't support onboard usb 3.0 yet. However, if this is a huge problem for you, €10 will get you the 3.0 upgrade kit which is also available for the shinobi's. Also note that the jacks aren't color coded but have a little figure underneath them.
The front panel is pretty clean, it has 3 5.25" bays and an extra one that can't be used externally because of the lower plastic cover. While the curve does make it look better, it does create a bit of a problem with optical drives, but more on that later.
The case sits on rubber feet with a chrome look, nothing really new with cases, but it should help cancel vibrations and let more air in. There is a cut out for a optional bottom mounted 120mm fan and the psu but sadly no dust filters.
The side panels are a lot better than expected, they do flex a little bit though. A series of hooks on the top and bottom side should help keep it attached and make for better alignment.

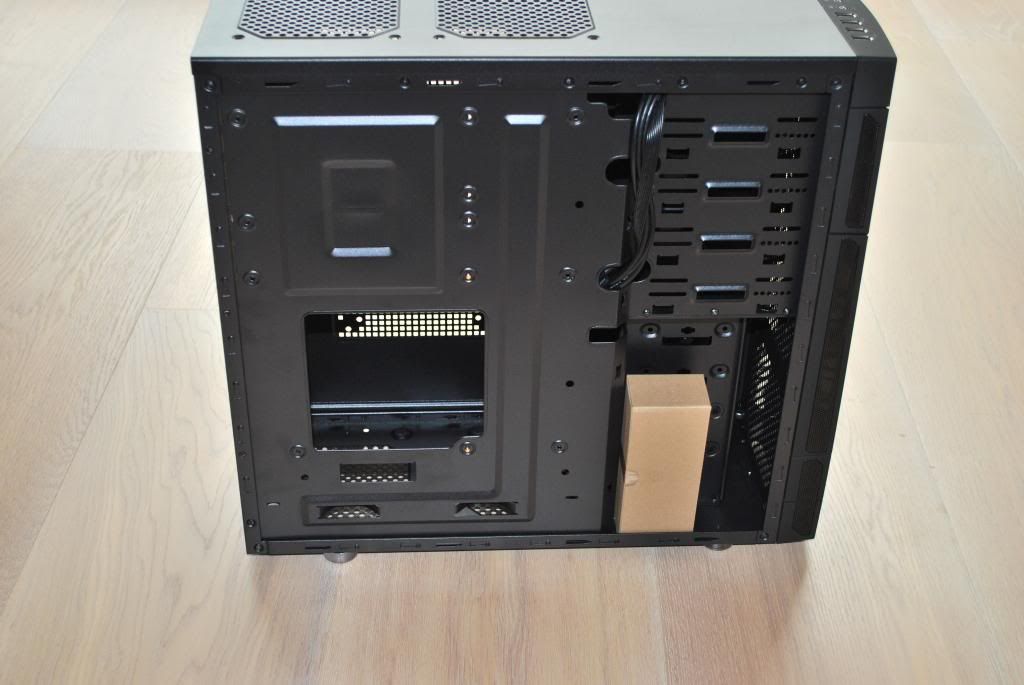
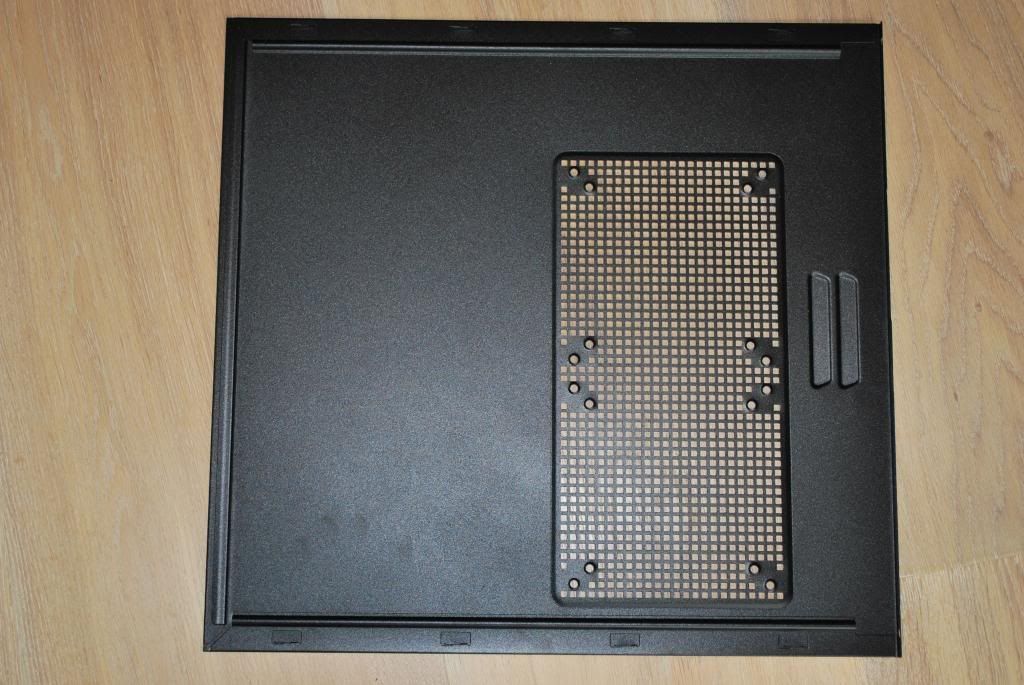
This case uses an inverted motherboard tray but I decided to start with the left side anyway. The thumb screws holding the panels on are just normal screws with plastic bits on them, which is weird given the amount of real thumb screws included in the accessories box. Behind the motherboard tray, there is no room for any cables except for the ugly fan cable. There is also nothing to keep the cables in place. Given that this case is cheap, so will be the power supplies people use, this will cause for extremely bad cable management which completely blocks the airflow in the front. The front I/O cables are also not braided, but they're black which makes everything look so much better.
There are plenty of holes to poke cables through and there is also a decent size cpu cut out to help with changing coolers.


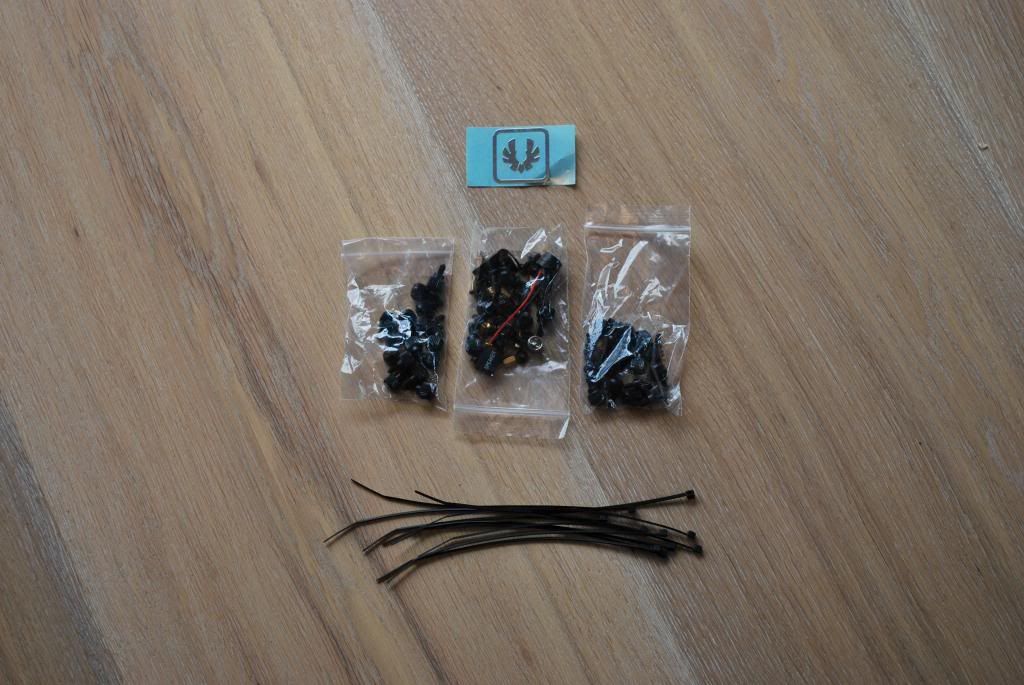
The little brown box does contain a lot of zip-ties and even more thumb screws, along the speaker (Don't know who uses that to be honest) and some stand-off screws to hold your motherboard in place. There is also a chrome Bitfenix badge so you can show that off, should you want.
This folks is the right side panel, as you can see it features the same mesh found everywhere else and you can fit 2 fans, 120mm or 140mm.
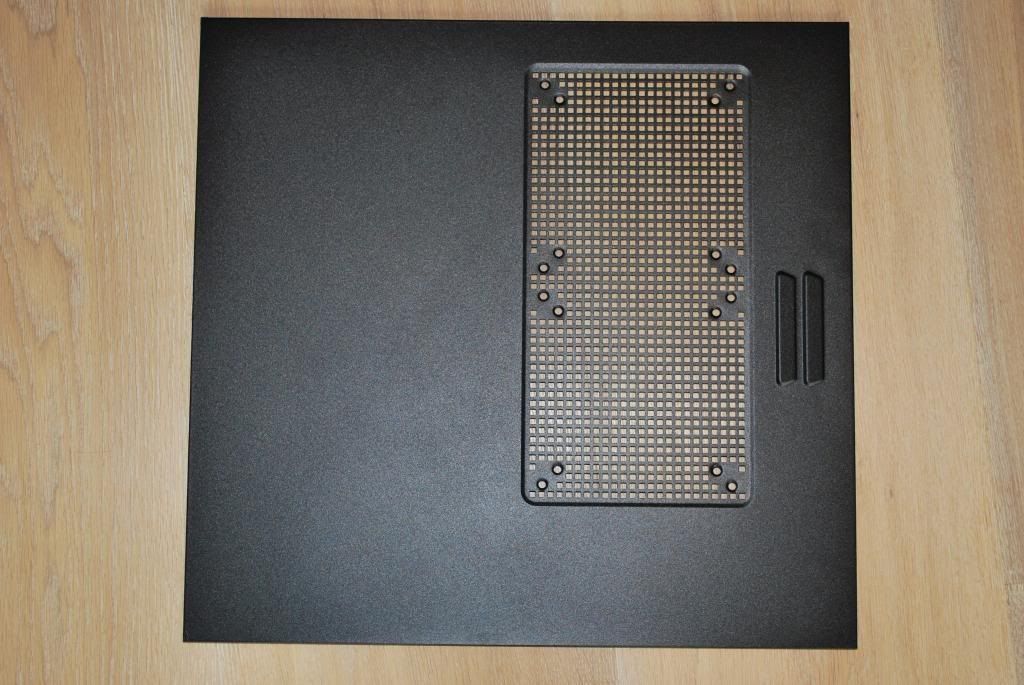
It's held on the same way as the other panel and doesn't have rubber vibration dampeners like some other cases do. However given the price, this was to be expected.
And here's the inside, as you can see, inverted atx or m-atx, even mini-itx is possible. Two of the motherboard stand-offs are in place, putting the others in is a job for the buyer.
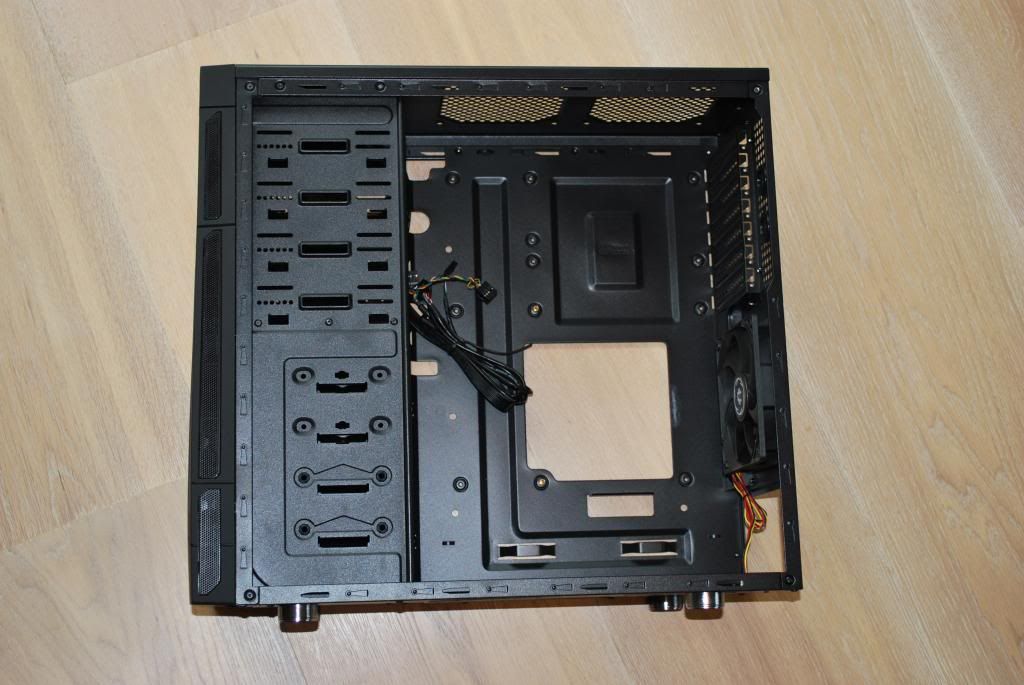


Like with a lot of these cases, the pci brackets are break-offs which is a bit of a bummer. There are 2 grommeted holes for external watercooling should you be mad enough to do that. Inside the case, there is no room for radiators, unless you would put one in the top and secure it with only 4 screws. Depending on how you choose your pci card and the type of motherboard, even the thickest of radiators could fit in.
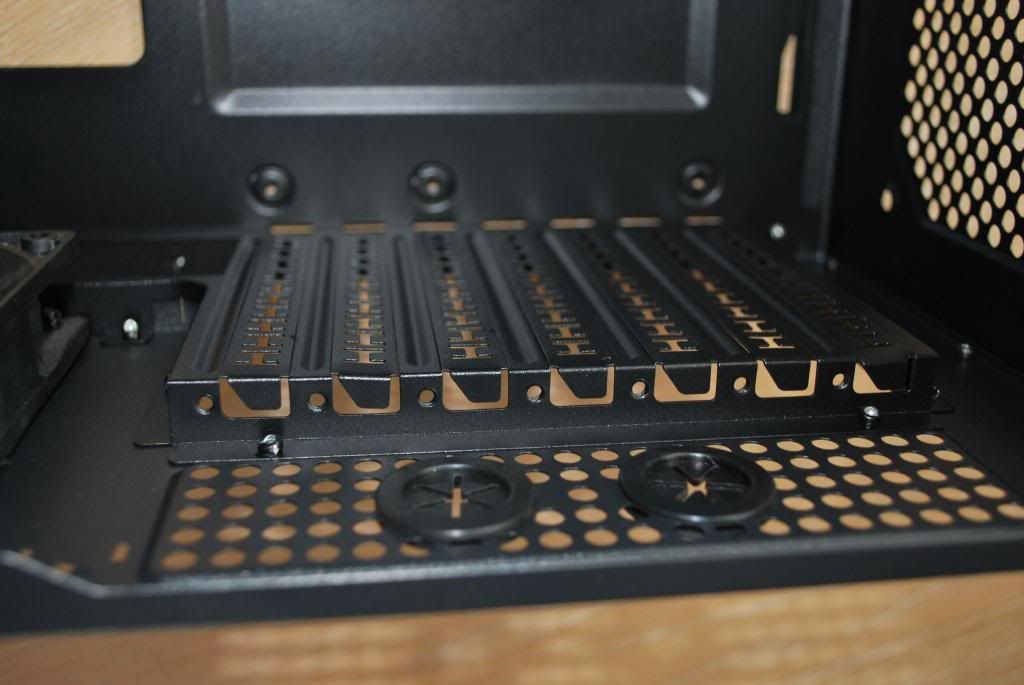
The bottom 2 hdd's do get rubber mounts to cancel some vibrations, you can remove the rubbers should you want.

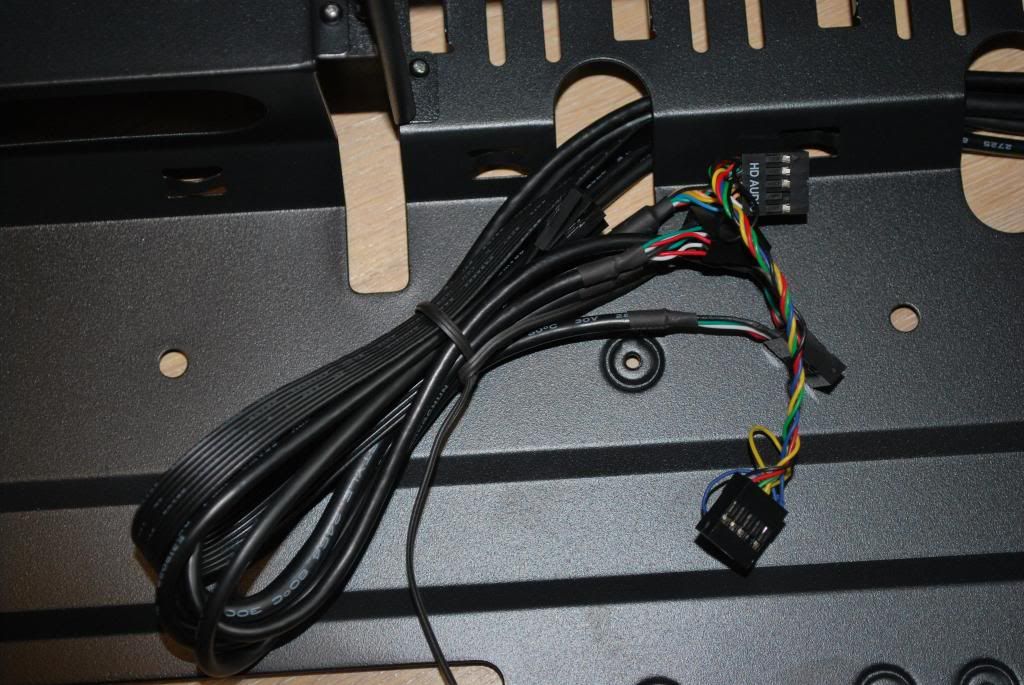
The onboard connectors are for the led's, 2 times usb 2.0 and both normal and hd audio.
As you could see in the previous pictures, nothing here is tool-less, unless you would use thumb screws on everything of course. There is plenty of choice in odd mounting holes so you can try to do as well as you can to line the rounded front up with the plat odd, fan controller or whatever you want to put in there. The problem is that first, you have to break the metal plate for the odd. The top one is already removed, and the front panel has to come off to get the plastic cover out of the way. If you have already build the entire system when you decide to put the odd in, this can be a pain in the posterior when you have tied all cables up tightly.
Instead of undoing all those connectors, I did it the lazy way and took the entire wiring out.

You can install up to 2 120mm fans in the front but they're likely to hit your cables. Bitfenix did think of an extra hole in the front though, so if you don't want to go with front fans, you could stash some wires in the front panel.

The build
For this build we used parts likely to go in to a case of this price.
Specs:
AMD A10-5800K
ASRock F2A75M-Pro
Corsair XMS 1600
WD Green 1.5Tb and an optical drive.
Corsair CX430
Total price: €342
While there are a lot of great thing about this case, it's the not so great and bad things you will remember after building a system in it. Because there is no room at all behind the motherboard tray, the only cable I could route behind it was that of the fan. Both usb connectors and the front I/O cables could not pass behind the motherboard because they are too thick. The audio cable simply wasn't long enough. I have spent quite a while thinking about the cables and this is all I could do. I just tied all of them together to form a big cable bundle. It would have been very nice to see some cable-tie clips on the motherboard tray in case you use m-ATX, but sadly there are none.

There is just enough room to put the hdd in the wrong way, but only if you use angled sata and sata power connectors. While this makes the inside look a lot cleaner, it does mean you can only secure the hdd with 2 screws (1 on both sides ).
Because there are plenty of mounting holes for the 5.25" drives, fitting them was very easy and even toolless.

As expected, all the cables had to be stashed in the little compartment. While there is a lot of room left on these pictures, remember that should u use a more powerful psu, you will have to deal with more cables. I don't see this being a problem though as I could easily add a 7850 in to transform it into a gaming machine. I my opinion, if all hardware is high end, you should cheap out on a case anyway.


Conclusion
Overall, the Bitfenix outlaw is a very good value. For €40 one can't expect it to have all the features the expensive models have. The case does feel very well build and there is plenty of room to fit all the parts you desire. This is not a case for people with dusty rooms since there is not a single dust filter and the mesh is so open, dust can fall right in. This however does cause for good airflow. The stock fan isn't very loud but defiantly audible, even at the lowest speeds this motherboard would let it do. All in all, a great case for budget builds or even something to learn some modding on, but with the low price came little features.
Pro's:
Price
Build quality
Front I/O panel
Room to stash cables
Con's:
No room behind the motherboard tray
No rubber grommets
Only 1 fan included
Review
The case comes in a brown box, probably to save manufacturing costs where ever possible. Albeit a bit simple, it does give all the information you need should you pick it up in a store.
As always, specifications are printed on the box, along with some pictures explaning the key features.
When you open the box, you'll find the instruction manual and the case itself.
The case is pretty well packaged in the typical plastic bag + styrofoam configuration. No soft foam, but given the price, one should expect that.
And this is what she looks like
The colors of the soft-touch plastic front and the metal panels are slightly different but they match a lot better than many other cases, even the more expensive ones. The insides and the back both have been painted which is a good thing. Sadly the fan hasn't got any braiding on it.
The power supply can be fitted both fan up or down, depending on user preferences.
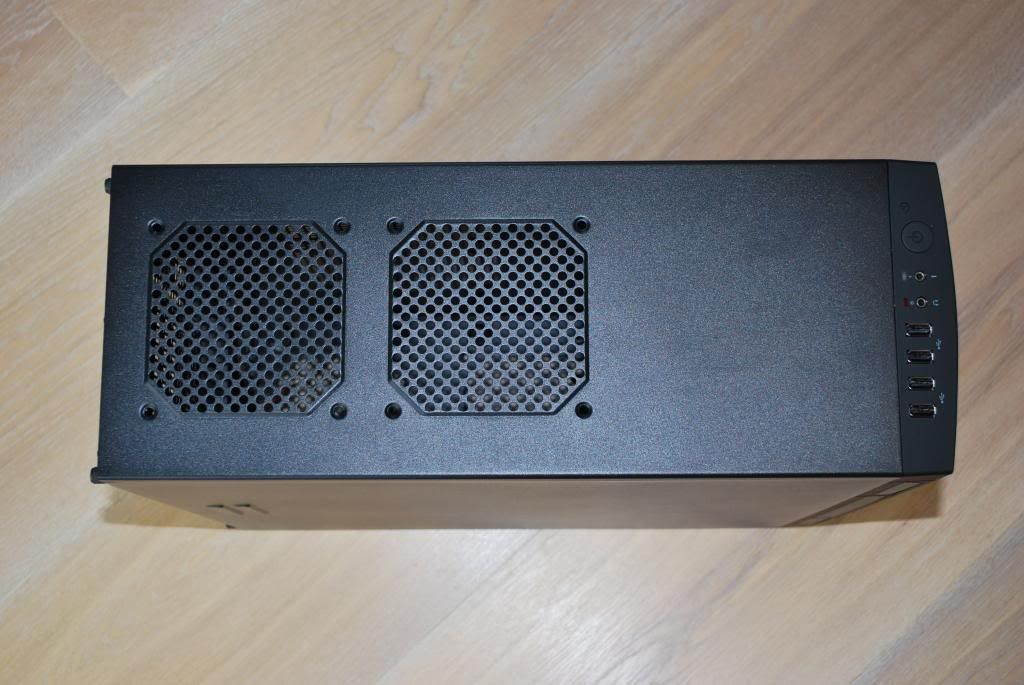
The top has a circular mesh cut out in case you want to install fans, sadly the case only comes with 1 120mm fan in the rear. Spacing is also off should you want to install 240mm liquid coolers. This isn't much of a problem since no sane person would put a €100+ cooler in a €40 case.
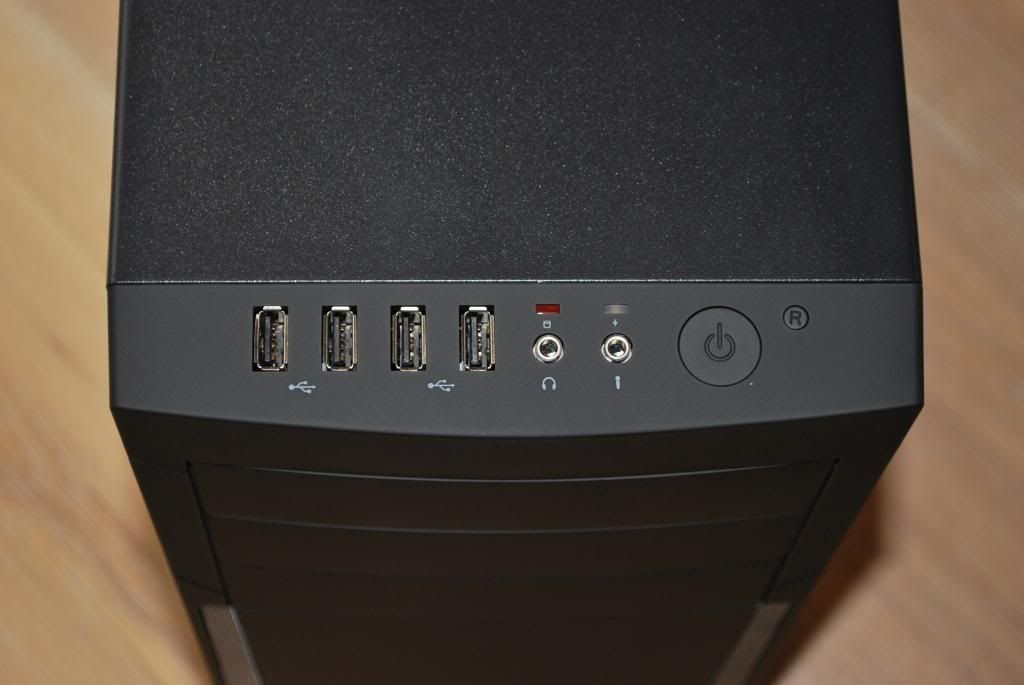
The front panel has the power and reset switch, microphone and audio jacks along 4 usb 2.0 ports. I don't see why not having usb 3.0 would be a problem for most people since it's likely to be a cheaper board going in, and those don't support onboard usb 3.0 yet. However, if this is a huge problem for you, €10 will get you the 3.0 upgrade kit which is also available for the shinobi's. Also note that the jacks aren't color coded but have a little figure underneath them.
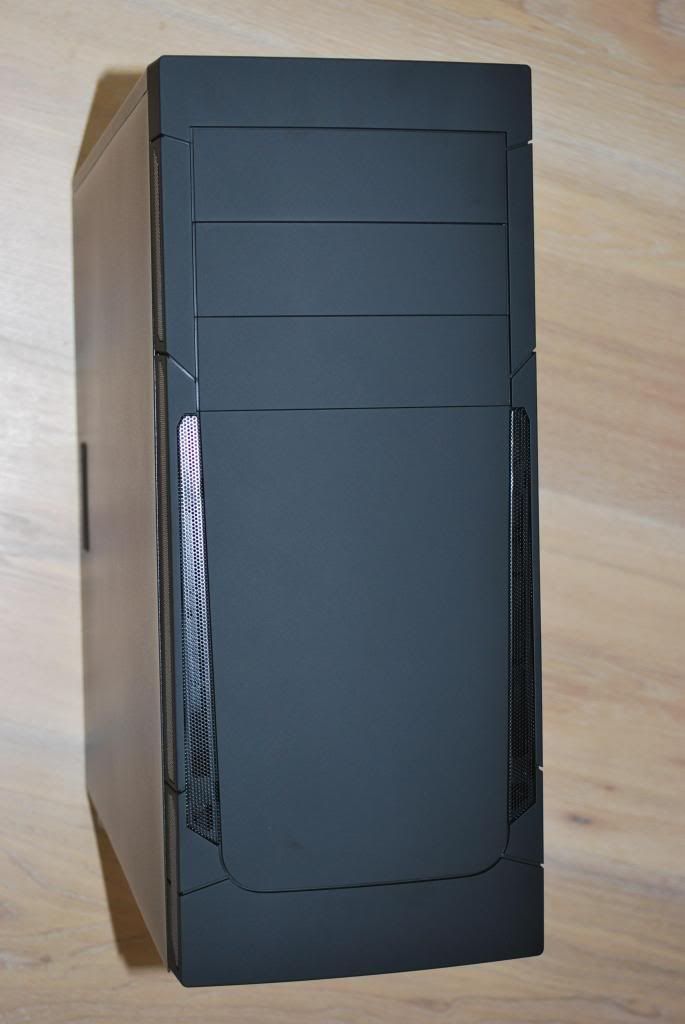
The front panel is pretty clean, it has 3 5.25" bays and an extra one that can't be used externally because of the lower plastic cover. While the curve does make it look better, it does create a bit of a problem with optical drives, but more on that later.
The case sits on rubber feet with a chrome look, nothing really new with cases, but it should help cancel vibrations and let more air in. There is a cut out for a optional bottom mounted 120mm fan and the psu but sadly no dust filters.
The side panels are a lot better than expected, they do flex a little bit though. A series of hooks on the top and bottom side should help keep it attached and make for better alignment.
This case uses an inverted motherboard tray but I decided to start with the left side anyway. The thumb screws holding the panels on are just normal screws with plastic bits on them, which is weird given the amount of real thumb screws included in the accessories box. Behind the motherboard tray, there is no room for any cables except for the ugly fan cable. There is also nothing to keep the cables in place. Given that this case is cheap, so will be the power supplies people use, this will cause for extremely bad cable management which completely blocks the airflow in the front. The front I/O cables are also not braided, but they're black which makes everything look so much better.
There are plenty of holes to poke cables through and there is also a decent size cpu cut out to help with changing coolers.
The little brown box does contain a lot of zip-ties and even more thumb screws, along the speaker (Don't know who uses that to be honest) and some stand-off screws to hold your motherboard in place. There is also a chrome Bitfenix badge so you can show that off, should you want.
This folks is the right side panel, as you can see it features the same mesh found everywhere else and you can fit 2 fans, 120mm or 140mm.
It's held on the same way as the other panel and doesn't have rubber vibration dampeners like some other cases do. However given the price, this was to be expected.
And here's the inside, as you can see, inverted atx or m-atx, even mini-itx is possible. Two of the motherboard stand-offs are in place, putting the others in is a job for the buyer.
Like with a lot of these cases, the pci brackets are break-offs which is a bit of a bummer. There are 2 grommeted holes for external watercooling should you be mad enough to do that. Inside the case, there is no room for radiators, unless you would put one in the top and secure it with only 4 screws. Depending on how you choose your pci card and the type of motherboard, even the thickest of radiators could fit in.
The bottom 2 hdd's do get rubber mounts to cancel some vibrations, you can remove the rubbers should you want.
The onboard connectors are for the led's, 2 times usb 2.0 and both normal and hd audio.
As you could see in the previous pictures, nothing here is tool-less, unless you would use thumb screws on everything of course. There is plenty of choice in odd mounting holes so you can try to do as well as you can to line the rounded front up with the plat odd, fan controller or whatever you want to put in there. The problem is that first, you have to break the metal plate for the odd. The top one is already removed, and the front panel has to come off to get the plastic cover out of the way. If you have already build the entire system when you decide to put the odd in, this can be a pain in the posterior when you have tied all cables up tightly.
Instead of undoing all those connectors, I did it the lazy way and took the entire wiring out.
You can install up to 2 120mm fans in the front but they're likely to hit your cables. Bitfenix did think of an extra hole in the front though, so if you don't want to go with front fans, you could stash some wires in the front panel.
The build
For this build we used parts likely to go in to a case of this price.
Specs:
AMD A10-5800K
ASRock F2A75M-Pro
Corsair XMS 1600
WD Green 1.5Tb and an optical drive.
Corsair CX430
Total price: €342
While there are a lot of great thing about this case, it's the not so great and bad things you will remember after building a system in it. Because there is no room at all behind the motherboard tray, the only cable I could route behind it was that of the fan. Both usb connectors and the front I/O cables could not pass behind the motherboard because they are too thick. The audio cable simply wasn't long enough. I have spent quite a while thinking about the cables and this is all I could do. I just tied all of them together to form a big cable bundle. It would have been very nice to see some cable-tie clips on the motherboard tray in case you use m-ATX, but sadly there are none.
There is just enough room to put the hdd in the wrong way, but only if you use angled sata and sata power connectors. While this makes the inside look a lot cleaner, it does mean you can only secure the hdd with 2 screws (1 on both sides ).
Because there are plenty of mounting holes for the 5.25" drives, fitting them was very easy and even toolless.
As expected, all the cables had to be stashed in the little compartment. While there is a lot of room left on these pictures, remember that should u use a more powerful psu, you will have to deal with more cables. I don't see this being a problem though as I could easily add a 7850 in to transform it into a gaming machine. I my opinion, if all hardware is high end, you should cheap out on a case anyway.
Conclusion
Overall, the Bitfenix outlaw is a very good value. For €40 one can't expect it to have all the features the expensive models have. The case does feel very well build and there is plenty of room to fit all the parts you desire. This is not a case for people with dusty rooms since there is not a single dust filter and the mesh is so open, dust can fall right in. This however does cause for good airflow. The stock fan isn't very loud but defiantly audible, even at the lowest speeds this motherboard would let it do. All in all, a great case for budget builds or even something to learn some modding on, but with the low price came little features.
Pro's:
Price
Build quality
Front I/O panel
Room to stash cables
Con's:
No room behind the motherboard tray
No rubber grommets
Only 1 fan included
Last edited by a moderator:
")