This guide was on a website, I found it put it in Word. And used it to get me started on my overclocking of my Assassin G1. Just like the one Tom built.
http://forum.overclo...ssin-overclock/
This guild was writen by MaiHallen on another website.
Introduction
So many users are searching around the net these days looking for advice on how to overclock their new systems but don't know where to start. To help everyone out, I decided a how-tog uide was in order. Searching around forums can be confusing and intimidating.There are so many people willing to give advice, but who can you trust? It's hard to know, and I've seen many users sent on wild goose chases because theyare following advice that doesn't solve or even address their specific problem. I've also seen too much trial and error overclocking, unless you get lucky it tends to be far too time consuming a frustrating. What I've attempted to do is create a very simple three step guide for overclocking Bloomfield and Gulftownbased CPUs. If you want to continue searching out other opinions, please consider each suggestion with caution. Some will undoubtedly be great, somewill not.
Disclaimer
I am not responsible for any bad things that happen to you or your computer as a result of you following this guide, nor is techreaction.net. My goal is for this guide to be a safe overclocking guideline, but the burden for damaged hardware lies on the user performing the overclock! Overclocking can damage hardware and in most caseswill void your warranties.
Prerequisites
In an earlier version of this guide, I requested that you have some basic knowledge of your motherboards BIOS. While I have not addressed every motherboard on the market, I have included details for the top enthusiastbrands. But as before, please do not be afraid to get into your BIOS and have alook around, if you are ever concerned that you may have changed a setting erroneously, you can always load defaults, and start over. Most boards have a CMOS reset button on them now-a-days, if not check your user manual for the location of the CMOS reset jumper…please ensure you know the location beforegetting started.
This guide is independent of your cooling system. Whether you are using the stock Intel cooler or if you're pushing to the extreme with phase change cooling, the basic steps remain the same. One thing that is far too common are mistakes mounting your cooling system, specifically the application of the thermal interface material (TIM).If you don't have much experience mounting cooling apparatus, please refer tothis excellent guide from Arctic Silver.
Methodology
Determining methods for finding a stable overclock are highly controversial, everyone has their own definition of a stable system, but when I refer to "stable" in this guide, I am referring to the stability of your selected "stability test." So for a power user or gamerwho wants a reliable system that won't ever crash due to an overclock pushedtoo far, you'd need to test with a program that will load all of the cores and threads applicable to your CPU, OCCT and IntelBurnTest are two popular choices. OCCT uses the same algorithm as Prime95 but has a more friendly interface. IntelBurnTest uses the Intel linpak binaries to stress the system and also has an easy to use interface. In this guide I may use testing this is insufficient in your opinion. It is only a guidline and if you feel more testing is necessary for your system, by all means feel free.
So with that in mind, we will attempt to isolate each portion of the system and overclock one step at a time.This may seem time consuming at first glance, but rest assured this will potentially save you hours of troubleshooting and frustration. So go slow, andfollow each step very carefully.
BIOS familiarization
If you've found my guide online, my guess is you're looking for more than a basic overclock. If you're not, and all you'd like is something simple, please redirect your attention to your motherboard manufacturer's website and download the latest overclockingutility. For basic 10-20% overclocking, they work pretty well. There is "Gigabyte EasyTune6", "Asus TurboV EVO", "MSIControl Center", and "eVGAeleet". This guide is written to take it to the next level, for THAT we need to do the overclocking from the BIOS.
Speaking of which, before we begin, please check your motherboard manufacturer's website for the latest version of your BIOS. Usually enthusiast level boards will have BIOS engineers tweaking them for months or years to improve overclocking support. Unless youhave a reason to stay with your current BIOS, I'd update to the newest version.
If you don't know how to accessthe BIOS, please refer to your motherboard's owner's manual for instruction.While you're there, find out how to "clear CMOS". As I mentioned in the introduction to this guide, it's important you know how to properly "clearCMOS" before we begin.
Secondly, the first thing to do after powering up the new system is to enter the BIOS and find the "hardware monitor" area and verify the CPU temperature is reasonable based on your cooling. If not, please power down the system and verify the mounting of your cooling apparatus (refer to the guide linked in the "prerequisites" section above).
Goals
The variety of users reading this guide is vast, and each user's goal will be unique and specific to his/herneeds. It would be impossible for me to address every user's specific needs. But I've attempted to be as broad, yet specific as possible. My goal is to assist the maximum number of users as possible, despite your specific needs.
Based on user feedback from the previous version of this guide, I decided to better address overclocking withpower features enabled. The easy answer was to follow the old guide and then attempt to enable your power features afterward, but that rarely worked when approaching the limits of a given system.
Just as before, if you want to maximize your overclock, you should disable all the power saving features inthe BIOS as detailed in step 1. However, if you're after a more moderate overclock, and you'd like to save power (especially while your system sitsidle) you can leave those setting enabled. Just follow the guide as written(I've added tips for you along the way) to find your best settings. While yourpotential overclock will be more limited, the bennefit will likely be worth it to many of you.
Terminology
I'd like to start off by writingbriefly about the BIOS and more specifically, differences in terminology between the different manufacturers. Obviously there are too many motherboards on the market to show you every single one in this guide. But looking at boards from the four top manufactures, we should be able to better identify specific terminologies used by each.
Below I've created a tablecomparing the terminology used by the four major enthusiast motherboardmanufacturers.
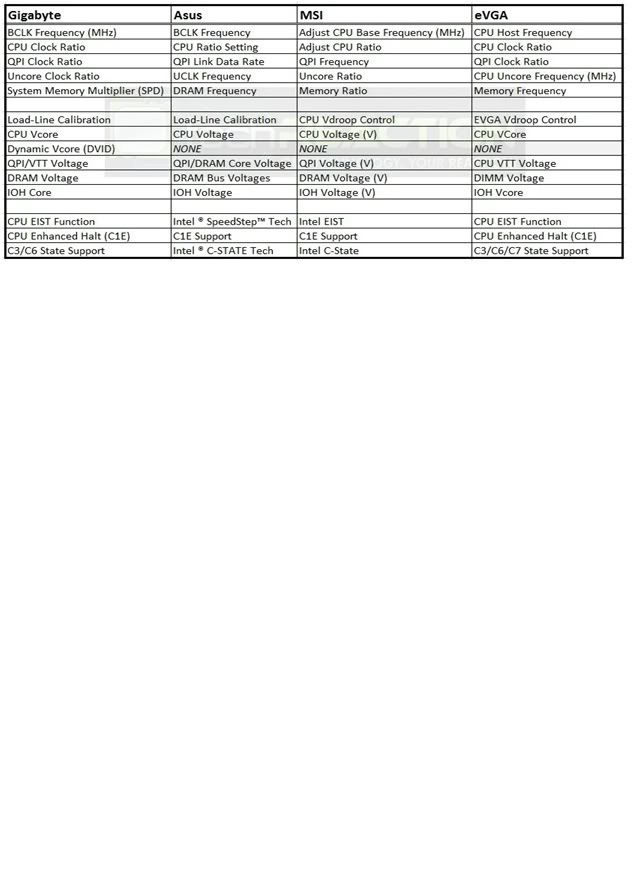
A comparison of BIOS terminologyused by four top manufacturers
***A brief note about Asus. Asus makes multipliers a little moreconfusing in this guide because the BIOS doesn't show the ratios at all, theyonly show the speed of the item based on the bclock set. This requires a little additional math on your part while using this guide. Please be aware of this difference as you progress***
Throughout this guide, I'll be referring to the terminology used by Gigabyte because it is most familiar tome. This top section is to be used for reference so that you know what I'mreferring to you when your BIOS options don't match my instructions.
Understanding "total system performance"
Before we go into how we overclock these CPU's let us look at what determines how fast your whole system will run. CPU frequency is very important. However, there are many other factors that play into your total system performance. All of your primary BIOS overclocking revolves around the Base Clock or "bclock" and multipliers. Thebase clock's default speed for all X58 based systems is 133MHz. Typically we shoot for an overclock in the range of 200MHz bclock….but doing that has a major effect on a number of things…
CPU frequency = bclock x CPU clock ratio
This is a biggest change from theold LGA 775 where FSB and multiplier determined the CPU speed. The base clock is similar to the FSB but also has some key differences. The bclock is the basis for all the other frequencies discussed below. So as you increase bclock,you're affecting the speed of many components.
The CPU speed is the primary concern for day to day, noticeable performance gains, but not the only factor that determines how fast your PC will run.
QPI frequency = bclock x QPI clock ratio
QPI or Quick Path Interconnect isthe Intel communication path between the CPU and the X58 chipset on themotherboard. So all devices not controlled on the CPU die itself have to communicate with the CPU via the QPI. For instance, the memory controller inbuilt into the CPU, so the memory bandwidth is not limited by the QPI, it hasit's own direct link to the CPU. However, the PCIe controller is located on the X58 chipset, all of your storage devices, NICs, audio devices, USB devices,etc….they all have to communicate with the CPU via the QPI.
The good news here is that Intelcreated the QPI for CPU to CPU communications for use in multi CPU servers for the enterprise market. That means the bandwidth they built in is HUGE, and inreference to overclocking, higher QPI speeds don't affect performance enough tonotice in day to day activities. So I never run the QPI clock ratio beyond x36,with the bclock at 200MHz this would result in the QPI running at 7.2GHz whichis plenty for anything you might throw at it.
Uncore frequency = bclock x uncore clock ratio
Uncore is everything on the die that is not "core", primarily, the memory controller and the L3 cache. It'si mportant to note that the L3 cache performance can have a major performance impact in many applications. If you're trying to get very high overclocks onyour memory or if you are running large quantities of memory, or if you haveall six slots utilized, you may need to compensate by giving the memorycontroller extra juice, ant that would be done in the form of VTT voltage.
Bloomfield require the uncore frequency to be, at a minimum, double that of the DDR speed. So if you are trying to get your memory to run at DDR3-2000, you'll need to have your uncore running at 4000MHz minimum.
With Gulftown based CPU's the requirement is only x1.5 the DDR speed. For instance, if you want to run your memory at DDR3-2000, then you'll need to have your uncore running at 3000MHz minimum.
Memory frequency = bclock x System MemoryMultiplier (SPD)
Memory is shown in the BIOS as amultiplier of 6, 8, 10, etc… This represents the multiplier to reach the DDRspeed. So, a stock 133MHz bclock with the multiplier of 8 would result in amemory speed of DDR3-1066.
DDR – The other part that can bequite confusing for users who are not familiar with DDR technology is the difference between the memory clock speed and the memory's DDR speed. For instance, DDR3-1600 actually runs at 800MHz, it's just that DDR (or dual data rate) technology allows the memory to process twice per clock cycle. Back whenwe switched technologies from SDRAM to DDR for the first time, the manufacturers started saying DDR-400 when it ran at 200MHz because it was better marketing to sell their memory over the older SDRAM technology. This iswhy CPU-Z shows 800MHz for your DDR3-1600, or 1000MHz for your DDR3-2000.
Memory speed and bandwidth can have a huge effect in some applications, and negligible impact on others. Butoverall, top shelf memory is one of the worse items you can spend your money on from a value perspective. Faster CPUs and GPUs will give you much moreperformance for your hard earned cash.
Important Voltages when Overclocking
There a few important voltages which you will need to manipulate while overclocking, below are the main ones. Not every motherboard BIOS is identical, but all enthusiast level motherboards should provide control of the voltages as shown below.
CPU Vcore – Directly related tothe CPU frequency. As you increase the CPU frequency you would need incrementally increase the v-core as well. Bloomfield has proven to be extremely durable and I ran a number of Bloomfield CPU's through the gauntletand back with very high vcore. Everyone continues to ask what is "safe", andI'll continue my previous suggestion that a safe voltage for you system shouldbe determined by your LOADED CPU core temperatures. So, while you are stresstesting, monitor your CPU core temperatures with Real Temp and if thetemperature is under control, you can SAFELY increase the voltage. So, the next logical question is what is a safe temperature, and Intel says 100C, and that'swhat I go by.
Nothing I've ever used my computer for come close to generating heat like IntelBurnTest configured to use all threads. Because itgenerates so much heat, it has become my favorite stress testing application. As long as I can keep my CPU cores below 100C while running IntelBurnTest, then for me that's safe. If you are more conservative/cautious than me that's perfectly OK. IntelBurnTest at default will only spawn one thread foreach physical core, so if you have HyperThreading support enabled on your CPU,please manuall select the number of threads in the drop-down box corrospondingto your CPUs thread count. From this point forward I will use the terminology IntelBurnTest (maximum) to remind you to manually configurethe thread count if your CPU has HyperThreading enabled.
QPI/VTT voltage – This is the uncore voltage. Remember that the primary uncore devices are the L3 cache andthe memory controller. This is also the primary adjustment required to increasebclock frequency. Again, for Bloomfield I personally wouldn't hesitate to runmine up to about 1.45V on air 24/7. For Gulftown I don't like to go over 1.4Vfor daily use.
DRAM voltage – This is directly related to your RAM modules and increases will allow increase in MEM speeds.There has been a lot of debate as to the limitation 1.65V limitation Intel has published. For quite a while users have been running much higher DRAM voltage without ill effect. The justification has always been that the default VTT is 1.15V and the DRAM voltage has to stay within 0.5V of the VTT. I have always played by that rule, although many power users have questioned whether it'sneeded or not. Doesn't really matter to me, because I usually run VTT at 1.3Vminimum which would allow me to run DRAM voltage up to 1.8V without breaking the rule, and 1.8V is plenty for most memory on the market these days.
Whether or not it's necessary I'm not going to debate here, but it's an easy rule to follow, and it's stood the test of time that you can safely run your DRAM voltage up to VTT +0.5V
Sample overclocking goals to use as a reference
I keep going back and forth with this guide trying to make it easy to read for everyone, and yet still relevant to anyone's personal goal. Sometimes as I'm typing away, I feel like I'm over explaining things over and over and that it'll cause more confusion than clarity. So, for clarity, as you read the guide, I'll be referring to the following thee sample goals and hopefully that'll allow my explanations to be alittle more concise.
1. Sample #1 – Easy/budget OC – Intel Core i7 920,DDR3-1333 CAS7
Bclock freq goal = 180MHz
CPU freq goal = 3.6GHz
Memory speed goal = DDR3-1440 (uncore @ 2880MHz)
***This OCshould be possible with the stock Intel cooler and minimal voltage increases***
2. Sample #2 – Moderate/midrange OC – Intel Core i7930, DDR3-2000 CAS9
Bclock freq goal = 200MHz
CPU freq goal = 4.2GHz
Memory speed goal = DDR3-2000 (uncore @ 4000MHz)
***This OCwill require high end air cooling at a minimum and moderate voltageincreases***
3. Sample #3 – Hardcore/high end OC – Intel Core i7970, DDR3-2400 CAS9
Bclock freq goal = 200MHz
CPU freq goal = 4.6GHz
Memory speed goal = DDR3-2400 (uncore @ 3600MHz)
***This OCmay require water cooling or better and moderate to high voltage increases***
Step 1) Maximize Bclock & uncore Frequency
I would start by entering the BIOS and select "load optimizeddefaults", then save and exit. After the reboot, go back into the BIOS and turnoff the start-up slash screen, so that you can view your system's post behavior. Also, feel free to disable any "integrated peripherals" that will notbe used (i.e. NICs, extra PATA/SATA controllers, legacy devices, etc). All other overclocking settings you can leave on auto for now.
If you are looking for your maximum overclock, and you're not concerned with power consumption, disable all power saving features. These include, but are not limited to; EIST, C1E, andall other C-states.
Isolate the bclock from the CPU
First you need to isolate the bclock, because all other major devices derive their frequencies from thebclock, it's the logical starting point. In order to isolate the bclock from the other components, the first thing you need to do is manually force a low multiplier for the CPU.
Sample #1, #2, and #3 – set the CPU clock ratio to x15
Isolate the bclock from the memory
Just like the CPU, the memory receives its clock from the bclock via a multiplier, in this case the defaultis 8 (133×8 = DDR3-1066). This is expressed in the BIOS as "8″. For now, wewant to drop that down a bit.
Sample #1, #2, and #3 – set the memory to 6
In all sample system, the IMC isthe limiting factor, and we don't want to push it up yet, that is the reasonfor all three to be set at 6 for this step, don't worry it won't be there forlong.
Lock in your desired uncore clock ratio
As previously mentioned, the uncore clock ratio must be set to double the System Memory Multiplier (SPD)with Bloomfield and 1.5 times the memory multiplier with Gulftown. In thisstep, set the uncore clock ratio based on your desired System Memory Multiplier(SPD) (not the temporary memory multiplier we're using right now).
Sample #1 – set the uncore clockratio to x16
Sample #2 – set the uncore clockratio to x20
Sample #3 – set the uncore clockratio to x18
bclock voltages
For this step, there are only two voltages you should play with; VTT, and IOH Core. IOH Core voltage is easy, ifyou are running a single PCIe card (graphics card), give the IOH Core 1.1V, twographics cards 1.15V, three graphics cards 1.2V, or four graphics cards 1.25V. If you plan to run bclock frequencies far beyond 200MHz, sometimes it may helpfor the IOH core to be even higher.
As mentioned above, QPI/VTT isthe crucial voltage adjustment for achieving high bclock stability. DefaultQPI/VTT is 1.15V and to reach 200MHz bclock you'll likely need to increase this to at least 1.2V, many CPUs will require 1.3V or more. The only way to know is to follow the instructions here and find out.
For all three sample systems, start by setting the QPI/VTT voltage to1.2V.
First overclock!
Go into the BIOS and set the CPUClock Ratio, the Uncore Clock Ratio, and the System Memory Multiplier (SPD) tothe setting we just decided on in the previous sections. Then go to the voltages section and adjust your IOH Core and your QPI/VTT voltages. Then restart your machine and go back into the BIOS, if your system fails to post,start a new thread in the forums and ask for some specific help. Please be sure to include as many details as possible when posting in the forums, and post apicture of the specific problem if possible.
After you've restarted yoursystem with your manually configured voltages and returned to the BIOS, adjustthe bclock speed from 133MHz to 150MHz. Then save and exit and allow the systemto reboot. This time, allow the system to boot fully into the operating system.
Testing for highest stable bclock frequency
Once the operating system hasfully loaded, start up RealTemp. RealTemp shouldalways be running while checking for stability of an overclocked system toensure you do not overheat your CPU. RealTemp shows your CPU's coretemperatures real-time. Now start up CPU-Z, this utility will allow youto ensure that your overclocked settings have been properly applied, and thatyou are running at your desired speed. Check both the CPU tab for the expectedCPU frequency, and check the memory tab to ensure your memory and uncore areboth running at the appropriate speed. At this point the sample systems shouldeach show up in CPU-Z with the following speeds.
Sample #1 – CPU = 2250MHz,uncore = 2400MHz, memory = 450MHz
Sample #2 – CPU = 2250MHz,uncore = 3000MHz, memory = 450MHz
Sample #3 – CPU = 2250MHz,uncore = 2700MHz, memory = 450MHz
***Note***, if you have SpeedStep("EIST") enabled, the CPU speed will fluctuate in CPU-Z when the load changes,please verify values given above WHILE RUNNING YOUR STRESS TEST.
Now start up your selected testprogram, for example OCCT (mix) or IntelBurnTest (maximum). Run the test for just a shortamount of time, I usually try to run 3 loops with IntelBurnTest (maximum). Then reboot the system and returnto the BIOS.
1. If the test ran without error, raise thebclock by 10MHz, reboot into your OS and run the test again.
2. Ifthe test failed, raise the QPI/VTT voltage by 0.025V, reboot into your OS andrun the test again.
Continue to repeat this testingfollowing the two procedures above, until you meet one of the following threecriteria:
· You reach the same bclock speed you identifiedin step one and successfully pass your stability test.
· You reach your maximum safe QPI/VTT voltage (asidentified above)
· Raising the QPI/VTT voltage is ineffective instabilizing the system.
* Note – there is a phenomena known as "bclock holes" that may createconfusion and frustration during this process. But if you appear to have foundyour limit at a much lower speed than anticipated, please consider trying astep or two higher before continuing on. A bclock hole cause's systeminstability within particular bclock ranges, and going past them may allow youto regain stability.
Fine tuning
After you have met one of thecriteria above, you should have a rough idea of your bclock limit, now it'stime to get a little more fine tuned. So, revert back to the highest speed THATPASSED the stress test. Then continue the same procedure as before, but insteadof 10MHz bclock changes, shift to 2MHz changes until you meet one of the threecriteria again. Also, ensure you check my note about "bclock holes" above, thesame concept can be applied to this fine tuning step as well.
After you have found your higheststable speed to within 2MHz accuracy, lower the bclock by 2MHz and run yourtest again. This time let the test run for a full hour. If it passes the test -Congratulations!– you have found your highest reasonably stable bclock frequency. If itdoes not pass, drop the bclock 2MHz and attempt the full hour long test again,continue to lower the bclock in 2MHz increments until the one hour test willpass.
For the purpose of this guide,I'm going to assume you met the goal as provided in one of the 3 sample systemslisted above.
<br style="page-break-before: always; mso-special-character: line-break;" clear="all">
Step 2) Optimize Memory Frequency & Uncore
System Memory Multiplier (SPD)
The next step is to find thelimit of your memory. In order to do this, we need to prepare you to meet yourmemory overclocking goal. Start off this step be entering the BIOS and settingthe bclock frequency back to 150MHz. Because we have already been through therange of bclocks from 150MHz to 200MHz (or whatever YOU reached), we alreadyknow that the bclock and uncore will be stable with these settings. So thateffectively allows you to go back through the same range again, changing onlythe variable of memory, so that you'll KNOW that that any instability is memoryrelated.
To do that you need to changeyour System Memory Multiplier (SPD) to a ratio that will allow you to push theblcock back up to your goal, whichout exceeding the memory's rated speed. Also,manually configure the memory timings according to the manufacturer'sspecifications. There will probably be many sub-timings in your BIOS that youcould change, but only change the timings specified by the manufacturer, theothers leave on auto.
Lets look at the sample systemsfor an example, for those systems you would configure the System MemoryMultiplier (SPD) as follows.
Sample #1 – set the SystemMemory Multiplier (SPD) to 8
Sample #2 – set the System MemoryMultiplier (SPD) to 10
Sample #3 – set the SystemMemory Multiplier (SPD) to 12
For the sample system #1, the goal is 180MHz bclock, the multiplier is8, and the memory is rated at DDR3-1333. If we were successful in reaching the180MHz bclock goal, the memory would be at 180×8 = DDR3-1440. This is about an8% OC and within the 10% I recommend limiting yourself to for this step.
For the sample system #2, thegoal is 200MHz bclock, the multiplier is 10, and the memory is rated atDDR3-2000. If we were successful in reaching the 200MHz bclock goal, the memorywould be at 200×10 = DDR3-2000. This is the memory's rated speed and within the10% I recommend limiting yourself to for this step.
For the sample system #3, thegoal is 200MHz bclock, the multiplier is 12, and the memory is rated atDDR3-2400. If we were successful in reaching the 200MHz bclock goal, the memorywould be at 200×12 = DDR3-2400. This is the memory's rated speed and within the10% I recommend limiting yourself to for this step.
In the same way, set yourmultiplier according to your goal, so as to prevent more than a 10% overclockon your memory. As a generalization, memory rated at lower speeds typically hasmore overclocking potential than higher rated memory. My suggestion for now isto focus on getting the IMC overclocked to the memory's rated speed (causeremember, the IMC is only rated to run at DDR3-1066).
Instead of overclocking memory, Iplace a higher value on tightening up timings. Take sample #2 from above, ithas DDR3-2000 CAS9 memory. You'll get better day-to-day performance out of thatmemory by tightening the timings down to CAS8 level, as opposed to overclockingthe speed to DDR3-2100…..not only that, but tightening the timings is almostalways easier than increasing the speed. Again, I'm not going to get intodetail here because tangible differences on a daily system will not exist.
DRAM voltages
There are two voltages we need tofocus on in this section, the QPI/VTT voltage you've already become familiarwith, and the DRAM voltage itself. QPI/VTT is already high enough to supportyour bclock and uncore goals, but as we push up the speed of the IMC (which isalso part of the uncore), the QPI/VTT voltage may need a bit more. This isespecially true if you are running with all 6 memory slots populated, or ifyou're using newer 4GB DIMMs, these configurations can put a lot of addedstress on the IMC and require extra QPI/VTT voltage to retain stability. Forall three sample systems, set the DRAM voltage manually to 1.65V (or 1.66V if1.65V is not possible).
Testing for highest stable memory frequency
Now start up your selected testprogram, for example OCCT (RAM) or IntelBurnTest (maximum). Run the test for just a shortamount of time, I usually try to run 3 loops with IntelBurnTest (maximum). Then reboot the system and returnto the BIOS.
1. If the test ran without error, raise thebclock by 10MHz, reboot into your OS and run the test again.
2. Ifthe test failed, raise the QPI/VTT voltage by 0.0125V, reboot into your OS andrun the test again.
Continue to repeat this testingfollowing the two procedures above, until you meet one of the following threecriteria:
· You reach the same bclock speed you identifiedin step one and successfully pass your stability test.
· You reach your maximum safe QPI/VTT voltage (asidentified above)
· Raising the QPI/VTT voltage is ineffective instabilizing the system.
Just as you did in step one, ifneeded you can follow the same procedure for fine tuning here.
After you have reached yourdesired goal, be sure to test the overclock with another one hour pass of yourselected stability test to ensure the entire uncore is happy with the currentconfiguration. However, I would add one additional stability test at thispoint, memtest86+.IntelBurnTest and OCCT (RAM) areboth very good at identifying IMC and memory error, but neither are asstrenuous testing the DRAM modules as memtest. It's a good way to verify thatthe memory modules are not defective, and will operate without error. Run atleast one pass, or for 1 hour, whichever is greater.
Congratulations! - Younow have a relatively stable bclock frequency and memory frequency.
<br style="page-break-before: always; mso-special-character: line-break;" clear="all">
Step 3) Stabilize CPU Frequency
Almost there
The last step in this guide isoften the first step for users who run into problems and then troubleshoot fordays afterward. Leaving it to the last step makes the task much simpler. Younow have the following settings locked in; QPI/VTT voltage, IOH Core voltage,memory voltage, QPI clock ratio, memory ratio, and memory timings. That meanswhen we are looking for our highest CPU frequency, there are only two variableswe need to play with: bclock and CPU voltage.
Please start by entering the BIOSand adjust the bclock back down to 150MHz, then adjust the CPU clock ratio asfollows.
Sample #1 – set the CPU clockratio to x20
Sample #2 – set the CPU clockratio to x21
Sample #3 – set the CPU clockratio to x23
Load-line calibration ("LLC")
This actually goes by a fewdifferent names, but they are all meant as a means to reduce or preventv-droop. It does typically ease the overclocking process at the cost ofviolating Intel's design specs. However, overclocking in its essence violatesIntel's design specs, so you're not breaking any new ground with this feature.I highly recommend enabling this feature. High end Gigabyte motherboards have twosettings, select "Level 2". For more insight on the theory of LLC, refer tothis excellent explanation at anandtech.com.There was also some real world testing recently; feel free to check out Bobnova's LLCinvestigation here.
CPU Vcore
That brings us to the first thingthat most users want to play with after powering up their new system for thefirst time: CPU voltage, aka "Vcore". As you can see, this is actually one ofthe last things you should be changing. I would recommend starting at a niceand easy 1.2V. Surprisingly enough, many users are able to achieve very goodoverclocks with this modest amount of CPU voltage. I would be surprised ifsample #1 needed any more than that, sample #2 probably need a bit more, andsample #3 will probably need quite a bit more.
If you are overclocking withpower saving features enabled, Gigabyte motherboards will allow you to set theCPU voltage via "Dynamic Vcore" which improves overclocking capabilities whileusing your power saving features….to unlock this feature; first you have to setthe standard Vcore setting to "normal". Then set the "Dynamic Vcore" setting to+0.05 and increase as directed below.
Testing for your highest stable CPU frequency
Once the operating system hasfully loaded, start up RealTemp. Now start up CPU-Z and verify that youroverclocked settings have been properly applied, and that you are running atyour desired CPU, bclock, and memory frequencies. Each of the sample systemsshould look like this.
Sample #1 – CPU = 3000MHz, uncore = 2400MHz, memory = 600MHz
Sample #2 – CPU = 3150MHz, uncore = 3000MHz, memory = 750MHz
Sample #3 – CPU = 3450MHz, uncore = 2700MHz, memory = 900MHz
***Note***, if you have SpeedStep("EIST") enabled, the CPU speed will fluctuate in CPU-Z and the load changes,please verify values given above WHILE RUNNING YOUR STRESS STEST.
Now start up your selected testprogram, for example OCCT (CPU) or IntelBurnTest (maximum). Run the test for just a shortamount of time, I usually try to run 3 loops with IntelBurnTest (maximum). Then reboot the system and returnto the BIOS.
1. Ifthe test ran without error, raise the bclock by 10MHz, reboot into your OS andrun the test again.
2. Ifthe test failed, raise the CPU Vcore voltage by 0.025V, reboot into your OS andrun the test again.
Continue to repeat this testingfollowing the two procedures above, until you meet one of the following threecriteria:
· You reach the same bclock speed you identifiedin step one and successfully pass your stability test.
· You reach your maximum safe Vcore (as identifiedabove), or maximum safe temperature.
· Raising the Vcore is ineffective in stabilizingthe system.
Just as you did in step one, ifneeded you can follow the same procedure for fine tuning here.
Is it stable?
So, once you find your highestCPU frequency by meeting one of the criteria above, and run OCCT (mix) or IntelBurnTest (maximum) for one hour minimum. I'd like torefer to all this testing as "reasonably stability". In my experience, the truetest of stability is the regular daily operation of your system, doing what youintended it to do.
The reason we use testingprograms like OCCTor IntelBurnTest is to simulate a worst case scenario. I havenever seen any real world application come close to generating the heat that IntelBurnTest (maximum) generates. But there are a few thatcan come close to OCCT, like folding or crunching for distributed computingprojects, encoding high definition videos, or very heavy multitasking. But eventhough OCCTor IntelBurnTest (maximum) stress tests tend to generate moreheat, they do not always find 100% of instabilities. In my opinion, theultimate test is to use the system!
Final Words
Well, that about wraps it up.Believe me, there is so much more to overclocking. There are SO MANY settingsyou can continue to fiddle with, you may have a million questions at this pointabout all of the settings in the BIOS that we never touched. They're validquestions, but not meant for this guide. My goal was for this guide to get you95% of the way in 5% off the time. Hopefully you're there! The other settingsin your BIOS will be needed to get you to 100%….but if I included those thingsin this guide, it would be 3 times as long, and much more complicated.
Please feel free to comment, andpost any questions in the Intelsection of the techreation forums. The community is the best resource tocontinue pushing your system beyond this guide. Post a new thread with a verydetailed description of which part of the guide you are having problems with,how far your progressed through the steps, and screenshots to help usunderstand the problem your encountering if necessary. We will do our best tohelp you out with any problems you may encounter!
http://forum.overclo...ssin-overclock/
This guild was writen by MaiHallen on another website.
Introduction
So many users are searching around the net these days looking for advice on how to overclock their new systems but don't know where to start. To help everyone out, I decided a how-tog uide was in order. Searching around forums can be confusing and intimidating.There are so many people willing to give advice, but who can you trust? It's hard to know, and I've seen many users sent on wild goose chases because theyare following advice that doesn't solve or even address their specific problem. I've also seen too much trial and error overclocking, unless you get lucky it tends to be far too time consuming a frustrating. What I've attempted to do is create a very simple three step guide for overclocking Bloomfield and Gulftownbased CPUs. If you want to continue searching out other opinions, please consider each suggestion with caution. Some will undoubtedly be great, somewill not.
Disclaimer
I am not responsible for any bad things that happen to you or your computer as a result of you following this guide, nor is techreaction.net. My goal is for this guide to be a safe overclocking guideline, but the burden for damaged hardware lies on the user performing the overclock! Overclocking can damage hardware and in most caseswill void your warranties.
Prerequisites
In an earlier version of this guide, I requested that you have some basic knowledge of your motherboards BIOS. While I have not addressed every motherboard on the market, I have included details for the top enthusiastbrands. But as before, please do not be afraid to get into your BIOS and have alook around, if you are ever concerned that you may have changed a setting erroneously, you can always load defaults, and start over. Most boards have a CMOS reset button on them now-a-days, if not check your user manual for the location of the CMOS reset jumper…please ensure you know the location beforegetting started.
This guide is independent of your cooling system. Whether you are using the stock Intel cooler or if you're pushing to the extreme with phase change cooling, the basic steps remain the same. One thing that is far too common are mistakes mounting your cooling system, specifically the application of the thermal interface material (TIM).If you don't have much experience mounting cooling apparatus, please refer tothis excellent guide from Arctic Silver.
Methodology
Determining methods for finding a stable overclock are highly controversial, everyone has their own definition of a stable system, but when I refer to "stable" in this guide, I am referring to the stability of your selected "stability test." So for a power user or gamerwho wants a reliable system that won't ever crash due to an overclock pushedtoo far, you'd need to test with a program that will load all of the cores and threads applicable to your CPU, OCCT and IntelBurnTest are two popular choices. OCCT uses the same algorithm as Prime95 but has a more friendly interface. IntelBurnTest uses the Intel linpak binaries to stress the system and also has an easy to use interface. In this guide I may use testing this is insufficient in your opinion. It is only a guidline and if you feel more testing is necessary for your system, by all means feel free.
So with that in mind, we will attempt to isolate each portion of the system and overclock one step at a time.This may seem time consuming at first glance, but rest assured this will potentially save you hours of troubleshooting and frustration. So go slow, andfollow each step very carefully.
BIOS familiarization
If you've found my guide online, my guess is you're looking for more than a basic overclock. If you're not, and all you'd like is something simple, please redirect your attention to your motherboard manufacturer's website and download the latest overclockingutility. For basic 10-20% overclocking, they work pretty well. There is "Gigabyte EasyTune6", "Asus TurboV EVO", "MSIControl Center", and "eVGAeleet". This guide is written to take it to the next level, for THAT we need to do the overclocking from the BIOS.
Speaking of which, before we begin, please check your motherboard manufacturer's website for the latest version of your BIOS. Usually enthusiast level boards will have BIOS engineers tweaking them for months or years to improve overclocking support. Unless youhave a reason to stay with your current BIOS, I'd update to the newest version.
If you don't know how to accessthe BIOS, please refer to your motherboard's owner's manual for instruction.While you're there, find out how to "clear CMOS". As I mentioned in the introduction to this guide, it's important you know how to properly "clearCMOS" before we begin.
Secondly, the first thing to do after powering up the new system is to enter the BIOS and find the "hardware monitor" area and verify the CPU temperature is reasonable based on your cooling. If not, please power down the system and verify the mounting of your cooling apparatus (refer to the guide linked in the "prerequisites" section above).
Goals
The variety of users reading this guide is vast, and each user's goal will be unique and specific to his/herneeds. It would be impossible for me to address every user's specific needs. But I've attempted to be as broad, yet specific as possible. My goal is to assist the maximum number of users as possible, despite your specific needs.
Based on user feedback from the previous version of this guide, I decided to better address overclocking withpower features enabled. The easy answer was to follow the old guide and then attempt to enable your power features afterward, but that rarely worked when approaching the limits of a given system.
Just as before, if you want to maximize your overclock, you should disable all the power saving features inthe BIOS as detailed in step 1. However, if you're after a more moderate overclock, and you'd like to save power (especially while your system sitsidle) you can leave those setting enabled. Just follow the guide as written(I've added tips for you along the way) to find your best settings. While yourpotential overclock will be more limited, the bennefit will likely be worth it to many of you.
Terminology
I'd like to start off by writingbriefly about the BIOS and more specifically, differences in terminology between the different manufacturers. Obviously there are too many motherboards on the market to show you every single one in this guide. But looking at boards from the four top manufactures, we should be able to better identify specific terminologies used by each.
Below I've created a tablecomparing the terminology used by the four major enthusiast motherboardmanufacturers.
A comparison of BIOS terminologyused by four top manufacturers
***A brief note about Asus. Asus makes multipliers a little moreconfusing in this guide because the BIOS doesn't show the ratios at all, theyonly show the speed of the item based on the bclock set. This requires a little additional math on your part while using this guide. Please be aware of this difference as you progress***
Throughout this guide, I'll be referring to the terminology used by Gigabyte because it is most familiar tome. This top section is to be used for reference so that you know what I'mreferring to you when your BIOS options don't match my instructions.
Understanding "total system performance"
Before we go into how we overclock these CPU's let us look at what determines how fast your whole system will run. CPU frequency is very important. However, there are many other factors that play into your total system performance. All of your primary BIOS overclocking revolves around the Base Clock or "bclock" and multipliers. Thebase clock's default speed for all X58 based systems is 133MHz. Typically we shoot for an overclock in the range of 200MHz bclock….but doing that has a major effect on a number of things…
CPU frequency = bclock x CPU clock ratio
This is a biggest change from theold LGA 775 where FSB and multiplier determined the CPU speed. The base clock is similar to the FSB but also has some key differences. The bclock is the basis for all the other frequencies discussed below. So as you increase bclock,you're affecting the speed of many components.
The CPU speed is the primary concern for day to day, noticeable performance gains, but not the only factor that determines how fast your PC will run.
QPI frequency = bclock x QPI clock ratio
QPI or Quick Path Interconnect isthe Intel communication path between the CPU and the X58 chipset on themotherboard. So all devices not controlled on the CPU die itself have to communicate with the CPU via the QPI. For instance, the memory controller inbuilt into the CPU, so the memory bandwidth is not limited by the QPI, it hasit's own direct link to the CPU. However, the PCIe controller is located on the X58 chipset, all of your storage devices, NICs, audio devices, USB devices,etc….they all have to communicate with the CPU via the QPI.
The good news here is that Intelcreated the QPI for CPU to CPU communications for use in multi CPU servers for the enterprise market. That means the bandwidth they built in is HUGE, and inreference to overclocking, higher QPI speeds don't affect performance enough tonotice in day to day activities. So I never run the QPI clock ratio beyond x36,with the bclock at 200MHz this would result in the QPI running at 7.2GHz whichis plenty for anything you might throw at it.
Uncore frequency = bclock x uncore clock ratio
Uncore is everything on the die that is not "core", primarily, the memory controller and the L3 cache. It'si mportant to note that the L3 cache performance can have a major performance impact in many applications. If you're trying to get very high overclocks onyour memory or if you are running large quantities of memory, or if you haveall six slots utilized, you may need to compensate by giving the memorycontroller extra juice, ant that would be done in the form of VTT voltage.
Bloomfield require the uncore frequency to be, at a minimum, double that of the DDR speed. So if you are trying to get your memory to run at DDR3-2000, you'll need to have your uncore running at 4000MHz minimum.
With Gulftown based CPU's the requirement is only x1.5 the DDR speed. For instance, if you want to run your memory at DDR3-2000, then you'll need to have your uncore running at 3000MHz minimum.
Memory frequency = bclock x System MemoryMultiplier (SPD)
Memory is shown in the BIOS as amultiplier of 6, 8, 10, etc… This represents the multiplier to reach the DDRspeed. So, a stock 133MHz bclock with the multiplier of 8 would result in amemory speed of DDR3-1066.
DDR – The other part that can bequite confusing for users who are not familiar with DDR technology is the difference between the memory clock speed and the memory's DDR speed. For instance, DDR3-1600 actually runs at 800MHz, it's just that DDR (or dual data rate) technology allows the memory to process twice per clock cycle. Back whenwe switched technologies from SDRAM to DDR for the first time, the manufacturers started saying DDR-400 when it ran at 200MHz because it was better marketing to sell their memory over the older SDRAM technology. This iswhy CPU-Z shows 800MHz for your DDR3-1600, or 1000MHz for your DDR3-2000.
Memory speed and bandwidth can have a huge effect in some applications, and negligible impact on others. Butoverall, top shelf memory is one of the worse items you can spend your money on from a value perspective. Faster CPUs and GPUs will give you much moreperformance for your hard earned cash.
Important Voltages when Overclocking
There a few important voltages which you will need to manipulate while overclocking, below are the main ones. Not every motherboard BIOS is identical, but all enthusiast level motherboards should provide control of the voltages as shown below.
CPU Vcore – Directly related tothe CPU frequency. As you increase the CPU frequency you would need incrementally increase the v-core as well. Bloomfield has proven to be extremely durable and I ran a number of Bloomfield CPU's through the gauntletand back with very high vcore. Everyone continues to ask what is "safe", andI'll continue my previous suggestion that a safe voltage for you system shouldbe determined by your LOADED CPU core temperatures. So, while you are stresstesting, monitor your CPU core temperatures with Real Temp and if thetemperature is under control, you can SAFELY increase the voltage. So, the next logical question is what is a safe temperature, and Intel says 100C, and that'swhat I go by.
Nothing I've ever used my computer for come close to generating heat like IntelBurnTest configured to use all threads. Because itgenerates so much heat, it has become my favorite stress testing application. As long as I can keep my CPU cores below 100C while running IntelBurnTest, then for me that's safe. If you are more conservative/cautious than me that's perfectly OK. IntelBurnTest at default will only spawn one thread foreach physical core, so if you have HyperThreading support enabled on your CPU,please manuall select the number of threads in the drop-down box corrospondingto your CPUs thread count. From this point forward I will use the terminology IntelBurnTest (maximum) to remind you to manually configurethe thread count if your CPU has HyperThreading enabled.
QPI/VTT voltage – This is the uncore voltage. Remember that the primary uncore devices are the L3 cache andthe memory controller. This is also the primary adjustment required to increasebclock frequency. Again, for Bloomfield I personally wouldn't hesitate to runmine up to about 1.45V on air 24/7. For Gulftown I don't like to go over 1.4Vfor daily use.
DRAM voltage – This is directly related to your RAM modules and increases will allow increase in MEM speeds.There has been a lot of debate as to the limitation 1.65V limitation Intel has published. For quite a while users have been running much higher DRAM voltage without ill effect. The justification has always been that the default VTT is 1.15V and the DRAM voltage has to stay within 0.5V of the VTT. I have always played by that rule, although many power users have questioned whether it'sneeded or not. Doesn't really matter to me, because I usually run VTT at 1.3Vminimum which would allow me to run DRAM voltage up to 1.8V without breaking the rule, and 1.8V is plenty for most memory on the market these days.
Whether or not it's necessary I'm not going to debate here, but it's an easy rule to follow, and it's stood the test of time that you can safely run your DRAM voltage up to VTT +0.5V
Sample overclocking goals to use as a reference
I keep going back and forth with this guide trying to make it easy to read for everyone, and yet still relevant to anyone's personal goal. Sometimes as I'm typing away, I feel like I'm over explaining things over and over and that it'll cause more confusion than clarity. So, for clarity, as you read the guide, I'll be referring to the following thee sample goals and hopefully that'll allow my explanations to be alittle more concise.
1. Sample #1 – Easy/budget OC – Intel Core i7 920,DDR3-1333 CAS7
Bclock freq goal = 180MHz
CPU freq goal = 3.6GHz
Memory speed goal = DDR3-1440 (uncore @ 2880MHz)
***This OCshould be possible with the stock Intel cooler and minimal voltage increases***
2. Sample #2 – Moderate/midrange OC – Intel Core i7930, DDR3-2000 CAS9
Bclock freq goal = 200MHz
CPU freq goal = 4.2GHz
Memory speed goal = DDR3-2000 (uncore @ 4000MHz)
***This OCwill require high end air cooling at a minimum and moderate voltageincreases***
3. Sample #3 – Hardcore/high end OC – Intel Core i7970, DDR3-2400 CAS9
Bclock freq goal = 200MHz
CPU freq goal = 4.6GHz
Memory speed goal = DDR3-2400 (uncore @ 3600MHz)
***This OCmay require water cooling or better and moderate to high voltage increases***
Step 1) Maximize Bclock & uncore Frequency
I would start by entering the BIOS and select "load optimizeddefaults", then save and exit. After the reboot, go back into the BIOS and turnoff the start-up slash screen, so that you can view your system's post behavior. Also, feel free to disable any "integrated peripherals" that will notbe used (i.e. NICs, extra PATA/SATA controllers, legacy devices, etc). All other overclocking settings you can leave on auto for now.
If you are looking for your maximum overclock, and you're not concerned with power consumption, disable all power saving features. These include, but are not limited to; EIST, C1E, andall other C-states.
Isolate the bclock from the CPU
First you need to isolate the bclock, because all other major devices derive their frequencies from thebclock, it's the logical starting point. In order to isolate the bclock from the other components, the first thing you need to do is manually force a low multiplier for the CPU.
Sample #1, #2, and #3 – set the CPU clock ratio to x15
Isolate the bclock from the memory
Just like the CPU, the memory receives its clock from the bclock via a multiplier, in this case the defaultis 8 (133×8 = DDR3-1066). This is expressed in the BIOS as "8″. For now, wewant to drop that down a bit.
Sample #1, #2, and #3 – set the memory to 6
In all sample system, the IMC isthe limiting factor, and we don't want to push it up yet, that is the reasonfor all three to be set at 6 for this step, don't worry it won't be there forlong.
Lock in your desired uncore clock ratio
As previously mentioned, the uncore clock ratio must be set to double the System Memory Multiplier (SPD)with Bloomfield and 1.5 times the memory multiplier with Gulftown. In thisstep, set the uncore clock ratio based on your desired System Memory Multiplier(SPD) (not the temporary memory multiplier we're using right now).
Sample #1 – set the uncore clockratio to x16
Sample #2 – set the uncore clockratio to x20
Sample #3 – set the uncore clockratio to x18
bclock voltages
For this step, there are only two voltages you should play with; VTT, and IOH Core. IOH Core voltage is easy, ifyou are running a single PCIe card (graphics card), give the IOH Core 1.1V, twographics cards 1.15V, three graphics cards 1.2V, or four graphics cards 1.25V. If you plan to run bclock frequencies far beyond 200MHz, sometimes it may helpfor the IOH core to be even higher.
As mentioned above, QPI/VTT isthe crucial voltage adjustment for achieving high bclock stability. DefaultQPI/VTT is 1.15V and to reach 200MHz bclock you'll likely need to increase this to at least 1.2V, many CPUs will require 1.3V or more. The only way to know is to follow the instructions here and find out.
For all three sample systems, start by setting the QPI/VTT voltage to1.2V.
First overclock!
Go into the BIOS and set the CPUClock Ratio, the Uncore Clock Ratio, and the System Memory Multiplier (SPD) tothe setting we just decided on in the previous sections. Then go to the voltages section and adjust your IOH Core and your QPI/VTT voltages. Then restart your machine and go back into the BIOS, if your system fails to post,start a new thread in the forums and ask for some specific help. Please be sure to include as many details as possible when posting in the forums, and post apicture of the specific problem if possible.
After you've restarted yoursystem with your manually configured voltages and returned to the BIOS, adjustthe bclock speed from 133MHz to 150MHz. Then save and exit and allow the systemto reboot. This time, allow the system to boot fully into the operating system.
Testing for highest stable bclock frequency
Once the operating system hasfully loaded, start up RealTemp. RealTemp shouldalways be running while checking for stability of an overclocked system toensure you do not overheat your CPU. RealTemp shows your CPU's coretemperatures real-time. Now start up CPU-Z, this utility will allow youto ensure that your overclocked settings have been properly applied, and thatyou are running at your desired speed. Check both the CPU tab for the expectedCPU frequency, and check the memory tab to ensure your memory and uncore areboth running at the appropriate speed. At this point the sample systems shouldeach show up in CPU-Z with the following speeds.
Sample #1 – CPU = 2250MHz,uncore = 2400MHz, memory = 450MHz
Sample #2 – CPU = 2250MHz,uncore = 3000MHz, memory = 450MHz
Sample #3 – CPU = 2250MHz,uncore = 2700MHz, memory = 450MHz
***Note***, if you have SpeedStep("EIST") enabled, the CPU speed will fluctuate in CPU-Z when the load changes,please verify values given above WHILE RUNNING YOUR STRESS TEST.
Now start up your selected testprogram, for example OCCT (mix) or IntelBurnTest (maximum). Run the test for just a shortamount of time, I usually try to run 3 loops with IntelBurnTest (maximum). Then reboot the system and returnto the BIOS.
1. If the test ran without error, raise thebclock by 10MHz, reboot into your OS and run the test again.
2. Ifthe test failed, raise the QPI/VTT voltage by 0.025V, reboot into your OS andrun the test again.
Continue to repeat this testingfollowing the two procedures above, until you meet one of the following threecriteria:
· You reach the same bclock speed you identifiedin step one and successfully pass your stability test.
· You reach your maximum safe QPI/VTT voltage (asidentified above)
· Raising the QPI/VTT voltage is ineffective instabilizing the system.
* Note – there is a phenomena known as "bclock holes" that may createconfusion and frustration during this process. But if you appear to have foundyour limit at a much lower speed than anticipated, please consider trying astep or two higher before continuing on. A bclock hole cause's systeminstability within particular bclock ranges, and going past them may allow youto regain stability.
Fine tuning
After you have met one of thecriteria above, you should have a rough idea of your bclock limit, now it'stime to get a little more fine tuned. So, revert back to the highest speed THATPASSED the stress test. Then continue the same procedure as before, but insteadof 10MHz bclock changes, shift to 2MHz changes until you meet one of the threecriteria again. Also, ensure you check my note about "bclock holes" above, thesame concept can be applied to this fine tuning step as well.
After you have found your higheststable speed to within 2MHz accuracy, lower the bclock by 2MHz and run yourtest again. This time let the test run for a full hour. If it passes the test -Congratulations!– you have found your highest reasonably stable bclock frequency. If itdoes not pass, drop the bclock 2MHz and attempt the full hour long test again,continue to lower the bclock in 2MHz increments until the one hour test willpass.
For the purpose of this guide,I'm going to assume you met the goal as provided in one of the 3 sample systemslisted above.
<br style="page-break-before: always; mso-special-character: line-break;" clear="all">
Step 2) Optimize Memory Frequency & Uncore
System Memory Multiplier (SPD)
The next step is to find thelimit of your memory. In order to do this, we need to prepare you to meet yourmemory overclocking goal. Start off this step be entering the BIOS and settingthe bclock frequency back to 150MHz. Because we have already been through therange of bclocks from 150MHz to 200MHz (or whatever YOU reached), we alreadyknow that the bclock and uncore will be stable with these settings. So thateffectively allows you to go back through the same range again, changing onlythe variable of memory, so that you'll KNOW that that any instability is memoryrelated.
To do that you need to changeyour System Memory Multiplier (SPD) to a ratio that will allow you to push theblcock back up to your goal, whichout exceeding the memory's rated speed. Also,manually configure the memory timings according to the manufacturer'sspecifications. There will probably be many sub-timings in your BIOS that youcould change, but only change the timings specified by the manufacturer, theothers leave on auto.
Lets look at the sample systemsfor an example, for those systems you would configure the System MemoryMultiplier (SPD) as follows.
Sample #1 – set the SystemMemory Multiplier (SPD) to 8
Sample #2 – set the System MemoryMultiplier (SPD) to 10
Sample #3 – set the SystemMemory Multiplier (SPD) to 12
For the sample system #1, the goal is 180MHz bclock, the multiplier is8, and the memory is rated at DDR3-1333. If we were successful in reaching the180MHz bclock goal, the memory would be at 180×8 = DDR3-1440. This is about an8% OC and within the 10% I recommend limiting yourself to for this step.
For the sample system #2, thegoal is 200MHz bclock, the multiplier is 10, and the memory is rated atDDR3-2000. If we were successful in reaching the 200MHz bclock goal, the memorywould be at 200×10 = DDR3-2000. This is the memory's rated speed and within the10% I recommend limiting yourself to for this step.
For the sample system #3, thegoal is 200MHz bclock, the multiplier is 12, and the memory is rated atDDR3-2400. If we were successful in reaching the 200MHz bclock goal, the memorywould be at 200×12 = DDR3-2400. This is the memory's rated speed and within the10% I recommend limiting yourself to for this step.
In the same way, set yourmultiplier according to your goal, so as to prevent more than a 10% overclockon your memory. As a generalization, memory rated at lower speeds typically hasmore overclocking potential than higher rated memory. My suggestion for now isto focus on getting the IMC overclocked to the memory's rated speed (causeremember, the IMC is only rated to run at DDR3-1066).
Instead of overclocking memory, Iplace a higher value on tightening up timings. Take sample #2 from above, ithas DDR3-2000 CAS9 memory. You'll get better day-to-day performance out of thatmemory by tightening the timings down to CAS8 level, as opposed to overclockingthe speed to DDR3-2100…..not only that, but tightening the timings is almostalways easier than increasing the speed. Again, I'm not going to get intodetail here because tangible differences on a daily system will not exist.
DRAM voltages
There are two voltages we need tofocus on in this section, the QPI/VTT voltage you've already become familiarwith, and the DRAM voltage itself. QPI/VTT is already high enough to supportyour bclock and uncore goals, but as we push up the speed of the IMC (which isalso part of the uncore), the QPI/VTT voltage may need a bit more. This isespecially true if you are running with all 6 memory slots populated, or ifyou're using newer 4GB DIMMs, these configurations can put a lot of addedstress on the IMC and require extra QPI/VTT voltage to retain stability. Forall three sample systems, set the DRAM voltage manually to 1.65V (or 1.66V if1.65V is not possible).
Testing for highest stable memory frequency
Now start up your selected testprogram, for example OCCT (RAM) or IntelBurnTest (maximum). Run the test for just a shortamount of time, I usually try to run 3 loops with IntelBurnTest (maximum). Then reboot the system and returnto the BIOS.
1. If the test ran without error, raise thebclock by 10MHz, reboot into your OS and run the test again.
2. Ifthe test failed, raise the QPI/VTT voltage by 0.0125V, reboot into your OS andrun the test again.
Continue to repeat this testingfollowing the two procedures above, until you meet one of the following threecriteria:
· You reach the same bclock speed you identifiedin step one and successfully pass your stability test.
· You reach your maximum safe QPI/VTT voltage (asidentified above)
· Raising the QPI/VTT voltage is ineffective instabilizing the system.
Just as you did in step one, ifneeded you can follow the same procedure for fine tuning here.
After you have reached yourdesired goal, be sure to test the overclock with another one hour pass of yourselected stability test to ensure the entire uncore is happy with the currentconfiguration. However, I would add one additional stability test at thispoint, memtest86+.IntelBurnTest and OCCT (RAM) areboth very good at identifying IMC and memory error, but neither are asstrenuous testing the DRAM modules as memtest. It's a good way to verify thatthe memory modules are not defective, and will operate without error. Run atleast one pass, or for 1 hour, whichever is greater.
Congratulations! - Younow have a relatively stable bclock frequency and memory frequency.
<br style="page-break-before: always; mso-special-character: line-break;" clear="all">
Step 3) Stabilize CPU Frequency
Almost there
The last step in this guide isoften the first step for users who run into problems and then troubleshoot fordays afterward. Leaving it to the last step makes the task much simpler. Younow have the following settings locked in; QPI/VTT voltage, IOH Core voltage,memory voltage, QPI clock ratio, memory ratio, and memory timings. That meanswhen we are looking for our highest CPU frequency, there are only two variableswe need to play with: bclock and CPU voltage.
Please start by entering the BIOSand adjust the bclock back down to 150MHz, then adjust the CPU clock ratio asfollows.
Sample #1 – set the CPU clockratio to x20
Sample #2 – set the CPU clockratio to x21
Sample #3 – set the CPU clockratio to x23
Load-line calibration ("LLC")
This actually goes by a fewdifferent names, but they are all meant as a means to reduce or preventv-droop. It does typically ease the overclocking process at the cost ofviolating Intel's design specs. However, overclocking in its essence violatesIntel's design specs, so you're not breaking any new ground with this feature.I highly recommend enabling this feature. High end Gigabyte motherboards have twosettings, select "Level 2". For more insight on the theory of LLC, refer tothis excellent explanation at anandtech.com.There was also some real world testing recently; feel free to check out Bobnova's LLCinvestigation here.
CPU Vcore
That brings us to the first thingthat most users want to play with after powering up their new system for thefirst time: CPU voltage, aka "Vcore". As you can see, this is actually one ofthe last things you should be changing. I would recommend starting at a niceand easy 1.2V. Surprisingly enough, many users are able to achieve very goodoverclocks with this modest amount of CPU voltage. I would be surprised ifsample #1 needed any more than that, sample #2 probably need a bit more, andsample #3 will probably need quite a bit more.
If you are overclocking withpower saving features enabled, Gigabyte motherboards will allow you to set theCPU voltage via "Dynamic Vcore" which improves overclocking capabilities whileusing your power saving features….to unlock this feature; first you have to setthe standard Vcore setting to "normal". Then set the "Dynamic Vcore" setting to+0.05 and increase as directed below.
Testing for your highest stable CPU frequency
Once the operating system hasfully loaded, start up RealTemp. Now start up CPU-Z and verify that youroverclocked settings have been properly applied, and that you are running atyour desired CPU, bclock, and memory frequencies. Each of the sample systemsshould look like this.
Sample #1 – CPU = 3000MHz, uncore = 2400MHz, memory = 600MHz
Sample #2 – CPU = 3150MHz, uncore = 3000MHz, memory = 750MHz
Sample #3 – CPU = 3450MHz, uncore = 2700MHz, memory = 900MHz
***Note***, if you have SpeedStep("EIST") enabled, the CPU speed will fluctuate in CPU-Z and the load changes,please verify values given above WHILE RUNNING YOUR STRESS STEST.
Now start up your selected testprogram, for example OCCT (CPU) or IntelBurnTest (maximum). Run the test for just a shortamount of time, I usually try to run 3 loops with IntelBurnTest (maximum). Then reboot the system and returnto the BIOS.
1. Ifthe test ran without error, raise the bclock by 10MHz, reboot into your OS andrun the test again.
2. Ifthe test failed, raise the CPU Vcore voltage by 0.025V, reboot into your OS andrun the test again.
Continue to repeat this testingfollowing the two procedures above, until you meet one of the following threecriteria:
· You reach the same bclock speed you identifiedin step one and successfully pass your stability test.
· You reach your maximum safe Vcore (as identifiedabove), or maximum safe temperature.
· Raising the Vcore is ineffective in stabilizingthe system.
Just as you did in step one, ifneeded you can follow the same procedure for fine tuning here.
Is it stable?
So, once you find your highestCPU frequency by meeting one of the criteria above, and run OCCT (mix) or IntelBurnTest (maximum) for one hour minimum. I'd like torefer to all this testing as "reasonably stability". In my experience, the truetest of stability is the regular daily operation of your system, doing what youintended it to do.
The reason we use testingprograms like OCCTor IntelBurnTest is to simulate a worst case scenario. I havenever seen any real world application come close to generating the heat that IntelBurnTest (maximum) generates. But there are a few thatcan come close to OCCT, like folding or crunching for distributed computingprojects, encoding high definition videos, or very heavy multitasking. But eventhough OCCTor IntelBurnTest (maximum) stress tests tend to generate moreheat, they do not always find 100% of instabilities. In my opinion, theultimate test is to use the system!
Final Words
Well, that about wraps it up.Believe me, there is so much more to overclocking. There are SO MANY settingsyou can continue to fiddle with, you may have a million questions at this pointabout all of the settings in the BIOS that we never touched. They're validquestions, but not meant for this guide. My goal was for this guide to get you95% of the way in 5% off the time. Hopefully you're there! The other settingsin your BIOS will be needed to get you to 100%….but if I included those thingsin this guide, it would be 3 times as long, and much more complicated.
Please feel free to comment, andpost any questions in the Intelsection of the techreation forums. The community is the best resource tocontinue pushing your system beyond this guide. Post a new thread with a verydetailed description of which part of the guide you are having problems with,how far your progressed through the steps, and screenshots to help usunderstand the problem your encountering if necessary. We will do our best tohelp you out with any problems you may encounter!


