Nuth'n Special.

alienware

Banned
As title. This is nothing revolutionary or ground breaking but it may give some of those who are not experts some cool ideas on doing a semi clean build.

Specs for the build are -

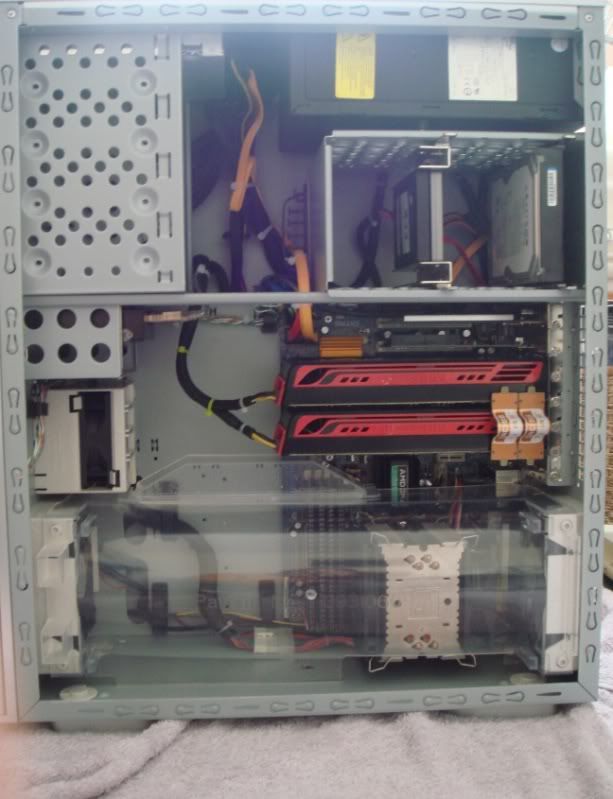
Silverstone TJ06 (Temjin)

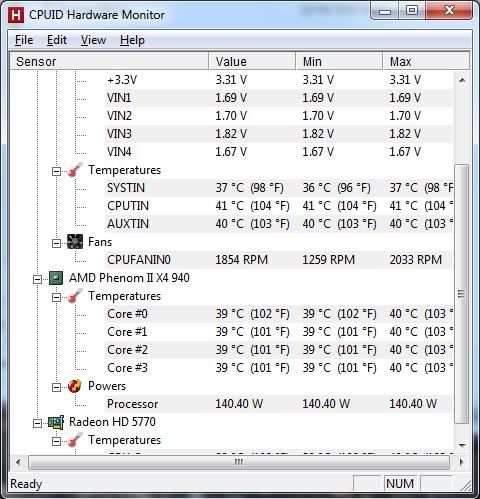
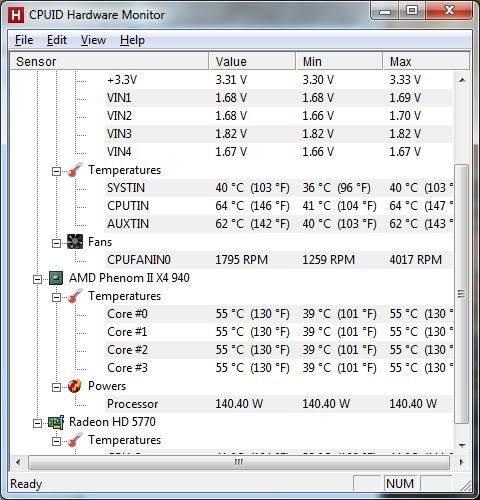
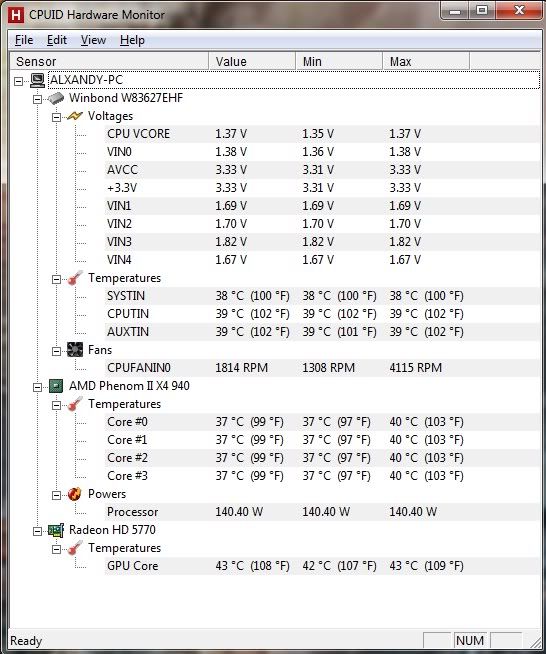
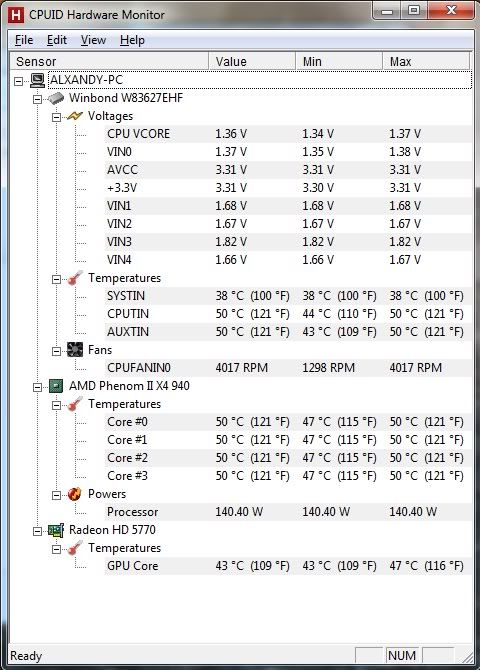
AMD Phenom 2 X4 940 (@ 3.4ghz right now, but could improve with the better cooling the case offers).

Asrock Alive Xfire rev 3.xx

4 GB PC6400 Dominator.

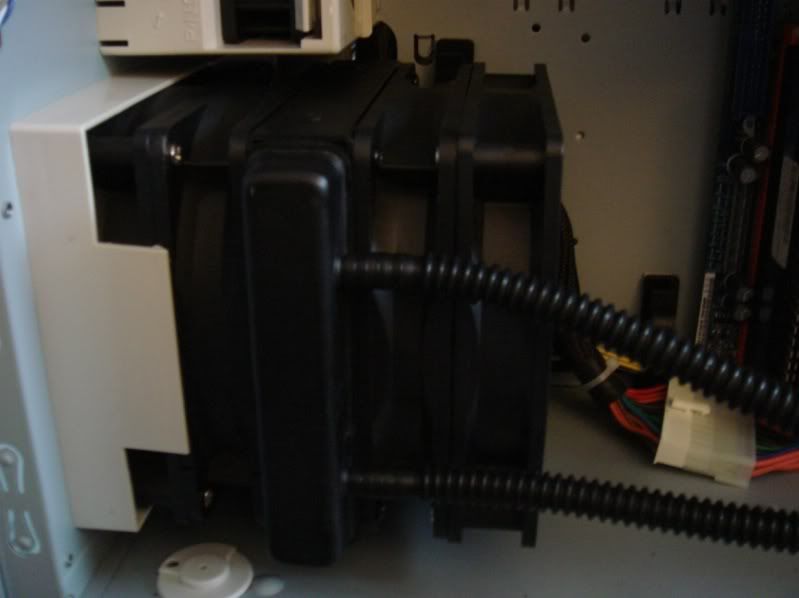
Noctua NH92 cooler with dual fans.

750w Hipro PSU

Xfire 5770 (XFX)

32gb Corsair Extreme series SSD (main? not sure yet)

Patriot PS-100 64GB SSD

Seagate Baracuda 500gb (storage)

Sony BDR

Possibly Silverstone HF51 or whatever it's called

Some fans (not decided yet).

The SSD came today (drool)

patriotpic.jpg


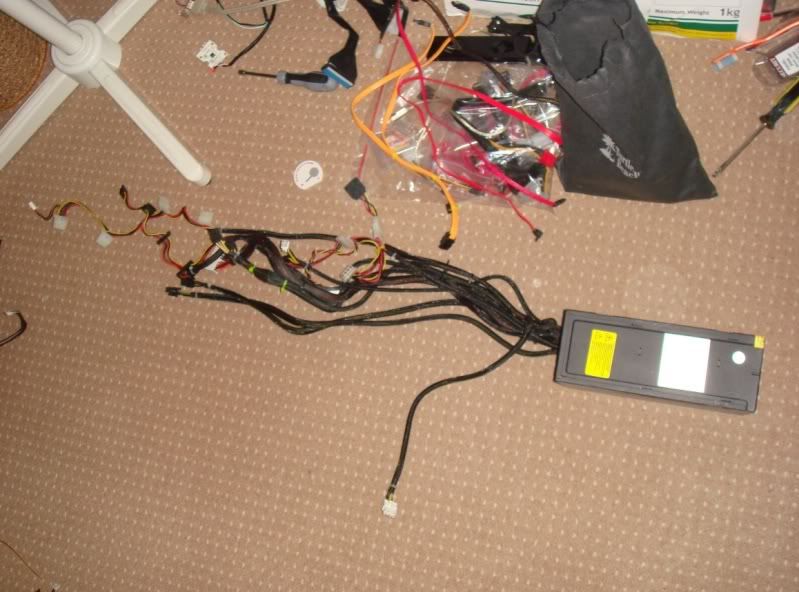
As did the case and the cable kit (PP04, you need one with this case)

case.jpg


And now, for my top ninja secret. A store that is local to me (well about as local as you get here, a mile away) has these things.

kit2.jpg


In there you get some cable ties, velcro straps (ideal for big cabling that may need moving) and lots of stick down cable holsters of various sizes. They work like this.

kit1.jpg


Good eh? the large ones can be used for all of your SATA cables for example, with the smaller ones used to channel power cables. And at 99p a pack? Fannytastic.

I shall begin the strip down tomorrow, so 'til then !
 
Cool, I was looking at that case for my new build not decided yet tho, maybe getting a tj07
 
For £72 it is unbeatable. However, to get it tidy YOU need to do the work. It's an older design, and so you'll need to think out of the box and probably be good with a solder iron.

I started watching Spurs tonight with great anticipation. Sadly after five minutes I could bear to watch no longer. Thankfully we got a result in the end (lost 3-2 but 2 away goals) and we were playing on a spazzy fake pitch. Any way, 8pm I decided to get on with the build.

First job was taking the Alienware apart. Please note I would NEVER normally use a PC with a rat's nest in it, but I have bunged stuff in there over the past few months and unless I stripped it all down and started again I needed to live with it. So I did. I have had the Alienware for closing in on two years now and I was getting bored with it, and more importantly cleaning it. Never buy a black laquered case. Horrible bloody things.

beginning.jpg


Next thing to do was flip it around and remove the other side... God, what am I getting myself into?

alienwareripout.jpg


Time to get the hardware out.

partspile.jpg


Ever onward and upwards, get the Temjin out. First thing to do is unlock the door, which is on lovely hinges.

dooropen.jpg
 
And then get all the crap ready.

manualbits.jpg


Final thing to do was get the PSU out. Take note how long the cables are on this PSU. They are the longest I have ever seen on a PSU ever.

However, that confidence would later come back to haunt me and nearly have me in tears of anger and frustration.

psu.jpg


Now it was time to start cleaning up (already). Silverstone simply bung the USB headers and others (audio, firewire) into the case. They expect you to route them straight to the motherboard but sod that, I had other plans.

fanmodmessywiresbefore.jpg


The next thing to piss me off was how the fans are all molex. None of them are 3 pin to fit your motherboard. So that needed work too. However, what was pissing me off the most was that the intake fan's wires were simply hanging out of the top. You'll see that in the last pic. Screw that. I took out the unit and modded it like this.

fanmod.jpg


And then put it back in, running the cable out of the case.

fanmoddone.jpg


It's little things like that that really irk me, and I HATE mess. With that done I began to look at running the header connectors (LEDs, switches) but again, they had put a spazzy great metal ring on them and they were only long enough to reach the board straight accross the inside of the case. BOLACKS to Silverstone. And again ten minutes of scratching my head and routing had them tidy as heck.

rerouteheaders.jpg


As you can see, the motherboard was now in. I test fitted the air duct but it fouled.... Wait for it... The CHUFFING CLIPS ON THE FAN. Can you Adam and Eve it? The only thing stopping me from fitting it was two SODDING clips. I shall mod it tomorrow, but it's going on.
 
As you can see I had now started using the kits I posted in the first post. These are invaluable tbh. Watch the pics, you'll see them more and more. So right now I hadn't finished tidying and tucking the fan wires but had ran the Molex to the motherboard for Crossfire. My board needs it, right in a crappy place. So more routing and head scratching was needed.

Now it was time to route the power cables. The power supply was now in. The first thing concerning me was is my 4pin AUX power for the CPU going to reach? Short answer? no. So, I broke open the PP04 kit (Silverstone extensions) and snapped on the extender. It still didn't reach. Not by a small bit, but by about A FOOT. So, in short CHUFF Silverstone. Any way, I decided to solder on an extension MYSELF.

newwire.jpg


As I said, you need to be good with a solder iron and know what you're doing. Tin, solder, shrink. One at a time, making sure everything goes where it came from. By this stage I had now wasted over an hour on one cable.. Went to plug it in.. STILL didn't fit. I was now close to tears and wanted to smash the lot up and throw it out of the window. I had no plugs left and to extend the one I had would have meant doing about eight more solder joints. Firstly I don't want that many, and secondly it would have taken ages. In the end I realised I had an old 350w psu under my bed. Ripped it apart and resoldered on a nice long one. IT FINALLY REACHED. However, NO PSU on earth would have reached as stock. Look back at my PSU and how long the wires are.

After a two hour stall I was finally ready to start gathering momentum. I now had the board all ready to take power.

noharddrives.jpg


I then fitted and wired all of the drives.

finished.jpg


Looks finished what? no chance. Flip the bastard around and you're in for a seriously nasty shock.

mess.jpg


That little lot needs to go in about 8mm of space. If not? the panel won't fit. At this point I used parcel tape (the brown stuff) and basically stuck down every spare molex, sata and power plug. The spare 8 pin CPU plug and PCIE power plugs I had to be more inventive with and hide elsewhere as they were too thick and would have stopped the side going back on.

Talking of the side? well it's now safely back on and I am in the process of re-lettering all my drives (as throwing in another has buggered it all) and installing drivers. I shall finish up tomorrow but I'm very happy with how it turned out. It's immaculate inside, WHISPER quiet (honestly it's as close to silent as silent gets) and putting in hardware is like throwing a sausage down Regent St.

I will also be fitting lighting and so on. So, more to come
smile.gif
 
Not today Josephine
biggrin.gif


I ended up awake until 4am which when you consider I was up at 6am the day before is not good. So tonight I'm going to chillax and watch some Masterchef (love it, love cooking, great cook).

No doubt I will get some more done tomorrow (got a Raptor to fit and a few other bobs and bits.)

I'm a bit stuck now though.. The lights on the front are blue. Now this just oozes class. So my immediate thought was to get some blue cathodes and roll with the sophisticated theme. However, the more blingy side of me is crying out "red plexi window with ATI Crossfire etched on".

I know a company who do such a thing. The plexi is very cheap and I can't see them charging me more than about £20 to do the etching.

I shall ponder it whilst regaining some energy
smile.gif
I've also had an idea that no one has ever used before, but I won't speak about that because no doubt some one would just nick it from me and claim it as theirs
biggrin.gif
 
Right, time for some ducted fun. I'm still tired because of the original build night. I got about three hours of sleep and haven't got it back. I got seven last night but my body still wants the five it missed. Any way, I almost clean forgot to take the temps of the machine before fitting the duct. The duct is a pain to get out and many have snapped them (clumsy fools). So, here is the idle temp of the machine after talking to Stepster for about an hour before hand
biggrin.gif


idleductoff.jpg


So basically it's hovering between 39 and 40c per core with a 400mhz overclock. Not too bad for a small Noctua I have to say, and why I said that I am sure that Scythe fan actually lowered temps. Any way, remember those temps for later. Straight after I ran a Prime. Went down for a cig and came back about twenty minutes in. My cpu never gets any hotter after about five mins so there's no point leaving it on purely for the stability as I already know it's stable as I have left it running for days at a time before. So, here we go then, duct off load temp.

loadductoff.jpg


55c. Again it was flucuating between 55 and 56 but as soon as it hit 56 it immediately dropped back to 55. Again, take a note of those temps because they become important later. Right, next step was to remove the machine from the table after unplugging it all. Again I forgot to get early pics so here I am after removing the flat support and cutting into the tube to make it fit.

Remember - Measure as many times as you need to then CUT ONCE. FFS don't just start cutting away. Thankfully this tube is Lexan which means it is soft and flexible unlike perspex and plexiglass. It's also maliable and not as shatter prone as plex. It's not as clear, but who gives a rat's ass? It's not there to look nice.

markedcut.jpg
 
Now as you can see I use a Sharpy to mark with. A nice putrid orange so that it can be seen very well. Sharpys have nice hard precise points so make nice clear lines.

Now because I have enormous ram I needed to fit the supplied duct adapter. Without it I would have been cutting more. It looks like this.

memoryscoop.jpg


Which just about clears the ram but more imporantly gives it a nice feed of cool air. It also isolates the GPUs meaning the fan for those takes direct aim at the graphics cards as you will see later.

Here is the finished article.Now thankfully I only had to use the hacksaw twice. Because Lexan is soft and maliable I was able to score it (with an INCREDIBLY steady hand) and simply snap it off. The edges are then smoothed with a stanley knife and wet sanded with some P800 to make sure there are no sharp edges.

cutoutunclean.jpg


For wet sanding, cleaning AND removing the Sharpy lines I use this. It's vinegar based so leaves no streaks and cuts straight through the Sharpy lines without causing any reactions as there's no nasty chemicals in it.

cleaner.jpg


So, as no suprise (because I did all of my homework before hand) it fitted perfectly.

fittedincase.jpg


And when I say perfectly I mean, perfectly. There were literally MM for the clearance. Sorry about the grainy pic, if I turn flash on it just makes the tube non see through.

precisefit.jpg


OK. Remember now how I mentioned it actually aiming air into the GPUs? Well this is what I meant.

graphicsductplacement.jpg


It's bloody genius IMO. Aims the air up a ramp and straight into where it should be. Here is the machine with the duct fitted and a complete view.

fullsideshotnew.jpg


But let's waste no more time.. Does it work? Well, I have read mixed reviews and it often seems to depend on the cooler. Mind you, this was back in the days of weeny little socket 478 coolers.. Would it perform on one that barely fits? At first I thought the answer was going to be no. Here is the idle temps with the duct in place.

idleducton.jpg


So basically a drop of 2-3c. I'll take that, because to be perfectly honest the duct came as a part of the case and thus was free. -2c for free is good I guess. However, it was the load temps that had me in disbelief.

loadducton.jpg


At first I thought it would go up. But no matter how long I waited with Prime on and no matter how hard I tried to make temps rise (by doing other things with it running) the highest it would tip was 50c. And as soon as it hit 50c it would then drop straight back down to between 47 and 49. I could not make it go any higher than 50, which when you consider I am running a 12% or so overclock and this is FREE cooling then hey, it's bloody impressive. Infact, it may even get me to the 3.6ghz mark without spending another cent. So over all I am even happier now. You'll note I also did some more cable tidying as it's not there to look pretty but improve airflow.

As much as I hated this case for a day I am now falling in love with it. It was hard work but TBH what it offers onto the dinner plate for £72 delivered is just unmatched IMO. And looks wise it's absolutely stunning.

temjin-1.jpg


Shot taken before I did the duct obs.
 
Thanks Steve. Yeah, two and a half years made me want something different.

Decided to keep my Silver Alienware now (mate was having it) as I realised that without it it would mean no more watching football in bed, and that's simply not an option.

Still mulling over what I want to do to the rest now that the dirty work is out of the way, but I can't find acrylic sheets big enough to replace the window. I Mean, it's a bloody enormous window.
 
If you need a extra case influx you could always rent the case out as a spare room?

Me, if you are windowing the side, strip her back down and get the internals powdercoated black or white.

Replace the leds on front white. ( Personally despise blue arrrgh my eyes they bleed! )

Lazer cut the side window and sheet behind the design.

Black sata cables

Braid the psu cables

White cathodes

Bulgin white ringed momentary switch on front

Stelathed drive bay ( li lis might fit, think they do a silver one )

Ohhhh the stick some water in there
smile.gif


Looking good mate, nice to see some piccys of build logs
 
No point in powdercoating the insides mate. The side window wasn't really a choice as I don't usually like them.

The blue LEDs will go out the door soon. I want orange as orange is my fave colour (being an Aquarian). Other than that though? Well I might just get the side panel sheeted in or put on an opaque window with lighting that you can't see through. Only reason I have gone for tidy is for airflow and cooling.

Talking of cooling....
sad.gif


I stripped all of my artic F12 and F9 fans from the black chassis today. Spent about two hours braiding and shrinking and soldering and when I plugged them in they all blew up. Literally a loud bang, puff of smoke and are all flatlined
sad.gif
I thought I must have done something wrong, but when I checked they were all wired perfectly. God only knows tbh. Thankfully I had others so that was cool. I wasn't just doing a swap out, I was doing some serious work to the cooling.

Double barrel any one?

doublebarrel.jpg


The two 'fans' directly on the rad are not fans. They are the blown Artics and have been sawn out and sanded so they're shrouds. The two outer fans are Silverstone, and because of those I have now been able to mount the rad on the front of the case.

Even better I have also got one of these coming.

BFGRPHYSX128P-unit.jpg


Sniper bidding right at the last second (I love things that finish when people are working
biggrin.gif
) £14.

I only got it because I'm ATI FTW and I play a lot of Mirror's Edge. I love that game, total adrenaline rush and not for the faint hearted. Sadly I don't like playing it on here atm due to Physx really making a massive difference and I am all out of PCIE slots. So this is perfect
smile.gif
 
It isn't no. Cooling was worse and it was a bit square to be sat next to me. I have to say though it's a wonderful media chassis. Especially witht the silver DVDRW and the Silverstone media panel.

It'll have the 5770s back in it soon too
biggrin.gif
 
Back
Top