Another corsair 600t build

TBash

New member
THE BASH BOX/Another Corsair 600T Build

So out of knowhere i came up with the name Bash Box i wanted some way to incorporate my name into the case somewhere either its going to be subtle or quite the opposite. When coming up with ideas to have a grille in the front of my case i came up with this idea

bashbox_zps520c4638.jpg


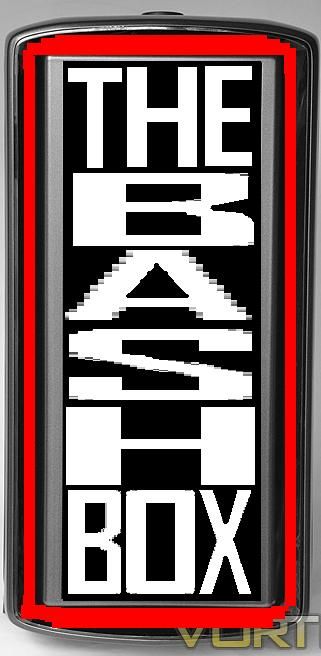
The red part is just me putting an idea out there i want to cut a piece of diffused or frosted acrylic and brindge the annoying gap in the front of the case and possibly light it up around the rim


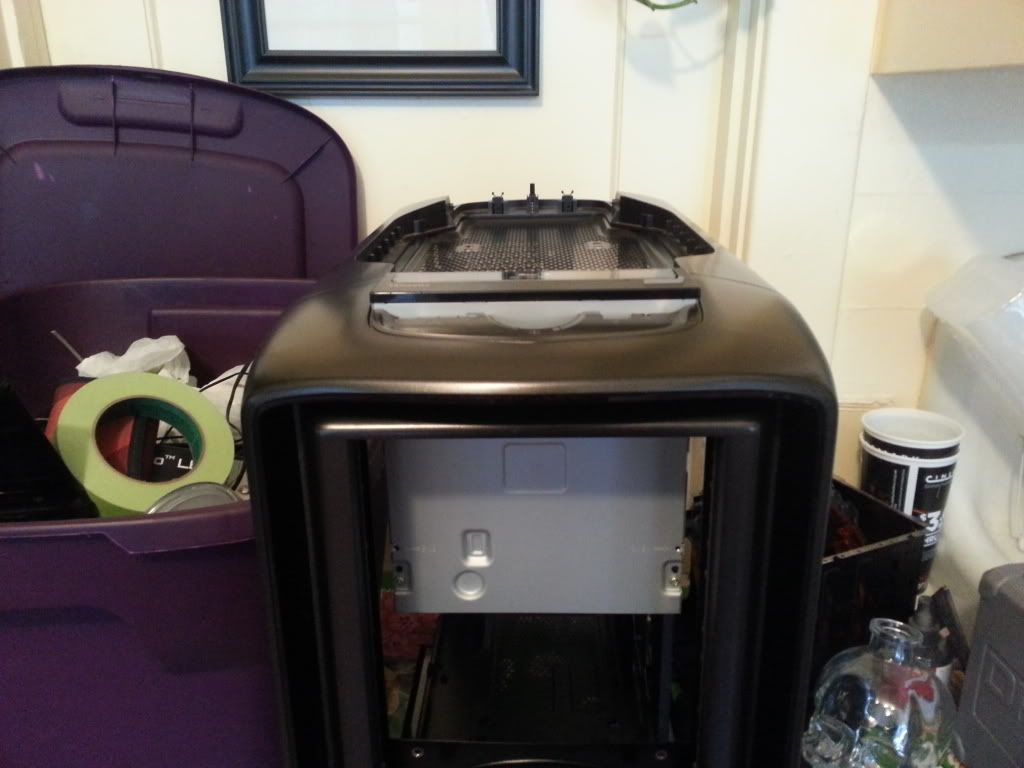
So here goes nothing, I originally bought the 600t with the intention of customizing it but one thing lead to another and in a desperate move i through just any ole thing into it to get it Diablo 3 ready. Know that the urge to play that game has passed and i have a new job that affords me a little more time to throw some ideas around im ready to go.

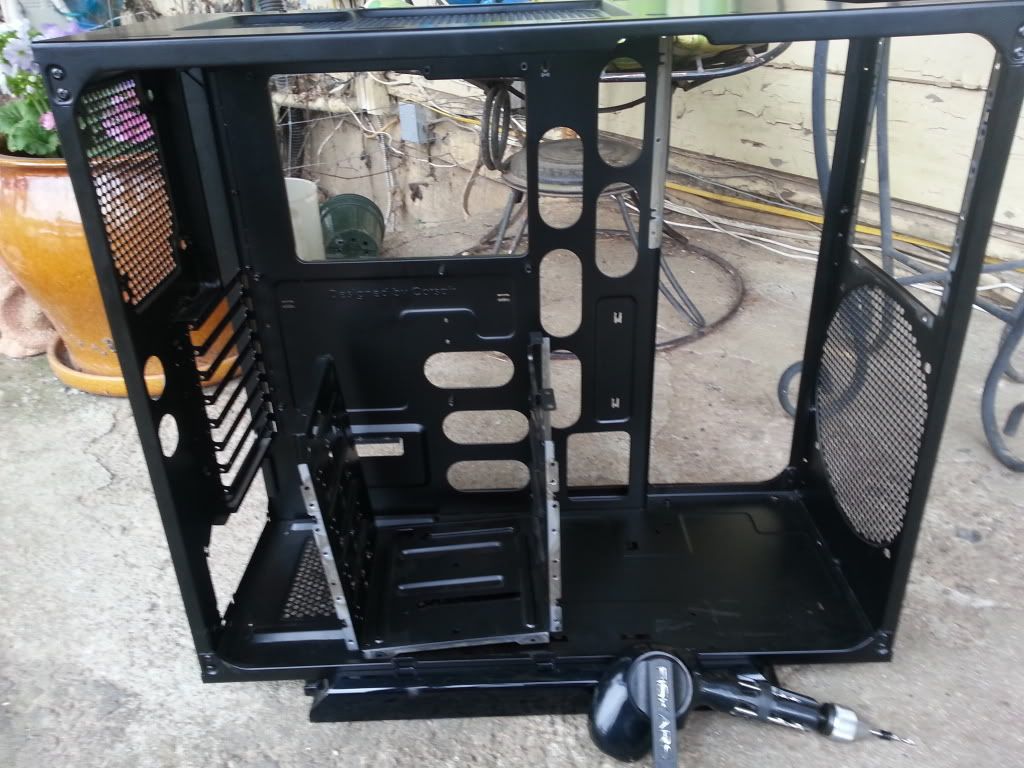
My case as of right know is completely torn apart plastics off and all the grommets taken out as well as the feet, In preparation for paint i just need to decide the shade of red im going with.

I will get some pictures up once im back home but heres a couple pictures of my thought process,For the color idea i wanted to go red interior with matte/glossy black case here is an example albeit a horrible one but you get the idea i want the stark contrast of matte and glossy black perhaps with some sort of design through out. Oh yeah if you cant tell the general theme is read and black.

For the most part i will list everything im going to be using in this build at some point or another with a couple exceptions im trying to create something custom that wont be unveiled until its up to my standards so expect something awesome with this build that i at least have not come across in any other build. My one and only hint is it has to do with water-cooling.
GQgBk4e.jpg
 
Last edited:
Good luck with it! :p I'm working on my 600T too. Curious to see what you are going to do with it :)
 
Subscribed. Always like getting ideas for what i could potentially do with my 600t in the future
 
Just a little update i have some odds and ends coming in a couple days and i have already decided this build is going to be all modding in the first bit so i apologize but the order in which im going about this will be modding/painting/liquid cooling/final hardware specs.

I came to this way of doing things because i feel like once i have the case looking pretty on the outside i will be more motivated to make it equally beautiful on the inside.
A couple pictures of what i got will be forthcoming for some reason i splurged on a Wiha precision screwdriver set because i figure if im gonna pretend to be good at modding i might as well have the proper tools. But im really getting excited about this build i hope you guys enjoy as it begins to evolve.

Also Im thinking of removing the stock fan controller and replacing it with something a little nicer to look at if anyone has good or bad experiences with and specific brand please chime in im really leaning toward the Lamptron fc5 V2 but i also plan on having some bitfenix fans in my case and the adult in me would really like to be able to control the leds on them without using the hydra pro.
 
A couple pictures of what i got will be forthcoming for some reason i splurged on a Wiha precision screwdriver set because i figure if im gonna pretend to be good at modding i might as well have the proper tools.

Also Im thinking of removing the stock fan controller and replacing it with something a little nicer to look at if anyone has good or bad experiences with and specific brand please chime in im really leaning toward the Lamptron fc5 V2 but i also plan on having some bitfenix fans in my case and the adult in me would really like to be able to control the leds on them without using the hydra pro.

Well, regardless of experience and/or skillset, nice tools make working with stuff just simply more fun :)

I recently got an FC5 V2, and feature-wise it's pretty good, although it hasn't been in service very long so I can't make any statements towards longevity.

I also have some 140 mm Bitfenix Spectre Pro (non-led) fans for my Rads. They are very nice. No bearing noises when turning down the voltages or at full speed, and they move a good amount of air without being very noisy. The 120 mm version is a bit weaker (pressure-wise) than the 140 and I haven't tested it on a rad yet, but they are spec'd similarly to the Corsair SP120's quiet edition. I intend to do some testing on my radiator to see whether the SP120's or the Spectre Pros are better for that purpose.

I don't really like LED's in my fans and use LED strips instead, but that's of course up to you :). I'm not very familiar with how to control the LED's on the BF fans though.
 
Last edited:
Well, regardless of experience and/or skillset, nice tools make working with stuff just simply more fun :)

I recently got an FC5 V2, and feature-wise it's pretty good, although it hasn't been in service very long so I can't make any statements towards longevity.

I also have some 140 mm Bitfenix Spectre Pro (non-led) fans for my Rads. They are very nice. No bearing noises when turning down the voltages or at full speed, and they move a good amount of air without being very noisy. The 120 mm version is a bit weaker (pressure-wise) than the 140 and I haven't tested it on a rad yet, but they are spec'd similarly to the Corsair SP120's quiet edition. I intend to do some testing on my radiator to see whether the SP120's or the Spectre Pros are better for that purpose.

I don't really like LED's in my fans and use LED strips instead, but that's of course up to you :). I'm not very familiar with how to control the LED's on the BF fans though.

I appreciate your insights. As far as i can tell theres a jumper that just gets connected with a small wire so im assuming if i run those two wires to either a push button or a switch i can emulate what the Hydra Pro fan controller does but we will see.

My intent with the lamptron fan controller is to mount it in the same location as the corsair one so i have to see if it will fit length wise with some heavy modification and button relocation i think i can pull it off im not looking foreward to putting my case back together just to test this theory.
 
corsair-600t_panel_zps4eabdae1.jpg


This is my thought process for mounting the fan controller and possibly even a Card reader. The fan controller is shallow enough it would not interfere with the first 5.25 drive bay but the card reader is another story im not sure theres card readers that aren't like 4 inches long which could cause me some problems because i had intended on using the drive bays and not cutting them out but if i do that gives me a lot more options for radiators which would be a blessing.

Side note i would have to relocate the hard drives i think im going to have one ssd and one mechanical another optiion would be only going SSD and use a external hard drive , What are you guys running ? Thoughts and advice always appreciated.

Oh yeah last thing i got the tool i bought it is a Wiha Precision screwdriver set its a little smaller bit then i had thought but overall a great little screwdriver that will make getting into small spots no problem , Definitely going to be investing in some more of there tools.

sideview_zps5a27510f.jpg


Some other thoughts that came about while i was reassembling the case to see what sort of clearance i had with the fan controller in the roof

P.S. I love paint lol
 
Last edited by a moderator:
This is my thought process for mounting the fan controller and possibly even a Card reader.

That's a pretty neat idea. And ambitious. I like ambition :)

Side note i would have to relocate the hard drives i think im going to have one ssd and one mechanical another optiion would be only going SSD and use a external hard drive , What are you guys running ? Thoughts and advice always appreciated.

Well, in my current rig which also doubles as my server, I'm running 11 HDD's, but that's probably of little use to you ;). My upcoming PC will have one SSD for OS and speed-dependent stuff, and an HDD for my data.

As an alternative to an external HDD you might consider mounting the HDD in a non-standard location. For example, on the back side of the 5.25" bays, or even the M/B tray. On the M/B tray, it might of course interfere with cabling, but I think with some creativity, the backside of the 5.25" bays or some other alternative location might be feasible. Only tricky thing might be the decoupling, but seeing as this seems to be a rather ambitious build anyway, I'm confident that you'd have the skillset to pull it off.

Also, getting a 2.5" HDD instead of a 3.5" one might make hiding it a lot easier (although you'd lose a bit of speed). They're usually also less noisy than their 3.5" counterparts.

I'm a bit apprehensive about using an external HDD as a primary means to store my data since even though HDDs have gotten a lot more reliable and quite sturdy in the past few years, external HDDs will always be more prone to damage (drops and rough handling etc.) than internal ones. Of course, you can just get two and make sure you have a good backup policy (which I recommend anyway ;)). That way, if you kill one, your data is still safe on the other one and you can just replace the defective drive and restore your data.

Speed-wise, working with a USB3 HDD is pretty speedy (me and my brothers shuffle data around between each other via one such device), and you might even be able to go Thunderbolt (I'm not fully up to speed on that one).

EDIT:
Found an image which shows what I mean with the HDD on the 5.25" bays:
05064538271l.JPG


It's from this build.
/EDIT
 
Last edited:
That's a pretty neat idea. And ambitious. I like ambition :)


Well, in my current rig which also doubles as my server, I'm running 11 HDD's, but that's probably of little use to you ;). My upcoming PC will have one SSD for OS and speed-dependent stuff, and an HDD for my data.

As an alternative to an external HDD you might consider mounting the HDD in a non-standard location. For example, on the back side of the 5.25" bays, or even the M/B tray. On the M/B tray, it might of course interfere with cabling, but I think with some creativity, the backside of the 5.25" bays or some other alternative location might be feasible. Only tricky thing might be the decoupling, but seeing as this seems to be a rather ambitious build anyway, I'm confident that you'd have the skillset to pull it off.

Also, getting a 2.5" HDD instead of a 3.5" one might make hiding it a lot easier (although you'd lose a bit of speed). They're usually also less noisy than their 3.5" counterparts.

I'm a bit apprehensive about using an external HDD as a primary means to store my data since even though HDDs have gotten a lot more reliable and quite sturdy in the past few years, external HDDs will always be more prone to damage (drops and rough handling etc.) than internal ones. Of course, you can just get two and make sure you have a good backup policy (which I recommend anyway ;)). That way, if you kill one, your data is still safe on the other one and you can just replace the defective drive and restore your data.

Speed-wise, working with a USB3 HDD is pretty speedy (me and my brothers shuffle data around between each other via one such device), and you might even be able to go Thunderbolt (I'm not fully up to speed on that one).

EDIT:
Found an image which shows what I mean with the HDD on the 5.25" bays:
05064538271l.JPG


It's from this build.
/EDIT

Yeah i think your right i have been mulling around the idea of removing the 5.25 drive bays and after making a list of reasons why i would want to keep it in im tipping towards removing it if i mount the fan controller and card reader where i plan on it theres no good reason to keep it if i want a DVD or blu ray drive i can just run a usb one for the 1% of the time i need it. And as you suggested if i get a little crafty theres no reason i cant have both an SSD and mechanical HDD in the case even out of sight.
 
20130316_175000_zpsf7898843.jpg


so I finally just decided to remove the cage I went a little low tech with removing the rivets in the form of an ancient Fiskar drill my arms are tired lol ,The nice thing about it is if i change my mind later on i can just throw some screws back in it and it looks stock again. Part of me wants to drill out all of the pop rivets and use some nice anodized bolts to put it back together but that probably wont happen.

On a side note there is no discernible change in the rigidity of the structure with the cage removed .
 
Part of me wants to drill out all of the pop rivets and use some nice anodized bolts to put it back together but that probably wont happen.

Red bolts everywhere!!! :drool:
Although I've never seen white anodized before, maybe painted instead? But yeah, that would be quite a bit of work. And if you go for anodized bolts, they're not exactly cheap afaik.

EDIT: Just remembered, theme is red/black. So: red bolts everywhere!!! :drool: :lol: /EDIT
 
Last edited:
it seems the more irreparable damage I do to the case the more ideas come flying
my head as of right now I'm working on mounting the fan controller and card reader where I had discussed. more pictures to follow in the coming days as well as some purchase updates.
20130318_214445_zpsccf93493.jpg
here is the sad state of my case this moment
 
Last edited:
As of right know i think im going with a 400mm radiator up front i had thoughts of doing a 200mm in the roof but do you guys think a 240 or 360 with modding would make more sense? Also for some reason i have diamond plate material stuck in my mind we shall see where that goes :)
 
As of right know i think im going with a 400mm radiator up front i had thoughts of doing a 200mm in the roof but do you guys think a 240 or 360 with modding would make more sense? Also for some reason i have diamond plate material stuck in my mind we shall see where that goes :)

Well, when it comes to water cooling "sense" is a rather flexible term ;)

You don't see too many 400 mm rads out there, so this would definitely make it more unique. The trouble with 200/400 rads is finding decent fans. I have some Bitfenix Spectre Pro 120 and 140's and they're pretty great (altough I haven't gotten around to testing performance yet, only acoustics, but reviews so far have been quite positive), so maybe the 200 version is decent as well. Not too familiar with that segment of the market, so there's probably some stuff out there I haven't thought of.

Alternatively, Alphacool has recently brought out a dual 180 (and a triple, though I doubt that would fit ;)) rad, and Silverstone has upgraded their 180 lineup with the AP182. It's a pretty powerful fan, and quite noisy on full power, but on lower voltages it might be decent (I might be slightly biased since I have a weakness for double ball bearing fans :blush:). There might be bearing noises on lower rpm's though, some ball bearing fans suffer from that problem.

A 360 (triple 120) certainly isn't a bad choice, but a 360 (dual 180) or 400 would make it just a bit more special imho :).

I have definitely committed to the 400mm radiator up front my only dilemma and topic of search is does the ports being on the top or bottom effect anything from the standpoint of tidiness the radiator having the fittings at the tops makes more sense but in terms of less modification it being on the bottom would be a hell of a lot easier. Im guessing if you have a strong pump it shouldn't make a difference. I will be ordering a couple pieces i have committed to in the next couple of days most of which will be modding supply's but some will be components i.e. the fan controller card reader.
As always i look forward to your comments and thank you Alpenwasser your insight has helped me quite a lot.
 
Ah, the old "radiator-ports-at-bottom" conundrum :)

If the case is not too heavy to handle, I'd mount the ports the best way they fit and just turn the case upside down once or twice, or maybe even just sideways.

I have recently done some experiments for my next build, running a 560 (HW Labs SR-1), a D5 pump, a Koolance flow meter and an Aqualis in a test loop, and even with the D5 on full power (12 V, not 24) I still shook loose some major bubbles when I moved the radiator around (it was horizontal in the beginning). So a strong pump might not be completely sufficient to bleed a loop out (or maybe it is, it just takes an eternity to do it). The flow meter indicated around 2 gpm/7 lpm, as a side note.

You could of course fill the loop with the radiator detached from the case (don't know if this is possible) then just move it around on its own to shake loose any bubbles, and bolt it down afterwards. This would require quite a bit of additional tubing though which might make the build look messy.

Or connect the rad to the loop with quick disconnects, fill it outside the case on its own, make sure it's properly bled, then insert it into the loop and mount it in the case. Again, feasibility is hard to judge for me. QDC's are expensive as hell though, especially if you need several.

But I'd probably just go with moving the case around and turning it on its head/side a few times; it's always worked for me before.

And thanks for the thanks, it's nice to be useful :blush:
 
20130321_190838_zps98a5cb47.jpg

Here we are two hours later. I am actually genuineley proud of my dremmel and filing work i still have a bit of a ways to go but one of the biggest hurdles at least in my mind is over with. The Blu ray drive was only used as a size comparison as this build wont have a drive in it at all .
20130321_191106_zpsb72a9f7a.jpg


I still have quite a bit of filing to go but to make my life easier i plan on getting a more course file so i can knock this part out much quicker. All that is left in the plastic is to cut out room for the 3.25 card reader and then think about making a bracket to hold both the fan controller and card reader.

My goal is to make all the mods im doing functional aesthetically and practically so if the fan controller or card reader crap out on me i want to be able to swap in a new one without a whole lot of hassle, That is kinda the overall theme of the entire build .
 
Last edited:
20130322_190313_zpsbca72f49.jpg


20130322_190335_zpsf493d8a0.jpg


Obviously the fan controller will fit better then a massive DVD drive but you get the idea

And here we are one step closer. This was a test fit with the plastics on to see if it would fit properly without warping and everything so far is working out how i planned next on the list of things on my mind is lighting,Part of me (the lazy part) want to make some sort of remote that will turn on and off the lighting this includes the bitfenix fan leds but i havnt quite wrapped me head around that yet all i have come up with is a switch nothing with a remote, Any suggestions?

I will be purchasing the fan controller and card reader in the next couple of days to get them properly fitted as well as some materials i will be using for modding the case.
 
LOLOLOL that vertical optical drive is beast x-). I not only have that exact case, but that exact Blu-Ray drive as well. I'll be subscribing to this thread to see how this mod turns out, cheers! :beer:
 
Back
Top