alienware
Banned
Hey all. I was meaning to do this for ages and ages but illness stopped me from getting much of anything done. Any way, ever onwards and upward and all that..
This guide is meant purely for informational purposes I do not suggest trying any of the methods put forward in this thread. If you do decide to try and reflow (bake) your card in the oven then do so at your own risk. I am in no way liable for anything, this is merely information based around repairing a graphics card and should not be taken literally in any shape or form. If anything at least it will show you how a GPU is designed and works, and why they fail.
DO NOT, UNDER ANY CIRCUMSTANCES ATTEMPT TO REPAIR A CARD STILL IN WARRANTY.
OK. I am going to basically pool all of the information I have found lying around the net and put forward my method of repairing a graphics card from my experience with solder and PCBs. Some of the methods used have been quite frankly frightening, with ideas that really should have stayed in someone's head.
Firstly let's get to understand what causes a graphics card to fail shall we?
Your graphics card contains many parts. Some of these are obvious, some are not and some are a complete secret (often with the surface rubbed off so you can't read the chips). However, most if not all cards contain the following.
A main graphical processing unit (GPU)
A RAMDAC
Memory
Capacitors
Regulators (VRMs)
Multiplexers (MUX)
Demultiplexers (DEMUX)
Chokes, taps, resistors and even possibly thyristors. All of which would be on the power stage of the card.
There are quite a few ways that a graphics card can turn its toes up to the daisies (or for want of a better expression die) and the main causes of failure are -
Broken solder contacts caused by expanding and contraction of the main PCB (affecting the main GPU, RAMDAC and RAM)
Failed capacitors (expanded, damaged or plain exploded)
Failed resitors
Failed 'other' components.
However, the main cause of failure (and the only repairable one) is broken solder.. So why does this happen?
Graphics cards are made up of components, a main circuit board and a ball grid array of solder (BGA). The BGA are thousands of small solder balls containing flux and are sat on the bare PCB before the components are added. Once the components are placed in position they are then fed into a fancy oven and heated to the melting point of the solder. Whence that happens the components all sit and bond into their positions making contact with all of the traces of the PCB and allowing the card to function. A new and healthy GPU will look like a far more complex version of this. FIG 1 is an extremely simplified view of how a GPU is put together.
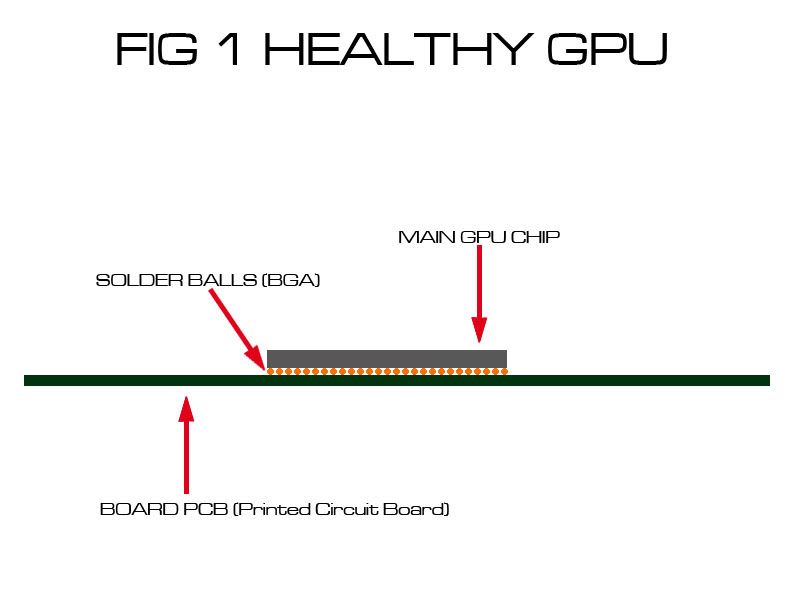
Note how the BGA is shown as tiny balls of solder? Well, there are hundreds of these tiny balls of solder on your graphics card allowing all of your components to link together. However, due to the serious heat of the components in newer graphics cards (which thankfully we are now moving away from) the PCB (printed circuit board shown in green in FIG1) tends to expand and contract. So how does this cause damage to the card?
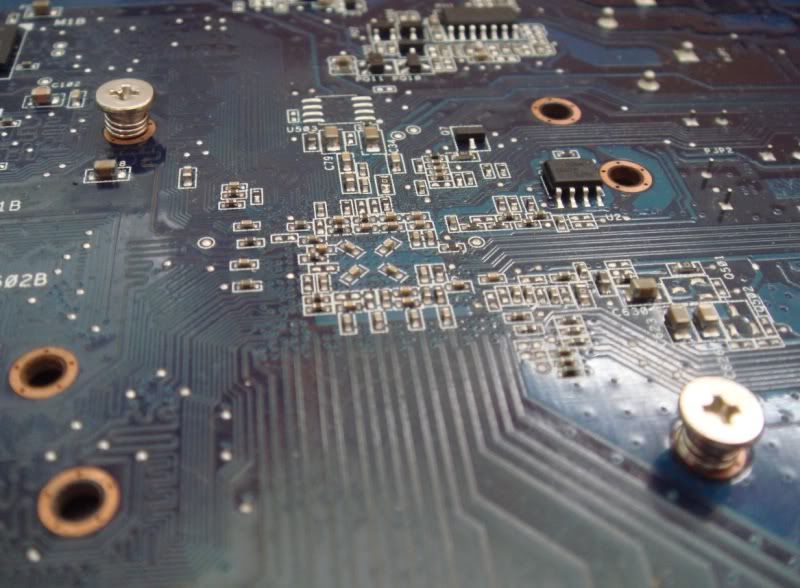
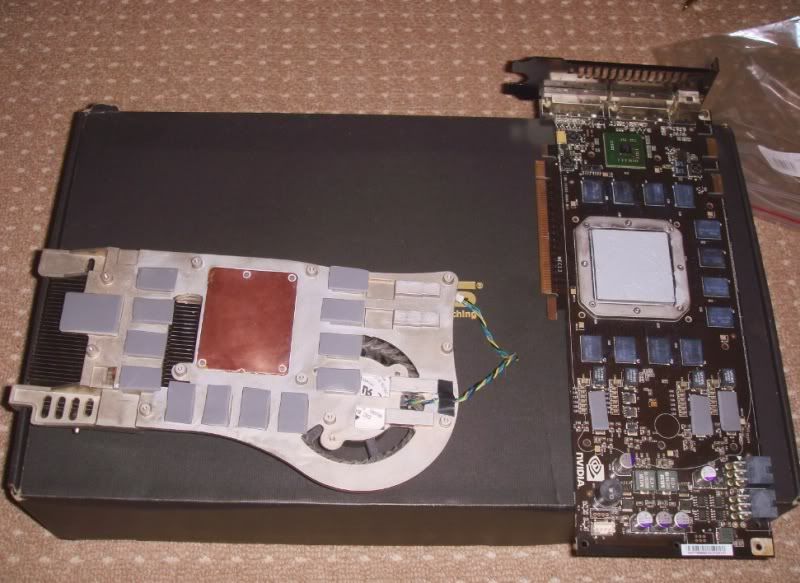
Well, certain things on the card can expand and contract. The main one is the PCB. As it heats up it expands and as it cools it contracts. This is why your card will often use springs to allow for movement. In this pic we see the back side of a basic graphics card, noting how the screws are sprung in order to allow for expanding and contraction.
And when removed the screws look like this
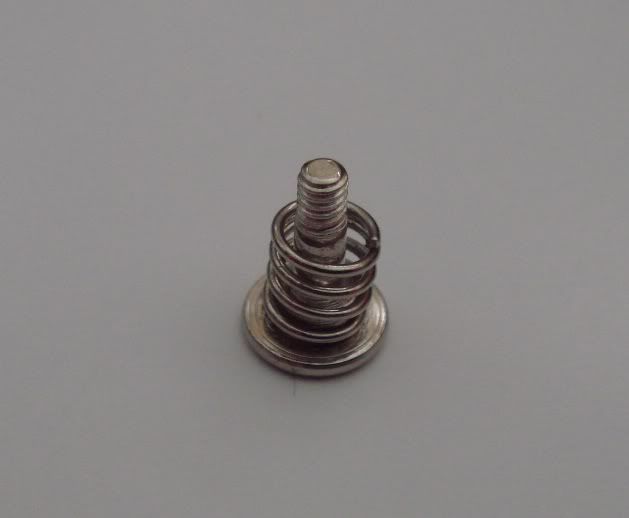
Just like the engine of a car or other components of a car or anything mechanical involving heat these screws are factory set to a specific torque level. IE - when tightened they are only tightend so much to allow for expanding and contraction. You see, the heatsink on a card is usually made of a hard metal. Far harder than the PCB or the solder contacts. As thus it will not expand and contract as the board does so if it is over tightened it will not give and something else will, causing cracking or damage.
OK so now we have that out of the way let's look into the specific reason for failure. Solder is made up of two major parts. These are -
Flux - a glue like epoxy that melts with heat and then forms a hardened shell. The reason for the flux is two fold. Firstly solder is made from either lead or a lead substitute and as such is very soft. Secondly lead or a lead substitute alone has no adhesive properties and will simply ball up and roll around without the flux in.
Lead or ROHS lead free substitute - the conductive part of the solder allowing contact.
This solder has a melting point. However, the flux in it is very hard and over time can become brittle and crack. It doesn't really allow a lot of expanding and contration due to it being a very hard and brittle material. Think about how much you can bend an egg shell and you will have a rough idea. Hard, strong, brittle. Over time solder will degrade and with the constant pushing and pulling of a circuit board it will eventually fail. Now it is impossible for me to show you a picture of failed solder contacts on a graphics card because they are literally microscopic and placed under the components so that you are likely never to see them. However, here is a failed solder joint on the power stage of a larger electrical unit.
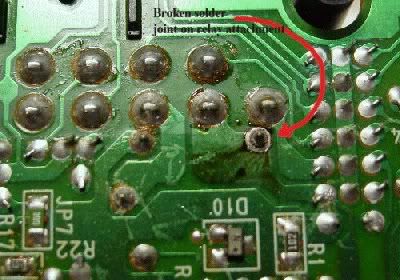
Note how the solder has degraded and cracked away from the PCB contact? this is, in theory, the exact same thing that happens to your graphics card. And the reason for that is explained by FIG2 here.
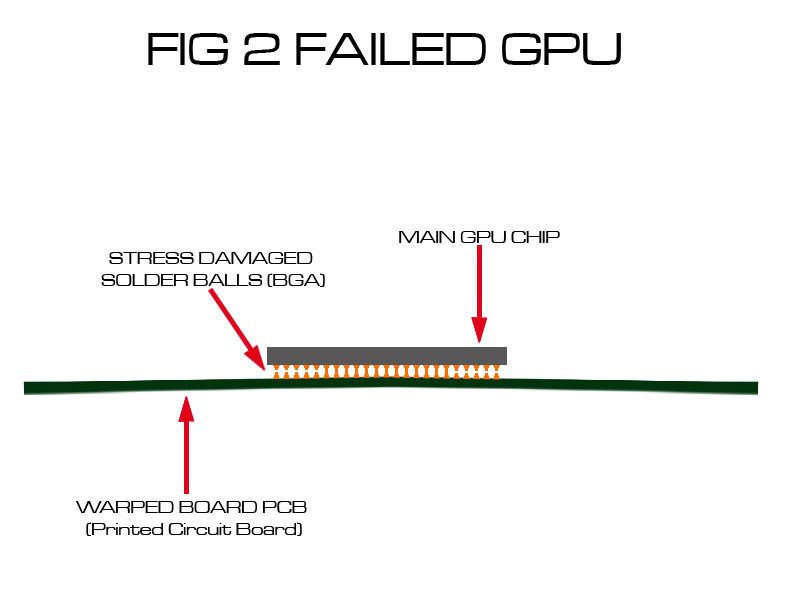
Note how the balls of solder are no longer ball shaped? As the stress of the main PCB expanding and contracting takes its toll the solder will form 'hourglass' or 'egg timer' shapes. The more the board pulls the more the solder distorts and eventually as shown in the picture the solder balls will break loose causing failure. This failure is usually very apparent as it does not cause the complete death of a card. It usually causes certain parts of the card to not work properly causing malfunction of certain parts (RAMDAC or certain aspects of the GPU, Physx for example).
Serious failure (faulty ram or a faulty component) is basically game over. However, there are ways to revive these failed solder joints.
The first thing you will need to do is take your card apart and get it down to the main board ONLY. Wires, heatsinks, fans and thermal paste ALL need to be removed. I'd like to thank OC3D for this picture as it turned up in Google images, but is a perfect shot of a card in two parts.
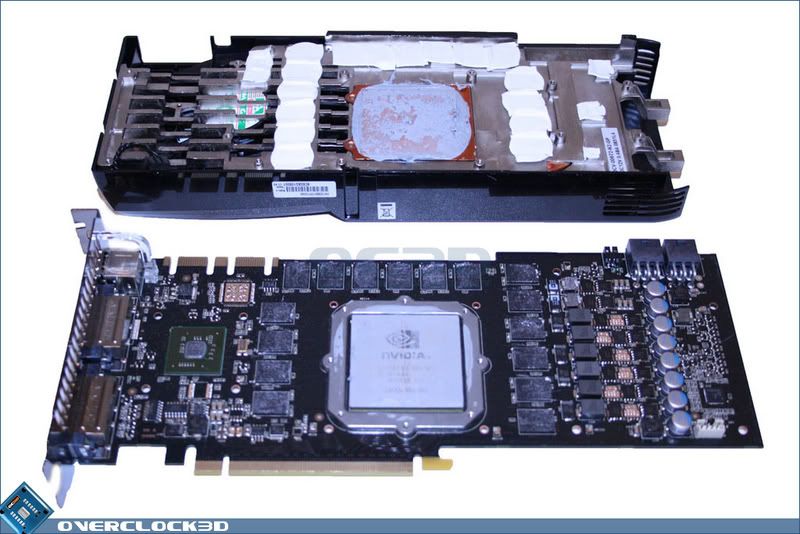
Note the main PCB and the cooling unit. Also note lots of thermal paste and 'woven' paste which consists of thermal paste and pieces of glass fibre woven through it to keep it together and stop it running away. Whilst the heatsink makes direct contact with the main GPU it does not make contact with the RAM or the RAMDAC. Here these thermal paste pads are used to bridge the gap and allow for good cooling contact and better give for the board to do its thing (expand and contract) and this is why the main GPU is usually the component to suffer the most stress.
Remove all of the heat pad things and thermal paste from the card. Clean them with a proper cleaner as this card is going to reach temps that you never thought possible once you put it in the oven. Once cleaned please take careful note of the following..
How not to bake your graphics card.
Please cast your eyes back to FIG2 for a moment. And then have a quick think about Newton's law of gravitation. As such the method touted and used on the internet is absolutely erroneous. It has been said that in order to safely bake a graphics card in the oven you need to place down some foil dull side up (to prevent too much heat being reflected into the bottom of the card damaging the RAM, makes perfect sense) yet it has then been said you need to place your card on foil balls like this.
However, as we can clearly see, the capacitors are now dangling precariously in space. And if we revert back to the logistics of gravity you can see why this is just a plainly stupid idea .
Afer spending lots of time reading about this type of repair I found many cases of people saying "Oh crap !!!! A couple of the capacitors have fallen off my card and now it won't work". Not surprising really is it?
So, the first thing to do is to place the card on the dull side of the foil with the bottom making contact. Not upside down, as then all of the components are pulling away from, instead of pulling into, the solder we want them to make contact with again.
The back side of the card is usually quite nicely flat and even. This means that when we apply a small ammount of pressure to the GPU and RAMDAC that pressure will form a higher level of gravity to press on the bottom of the card, pressing those components back into the BGA.
Now, sadly due to the many erroneous methods of doing this and due to the fact I forgot to take photos when doing it I can not show you pictures. However, please just remember to read over what I just said about placing and position of the card and then apply the following.
Get some 2 pence coins. If you are a resident of the USA then quarters will suffice. Take a good 15-20 and wrap them into a barrel (kinda like money rolls fom the bank) with the dull side of the foil on the outside. Then place these rolls onto the main processors on the card. Don't worry about the capacitors as these will fall into the solder of their own accord (good old gravity again !) and, are likely not to have failed any way as they are quite small so less prone to failing to make contact. Again, see FIG2 and you can see why the solder can break from a larger component.
OK. I am not going to reccomend any heat settings for your oven, or, how long to do it for. This is a way for me to not get involved in what you decide to do. Make sure to do your research and you will find the answers out there in cyberspace, but I don't want to make any reccomendations or suggestions in this part. Do make sure you remove all of the stickers and labels though, as these are added 'post bake' in the factory. If you like you can buy some liquid flux and spray it over any visible contacts OR underneath the GPU core. This will allow the solder to harden once more, hopefully causing a longer fix.
Reports for this fix vary. However, I can happily report that since baking mine many months ago I have not only used the card for a standalone Physx card but am now using it full time in my media PC. And not once has it made a hiccup or burp - make of that what you will. I strongly suspect this is because I have designed the best method, or, the one that will give your repair the most longevity. But you can add methods into the mix of your own if you think you know best

Once you have found specifics on the temperatures and timings of the bake remove it from the oven. DO NOT touch it as it will be very hot. Let it stand in a warm room until it has completely cooled. DO NOT handle it until it has cooled as the solder will still be soft.
Now. Here is my subjective and logistic opinion of how to make sure your repair lasts. This will again be subject to opinion but hey, it worked for me.
Because you have removed all of the thermal paste and pads (because they are pretty crap) you now need to find a set of pads, good ones. Also, a good idea is to use a thicker pad than you did originally. The reason for this is simple. To prolong the life of the now reflowed solder we are going to have to close the gap that it has to fail in. If you add more pressure as the card heats it will push the solder connections together.
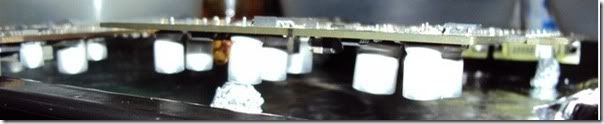
Here is a shot of my card pre assembly after the reflow/repair.
I used Phobya pads on my card (as they are not gooey and gunky and allow multiple removal/replacements) and I used 1.5mm dense pads. I am not sure what the original pads would have been like as they are gunge, but I would imagine they were either .5mm or 1mm.
As you replace the heatsink and begin to tighten the screws you will take note that the GPU is not making contact through the card. You need to really crank on the screws until you can see the thermal paste coming out. You will also notice at this stage that any warping on the PCB will pull straight. This is not a good idea, but, it WILL prolong the life of the repaired card. If it goes again you can rebake it, but it's pretty much the last chance saloon, so crank the pressure.
And that about does it. Please DO NOT post here with reccomended heat settings and timings for this proceedure.
This guide is meant purely for informational purposes I do not suggest trying any of the methods put forward in this thread. If you do decide to try and reflow (bake) your card in the oven then do so at your own risk. I am in no way liable for anything, this is merely information based around repairing a graphics card and should not be taken literally in any shape or form. If anything at least it will show you how a GPU is designed and works, and why they fail.
DO NOT, UNDER ANY CIRCUMSTANCES ATTEMPT TO REPAIR A CARD STILL IN WARRANTY.
OK. I am going to basically pool all of the information I have found lying around the net and put forward my method of repairing a graphics card from my experience with solder and PCBs. Some of the methods used have been quite frankly frightening, with ideas that really should have stayed in someone's head.
Firstly let's get to understand what causes a graphics card to fail shall we?
Your graphics card contains many parts. Some of these are obvious, some are not and some are a complete secret (often with the surface rubbed off so you can't read the chips). However, most if not all cards contain the following.
A main graphical processing unit (GPU)
A RAMDAC
Memory
Capacitors
Regulators (VRMs)
Multiplexers (MUX)
Demultiplexers (DEMUX)
Chokes, taps, resistors and even possibly thyristors. All of which would be on the power stage of the card.
There are quite a few ways that a graphics card can turn its toes up to the daisies (or for want of a better expression die) and the main causes of failure are -
Broken solder contacts caused by expanding and contraction of the main PCB (affecting the main GPU, RAMDAC and RAM)
Failed capacitors (expanded, damaged or plain exploded)
Failed resitors
Failed 'other' components.
However, the main cause of failure (and the only repairable one) is broken solder.. So why does this happen?
Graphics cards are made up of components, a main circuit board and a ball grid array of solder (BGA). The BGA are thousands of small solder balls containing flux and are sat on the bare PCB before the components are added. Once the components are placed in position they are then fed into a fancy oven and heated to the melting point of the solder. Whence that happens the components all sit and bond into their positions making contact with all of the traces of the PCB and allowing the card to function. A new and healthy GPU will look like a far more complex version of this. FIG 1 is an extremely simplified view of how a GPU is put together.
Note how the BGA is shown as tiny balls of solder? Well, there are hundreds of these tiny balls of solder on your graphics card allowing all of your components to link together. However, due to the serious heat of the components in newer graphics cards (which thankfully we are now moving away from) the PCB (printed circuit board shown in green in FIG1) tends to expand and contract. So how does this cause damage to the card?
Well, certain things on the card can expand and contract. The main one is the PCB. As it heats up it expands and as it cools it contracts. This is why your card will often use springs to allow for movement. In this pic we see the back side of a basic graphics card, noting how the screws are sprung in order to allow for expanding and contraction.
And when removed the screws look like this
Just like the engine of a car or other components of a car or anything mechanical involving heat these screws are factory set to a specific torque level. IE - when tightened they are only tightend so much to allow for expanding and contraction. You see, the heatsink on a card is usually made of a hard metal. Far harder than the PCB or the solder contacts. As thus it will not expand and contract as the board does so if it is over tightened it will not give and something else will, causing cracking or damage.
OK so now we have that out of the way let's look into the specific reason for failure. Solder is made up of two major parts. These are -
Flux - a glue like epoxy that melts with heat and then forms a hardened shell. The reason for the flux is two fold. Firstly solder is made from either lead or a lead substitute and as such is very soft. Secondly lead or a lead substitute alone has no adhesive properties and will simply ball up and roll around without the flux in.
Lead or ROHS lead free substitute - the conductive part of the solder allowing contact.
This solder has a melting point. However, the flux in it is very hard and over time can become brittle and crack. It doesn't really allow a lot of expanding and contration due to it being a very hard and brittle material. Think about how much you can bend an egg shell and you will have a rough idea. Hard, strong, brittle. Over time solder will degrade and with the constant pushing and pulling of a circuit board it will eventually fail. Now it is impossible for me to show you a picture of failed solder contacts on a graphics card because they are literally microscopic and placed under the components so that you are likely never to see them. However, here is a failed solder joint on the power stage of a larger electrical unit.
Note how the solder has degraded and cracked away from the PCB contact? this is, in theory, the exact same thing that happens to your graphics card. And the reason for that is explained by FIG2 here.
Note how the balls of solder are no longer ball shaped? As the stress of the main PCB expanding and contracting takes its toll the solder will form 'hourglass' or 'egg timer' shapes. The more the board pulls the more the solder distorts and eventually as shown in the picture the solder balls will break loose causing failure. This failure is usually very apparent as it does not cause the complete death of a card. It usually causes certain parts of the card to not work properly causing malfunction of certain parts (RAMDAC or certain aspects of the GPU, Physx for example).
Serious failure (faulty ram or a faulty component) is basically game over. However, there are ways to revive these failed solder joints.
The first thing you will need to do is take your card apart and get it down to the main board ONLY. Wires, heatsinks, fans and thermal paste ALL need to be removed. I'd like to thank OC3D for this picture as it turned up in Google images, but is a perfect shot of a card in two parts.
Note the main PCB and the cooling unit. Also note lots of thermal paste and 'woven' paste which consists of thermal paste and pieces of glass fibre woven through it to keep it together and stop it running away. Whilst the heatsink makes direct contact with the main GPU it does not make contact with the RAM or the RAMDAC. Here these thermal paste pads are used to bridge the gap and allow for good cooling contact and better give for the board to do its thing (expand and contract) and this is why the main GPU is usually the component to suffer the most stress.
Remove all of the heat pad things and thermal paste from the card. Clean them with a proper cleaner as this card is going to reach temps that you never thought possible once you put it in the oven. Once cleaned please take careful note of the following..
How not to bake your graphics card.
Please cast your eyes back to FIG2 for a moment. And then have a quick think about Newton's law of gravitation. As such the method touted and used on the internet is absolutely erroneous. It has been said that in order to safely bake a graphics card in the oven you need to place down some foil dull side up (to prevent too much heat being reflected into the bottom of the card damaging the RAM, makes perfect sense) yet it has then been said you need to place your card on foil balls like this.
However, as we can clearly see, the capacitors are now dangling precariously in space. And if we revert back to the logistics of gravity you can see why this is just a plainly stupid idea .
Afer spending lots of time reading about this type of repair I found many cases of people saying "Oh crap !!!! A couple of the capacitors have fallen off my card and now it won't work". Not surprising really is it?
So, the first thing to do is to place the card on the dull side of the foil with the bottom making contact. Not upside down, as then all of the components are pulling away from, instead of pulling into, the solder we want them to make contact with again.
The back side of the card is usually quite nicely flat and even. This means that when we apply a small ammount of pressure to the GPU and RAMDAC that pressure will form a higher level of gravity to press on the bottom of the card, pressing those components back into the BGA.
Now, sadly due to the many erroneous methods of doing this and due to the fact I forgot to take photos when doing it I can not show you pictures. However, please just remember to read over what I just said about placing and position of the card and then apply the following.
Get some 2 pence coins. If you are a resident of the USA then quarters will suffice. Take a good 15-20 and wrap them into a barrel (kinda like money rolls fom the bank) with the dull side of the foil on the outside. Then place these rolls onto the main processors on the card. Don't worry about the capacitors as these will fall into the solder of their own accord (good old gravity again !) and, are likely not to have failed any way as they are quite small so less prone to failing to make contact. Again, see FIG2 and you can see why the solder can break from a larger component.
OK. I am not going to reccomend any heat settings for your oven, or, how long to do it for. This is a way for me to not get involved in what you decide to do. Make sure to do your research and you will find the answers out there in cyberspace, but I don't want to make any reccomendations or suggestions in this part. Do make sure you remove all of the stickers and labels though, as these are added 'post bake' in the factory. If you like you can buy some liquid flux and spray it over any visible contacts OR underneath the GPU core. This will allow the solder to harden once more, hopefully causing a longer fix.
Reports for this fix vary. However, I can happily report that since baking mine many months ago I have not only used the card for a standalone Physx card but am now using it full time in my media PC. And not once has it made a hiccup or burp - make of that what you will. I strongly suspect this is because I have designed the best method, or, the one that will give your repair the most longevity. But you can add methods into the mix of your own if you think you know best
Once you have found specifics on the temperatures and timings of the bake remove it from the oven. DO NOT touch it as it will be very hot. Let it stand in a warm room until it has completely cooled. DO NOT handle it until it has cooled as the solder will still be soft.
Now. Here is my subjective and logistic opinion of how to make sure your repair lasts. This will again be subject to opinion but hey, it worked for me.
Because you have removed all of the thermal paste and pads (because they are pretty crap) you now need to find a set of pads, good ones. Also, a good idea is to use a thicker pad than you did originally. The reason for this is simple. To prolong the life of the now reflowed solder we are going to have to close the gap that it has to fail in. If you add more pressure as the card heats it will push the solder connections together.
Here is a shot of my card pre assembly after the reflow/repair.
I used Phobya pads on my card (as they are not gooey and gunky and allow multiple removal/replacements) and I used 1.5mm dense pads. I am not sure what the original pads would have been like as they are gunge, but I would imagine they were either .5mm or 1mm.
As you replace the heatsink and begin to tighten the screws you will take note that the GPU is not making contact through the card. You need to really crank on the screws until you can see the thermal paste coming out. You will also notice at this stage that any warping on the PCB will pull straight. This is not a good idea, but, it WILL prolong the life of the repaired card. If it goes again you can rebake it, but it's pretty much the last chance saloon, so crank the pressure.
And that about does it. Please DO NOT post here with reccomended heat settings and timings for this proceedure.

